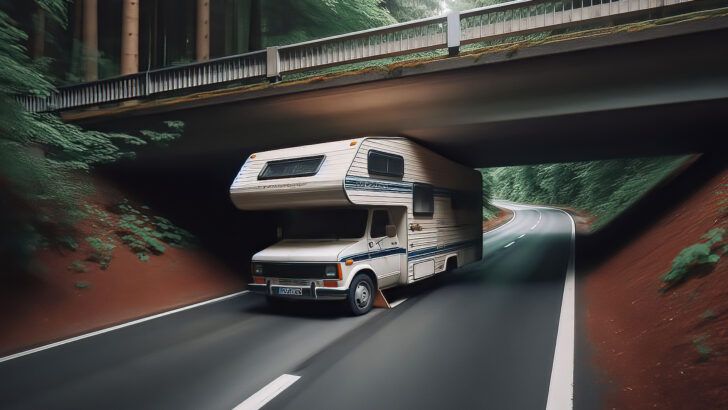

Have you ever been driving your RV, come to an overpass, weren’t sure of the clearance, slowed down… then drove under it anyway? If so, you certainly know, in hindsight, that slowing down doesn’t make your RV shorter/less tall. In this post, we’re talking about the critical topic of RV height clearance.
- 1) Why Is Measuring Your RV Height Clearance So Important?
- 2) Why Do I Need to Know How to Measure RV Height? (Isn’t It Listed In My Owner’s Manual?)
-
3)
How to Accurately Measure Your RV Height Clearance
- 3.1) What You’ll Need to Measure Your RV’s Height
- 3.2) Park On a Level Surface
- 3.3) Prepare Your Measuring “Tool”
- 3.4) Position Your Pole and Tape Measure
- 3.5) Measure From the Roof to the Ground
- 3.6) Identify and Measure the Highest Point on the RV
- 3.7) Post Your RV Height Clearance Where It’s Visible
- 3.8) Allow Yourself Some Leeway!
- 4) Free RVing Tips, Tricks, Reviews & Giveaways
Why Is Measuring Your RV Height Clearance So Important?
As an RV owner, it’s critical to know how tall your rig is. Even an RV-specific GPS system (or RV GPS app) is no substitute for knowing (actually… memorizing) the height of your RV. We’ve written posts about the Garmin RV GPS and the RV Life app for trip planning, which can be super helpful.
But even those require knowing your rig’s height and paying attention to conditions as you drive. RV travel involves overpasses, bridge clearances, and other places with height limitations, such as gas stations. When you come to any location where the maximum height/clearance is posted, it’s a good idea to instantly know whether your rig will make it through safely.
If you have that information accurately recorded and clearly posted where you can see it at a glance, you can avoid the type of cringe-inducing self-inflicted wound seen in this video (which could have been a lot worse had the RV been just a little bit taller):
Why Do I Need to Know How to Measure RV Height? (Isn’t It Listed In My Owner’s Manual?)
Your RV’s height may indeed be listed in its owner’s manual, but we suggest that you avoid relying on that information. Even if it’s accurate, how will you know that for sure if you don’t measure it yourself? Considering the potential consequences, we would never risk it.
First, the listed height may be measured to the top of the roof, rather than the top of your air conditioner, for example. You likely have a roof vent or two and maybe you’ve even installed a new MaxxAir fan or other fan cover up there. And what about aftermarket gear like solar panels or cellular antennas? The height of these items must be included in the overall measurement of your RV’s height.
Second, when an overpass comes into view just ahead, that’s not the time for guessing, hoping, praying, butt-clenching, or frantically flipping through a notebook or owner’s manual. You need to know your rig’s maximum height RIGHT NOW!
When you round a curve and see an overpass ahead, that’s not the time to consult a notebook or owner’s manual. You MUST know your RV’s height at its tallest point by heart or have it posted in sight of the driver at all times.
Should you ever find yourself staring down an overpass that you aren’t 100% sure you’re going to clear, there is only one thing to do: STOP! NOW! SERIOUSLY! A campfire story about how you had to K-turn in an uncomfortable situation will be a whole lot funnier than the one about the time you turned your RV into a convertible.
PRO TIP: There is no map, GPS, app, or website that eliminates your responsibility for paying attention to your surroundings. As the “D.I.C.” (Driver in Command), your job includes observing and processing what’s ahead. Know your height, look for signs warning of low clearances, and leave some extra leeway for new pavement.
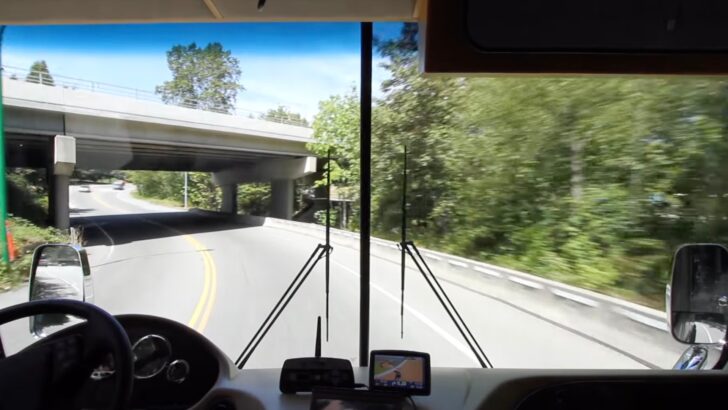
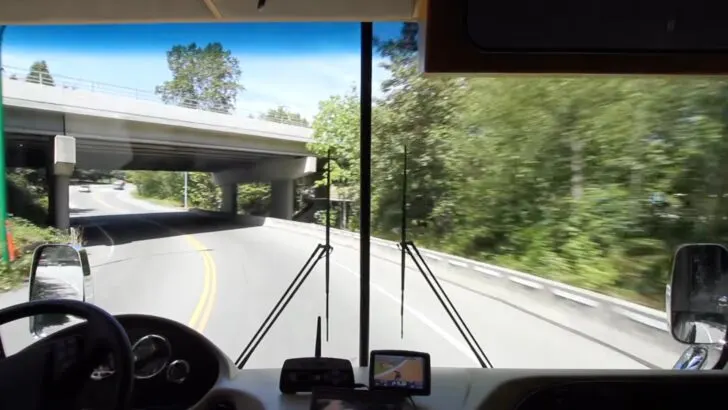
I (Peter) spent many years training professional bus drivers in and around New York City. There are plenty of low overpasses in the area, including an unmarked one in Jersey City, NJ where we spent lots of time training. That overpass just happened to be only a few inches above the roofs of the MCI tour buses we all drove.
Whenever we were headed toward that low overpass, I would ask the trainee who was driving if they thought we’d fit underneath when it appeared in the distance. They’d already been taught the height of the bus, so all they needed to know was the height of the overpass, right? But since it wasn’t marked, what might they do?
Inevitably, they slowed down… but didn’t stop. As we got closer, I repeated that I wasn’t sure we’d fit, and asked them again what they thought we should do (there was a turn right before the overpass, which was a valid escape route). This was a test of their observation, judgment, processing, and decision-making skills.
Of course, I knew we were in no danger since I’d driven there many times and was familiar with the overpass. But my trainees had no way of knowing if we’d fit since it was unmarked. But it sure did look low (try driving under a bridge that’s only three or four inches above your rig and see how low it looks)!
The correct course of action was to turn the corner, or pull over to the side of the road and stop. But the vast majority of trainees continued driving straight ahead, gradually slowing down, but never actually stopping. It was as though they thought that driving slowly would make us a little less tall! Obviously, driving slowly under a low overpass would reduce the damage, but it would still cause an accident.
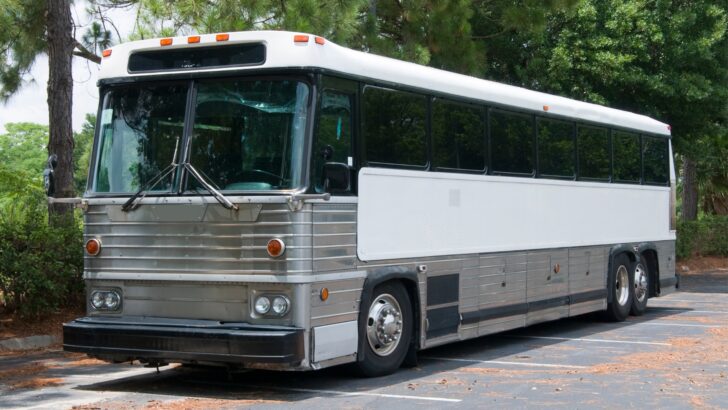

This MCI is identical to those I drove and trained drivers on all around New York City for a decade in the 1980s and 90s. What a great experience for future RV ownership!
If we continued rolling toward the overpass, with the driver and any other trainees on board not knowing if we’d make it, I applied a lesson that would stick with them. At the exact moment we nosed under the overpass, I took my clipboard and whacked it against the inside wall of the bus.
I know that may sound mean, but I guarantee you that everyone who experienced that, whether actually driving or watching another trainee at the wheel, never forgot that moment. I’d bet money that none of them has ever crashed a bus (or any other vehicle) into an overpass. The “crack” of that clipboard was surely a heart-pounding lesson that they’d never forget. They said as much during our debriefing at the end of the day. A good lesson to learn, even if a little startling in the moment!
How to Accurately Measure Your RV Height Clearance
To guarantee that you’ll never hit an overpass, get up on the roof of your motorhome, travel trailer, or 5th wheel (they can be really tall!) and check the height of the tallest item installed on the roof.
You’ll need to accurately measure the exact distance from the ground to the top of that tallest item. We do this in two steps: we get up on the roof and measure the height from the ground to the roof surface itself, followed by the distance from the roof to the highest point. We then add those two numbers together.
We then suggest posting that total RV clearance height somewhere clearly within the driver’s view. Posting your rig’s weight on that same note or placard is a great idea. too, since low-weight bridges are another concern to be managed.
There’s a little bit more to know about measuring accurately to ensure you get it right. Below is our simple technique to measure your RV’s height clearance with items you probably have on hand.
What You’ll Need to Measure Your RV’s Height
- Tape Measure
- Electrical Tape
- Extendable wash pole (or other long, straight edge)
- Carpenter's Level (optional)
Park On a Level Surface
To get an accurate measurement, it’s important to park your rig on a reasonably level surface. If your rig has leveling jacks, make sure they’re not deployed. And, of course, if you have air suspension, the airbags need to be fully inflated and ready for travel.
When measuring the height of any towable, it’s important that it be connected to the tow vehicle and in travel-ready mode before measuring. Obviously, having your trailer or 5th wheel up on jacks, vs connected and ready for travel, will not yield an accurate height measurement.
Prepare Your Measuring “Tool”
Extend your tape measure about a foot or so and use the electrical tape to secure the tip of it to the side of your wash pole (or other long, straight edge). Be sure to position the tip/end of the tape measure directly against the side of the pole.


Here we’re preparing our measuring tool using a wash pole as our straight edge and attaching the tip of our tape measure to the side of the pole using electrical tape.
Position Your Pole and Tape Measure
Lay your wash pole flat onto the roof, with the tape-measure end sticking out about a foot over the side of the RV. Pull the measuring tape out about 10 feet or so and secure it using the lock mechanism on the tape. Then lower the body of the tape measure over the side of the RV and lay the pole flat on the roof.
Be careful to avoid banging the tape measure into the side of the RV as you lower it down. Confirm that the electrical tape is holding the tip/end of the tape measure directly against the side of the pole with no gap in between.

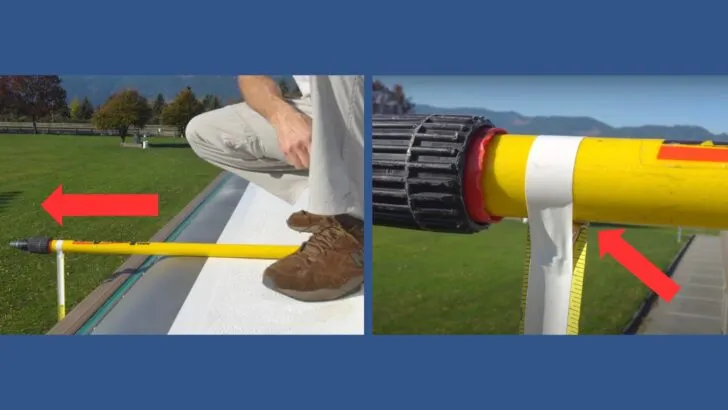
1) Extend your measuring pole approximately a foot beyond the side of the RV with the body of the tape measure hanging down. 2) Make sure the end of the tape measure is pressed directly against the pole with no gap.
If you’re working alone, you can now head down the ladder. It’s easier to have a helper on the ground, but this can be done by one person.
Measure From the Roof to the Ground
Now, you’ll measure from the top of the roof itself to the ground. Extend the tape to the pavement and lock it in place. Note the length, and remember to add/include the length of the tape measure’s body. You now know the exact height of your rig’s roof. But of course, there are things sticking up off the roof, so let’s get the final measurement in the next step.
Identify and Measure the Highest Point on the RV
Scan your roof and locate the tallest item up there. It may be an A/C unit, a vent fan cover, or an antenna. Crouching down and looking along the length of the roof should make it obvious what the tallest item is up there.
Using our motorhome as an example, the tallest item up there is a WeBoost cellular antenna. We simply measured the height of the antenna above the roof, and then added that to the ground-to-roof measurement, and voila! We have our total maximum height.
Post Your RV Height Clearance Where It’s Visible
Post your RV’s total height on a Post-it note or something similar in a location that’s clearly visible to the driver. We have friends who had a little plastic placard made up with their height and weight on it, then posted it permanently on the dashboard right in front of the driver. They never have to worry about forgetting their height and weight under the pressure of suddenly staring at a low overpass ahead of them.
Allow Yourself Some Leeway!
Once you’ve gone to the trouble to become a bona fide expert on your rig’s exact height, don’t get too cocky with that knowledge. If you drive a 10′ 8″ tall RV, we’d suggest that driving under an 11′ overpass is a bad idea. Allowing additional clearance for any fresh pavement that may have been added since the sign was posted will add an important safety margin.
It’s also important to remember that if you add anything to your roof that exceeds the height of your previously measured tallest item, you need to re-measure your rig and post the new height where it’s visible to the driver.
Finally, if you travel to Canada or Mexico, be sure you know (and post) your total RV height clearance in meters as well as feet & inches. Overpass heights in CA & MX will be posted in meters, and you don’t want to be scrambling to convert that as you approach the overpass. The same thing goes for Canucks traveling in the USA. Know your height in feet & inches, even if you’re used to meters at home.
PRO TIP: If you were wondering what the (optional) carpenter’s level is for, you can use that to make measuring a 1-step process… if you have a helper. Extend your pole and tape measure directly from the top of the highest point on the RV all the way to the ground. Using a level, make sure the pole is perfectly level, and have your helper on the ground get your measurement. The level is needed for this since you’ll have no way of knowing if the pole is level without it, making your measurement inaccurate.
If you’d like to follow along as we show exactly how we measured our motorhome, check out our video:
You may also be interested in our live chat follow-up to the video above, where we provide additional tips about avoiding overpass crashes. Just be aware that this was a deep dive so it runs over an hour. But if you’re looking for the most detail on this important topic, grab a cup (or two) of coffee and settle in! This video goes into the weeds (figuratively, not literally!), providing lots of additional detail.
For related information, see our post on how to drive an RV (off-tracking and rear overhang).
And if you have a morbid curiosity about RV crashes, read We Saw An RV Crash & Made The News! RV Accident Prevention Tips.
Free RVing Tips, Tricks, Reviews & Giveaways
As 20-year full-timers, we share everything we’ve learned about RVing over the years. Join our online community to receive a wealth of great RVing knowledge delivered daily to your inbox.
Whether you’re a new RVer or a seasoned full-timer, you’ll love the wide range of RVing topics we cover. Don’t miss a single article or any of our famous Giveaways. Subscribe to our newsletter today!
mark hoffmann
Tuesday 13th of February 2018
Great videos guys . . . We have an '04 Essex, so it is the same vintage as yours, and when I went topside to measure height, I found that the roof was not parallel to the ground. Our tallest point was the rear AC cover even though it was not the tallest fixture on the roof. As I remember it was a couple of inches different from the front of the coach to the back, but could be more dependent on the coach. In any case, I think you covered it by adding the margin for error... .
TheRVgeeks
Tuesday 13th of February 2018
Hi Mark! Thanks for the additional info. It was the '04/'05-era Essex that made us first fall in love with Newmar! We couldn't even afford the mortgage, but luckily, the Mountain Aire was a close second for us, and we've been happy with ours for nearly 13 years now (still with that more-affordable mortgage though). LOL You might be interested in the first part of our Live Q&A follow-up to this video. Just after the 5 minute, 30 second mark, we go into considerable detail about measuring the height of an RV with a roof that isn't flat (either side-to-side or front-to-rear). You might find some of that discussion interesting. You can find it here. Safe travels - Peter & John
Curt Johnson
Sunday 28th of January 2018
I noticed going up I 95 on the east coast that many bridges aren’t marked for clearance. Is there a minimum height before they are required to post a clearance? Also, is there a variance in the standard policy of reporting, or not reporting clearance between US highways, State roads or County roads?
TheRVgeeks
Sunday 28th of January 2018
Hi Curt! According to the DOT, anything under 14' is considered under height: https://safety.fhwa.dot.gov/geometric/pubs/mitigationstrategies/chapter3/3_verticalclearance.cfm The reason there are so many overpasses with no markings on major highways, especially interstates, is because they're 14' or higher.
Doug LaFeve
Wednesday 17th of January 2018
My only comment would be that it might be best to measure, as you said on a level surface and with the motor running until your air system reaches it's max pressure. Then shut down and measure immediately. Your tires should be pressurized for your weight and load distribution prior to measuring. Another question though - if you are running empty i.e. not at full load capacity will you air system give you a higher ride? On a big RV you could be losing a lot of weight if running a low fuel tank and no water, that could be 1600 to 1900 lbs or more depending upon the size of your respective tanks. Thank you for all the highly informative videos, as a newbie with a 43Ft Class A DP I have learned a lot from your YouTube and website.
TheRVgeeks
Wednesday 17th of January 2018
Hi Doug! Thanks for the great comments and questions. I happen to have considerable experience with a wide range of air-bag equipped vehicles, from 1950s, 60s and 70s-era GM transit buses, to 1980s and 90s-era MCIs, to 2000s-era diesel pusher motorhomes. The only ones that have any issue with losing air system pressure and coming down off the air bags are the really old ones, which can end up with deflated air bags in a matter of hours, and certainly overnight. That's the result of slow leaks developing in older air systems over time. Anything even reasonably new will have such a tightly sealed air system that it's just not an issue. When we shut down our nearly-13-year-old motorhome for the night in a Wal-Mart lot for example (leaving the RV up on air bags, since we wouldn't level in that situation), there is almost no airing up required the next morning. It stays virtually all the way up on the air bags, with almost no loss of air pressure on the gauges, even with us moving around inside. Modern air systems are very tight. That said, if you want to be overly careful about it, just run your RV until it airs up all the way, and then do your measuring in a reasonable amount of time after shutting it down... maybe within an hour. You won't have any height difference than if you were idling the engine, so that's not needed. As far as the rig being empty or fully loaded, one of the things about air suspension is that it is far more robust than spring-type systems, which is why it's used in heavy-duty vehicles like buses. A great example of how an air-suspended chassis are oblivious to load is a charter bus. I routinely took an empty bus to pick up a full load of 50 passenger and all of their luggage. Figuring 175 lbs for an adult and one large suitcase, that's an instant 8,750 lb addition to the vehicle. The height of the bus stayed precisely the same. For a gas rig or travel trailer, empty weight might be slightly higher than fully loaded. But that's exactly why we always leave several inches of extra space overhead, for exactly that sort of variance. As far as tire pressure goes, they should always be set correctly anyway, so of course do that first. We wouldn't worry too much about an inch or two up or down. Just don't cut things so close that it matters.
Rodney
Wednesday 17th of January 2018
Loved the video as this has been one of my concerns for years. Fortunately I have a 6' level and could measure from the highest point to the ground. I have a 2001 Dutch Star and it measured 12'-2", so I use 12'-6" for the height. However, I've always wondered how much the air-assist ride would raise the motor home up when driving. I should have measured when the engine was running but didn't think about it then nor now when parking. Do you have a estimate of the distance? I liked your suggestion of using 13' as a safety factor when traveling.
I was curious about what you taught your students to do when they come upon an overpass they thought might be too low. Stop and have someone observe as they slowly drove under? If unable to pass under try to turn around (on a two line rode that might be impossible). I'm sure you have a suggestion or two to handle this situation.
TheRVgeeks
Wednesday 17th of January 2018
Hey Rodney! Great questions. We'd estimate that our air bags drop the RV about 4-6" although we've never measured that. You don't actually have to worry about whether or not you measure with the engine running. As long as the rig has not been parked overnight since you shut the engine down, it will still be fully up on the air bags. They just don't drop that fast. If you want to be sure, measure within an hour of shutting down.
As far as coming upon a low overpass... as a tour & charter bus operator, there were many times when I'd be traveling in areas I'd never been to before. And many of those tours were to areas away from Interstate highways, depending on where the tour group was going. And remember, this was back in the 80s and 90s, before the internet or GPS existed. So us drivers would be flying completely solo, with nothing more than state maps, and our wits to keep us safe.
The most important thing to do (of course already knowing that the bus was 11' tall) was to pay attention. Most low overpasses have some sort of advance warning in time to change course or turn around. I found that the general rule was if a country road lead to a 10' 6" overpass, there would be a warning sign no further along than the last intersection where I could turn to avoid it. Being vigilant for those types of signs (as well as low weight limits, but that's a topic for another video), is the single most important key element for avoiding being stuck on a remote road with no way under a bridge, and a potentially very difficult, dangerous, or impossible u-turn required.
If I were ever to come upon a low bridge (marked or not) that I wasn't sure I could fit under, with no way to turn around or back up, I'd stop dead at the side of the road with hazard lights flashing, get out and walk down the road to sight back under the bridge to see if I could tell how close it was (you often can if you walk far enough ahead). If it still seemed very close, and I had someone with me, I'd prefer have them walk out ahead, and watch as I crawled under, signaling to me as needed. This would be easier with an RV than a bus, because the idea of stopping on the side of the road like that with passengers on board isn't the kind of thing that inspires confidence among them! And add to that the liability of asking one of them to walk out ahead on the road to spot for me. Not fun.
But I will tell you what is even less fun than any of that... hitting the bridge. I always used to tell students: If you think you're going to hit something, and you keep going anyway because you're worried about blocking traffic, being embarrassed in front of passengers, or any other reason, imagine how embarrassed you'll be when the crash happens. I'd tell them that anything else that happens will be forgotten within a few weeks, except a collision. That will stay with you for life. No matter what you have to do, don't hit that bridge! Stay cool, deal with the situation, and learn from it. You can even use a close call as a great story someday (crashes never seem to be worthy of laughing, even in hindsight). I have a few of those stories is myself, but this is too long already. ;-) Hope this helps.
aelkins1
Wednesday 17th of January 2018
My hubby has been watching (and showing me) videos from 11foot8 for years. Those -- and other YouTube videos about various crashes -- have made me more alert even when just driving my little car. It's infotainment! lol
TheRVgeeks
Wednesday 17th of January 2018
We've always loved that channel, too! So we were really pleased that they readily gave us permission to use some of their footage. :)