
If you’re a new RVer, or haven’t even taken delivery of your first rig yet, the connections and hoses you need to hook up your RV might seem a bit overwhelming. But don’t worry… hooking up your RV for camping is a simple process that anyone can learn how to do.
In this post we’ll give you three simple steps for hooking up your RV successfully, and we’ll provide you with a list of items you’ll need to do it.
Essential Items for Hooking Up Your RV at a Campsite
Before you start, you’ll need the following supplies to help with the process of hooking up to shore power, water, and sewer.
- Power cord and adapters (see the cords & adapters we use here)
- Surge protector (30-amp or 50-amp versions available)
- Potable water hose (we like the NeverKink brand… available in 25-foot or 50-foot lengths)
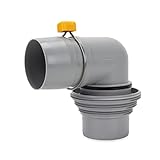
- Water pressure regulator (at a minimum, this simple one… but we use an adjustable regulator)
- Disinfectant spray (we use Lysol Disinfectant Spray)
- Protective gloves (Nitrile gloves work great)
- Sewer hose
- Hose adapters and clear sewer elbow
- Sewer hose support
Check These Vital Steps Before Plugging In Your RV
Prior to taking the three main steps to successfully connect your RV at your campsite, you’ll need to take special note of a couple of important precautions:
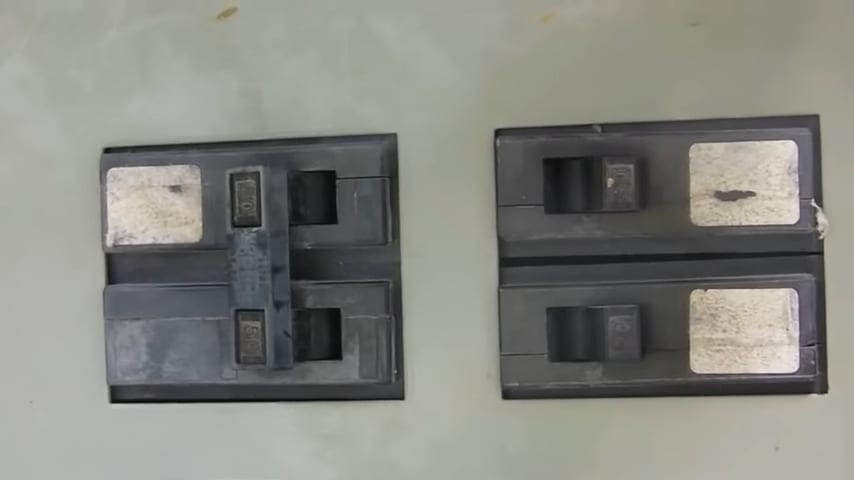
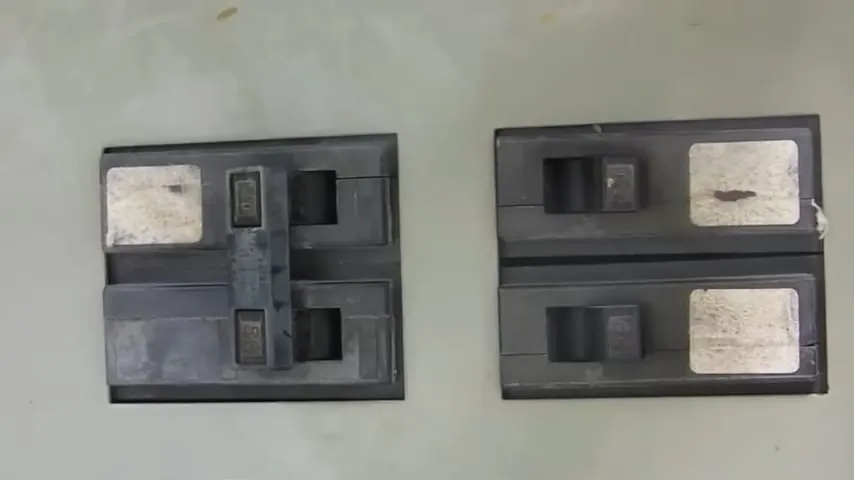
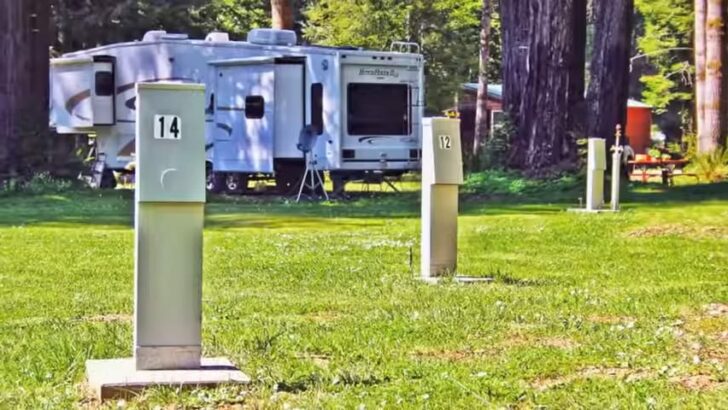
Make sure to turn off the circuit breaker on the RV park’s power pole before connecting!
Be sure that the circuit breaker is in the “off” position.
Before you even think about connecting to the power source, you need to make sure the circuit breaker on the RV park’s power pedestal is in the “off” position
Be sure to use a surge protector to protect your RV from a faulty pedestal.
A quality surge protector will protect your RV in case of power surges or because of a faulty pedestal. Otherwise, you risk frying your electrical connections and gear in your RV. Here’s the 30-amp version of the surge protector we use:
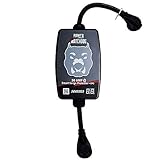
- Replaceable Surge / Spike Module: Should a large spike happen, surge module is completely replacable instead of replacing the entire unit.
- Wirelessly Monitor voltage, amperage, and wattage on your smartphone in real time using our free mobile app! Oldest and most reliable phone app in the...
Amazon often has very competitive pricing, but you can also save 10% when ordering directly from Hughes (we think their Power Watchdog is the best surge protector we’ve ever seen).
Make sure your RV is protected from low voltage, bad RV park wiring AND power surges when connecting to shore power with a Power Watchdog and/or Hughes Autoformer. We never hookup without ours (we...Show More
Make sure your RV is protected from low voltage, bad RV park wiring AND power surges when connecting to shore power with a Power Watchdog and/or Hughes Autoformer. We never hookup without ours (we have both), and know our RV's electrical system and all our electronics are being protected.
Watch our Hughes Autoformer video
Watch our Hughes Power Watchdog video
Save 10% on your entire purchase when ordering from Hughes!
Show Less3 Simple Steps for Hooking Up Your RV at a Campsite
Step One: Plug Your Power Cord into the Appropriate Outlet

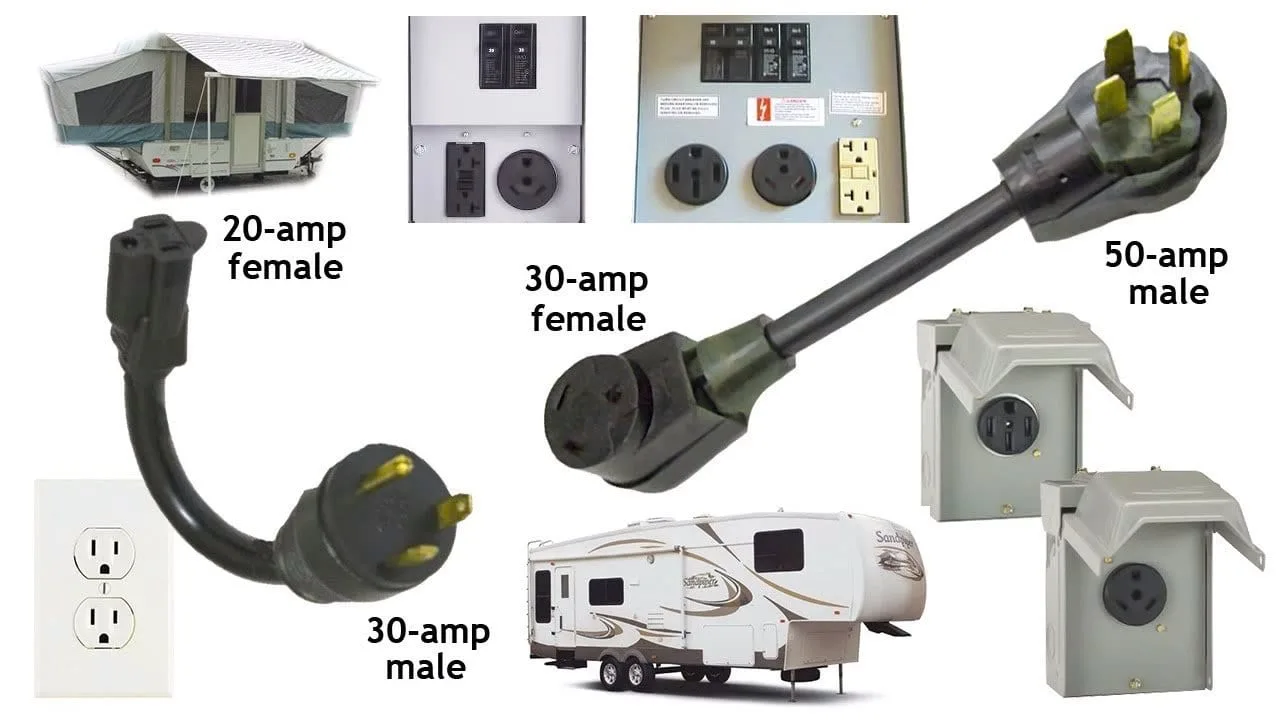
The first step to hooking up your RV is to connect to a power source. To do this, plug your RV electrical cord’s plug into the pedestal. If the pedestal offers 50-, 30-, and 20-amp power outlets, simply plug your RV’s electrical cord into the corresponding outlet (the hole sizes and patterns are unique to each type of connection, so you can’t mistake which one is the correct one for your RV).
However, if the pedestal doesn’t have an outlet that corresponds to the type of plug you have, you can use a “dog bone” adapter like this one:

- Converts Electrical Connection Type: Designed to allow you to hookup to your campground's power pedestal, adapting the electrical connection to fit...
- High Conductivity: Heavy-duty 30-amp male (NEMA TT-30P) and 50-amp female (NEMA 14-50R) electrical heads. Rated for 125 volts/3750 watts. Constructed...
If that isn’t the adapter you need, others we use are available here. And you can watch our video all about using dog bone adapters to connect your RV to the available electrical outlet.
Once you’ve plugged into the pedestal, flip the breaker for the corresponding outlet to the “on” position.
Step Two: Hook Up Your Fresh Water Hose
Once you’ve made your electrical connection, the next step to hooking up your RV is connecting the fresh water hose. We’re pretty confident that you know how to connect a hose to a faucet, but here are a few important tips/facts you’ll want to be aware of:
Be sure you’re using a potable water hose.
A potable water hose is one that’s specifically designed for drinking water (typically a white or blue hose). You shouldn’t use a standard garden hose since they may contain harmful chemicals that can leech out into the water, making it unsafe to drink.
Disinfect the water faucet.
Before you connect the waterline, spray the faucet with disinfectant. Why, you ask? Well, the previous camper may very well have rinsed out their sewer hose using that very water faucet! Yuck! You don’t want to hook up to a dirty faucet and then drink that water.
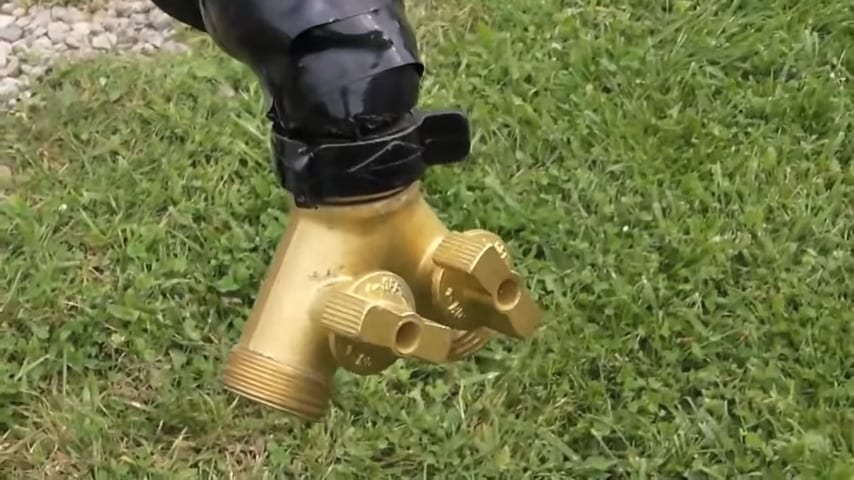

A Y-valve allows you to use two outlets!
Get an extra connection with a Y-valve (optional).
Another tip when hooking up an RV is to optionally screw a Y valve onto the park’s water connection before attaching your fresh water hose. This allows you to have an additional outlet if you need water for other purposes during your stay. That way you don’t have to unscrew your drinking hose if you need to use the outdoor faucet for something. Just be sure the Y valve is safe for use with drinking water, like this one that we use.
Use a water pressure regulator to protect your RV’s water system.
When you’re hooking up your water, always use a water pressure regulator to protect your RV water system from high pressure. There are various models of water pressure regulators, but the important thing is that you have one… and never connect to water without it. If you want to splurge, you can buy an adjustable water pressure regulator like this one with a gauge that shows you the exact pressure levels (it’s the one we use):
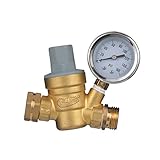
- WATER REGULATOR: Versatile water regulator is compatible with standard campers, RV's, trailers, and more
- IDEAL PRESSURE: Regulates water pressure to your preference with pressure gauge
Step 3: Hook Up Your Sewer Hose
If the campsite you’re staying in has full hookups, it’s now time to attach the sewer hose. Whenever you’re dealing with the sewer hose, always use protective gloves. Then wash your hands immediately after completing the task, to make sure you aren’t spreading germs/disease.
Now that your gloves are on, let’s get started!
Make sure your black and gray tanks are closed before removing the cap.
The first thing to do when hooking your RV up to an RV park sewer connection is to make sure both black and gray valves are closed first (since you weren’t hooked up yet, they should already be in the closed position). If your tank valves aren’t closed and you remove the cap, anything in the tanks will come pouring out. This is definitely something you want to avoid!
A clear elbow allows you to confirm that “stuff” is running through your hose!
Tip: use a clear elbow on your sewer hose so you can visually confirm that your tanks are draining… and when they’re done (which is especially helpful when using a black tank rinse, the clear elbow lets you know when you’ve thoroughly rinsed the tank out).
Clip the clear elbow onto the outlet to the sewer outlet on your RV (some sewer hoses may already come with a clear section attached)
Use a sewer hose support to keep the hose off the ground. Simply lay your hose on the support, and pull the elastic bands tightly to prevent the hose from falling off the support. We’ve found this to be a quality sewer hose support:
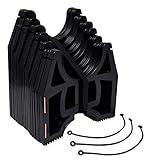
- RV SEWER HOSE SUPPORT: Elevated design supports your drainage hose and promotes better draining
- IMPROVED DESIGN: 26% wider and 30% deeper for increased stability and a smoother overall RV experience
Use an adapter to secure the sewer hose into the inlet.
You can get a sewer hose adapter that has three different sized threads, like this one:
- Connects RV sewer hose to dump station
- Patented spin-lock rings for effortless hose connection
The park’s sewer line will typically use one of three sizes. Having an adapter like this means you don’t have to worry about pulling into an RV site only to be unable to hook up to the sewer.
To connect your sewer hose, firmly screw your adapter into the park’s sewer line. Attach the other end of the adapter to your sewer hose, and connect the two sides of the adapter together. Make sure everything is firmly attached so there’s no leakage.
If you need to dump black and gray tanks, dump the black tank first. Otherwise, always leave the black tank closed while using full hookups. A terrible newbie mistake is to leave the black valve in the open position while hooked up. This will allow “liquids” to run out, while “solids” slowly pile up. Over time, this will cause a nasty situation inside the black tank which is commonly known as “pyramiding,” (a buildup of solid material) which can eventually require professional help to remedy.
Dumping the black tank first lets the grey water clear out your sewer hose on its way through. After both tanks are dumped, it’s generally recommended to leave the gray valve closed as well, letting out gray water every couple of days as needed. You could leave the grey tank valve open so that you can run water freely in the RV, but we’ve heard stories of people getting odors into the RV from the park’s sewer system if they have a bad air admittance valve under one of their sinks (if you think you may have a problem with one of those valves, here’s how to replace it). Again, don’t EVER leave the the black tank valve open while hooked up, or your black tank will get messy very quickly! ?
Click here if you’d like to follow along with our step-by-step video as we hook up at an RV park!
Now It’s Time to Enjoy the RV Life!
While boondocking is our favorite way to camp, we definitely enjoy the luxury of having full hookups at an RV park. If you follow the simple steps above when hooking up your RV, you’ll be set to go in no time.
Now go and enjoy that camping trip!
Megan ONeill
Tuesday 8th of June 2021
I wonder why people hook up their tanks to the sewer upon arrival at the park. I always hook mine up the day I leave, before emptying the tanks. I understand if you are staying a while and have a family, but why not hook up right before dumping? I don't particularly like looking at my neighbor's sewer line (another reason I prefer to dry camp). Is there a reason to hook up at arrival?
TheRVgeeks
Wednesday 9th of June 2021
Hi Megan. Good question. For us, it's usually because when we arrive at an RV park, we've probably just come in from a period of boondocking and our tanks are likely full, so we need to dump. And in that same vein, we're probably going to be doing laundry... so want the tanks dumped, sewer hose hooked up, and gray valve open so we don't have to worry about overfilling the tank. Since we're usually only in RV parks for short stays, too, it doesn't make sense to hook up to dump, put it all away, and then have to do it again a couple days later to dump before leaving. So it's easier to leave it all hooked up.
Luc
Thursday 28th of January 2021
Greeting fellows. Quick question about the surge protector: Do you plug it in the pedestal or into the rig's panel. Thinking theft here.
TheRVgeeks
Thursday 28th of January 2021
Hi Luc! Great question. We keep ours inside our electrical compartment, so out of both sight and weather. Depending on your RV's power cord set-up, that might not be practical or even possible. In that case, we recommend locking the unit to the pedestal using the steel ring on the cord that's provided for that purpose.
Pat Parker
Wednesday 27th of January 2021
Great knowledge and thanks for the tips. Always great to read your information.
TheRVgeeks
Wednesday 27th of January 2021
Thanks so much Ladies! ?
Drew
Wednesday 27th of January 2021
Here's another tip: Although it's correct to dump the black first, it's best to crack open the gray valve before that to assure your system isn't leaking. This would have saved me a couple of times in the past.
TheRVgeeks
Wednesday 27th of January 2021
Great additional tip, Drew! Thanks so much.
Jim Knoch
Wednesday 27th of January 2021
Guys, I think you are giving bad advice to leave the grey tank dump valve open when connected to full hookups. I have rescued a number of RV'ers that had done just this and were run out of their RV when a neighbor dumped into the sewer system and the system vented into their grey tank and a leaky air admittance valve under the sink or lavatory allowed the stench into the RV. In my opinion, best practice is to keep the grey dump closed and allow the tank to fill, dumping as needed. Besides, you conserve water when you flush the black water residue from the hose with the grey water.
TheRVgeeks
Wednesday 27th of January 2021
Hi Jim! Thanks for catching that. We accidentally published a draft version of the post. We've corrected that, advising people to leave the gray valve closed.