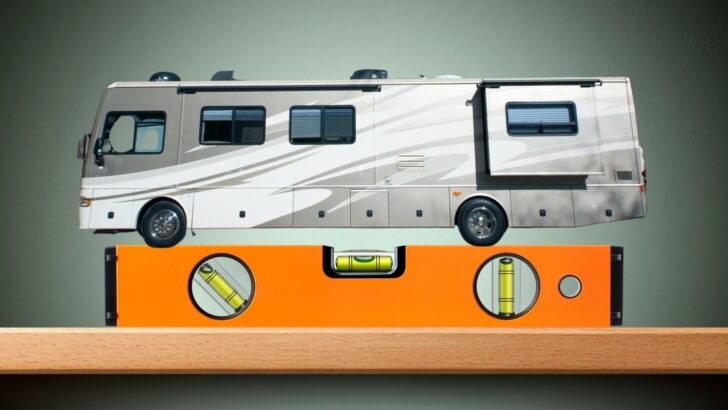

Bubble levels are the simple, low tech, tried-and-true method for leveling an RV. They’re easy to use, affordable, and effective.
Bubble levels come in a variety of shapes, styles, and sizes, and there are several different ways for an RVer to use them to level their rig.
Today we’re looking at the good old-fashioned bubble level, a cheap and effective instrument for getting an RV level in any location.
What Is a Bubble Level?
A bubble level (or “spirit level”, “torpedo level”, or “line level”) is a sealed tube that contains a solution that moves a bubble to the center of the instrument to indicate when something is horizontally level and/or vertically plumb.
When leveling any object using a bubble level, the bubble contained in the vial should move to the center between the perpendicular lines.
If the bubble is centered, then your RV (or any surface) is level in that direction.
If the bubble is off-center, then the RV (or other surface) needs to be raised or lowered until the bubble is sitting in the center of the level.
What Is In a Bubble Level?
Invented all the way back in the 1600s, a bubble level historically contains alcohol and an air bubble. Today many bubble level manufacturers use a formula of their own that is proprietary to their product, but the effect (and end result) is the same.
The term “spirit level” arose from the fact that the level contained alcohol – or “spirits”.
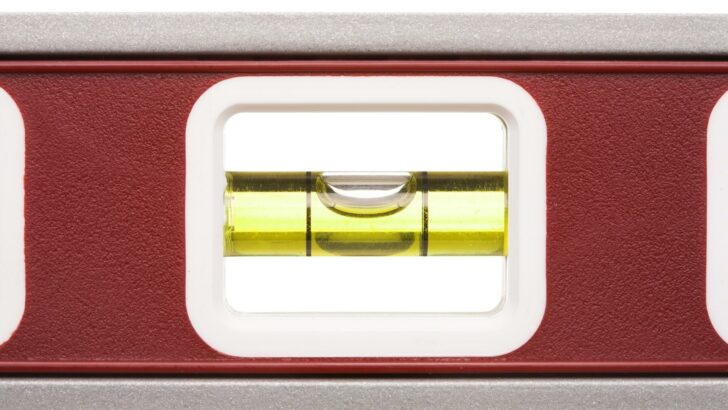

A traditional bubble level contains alcohol and an air bubble that indicates whether or not a surface is level.
What Does “RV Leveling” Mean?
No matter where you camp, it’s hard to find a place to park your motorhome or camper that’s perfectly level. Sure, sometimes you get lucky, but it’s a rare experience to simply pull into a camping spot and not need to level your rig to some degree.
The object of RV leveling is the same no matter what type of leveling you use. Your goal is to use your rig’s built-in levelers, a good set of RV leveling blocks, and/or whatever you prefer to use to bring your RV to a flat, level position from side-to-side and from front-to-back.
There are a number of ways to accomplish this important goal. You may have seen our post on the Lippert leveling system or the one on how to level a travel trailer. Then there was our post on the HWH leveling system and of course the post on our all-time favorite RV leveling system, the LevelMatePRO.
And those aren’t our only posts related to leveling and leveling gear. Why so many? Well, that’s how important proper RV leveling is!
Why Is RV Leveling Important?
If you’re wondering why we’ve prioritized so many posts related to RV leveling over the years, there are actually multiple reasons.
Let’s take a quick look at why it’s so important to get your RV level every time you reach a camping spot.
Safe RV Refrigeration
That’s right. We didn’t say “good” RV refrigeration (although that can be an issue, too). We said SAFE RV refrigeration. Most RV refrigerators (absorption style) require being level to operate properly and safely.
If your RV fridge is off-center, not only is it unlikely to function properly to keep things cold, but it could also be a very significant safety hazard.
RV refrigerator issues can lead to a fire. This means that not only could being off-level lead to the total destruction of your RV, but it could also lead to severe injury or even death.
Safe Use of Propane Appliances
Your RV refrigerator isn’t the only appliance in your rig that may be affected by being off-level. All of the appliances in your RV that use propane to run are subject to malfunctioning if used while the rig is sloped.
So, if you intend to cook using your RV’s propane stove/oven, or you intend to use your RV’s propane-fueled water heater or furnace, you’d better make sure you know how to level your rig so that the appliances run properly and won’t pose a danger.
Avoid Damage to Slides
If your RV has a slide or two, you’ve got yet another reason to grab some bubble levels or any other method of leveling your rig.

Damage can occur to slides that are extended or retracted when an RV is off-level.
If slides are operated when an RV isn’t level, they can get jammed or can even be damaged.
Proper Shower Drainage
If your RV isn’t level, the water will pool on one side of your shower pain, unable to drain. This isn’t just a pain in the neck to deal with, it could also cause a real mess and water damage that should be avoided at all costs in an RV.
Door & Drawer Operation
Doors and drawers of all types are set to operate properly in a level RV.
You may have difficulty opening drawers and could even damage them when closing them at an angle. Cabinet doors won’t close properly, and room doors may swing open. Try closing that door tightly on an angle and you could even damage the hinges.
Comfort
Last, but certainly not least, is your comfort as you go about living in your RV. It’s not all that easy (or comfortable) to sleep at an angle, for example. Or try walking in an unlevel RV or even using the toilet!
There are so many reasons to properly level an RV, and with bubble levels being cheap and easy to access, there’s no excuse to have an unlevel rig.
No-Excuse RV Leveling
As we’ve mentioned, there are many different techniques to level an RV, but good old-fashioned bubble levels are cheap, easy to find, and easy to use. There are higher-tech options for those who prefer them, of course. But bubble levels represent no-excuse RV leveling.
Using a simple bubble level (or more than one), you can level your RV from front to back and side to side, providing a safe, stable, and comfortable place to live.
Leveling Side to Side
Regardless of the size of your RV, you can level your RV from side to side by using your axles. If you don’t have an automatic leveling system, simply start by placing a bubble level close to the rear axle of your rig (with the length of the bubble level positioned so it aligns with the side-to-side axis of your RV).
Check the level vial for a centered bubble. If the bubble is only slightly off-center you can try moving forward or backward slightly in the site to attempt to get the rig level.
If that slight backward/forward movement isn’t sufficient to level the RV, you can add your levelers (leveling blocks or pads) under the lower side tires and drive up onto them. Your goal is for the bubble to sit as close to the center as possible.
Once your rig is leveled from side to side, you can begin the front-to-back leveling process (if you have a camper that you tow, such as a travel trailer or 5th wheel, you’ll unhitch your RV from the tow vehicle at this point).
Leveling Front to Back
When leveling an RV from front to back, you’ll raise or lower one or both ends of the rig, using the rear axles as a pivot point. For towables, you’ll raise the front only, as that is typically where the tongue jack (or leveling jacks) is located.
Place the bubble level so that it aligns along the front-to-back axis of your RV. Then raise or lower the front of your RV using a tongue jack (travel trailers), front stabilizers (5th wheels), levelers under your front tires (motorhome without jacks), or with your RV’s leveling jacks.
If you need to use leveling blocks, these ones are our favorite, but there are a number of products that’ll work:

Here’s a different type of leveling block with the ability to interlock:
- CUSTOMIZABLE RV LEVELING SYSTEM: These interlocking RV wheel blocks offer a reliable way to achieve safe and secure camper leveling. They are designed...
- COMPATIBILITY: Camco’s leveling blocks work with single wheels, double wheels, hydraulic jacks, tongue jacks, stabilizer jacks, fifth wheel jacks,...
These are drive-on levelers:

- Raise your RV up to 3-7/8" on any tire for a more level position
- Load capacity of 3500 lbs
And here’s a set of Anderson levelers, which are great for towables. You can see how these are used in our post on how to level a travel trailer:
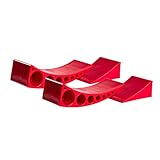
- 🛻[MUST HAVE FOR CAMPERS OR FIFTH WHEEL]: Works great on trailers up to 30,000 lbs and with tires up to 32" diameter. The Andersen Camper Leveler...
- 🛻[EASY TO USE]: Just drive on, decide how high you want it and place the chocks! You'll be ready to go dirt biking or hiking in no time- It's that...
What Kind of Bubble Level Should I Use to Level My RV?
To level your RV, you can use any kind of bubble level that works for you. The key will be your ability to observe the bubble and where it sits within the level… so, it should be placed in a location where you (or someone assisting you with leveling) can see it easily.
Let’s take a look at several different bubble levels.
Hopkins Graduated Level
These small bubble levels (they come 2 to a pack) have graduated markings that indicate how many inches are needed to raise or lower your motorhome or travel trailer, helping to eliminate the trial-and-error of rolling up onto a leveling block, only to find out you need more height.
These can be placed strategically in your RV using the adhesive backing or included screws.

- Designed to take the guesswork out of RV leveling
- Markings indicate how many inches are required to raise or lower a trailer or vehicle
Sun Company Lev-O-Gage II
Referred to as inclinometers or tilt gauges, these levels have shatterproof vials that use a brass ball as their “bubble” to improve their accuracy. The tube is filled with a bright yellow solution and the contrast makes the brass ball easily visible.
These levels include high-bond VHB tape as well as screw holes for permanent mounting if desired.
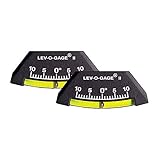
- Ideal Tilt Reading - Each gauge monitors tilt from -10 to 10 degrees. Brass ball rides in special damping fluid for smooth, accurate leveler readings.
- Easy to Read Display - Brass ball indicators in bright Saturn yellow tube assembly provide higher visibility than traditional bubble levels. Engraved...
YOTOM Cross-Check Bubble Levels
These bubble levels come in a package of 5 and offer the ability to cross-check your RV leveling using the horizontal (level) vial and the vertical (plumb) vial at one time.
They’re small (1.63″ W x 2.26″ H x 0.54″ D) and can be placed in various spots on your RV using the included screw holes (they don’t come with adhesive).

- Great for leveling campers, trailer tongues or hitches, large tools, tripods, cameras, pictures, rifle rests, furniture, appliances, machines, pool...
- Sizes: 1.63" W x 2.26" H x 0.54" D, the cross check level is designed to give dual direction leveling
Wheel Masters 6700 Level Master
This is a larger level with the ability to be viewed from further away than the small levels listed above. The dimensions of this level are 11″ x 2 3/4″ so the level can be viewed from the driver’s seat (if the level is mounted on the front of your towable) as the RVer levels the rig.
Each perpendicular marking on the side-to-side scale indicates one inch of leveling. The front-to-rear scale is adjustable.
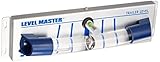
- Dimensions: 11" x 2 3/4"
- All-in-one RV level
Camco RV EZ Level
This is an interesting option as it’s an electronic, battery-operated replacement for typical bubble levels.
This level can sit on the floor of the rig or it can be mounted with adhesive (not included), and the lighted endpoints indicate whether the RV is level. When the lights are illuminated in green, the RV is level. Red indicates a low side that needs to be raised.
This level has an automatic shut-off feature to preserve battery life.

- PROVIDES FAST & EASY RV LEVELING: This RV leveling system allows you to level both axes simultaneously.
- ILLUMINATED INDICATOR LIGHTS: Easy to read indicator lights provide the leveling status: green means level; red indicates a low side.
Is There a More Accurate Way to Level My RV?
Bubble levels work, but for those who want a higher-tech, more accurate way of leveling their RV, upgrading to something like the LevelMatePRO might be the answer.
This is our chosen method for leveling our rig. You can learn more about it in our post on the best technology for easily leveling your RV – LevelMatePRO.
The LevelMatePRO is available through Amazon:

- FUSS-FREE LEVELING: LevelMatePRO is an essential RV accessory that saves you time for leveling. It provides real-time feedback on how much and which...
- SIMPLE SETUP: Simply mount this device in your vehicle with the included screws. LevelMatePRO app compatible with iOS and Android will guide you...
But you can also buy the LevelMatePRO through TechnoRV with this coupon for 5% off (be sure to compare pricing):
TechnoRV.com is a supplier of leading RV technology products that are designed to enhance your RV lifestyle. That includes items like LevelMatePRO, Viair portable air compressors, connectivity...Show More
TechnoRV.com is a supplier of leading RV technology products that are designed to enhance your RV lifestyle. That includes items like LevelMatePRO, Viair portable air compressors, connectivity equipment, and more!
Use the Promo Code "RVGEEKS" to save 5% on your entire order at TechnoRV.
Show LessFor a good look at how the LevelMatePRO works, check out our YouTube video:
Geek Out with Us Every Week
Join our newsletter to learn about all things RV-related. Every week we offer free tips, tricks, product reviews, and more to our online community of RVers. So, whether this is your first time on the road or you’re a seasoned expert, we’d love for you to geek out with us!
TJL
Tuesday 8th of November 2022
I use an electronic level to check front-to-back and side-to-side, looking for <3 deg (FTB) and <6 deg (STS) to protect my 3-way fridge. Takes about 60 seconds, mostly to unzip/rezip the case.
Judy Bowen
Monday 7th of November 2022
When I first started Rving, i was told to use the little round bubble device, put it in bottom of refrigerator and make sure the bubble was more than half way in the middle and we would be fine. Although we now have the Levelmate Pro, I still put that little round bubble at the bottom of the refrigerator and it matches pretty close to the Levelmate!
Kathleen Donaldson
Monday 7th of November 2022
We use a 3 foot level on the entry floor to get side to side and then under the bed slide for fore and aft. DH found the bumper, close to axle, is not a good point to judge level.
Mark
Monday 7th of November 2022
Can I use the Anderson levelers with my class A? Using our Levelmate Pro, I have been on sites that are out by as much as 5 inches and nudging the Newmar over a mountain of blocks isn't easy.
TheRVgeeks
Tuesday 7th of November 2023
@Mark, Ray is correct that the Andersen levelers are good for up to 4" of lift... but you'll also want to doublecheck that they are compatible with weight and tire size. Andersen reports their curved levelers work fine "on trailers up to 30,000 lbs and with tires up to 32 inches in diameter"... so as long as your rig meets those specs, you should be fine.
Ray Davis
Monday 6th of November 2023
@Mark, Andersen Levelers are good, "up to 4 inches" in height.