

One of the many great things about owning an RV is that you can decorate your home-on-wheels to make it really feel like… a home. In fact, our rig IS our home. And after 20 years on the road full time, we’ve got it just the way we love it. But one of the questions newcomers ask frequently is “Can you hang things on RV walls?”
That’s a great question because RV walls are not the same as the walls of most sticks & bricks houses. Today’s post takes a look at RV walls and methods of hanging things of various weights on those walls.
We’ll take a look at what you should not use on your rig’s walls, as well as the best and easiest ways to hang things to make your RV feel like home.
- 1) What Are RV Walls Made Of?
- 2) How Thick Are RV Walls?
- 3) What Is Behind RV Walls?
- 4) Are There Studs in RV Walls?
- 5) How to Find Studs in an RV Wall
- 6) Can You Screw Things Into RV Walls?
- 7) Can You Use Command Hooks on RV Walls?
- 8) How to Hang Pictures in an RV
- 9) How to Use Pop Rivets to Hang Things in Your RV
What Are RV Walls Made Of?
The interior walls of most RVs are typically constructed of some combination of plywood, medium-density fiberboard (MDF), plastic laminate paneling, or wood paneling.
When you consider how thin these materials are compared with the materials used to construct the walls of a sticks & bricks house, it’s easy to understand why the question “Can you hang things on RV walls?” is asked so frequently.

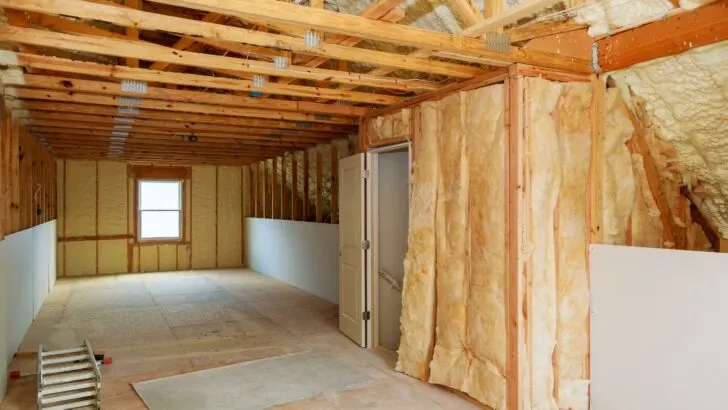
Here you see walls under construction in a traditional “sticks & bricks” building. These walls and the insulation behind them, are significantly thicker than the very thin walls of an RV.
How Thick Are RV Walls?
RV walls are considerably thinner than the walls of standard homes because RV manufacturers need to keep materials as lightweight as possible. After all, part of their goal is to make sure that the gross weights of all RVs are reasonable for travel, and that towed RVs are safe and manageable for the vehicles that tow them.
With all of this in mind, most RV walls are typically around 2 – 2 ½ inches thick (including the hollow, open space in between). There are some RV walls out there that are as thin as ¾”!
The material forming each side of an RV wall is much thinner. Since the outer wall itself is usually made of luan or paneling, it’s usually very thin. If you’d like to get a feel for what a typical RV wall thickness looks like, check out our post on RV window replacement… watch the video embedded there and you’ll see our RV’s walls when we remove or window.
For reference, you can compare this with the minimum of about 4 inches total thickness (again, including open, hollow space) for a standard wall in a sticks & bricks house.
What Is Behind RV Walls?
Behind the typical RV wall, you may find such things as wiring and plumbing, not dissimilar to a regular house. While heating, ventilation, and air conditioning ductwork may be less common in RV walls, some manufacturers may route certain HVAC components there.
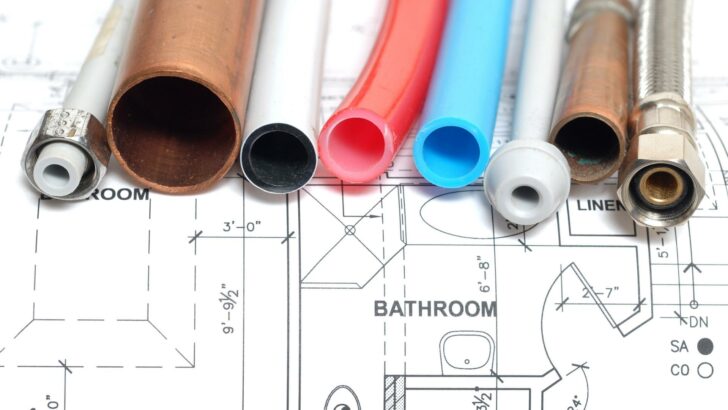

Plumbing or electrical components are often behind walls, but the very thin nature of RV walls means that extreme caution should be taken before drilling into an RV wall without knowing what’s behind it.
For this reason, you need to be extremely cautious when penetrating RV walls by drilling or screwing into them. But drilling may not be the best answer to how you can hang things on RV walls, so let’s move forward with some other ideas.
Are There Studs in RV Walls?
Yes. Behind the thin paneling materials from which the interior walls of an RV are constructed, there typically are studs, some insulation (in the outer walls), maybe some soundboard material, and either plywood, vinyl, or fiberboard.
(The exterior walls are generally constructed of lightweight composite material, aluminum, or fiberglass.)
However, it’s important to know that while the wall studs in a sticks & bricks house typically follow a set pattern, (usually on 16” centers), the same is not always true in an RV.
Often, you’ll find that the studs of RVs are not only placed in irregular arrangements, but instead of wooden studs (or in addition to them), they may have metal studs. The studs in the walls of our Newmar are aluminum for example.
How to Find Studs in an RV Wall
If you’re interested in wall-mounting something on the heavier side in your RV, it may be best to locate the wall studs and drill (or mount) directly into them.
However, the irregular spacing of studs in an RV, (sometimes as much as 24” to 36” apart), can make them difficult to locate.
So, if you have a need to identify the studs in your RV, you’ll need to do a bit of investigating. Here are a few tips to help you through the process:
Use a Framing Diagram
If you happen to have a framing diagram or structural renderings from the RV manufacturer, that document may well contain information related to measurements between the studs of the rig’s interior walls. If not, these renderings may at least give you an idea of what’s behind your RV’s walls.
Look for Rivets
There may well be rivets used to attach the interior wall covering directly to the studs. If you can spot those rivets, they may offer your best clue as to where the studs are located.
Pro Tip: If you think you’ve located a stud and you want to drill into it, use a very tiny drill bit at first. This way, if you’re wrong, you won’t have created a large hole in your wall, but only a tiny pilot hole that’s far less visible.
Use a Magnetic or Electronic Stud Finder
You can use a magnetic/electronic stud finder to locate the studs in your RV. These aren’t generally very expensive but can be very helpful in locating your rig’s wall studs, both metal and wooden.
Just a quick “heads up” here, if you’re planning to use a stud finder in your RV:
Sometimes sections of plywood are added between the studs of an RV to reinforce certain areas of the walls. This can throw off the accuracy of the stud finder or make you think it isn’t working properly because the extra plywood may appear to be a stud.
- Small and compact, easily fits in pocket
- 2 way level for ease of marking
Use an Infrared Thermometer
Infrared thermometers work by detecting temperature changes within the wall. Since there’s no insulation in the studs, you’re likely to detect a cooler temperature wherever studs are located.
- Better Accuracy: The Lasergrip’s 12:1 distance-to-spot ratio enables you to accurately measure targets from a comfortable distance. For best...
- Adjustable Emissivity: The upgraded Lasergrip let you quickly change the emissivity from 0.1–1.0 by holding the Up and Down buttons. Whether working...
Test the Paneling Using Your Hands
You can also place your hands 8” to 10” apart on your RV walls and press gently. Doing so may allow you to see where the paneling flexes, thus giving you information as to where the studs are located.
Check for Stud Outlines on the Outside of Your RV
Interestingly, it might be possible to detect where your RV’s interior wall studs are located by stepping outside very early in the morning when there’s dew on the sides of your rig. If the weather conditions are right, you may be able to see a surprisingly clear outline of the studs.
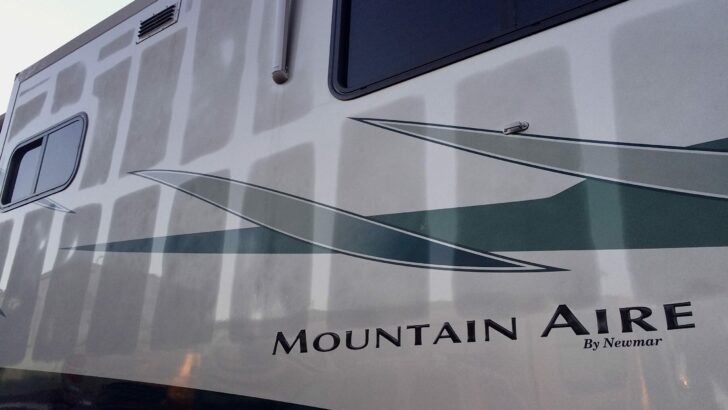
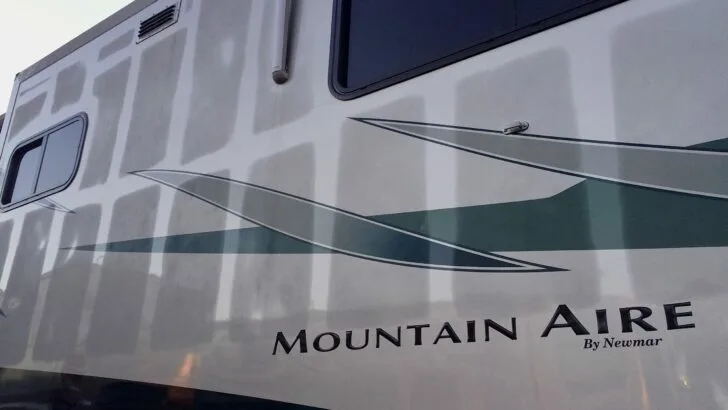
In this photo, you can see the outline of the studs in our 2005 Newmar Mountain Aire diesel pusher.
We’ve heard of people who’ve taken a photo of the dew-ridden stud outline and then used a photo editing program to note the location of the studs.
While this wouldn’t be our chosen method (we prefer tools like the stud finder or infrared thermometer), it might work for you.
Can You Screw Things Into RV Walls?
Can you? Probably. Should you? That’s another question altogether.
We should say at the outset that many RVers hang things on their RV walls using screws. However, wood OR metal studs in RV walls may be hard to locate, or in the wrong place, to allow screws to work, unless a stud happens to be right where you want to hang something.
If possible, we suggest using an alternative to screws in your RV walls. There are many to consider, depending on what you want to hang.
If you’re determined to use screws, though, you may want to first locate the studs and screw into those instead of into thin wall material. And be sure to stick with short screws, because your RV walls are thinner than you may anticipate.
At all costs, you’ll want to avoid screwing into components located behind your walls or drilling/screwing right through to the opposing wall. That’s especially true if it’s an outside wall!
Typical household wall anchors, toggle bolts, or mollies may work well in some situations. But let’s look at some other alternatives that might be better for RV applications.
Can You Use Command Hooks on RV Walls?
Yes! Command Hooks are very popular among RVers. These hooks are designed to attach to your walls with a strong double-sided adhesive. They’ll prevent you from having to make holes in your RV walls, but there may be a limit to the amount of weight they can reliably hold.

Command Hooks are a popular option for hanging things on RV walls. There are various sizes and strengths of hooks from which to choose depending on the weight of the object you want to hang. (Photo credit: Command)
There are several types and sizes of Command Hooks available. You’ll need to check the details on every type and compare them with the weight and material you want the hook(s) to hold.
Here are a few tips for using Command products in your RV.
Prep Your Walls
Before adhering a Command Hook to your RV wall, take a few minutes to properly prepare the wall surface. This can make all the difference in whether or not the hook holds up well to the rigors of RVing such as extremes of heat and cold, and vibrations from traveling.
To prep the wall, just use a little rubbing alcohol on a paper towel in the area where you want to adhere your Command Hook. Wipe the area down well and let it dry.
Wait Before Hanging Items
Once the hooks are on the wall, wait for one hour before hanging any weight on them. This will allow the adhesive to cure well to the wall surface prior to the stress of weight being placed on the hooks.

- INCLUDES – 2 Hooks, 2 Medium Strips
- DAMAGE-FREE BATHROOM ORGANIZATION– Things don’t dry piled on the bathroom floor. Now you can organize towels, robes, loofahs, and any other...

- INCLUDES – 4 strips
- DAMAGE-FREE BATHROOM ORGANIZATION- No sticky residue. No holes. Just a strong hold that’s easy to remove holds strong in hot, wet, and humid...

- INCLUDES – 1 brushed nickel hook, 2 large strips, 1 hook holds 5 lbs
- ORGANIZE DAMAGE-FREE- Say goodbye to holes, marks, or sticky residue on your walls, doors, cabinets, or closets; Command Hooks by 3M are easy to use...
For hanging things near windows & doors, the outdoor versions may work best due to the possibility of moisture in the vicinity:

- INCLUDES – 2 slate hooks, 4 medium strips, 1 hook holds 3 lbs
- ORGANIZE DAMAGE-FREE- Say goodbye to holes, marks, or sticky residue on your walls, doors, cabinets, or closets; Command Hooks by 3M are easy to use...

- INCLUDES: 4 Outdoor Medium and 2 Outdoor Large Replacement Strips
- RE-HANG HOOKS: Command Outdoor Medium and Large Refill Strips make it easy to hang and rehang your Command Outdoor Window Hooks, damage-free!
How to Hang Pictures in an RV
When hanging a picture on the wall of an RV, it’s best not to use screws or nails. But there are many good alternatives, depending on the weight of the picture.
Just as Command Hooks can be used to hang other items on RV walls, as mentioned above, they can of course be used for pictures as well. But there are other popular alternatives for hanging pictures in an RV, including Command Strips, Command Picture Hooks, and heavy-duty velcro:

- MAXIMUM FRAME SIZE 24 X 36 INCHES: One package includes 14 pairs (28 strips total) of the Command Large Picture Hanging Strips; four wall adhesive...
- WORKS ON A VARIETY OF SMOOTH SURFACES: Wall hanging strips work on a variety of smooth surfaces, including painted walls, finished wood, painted...
No products found.

- PROFESSIONAL GRADE ADHESIVE FASTENERS: These industrial strength hook and loop fasteners provide strong holding power designed for heavy-duty...
- WATER RESISTANCE PROVIDES UNMATCHED VERSATILITY: With heavy-duty strength, these fasteners make the ultimate organization tool for mounting, hanging,...
For lighter pictures (like posters or other frameless photos), using a product like Poster Putty or a similar putty may work well.

- Removable and reusable
- Ideal for temporary hanging and mounting photos, posters, notes, drawings and decorations up to 1 lb.
But remember – Command Strips and Hooks, velcro, putty and the like are all reasonable methods for hanging very lightweight items in an RV.
What if you need to hang something a little heavier? Well, we’ve got an idea to share that has worked well for us and for our friends for years…pop rivets!
How to Use Pop Rivets to Hang Things in Your RV
As we discussed earlier in the post, just about all motorhome, travel trailer, and fifth wheel walls are made of the same thin material that isn’t strong enough to hold wood screws. And without the ability to gain access behind the wall panels, there’s no way to use bolts, since you can’t tighten down the nuts.
3M Command hooks and velcro are good for items up to a certain weight, but if you want to attach something heavier, or if you want to hang something permanently, we like using pop rivets.
For example, if you’re wondering how to hang a mirror in an RV, or you’re interested in hanging a small shelf, pop rivets just might be the way to go.
We’ve installed things with pop rivets many times in our Newmar Mountain Aire and before that in our Fleetwood Bounder Diesel. We’ve also used pop rivets to install a couple of things for our friends Pat & Rita in their Winnebago motorhome.
We attached their central vacuum system and a shelf in their bathroom, as well as a fire extinguisher in our Newmar, which have all held on tight over more than a decade (of full-timing in our case). We can all attest that the method works well over time and travel.
We do suggest that you confirm that all methods and materials used are compatible with your particular RV. Also, pop rivets may work best for materials that are stronger than thin wood veneer.
Steel rivets are stronger than aluminum rivets, and given the amount of vibrating and jostling an RV does, steel rivets may hold up best in an RV environment.
To use pop rivets to install an item in your RV, you’ll just need a pop rivet tool and some pop rivets. There are a variety of tools available on the market, but a simple manually-operated tool like one of these has worked very well for us:

- READY FOR ACTION: The RHT300 Manual Riveter is perfect for projects involving sheet metal, gutters, storm doors, and automotive repairs; This...
- REACH TIGHT SPACES WITH EASE: Unique swivel head design rotates to accommodate tight corners and tough angles and makes work easier in hard-to-reach...
No products found.
Pop rivets come in various lengths and types. There are standard rivets like these:

- ST RIVT ASSORT 6PK
- ST RIVT ASSORT 6PK
And there are load-spreading rivets that spread wider for an increased load area compared to a standard pop rivet. These may be the best choice of all for RV applications:

- HIGH QUALITY - Full aluminum. This high corrosion resistance makes them the perfect choice for use in any environment.
- SIZE - Grip Diameter: 3/16" | Grip Length: 4/5" | Flange Diamter: 5/8"
For a visual demonstration of how to use pop rivets to hang things in your RV, check out our YouTube video on the topic:
Geek Out with Us Every Week
Join our newsletter to learn about all things RV-related. Every week we offer free tips, tricks, product reviews, and more to our online community of RVers. So, whether this is your first time on the road or you’re a seasoned expert, we’d love for you to geek out with us!
Brian Nystrom
Tuesday 27th of June 2023
Unless you're mounting to metal or another hard material, pop rivets are supposed to have a washer on the back side. Otherwise, the rivet can just rip right through the wall material, especially with steel rivets. I definitely wouldn't do this in paneled or lauan walls.
TheRVgeeks
Tuesday 27th of June 2023
While pulling out is a consideration, pop rivets are needed in the specific situation where the opposite side of the wall is isn’t accessible, no using a washer isn’t feasible. There are two good solutions though. One is to use special broad-backed rivets that spread wider, and/or limiting the weight of any item they’re used to hang. We’ve hung many things of modest weight with regular rivets in more than one RV and never had one pull out. But hanging something too heavy is indeed the most common problem.