
Camping or living in a motorhome is one thing, but safely driving and maneuvering it is quite another. A while back we went over the finer points of off-tracking & rear overhang, and in a later post we covered 7 pro tips for backing up a motorhome. In today’s post, we’ll cover how to adjust your RV mirrors and maintain good lane position.
Knowing exactly how to adjust, and then correctly use, your RV’s mirrors can be difficult to explain because it’s (obviously) such a visual task. But it’s a critical requirement for safely driving an RV. Learning how to then use your mirrors to properly monitor and manage lane position and control is another key RV driving task.
Not only do correctly adjusted mirrors and good lane control greatly enhance safety, but they also make driving a large RV less stressful, and therefore more enjoyable. This is a crucial aspect of driving an RV, so take your time reading and absorbing the post, and then watch the video we’ll embed at the end of the article.
In the video, we demonstrate as vividly as possible how to adjust your mirrors, and then use them all for both situational awareness of surrounding traffic and establishing and maintaining good lane position and control.
- 1) Why Are Objects in the Mirror Closer Than They Appear?
- 2) Why Are the Side Mirrors of My RV Split?
- 3) How to Adjust RV Mirrors – Proper Adjustment Technique
- 4) How to Use Properly Adjusted RV Mirrors
- 5) When Driving an RV, Do I Use My Left and Right Side Mirrors in the Same Way?
- 6) Using Your RV Mirrors to Practice Good Lane Position and Control
- 7) Conclusion
If you’re interested in some professional motorhome driving instruction, you’ve come to the right place.
As many of you know, our motorhome is a 43-foot diesel pusher behind which we tow a Honda CR-V. That’s a long, tall drink of water, but fortunately, our rig is driven by a professional.
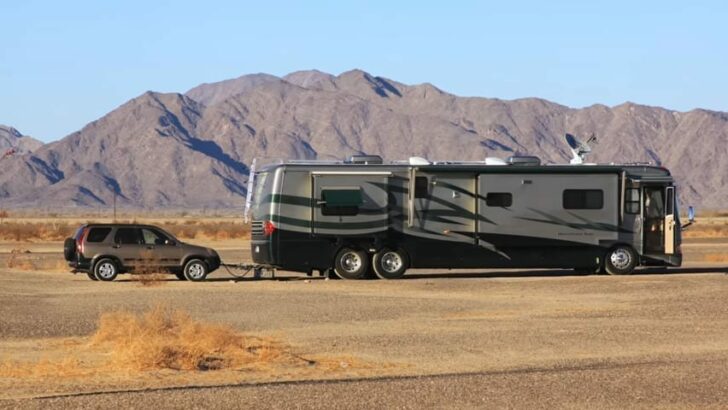

Our 43-foot Newmar Mountain Aire diesel pusher towing our 2003 Honda CR-V.
Peter is a former professional motorcoach operator and bus driving instructor with thousands of driving and teaching hours under his belt. He was also the Safety & Training Manager for one of the largest tour bus companies in North America. Having trained literally hundreds of professional drivers (in New York City, no less!), we’re confident he can help you up your driving game, too.
To get an idea of the level you can take professional driving to (and to let Peter live a little of his Glory Days!), here’s an article about his driving prowess. If you’d like to read the whole story, click the image to see a PDF version.

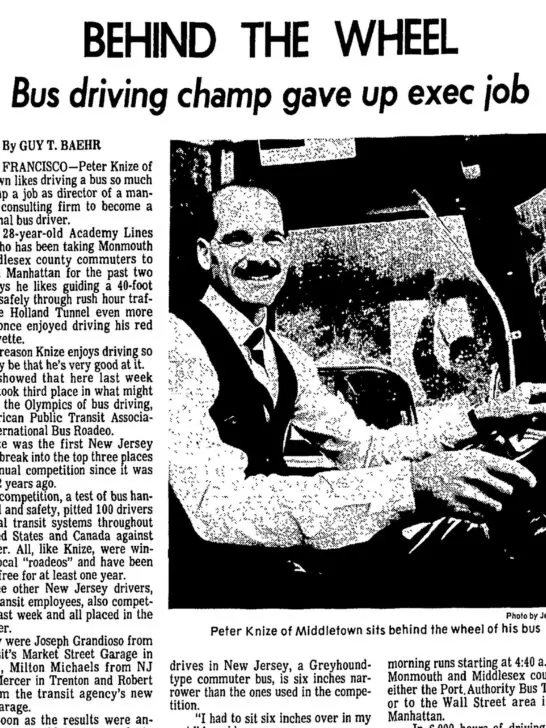
Peter Knize, behind the wheel of his MCI. Some people are born to drive a big rig! Click the image to read the entire article.
In the accompanying video, we’ve put our drone to good use, giving us an aerial view that wouldn’t otherwise be possible. We’ve also added some overhead GoPro shots from high up on the side of our RV, and synchronized the footage with a driver’s-eye view.
We hope the result is so clear that even a brand new RV driver will understand it clearly, and be safer behind the wheel after watching our video.
Whether you’ve been driving large vehicles with both flat and convex mirrors for years, or you don’t even know what convex mirrors are yet, we think you’ll find some useful information to help keep you safer on the road. Let’s get to it.
Why Are Objects in the Mirror Closer Than They Appear?
We’ve all seen the cautionary words “OBJECTS IN MIRROR ARE CLOSER THAN THEY APPEAR” engraved on the right side-view mirror on most cars. These words are there to warn us that the glass in the mirror is curved – or convex – and thus the glass expands the field of view, allowing us to see a larger area.
But squeezing that wider viewing area onto the small surface of the mirror makes everything seem smaller than it really is, signaling to our brains that objects are further away than they really are.
Why Are the Side Mirrors of My RV Split?
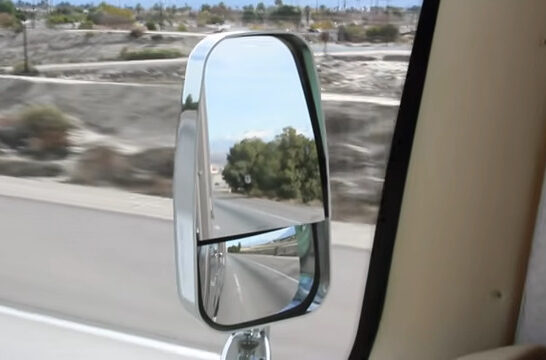
Larger, tall vehicles like RVs, trucks and buses are too big for one mirror to effectively cover such a large area. So they use at least two mirrors on each side of the vehicle. One is perfectly flat, and the other is even more convex (curved) than the one on your car (which makes things appear even smaller).
The two mirrors – flat and convex – need to be used together, as a team, because neither mirror can give you the information you need as a driver on its own. In general, flat mirrors are used to see objects in the distance, and convex mirrors are used to see objects alongside our RV. The “crossover point” where objects transition from flat to convex and vice-versa, is approximately at the rear of your vehicle.
Some side mirrors are rectangular like ours, and others are round. Once you learn to adjust them, however, they all work the same way.
How to Adjust RV Mirrors – Proper Adjustment Technique
Knowing how to adjust RV mirrors is a process that takes a little time to understand, especially considering the dual mirrors and how each one functions. Let’s take a look at the proper adjustment technique, step by step.
How to Adjust Your RV’s Right (Passenger Side) FLAT Mirror
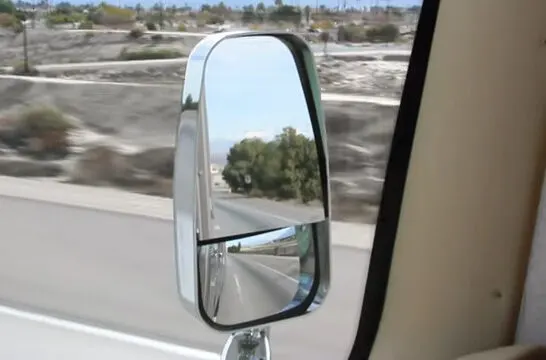
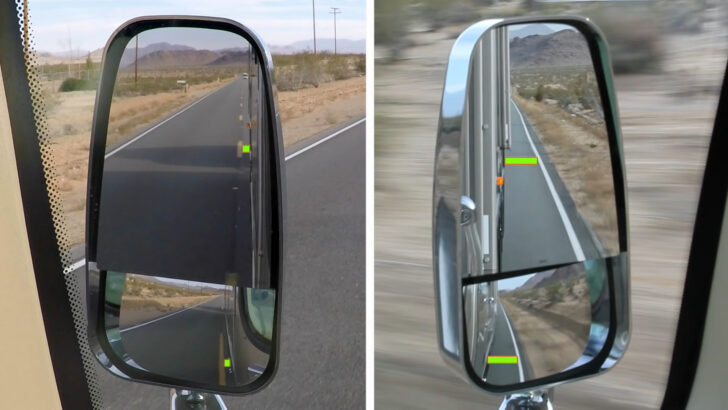
Let’s talk about height adjustment first. Move the flat mirror up or down so that you can see as far off into the distance as possible in the upper portion of the glass.

Here the top red line depicts the driver’s ability to see as far back into the distance as possible based on the adjustment of the flat mirror up or down, and the bottom red line depicts the viewing, typically seeing (approximately) as far forward the rear bumper.
This will allow the rear viewing area to extend down to approximately the rear bumper.
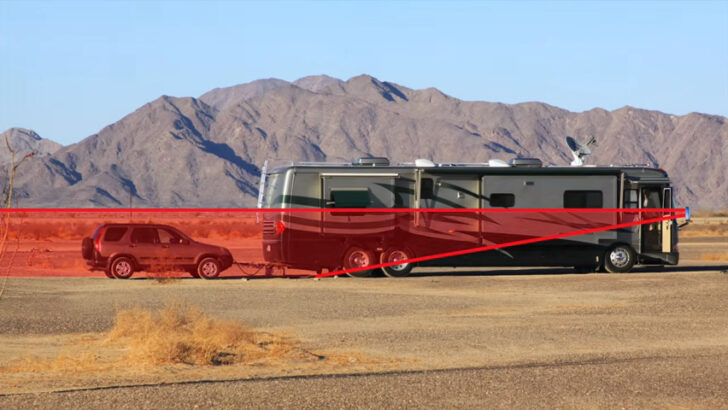

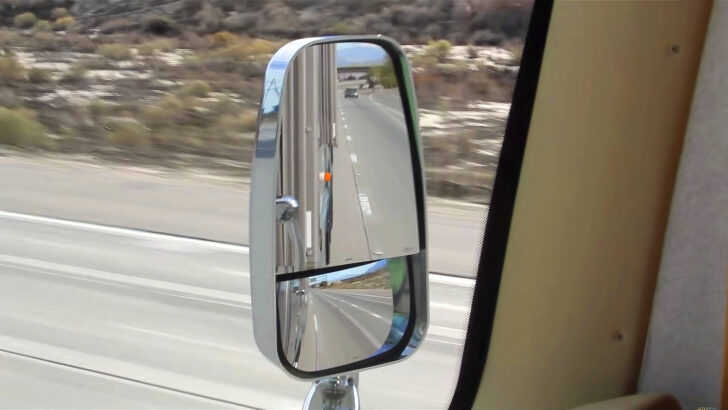
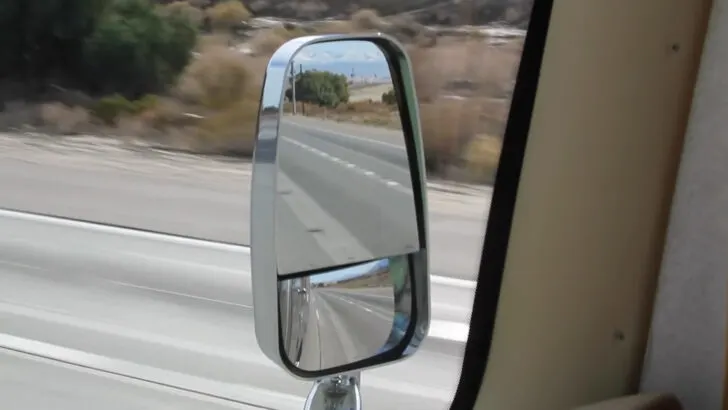
Here we see the entire viewing area of the FLAT mirror based on the proper adjustment. Basically from somewhere around the rear of your RV into the distance as far as it’s possible to see.
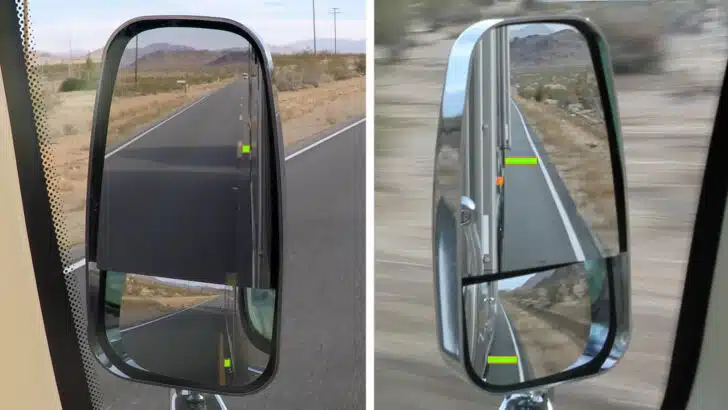
You should be able to see all the way to the horizon in the upper section of the mirror, allowing us to see vehicles far off in the distance in the top ¼ to ⅓ of the glass.

Properly adjusted, the top ¼ to ⅓ of the mirror allows us to see vehicles far off in the distance in the adjacent lane.
The horizontal (side-to-side) adjustment should be set so that the inside edge of the mirror (the side closest to the RV) just skims along the RV’s body like this:

Proper horizontal adjustment allows the inside edge of the mirror (the side closest to the RV) to skim along the bodywork.
If you have an awning on the right side of your rig, you may be seeing the awning arm instead of the paint job. Make sure that you can see part of the RV in the edge of the mirror, guaranteeing that no one can slip between your view and your rig.
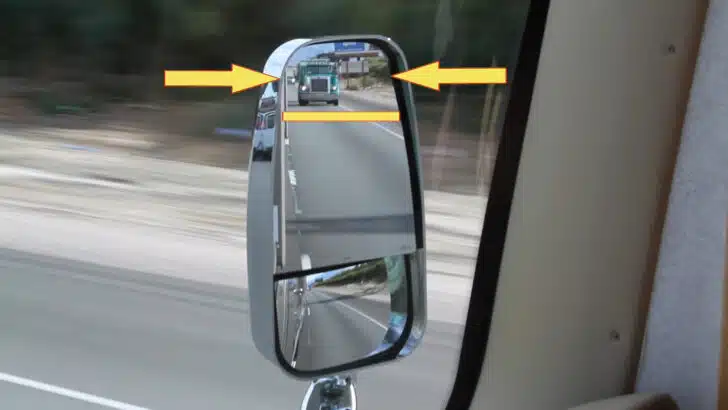
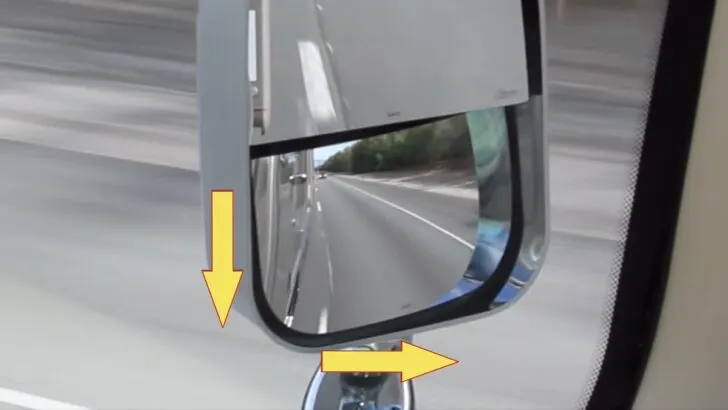
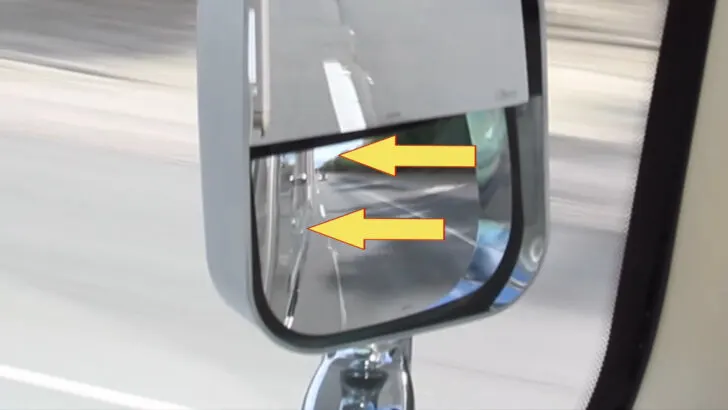
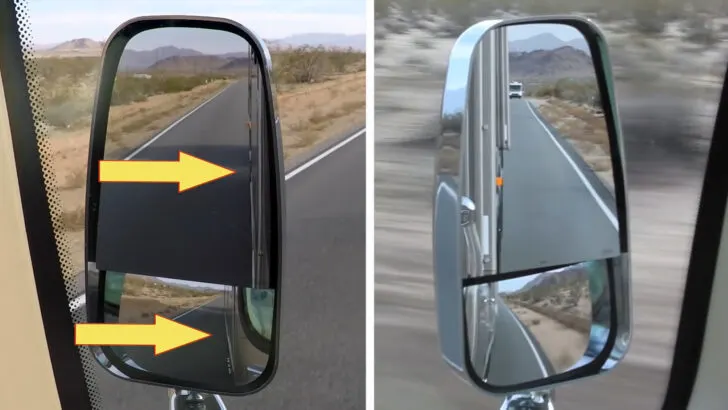
In the photo below, you’re looking at a correctly adjusted flat mirror – with the horizon visible near the top (top yellow arrow) and the awning arm on the side of the RV just visible at the edge of the glass (bottom yellow arrow).

Here the red truck on the horizon in the adjacent lane is visible near the top of the flat mirror and the awning arm on the side of the RV is just barely visible at the edge of the glass (bottom yellow arrow).
If you adjust the mirror too high, you’ll waste valuable mirror real estate by looking at too much sky, like this:
Adjusting the flat mirror too high shows mostly sky, which is generally not a threat to your safety…. unless it’s falling. ????
If you adjust the mirror too low, you won’t be able to use it for its primary purpose which is seeing vehicles in the distance.

Adjusting the flat mirror too low prevents you from seeing into the distance.
Adjusting the flat mirror too far inward wastes valuable mirror area by watching the side of the RV like this:

This flat mirror is adjusted too far inward, wasting fully half of its area looking at the side of the RV, which again isn’t a likely threat.
And adjusting it too far out will open up a blind area alongside the rig.

Adjusting the flat mirror too far out opens up a dangerous blind area in a critical location – where vehicles approach and come alongside your rig.
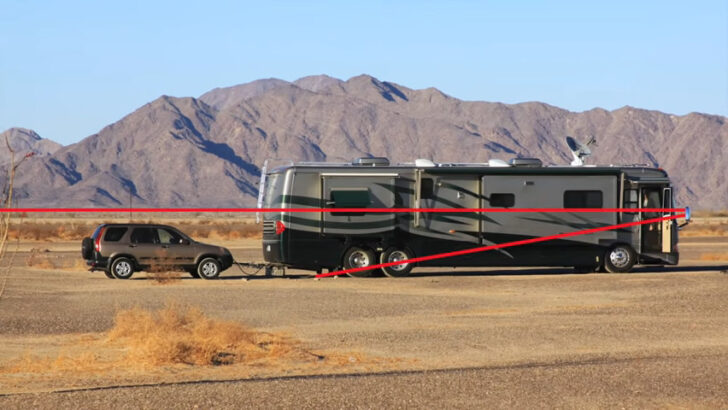
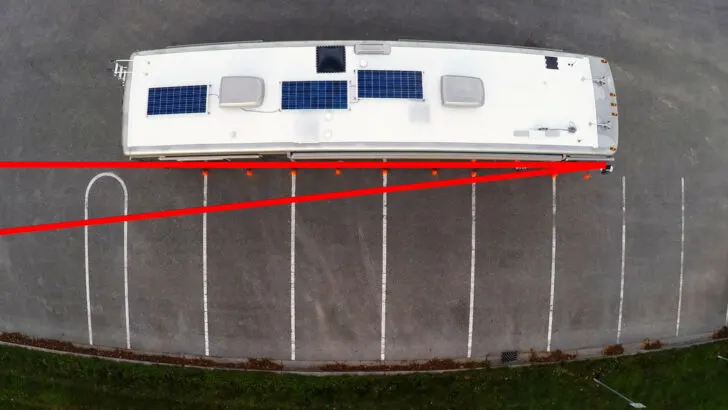
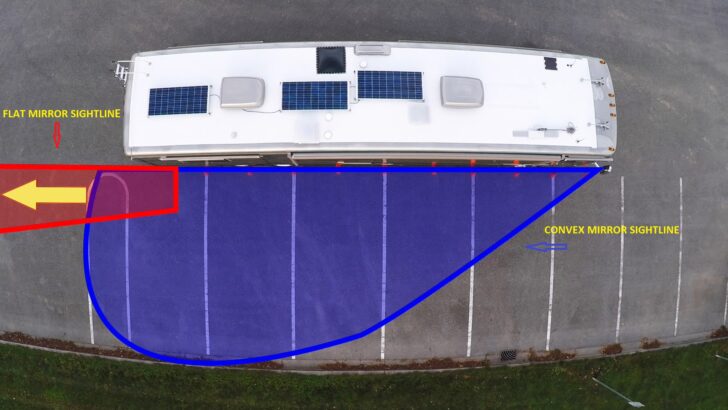
In the photo directly above, with the mirror adjusted too far out so that none of the side of the RV is visible, it could allow vehicles to approach us unseen, as shown in the following overhead photo. The area between the red lines is what we can see, but the area alongside the RV is where we need to be looking. Imagine that yellow arrow is a car coming alongside. You wouldn’t have seen it as it was approaching, due to an incorrectly adjusted flat mirror (since it looks into the distance for approaching traffic).
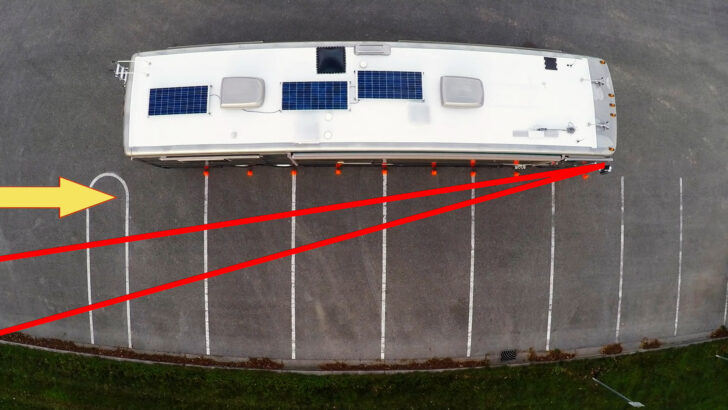

If the RV’s mirror is adjusted so that we can’t see the side of the RV at all, a vehicle could approach us unseen, as depicted here by the yellow arrow (our viewing area in this illustration is between the red lines).
How to Adjust Your RV’s LEFT (Driver Side) Flat Mirror
Adjust the left flat mirror exactly the same way as you adjusted the right mirror — with the horizon visible in the distance at the top, and the side of the RV just visible at the edge. The only difference on the left side of the RV is that it’s the right side of the flat mirror that skims along the bodywork. Basically a… ahem… mirror image. (sorry!)
There won’t be any awning arm on the left side, so you should have a very straight line of paintwork visible along the entire inboard (right) side of the left flat mirror. Remember to skim the edge of the RV’s body with the inboard side of the mirror. You want to see a little of it at the very edge of the mirror, but no more.
How to Adjust Your RV’s Convex Mirrors
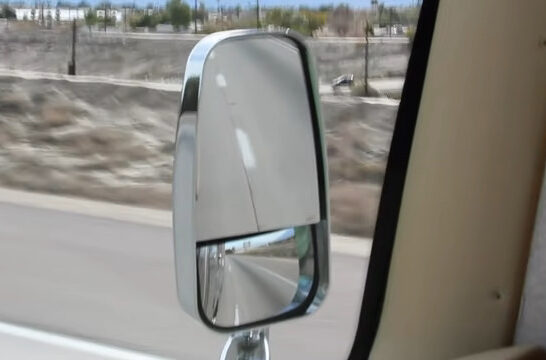
If your RV’s convex mirrors are adjustable (not all are), the rule of thumb to follow is to adjust them as far down, and as far out, as they’ll go without losing sight of the horizon or the side of the RV. This is somewhat similar to adjusting the flat mirrors, but the view won’t be the same. And the primary area we use it to view isn’t the same either.
To give you a visual image…
Adjust your convex mirrors as far down and out as possible:

Adjust your convex mirrors as far down and as far out as you can without losing sight of the horizon or the side of the RV.
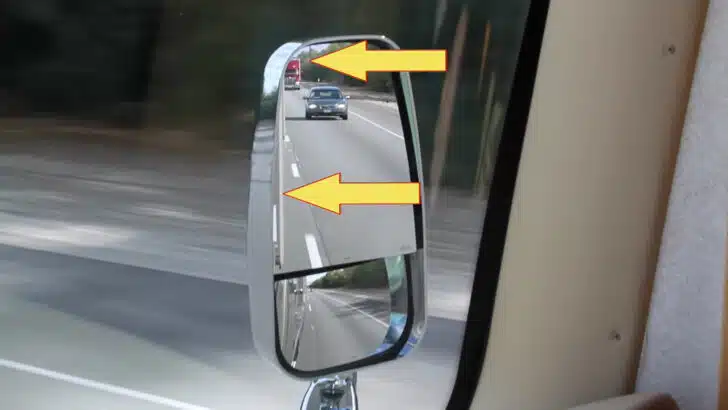
But, don’t lose sight of the horizon or the side of the RV:
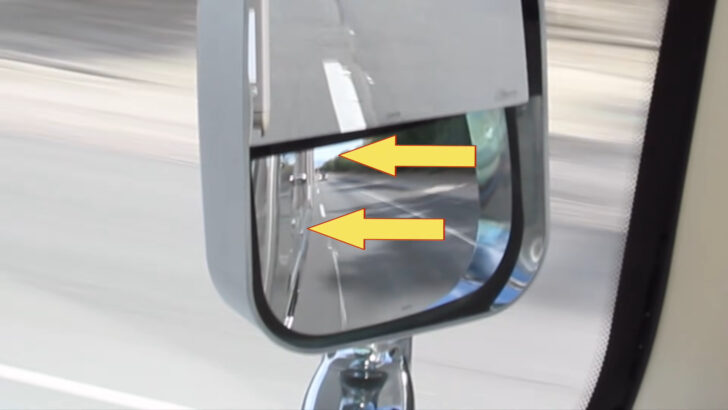
The upper arrow points to the horizon, which should be visible. The lower arrow points to the side of the RV, which should also be visible.
With our rectangular mirrors set in a fixed housing, we set our convex mirrors as far down and as far out as they’ll go. But keep in mind that many convex mirrors are different. Many convex mirrors are round. And many have different mounting brackets.
Our rectangular convex mirrors are mounted in such a way that we can’t lose sight of the horizon (at the top) or the side of the RV (on the inboard side, of course) no matter how we adjust them. But many convex mirrors can be adjusted far more than ours. DON’T automatically adjust your convex mirrors as far down and out as they’ll go!
Some convex mirrors, especially round ones can be adjusted very far down and/or out. Again, make sure you only adjust them as far downward and outward that you don’t lose sight of the horizon at the top, and the side of the RV!
Are RV Mirrors Adjustable in Any Additional Places?
Your RV’s side-view mirrors are likely adjustable in one or two additional places.
1) Where the arm meets the motorhome should be able to rotate forward or backward, allowing you to set it so the inside edge of the mirror lines up perfectly with the side of the RV. If the inside edge of the head isn’t perfectly lined up with the side of the RV, it should be adjusted so that it is.
2) Depending on the type of mirror on your RV, the mirror head itself may be able to rotate and adjust up and down.
Both of these adjustments may require a tool of some sort, possibly an Allen wrench. But once they’re set, they will never need adjusting again, no matter who’s driving. We’ve owned our Mountain Aire for over 16 years, and after the very first time we fine-tuned the arm and head positions, we’ve never touched them again.
What Do Properly Adjusted RV Mirrors Show?
Adjusted correctly, your RV’s flat mirror will view a narrow band straight back, starting near the rear bumper, and off into the distance as far as the eye can see. This allows you to see vehicles approaching from behind.
Your RV’s convex mirrors monitor the area alongside the RV.
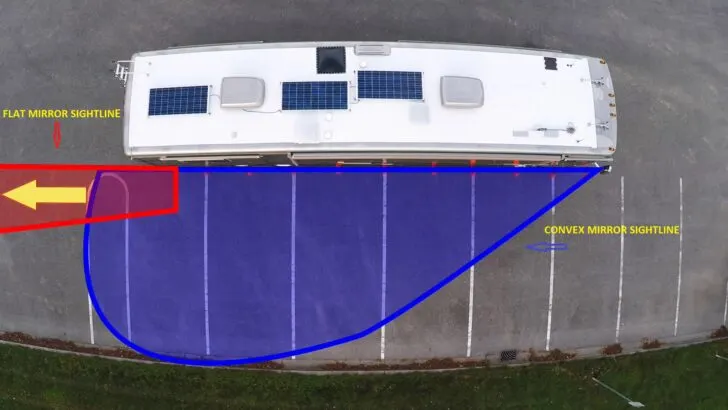
The red area shows the proper flat mirror sightline. The blue section depicts the convex mirror viewing area.
How to Use Properly Adjusted RV Mirrors
Now that you know how to adjust RV mirrors properly, let’s take a look at some of the real-life perspectives of an RV’s flat and convex side mirrors.
We’ve used drone footage to demonstrate from above our RV situated in a parking lot. Our Honda CR-V served as the vehicle slowly approaching the RV on the right-hand side.
RV Mirror Perspectives
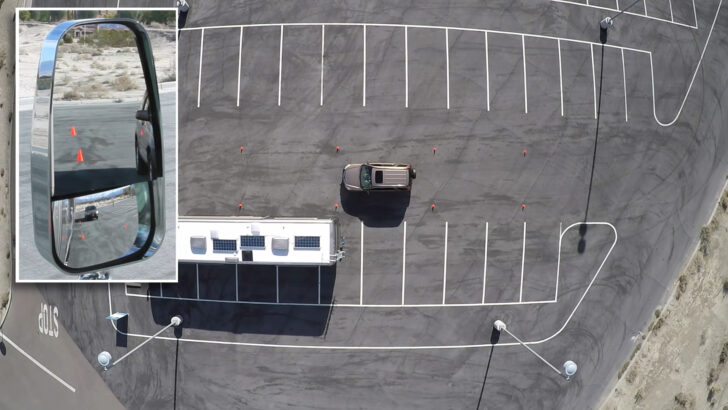
As we begin, at about two car lengths behind the RV, our car is clearly visible in the flat mirror but is barely visible in the convex mirror (it’s too far away, since the curve of the mirror makes everything so much smaller).
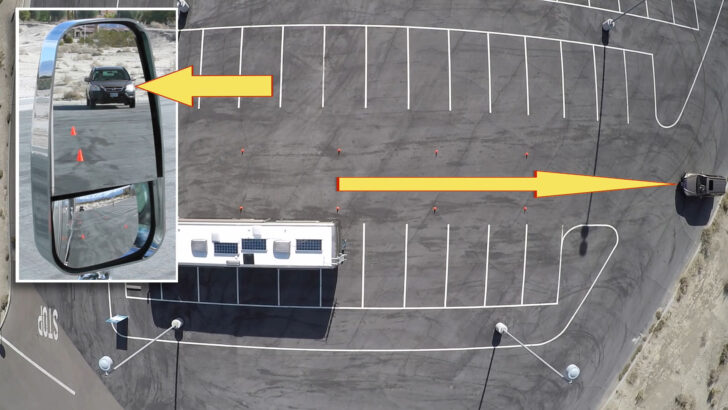

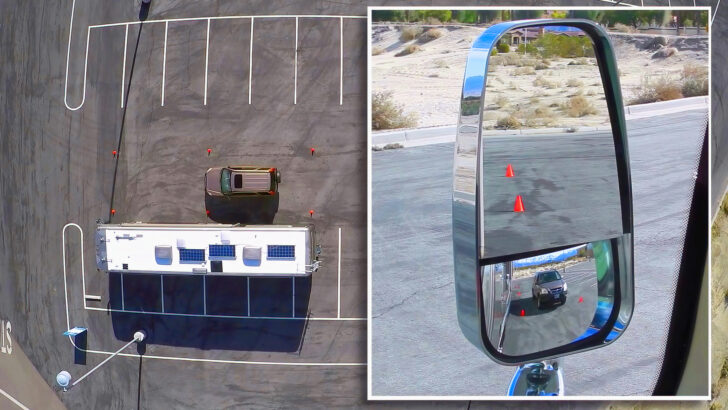
We simulated a car approaching and passing our RV on our right-hand side, marking out an adjacent highway lane with red cones. You can see the car visible in the distance in the RV’s flat mirror. Notice that the car is so far away that it’s only a speck in the convex mirror.
As the car approaches the RV from behind, and reaches the area near the RV’s rear bumper, you’ll notice that it begins to exit the narrow field of view of the flat mirror, and gradually becomes larger and more visible in the convex mirror. The rear of the RV is the approximate “transition zone” between flat & convex mirrors.
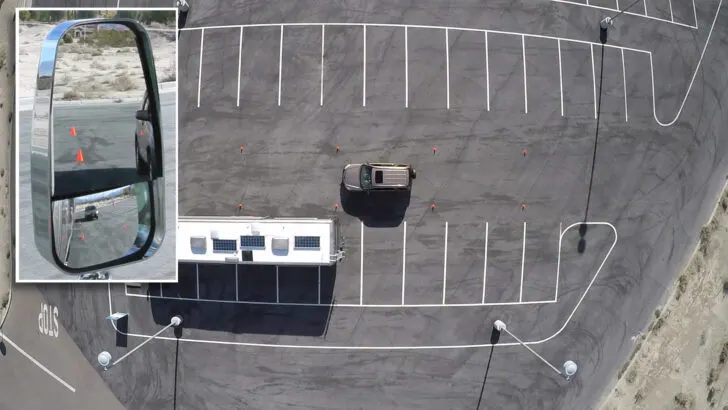
As the car approaches the RV from behind, it becomes less and less visible in the flat mirror, and more and more visible in the convex mirror, right around the rear of the RV.
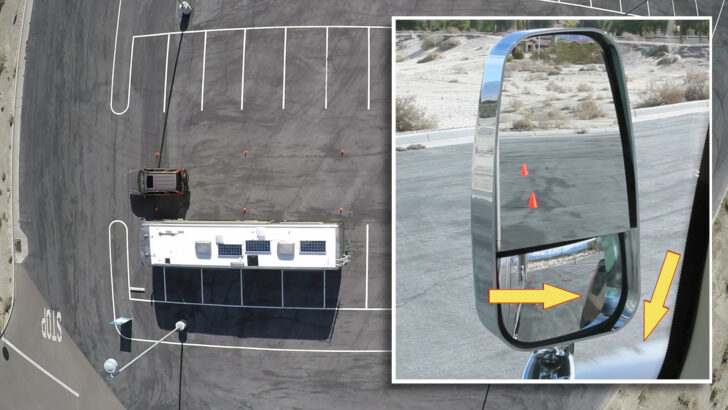
In the next photo, we’ve moved the inset view of our mirrors over to the right side, allowing you to see what happens as the car continues to move forward. As it comes alongside the RV, it completely disappears from the flat mirror, but is much more clearly visible in the convex mirror. This transition is why we need to use BOTH mirrors as a team! This is what we always check them both! No single mirror can do it all.
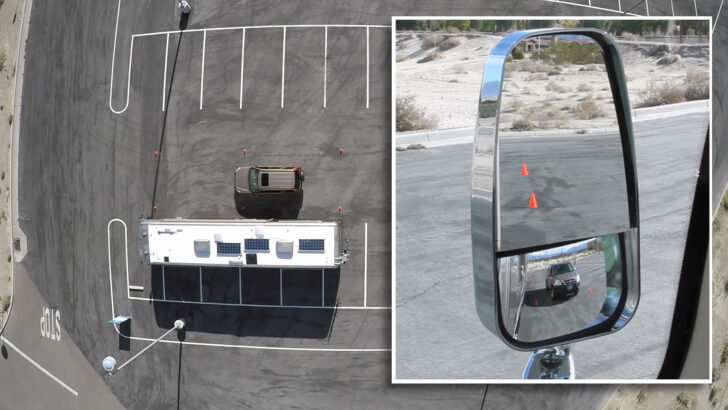
With the car halfway alongside the RV, it’s completely lost in the flat mirror and fully in view in the convex mirror.
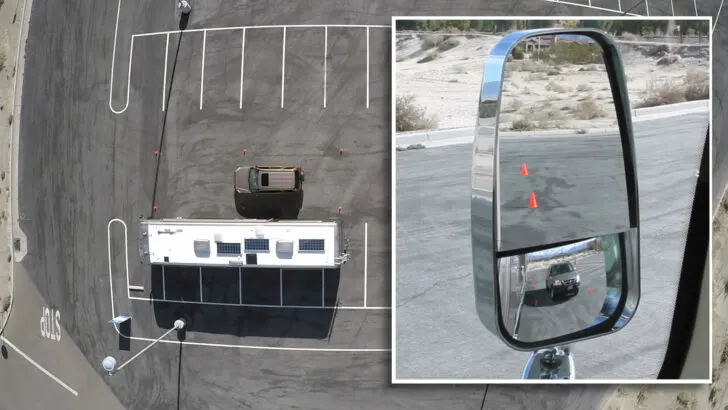
Next, we show that the car reaches another critical transition point, as it moves up to our front corner of our RV. It hasn’t yet disappeared from the convex mirror, but the hood has just come into view through the windshield.
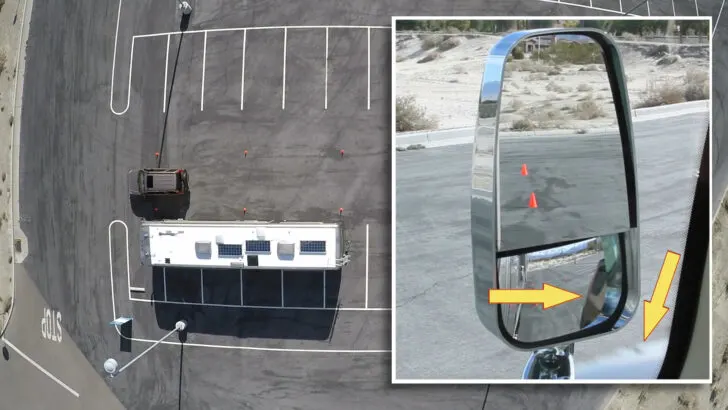
Our Honda CR-V, barely still visible in the convex mirror, just barely coming into view directly out the windshield.
PLEASE NOTE: It’s very important that you don’t get a false sense of security because we never totally lost sight of the car in this demonstration. Remember that our car is an SUV. It’s larger and sits up higher than many vehicles.
Had our CR-V been a smaller passenger car, or a motorcycle, this would potentially be the most dangerous spot for it to be in, as it could easily hide completely out of sight in the blind spot along the right front corner of the RV.
The single best defense you have against another vehicle hiding alongside your RV is scanning your mirrors. Situational awareness is the best way to know what’s happening all around your rig at all times, but it requires properly set mirrors, knowledge of how to use them, and scanning ALL of them routinely.
What is Scanning?
Once you’ve learned how to adjust RV mirrors, it’s time to use them! Good defensive drivers routinely scan their surroundings, including all four mirrors. This is done to gather critical safety information, including the progress of other vehicles as they move through your space. How often should you scan? Every 5 to 8 seconds is a good rule of thumb.
That may sound like a lot, but the “fixed stare” habit is a bad habit, and by scanning the critical areas around your RV as part of your ongoing routine of information gathering, you’ll stay more alert, and spot potential trouble early enough to react accordingly.
Be sure to watch our video embedded below for a real-time view of what can happen if you don’t properly scan your surroundings.
When Driving an RV, Do I Use My Left and Right Side Mirrors in the Same Way?
We’ve concentrated a lot on the right side of the RV in this post for a reason. That’s because, in countries where we sit on the left side of the vehicle and drive on the right side of the road, the right side is, by definition, our “weak” side. That’s because we’re further from the right-hand mirrors. That means objects in those mirrors are that much smaller than on the left side, but there’s also another weakness on our right.
Since we sit on the left side of our RVs in North America (and on the European Continent), we can look almost straight down alongside us through the driver’s side window on our left. That helps eliminate a big blind area. Remember when we were talking above about how a smaller car or motorcycle could easily hide in the front transition area near our right front corner? It’s a lot easier to see them on the left, straight down below you from the drivers’ seat, even without the mirrors.
Of course in countries where drivers sit on the right side of the vehicle and cars drive on the left side of the road, the left side is the “weak” side. Besides renting an RV in Italy (where they drive on the right), we’ve also rented RVs in countries where we had to get used to driving on the left. We’ve spent weeks at a time RVing around Australia, England and, most recently, New Zealand. It does take a little getting used to driving on the opposite side, but the rules for mirrors are the same, only reversed, with the right being our strong side.

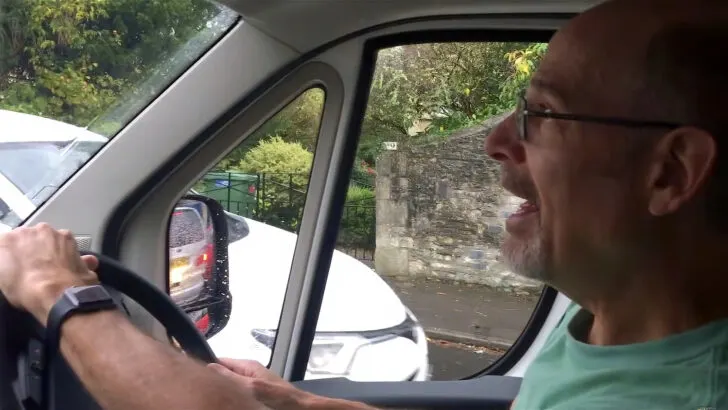
Peter may look scared driving our rental RV on the left side of the narrow streets of The Cotswolds in England. But he was actually cool as a cucumber sandwich. When sitting on the right, and driving on the left, the “weak” side is reversed — it’s the left, not the right.
Using Your RV Mirrors to Practice Good Lane Position and Control
As part of your routine scan, note the space between your RV and the lines on the road. It should be about the same on both sides.
Notice that both the flat and convex mirrors provide feedback about lane position.

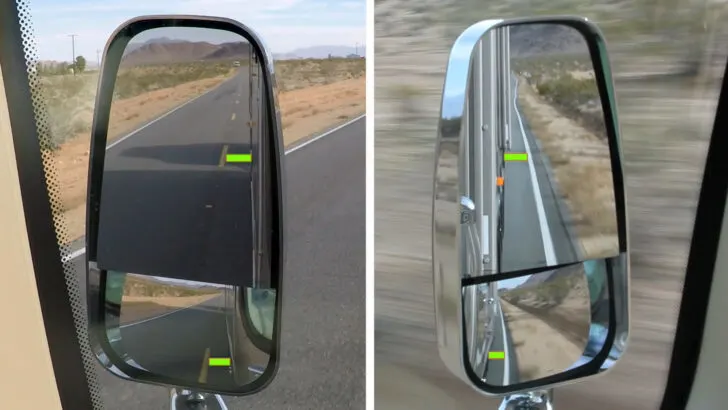
As noted by the green horizontal lines, both the flat and convex mirrors provide feedback about lane position.
In the following photo, we demonstrate what drifting off-center looks like, with a larger gap on one side than the other.
Here you see us drifting left in our lane, illustrated by a larger gap on the right side between our RV and the line on the road.
If you drift far enough to actually cross out of your lane, you’ll know, because the line on that side will disappear from view completely.

Here the line on the left side has disappeared completely, informing us that we’ve drifted completely outside our lane.
Don’t stare at your mirrors, but use routine scanning as an integral part of good driving habits to gather information. This will also build good visual and muscle memory.
With regular practice over time, staying in your lane will become totally automatic.
Here’s our video showing everything noted above but in video format so that you can actually ride along with us:
Conclusion
We hope this overview of how to adjust RV mirrors and maintain lane control has been helpful. Give yourself plenty of time and practice. As time goes by, you won’t even have to think about these instructions anymore, and that will only be due to practice, experience, and confidence.
And with your mirrors adjusted, and your confidence in your lane control improved… you can pay attention to other issues like rear overhang swing and ensuring that you avoid hitting a low overpass (by knowing your RV’s height)!
Geek Out with Us Every Week
Join our newsletter to learn about all things RV-related. Every week we offer free tips, tricks, product reviews, and more to our online community of RVers. Whether this is your first time on the road or you’re a seasoned expert, we’d love for you to geek out with us!
Charles Seraydar
Tuesday 11th of October 2022
I have a 2004 Newmar Mountain Aire in excellent condition. I recently made a sharp left turn and though I was clearing a small tree. I didn't and snapped the mirror from the mounting port. I broke the round connecting extrusion that goes from the bottom of the mirror to the extension arm mounting arm is in good shape. I need a replacement mirror (2 piece) electric with yellow light on mounting arm.
TheRVgeeks
Wednesday 12th of October 2022
Hi Charles. Ouch! Sorry to hear about that! We'd suggest contacting Newmar's Parts Department and asking them. With your coach's serial number, they'll be able to look up the exact replacement and get you a price. Of course, if they can give you the part number, too... you can look for it elsewhere online to see if Newmar's pricing is competitive or not.
R.Jackson
Friday 29th of October 2021
Great video guys.My problem is I have 3 mirrors on each side of my 2004 Fleetwood Revolution. Could you please help me understand how the third mirror should be adjusted. Thanks for the help and keep making those great videos to held all the RV'ers out there traveling our highways.
TheRVgeeks
Friday 29th of October 2021
I’m familiar with those Velvac brand mirrors, and I’m sorry to report that for the life of me, I’ve never understood the benefit of 2 virtually redundant convex mirrors. They provide no meaningful increase in field of view, but create 50% more mirrors to include in your scan and interpret the information being provided. I don’t know how adjustable each of the convex mirrors is, but I suppose I’d adjust the lower one, and the flat mirror, exactly as shown in our video, and then aim the upper convex at the sky to keep an eye on on the weather! LOL Seriously though, I think the idea is supposed to be that one of the convex mirrors is intended to see directly down alongside the front corner of the RV, meaning you could adjust it lower than the other one to fill in any potential gap directly along side your left and right front corners. I’m sorry to say that I’m not a fan of these, but I suppose it’s possible they may fill in a tiny bit of extra area along the front corners. It’s possible that the problem may be that the UPPER convex is the one aimed further down to cover that front corner area. If that’s the case, it would be counterintuitive to watch traffic move through the mirrors, since a vehicle passing you on your left would first appear in the middle (flat) mirror, move its way down to the lower mirror, and then appear finally in the upper mirror, as opposed to the smooth flow that normally occurs when passing traffic travels from top to bottom from flat to the convex beneath it. The best thing to do is to try to get an idea of whether or not the upper or lower convex mirror has an advantage down by that right front corner, and adjust them accordingly, and get used to that flow of vehicles moving between the three mirrors. I hope this is clear, and sorry I can’t be of more help on this one. I’m just not a fan of them, but that doesn’t mean they can’t successfully do the job for you and keep you safe when used correctly.
D Kay
Tuesday 19th of October 2021
We've been RVing since the 80's. When we bought out 1st Newmar a couple years ago, (after being RV-less for 8 yrs), a Newmar rep recommended your site as a great place to get info. They hit the nail on the head! Thanks for everything you guys do. The mirror video is VERY informative!
TheRVgeeks
Tuesday 19th of October 2021
Thanks so much! It's always great to hear from a fellow Newmar owner.... doubly so with such a nice comment! Thanks for letting us know we've been helpful. Means a lot. ????
Suzanne Menzies-Bigford
Sunday 17th of October 2021
This is a great, most informative article. Thank you from a Newmar 38’ owner.
TheRVgeeks
Sunday 17th of October 2021
That's awesome to hear, Suzanne. Thanks! Hope it helps you with YOUR Newmar! ????
DPlant
Sunday 17th of October 2021
Nicely done! Thank you
TheRVgeeks
Sunday 17th of October 2021
Thanks so much... glad you liked it!