
Leveling a travel trailer is no minor mission. While we don’t have a travel trailer ourselves, we’ve got lots of friends who do, and we know that unless you learn how to level a travel trailer using the right tips and tricks, you could be in for some frustration.
Research suggests that knowing how to properly level a travel trailer can prevent ailments such as campground cursing, overindulgence in mind-altering substances, and even divorce. So, today we’re out to save the community of travel trailer owners who need the secret sauce for how to level a travel trailer as an antidote to any of the above.
Let’s go, friends — level with us! ????
- 1) What Do You Need to Level Your Travel Trailer?
- 2) How to Level Your Travel Trailer
- 3) Why is it Important to Level Your Travel Trailer?
- 4) Can You Level Your Trailer By Yourself?
- 5) Should You Replace Your Tongue Jack With an Electric Version?
- 6) Is it Hard to Level Your Travel Trailer?
- 7) Conclusion
What Do You Need to Level Your Travel Trailer?
As with just about everything related to RVing, having the proper gear/tools available will make leveling your travel trailer much easier, and will save you both time and frustration. We’ve got a few suggestions:
Leveling Blocks/ Jack Pads / Levelers
Earlier this year we covered the question about the need for leveling blocks quite thoroughly in our post entitled “Do You Need RV Leveling Blocks?” Pop over there and read that post if you’re interested, especially if you’re unsure about exactly what RV leveling blocks are. But the short answer in our opinion is “Yes, you need to carry RV leveling blocks!”
Those of you with fancy hydraulic jacks may be screaming, “We don’t need no stinking leveling blocks!” (bonus points if you can correctly identify that reference in the comments section ????). But, in some cases your built-in levelers might not be enough to get your RV level, either. We have them ourselves and can tell you first-hand that it’s easy to encounter sites that are sloped so much that your hydraulic jacks won’t have enough travel to get you level.
And more frequently, you might encounter soft ground. If it’s soft enough, your built-in jacks can sink in, which can make it impossible to get your rig level. Leveling blocks serve two purposes: 1) Added height for very off-level campsites, and 2) Increased surface area to prevent sinking into the ground.
Our favorite leveling blocks are called “Utility Blocks” and can solve both of the above problems. They come in a pack or four:

They’re available as single blocks as well:

These are the best leveling blocks we’ve owned, and we’ve used them for many years. If you’re interested in knowing why these are the best leveling blocks for us, we’ve got a video explaining all of that for you:
Tire Chocks
Tire chocks are important for lots of reasons, including the most obvious which is to keep your rig from rolling on a grade… even a slight one. Chocks are useful not only at a campsite, but when parking as well (ever driven up to a friend’s driveway and been greeted by a slope?). But they’re also important for such tasks as keeping your trailer in place when you’re hitching and unhitching.
We like the Camco Super Wheel Chocks. They’re inexpensive but durable, and they’re lightweight and easy to carry.

- Item Package Dimension: 9.99L x 8.49W x 5.19H inches
- Item Package Weight - 1.75 Pounds
Tongue Jack Stand
Here’s a simple rule of thumb to follow: If you’ve got a tongue jack, then you need SOME TYPE of tongue jack stand. It’s really that simple.
You can use something like a cinder block, or create a perfectly optimized wooden stand, but who wants to carry those? They’re heavy and/or take up extra space, two of the things RVers most want to avoid.
Tongue jack stands are used to distribute the weight of the tongue of your trailer, providing a stable platform that will also prevent slipping. They also keep the tongue from sinking into soft ground, or asphalt that’s been softened by the sun and heat.
We always try to recommend items we use ourselves. But even though we don’t have a travel trailer, we’ve seen the tongue jack stands that look like small traffic cones, and we’ve also read reviews about them failing.
For that reason, we’d be more inclined to recommend using some good quality leveling blocks like those we mentioned above as your tongue jack stand. In fact, the Utility Blocks we use have a custom-designed indent in them, just for the foot of a tongue jack.
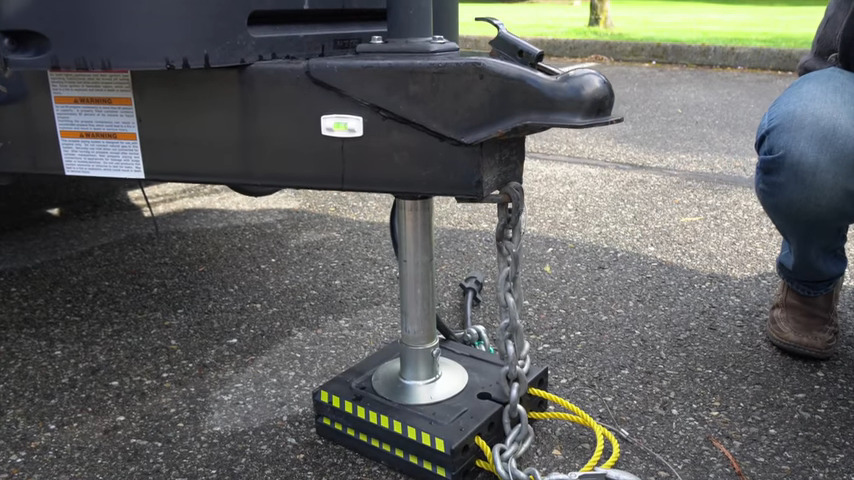
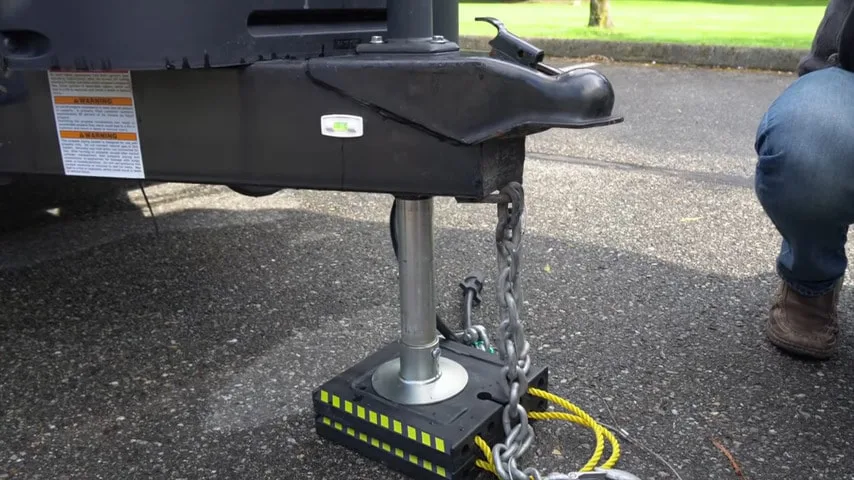
In our opinion, the best tongue jack stand is a quality leveling block or two (or as many as are needed) – like these.
Bubble Level
A bubble level is a simple but effective tool for helping to level any RV. When considering how to level a travel trailer, a couple of small, inexpensive bubble levels permanently attached in strategic places inside or outside the RV (and even on the trailer hitch) can be more helpful than you might imagine.
Bubble levels are easy to read, require very little space, don’t require any software updates, and are virtually weightless. A glance at a bubble level allows you to quickly see when and how you’re off level, allowing you to make adjustments as necessary.
Bubble levels work on any RV: from the smallest camper/trailer… to a Class B camper van… to a 45-foot motorhome… and everything in between.
Many RVers use bubble levels in tandem with other leveling systems, but nothing is easier to mount, or cheaper.
You can opt to use a couple of inexpensive bubble levels, like this inclinometer. Or you can opt for this inexpensive but effective product that offers two bubble levels in a T-shape for effective side-to-side and front-to-back leveling in one glance.
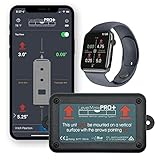
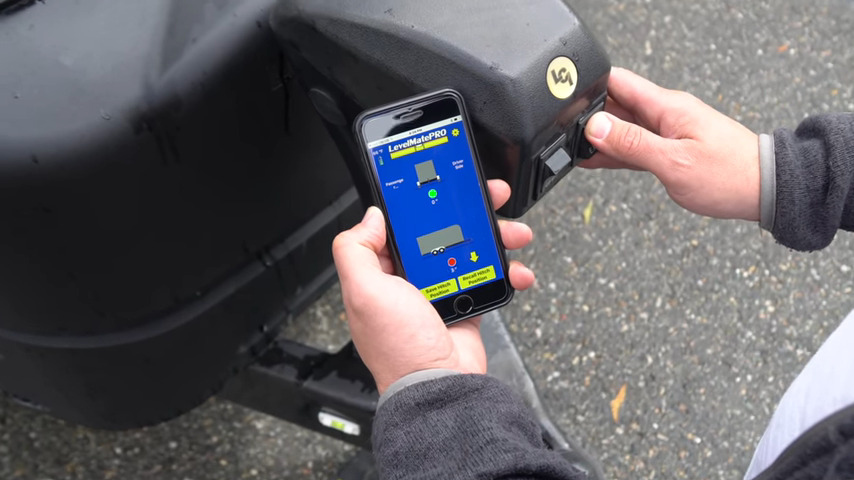
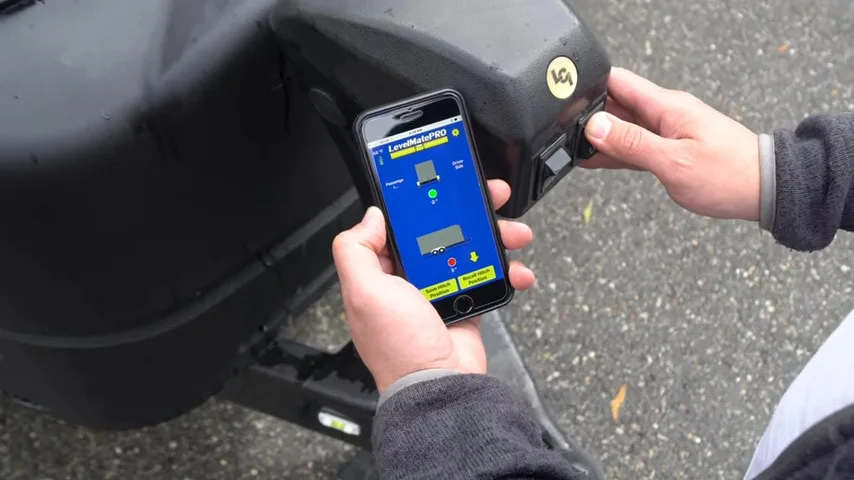
LevelMatePRO or LevelMatePRO+ (recommended upgrade)
The LevelMatePRO happens to be our favorite leveling tool and one of our all-time favorite pieces of gear – and we’ve been full-timing for nearly 2 decades, so that’s saying something!
We’ve used a LevelMatePRO for years and highly recommend it as a result of our experience. In our opinion, it’s the best technology available for leveling any RV. We started out with a LevelMatePRO and then upgraded to the newer “+” model, but we love them both. Until you’ve used one, you can’t really appreciate the awesome difference it makes every time you set up camp (or, with a towable, break camp… more on that in a minute).
The LevelMatePRO and LevelMatePRO+ each use a highly accurate 3-axis digital accelerometer to assist you in leveling your RV. In addition to wirelessly showing you which direction(s) your RV is off-level (it broadcasts via Bluetooth to a dedicated app on your smartphone or tablet), it also tells you exactly HOW MUCH you’re off-level. As in actual measurements (as in centimeters or fractions of an inch, your choice)!
By showing you how much height to add, and where to add it, you can get your travel trailer perfectly level on the first try, every time.
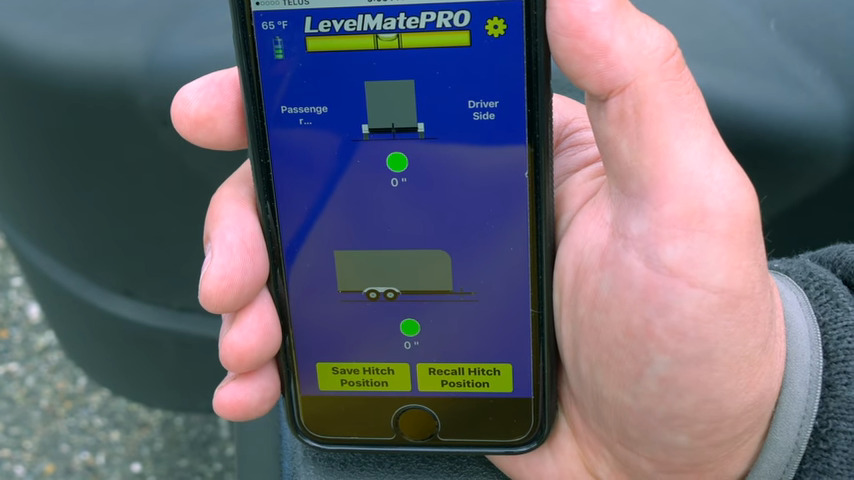
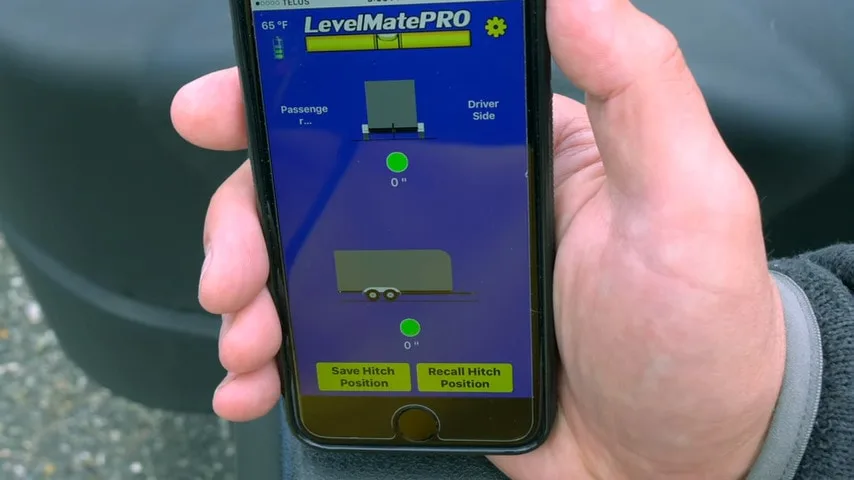
The technology behind the LevelMatePRO and LevelMatePRO+ is amazing. Via the Bluetooth app, not only can you level your RV using your smartphone as a guide, but the app can even remember your hitch position for easy raising of the jack to the perfect height every time you break camp.
And just how many leveling devices enhance your experience of breaking camp? Since both models of LevelMatePRO remember the exact height where you disconnected your hitch when you arrived in camp, they can recall that height when it’s time to leave. That allows you to precisely position the height of the tongue for the perfect alignment of hitch and trailer.
While the base model (the LevelMatePRO) is slightly less expensive, we recommend the LevelMatePRO+ for its significantly increased battery capacity, micro-USB port for using external power, and extended app support for the Apple Watch.
- FUSS-FREE LEVELING: LevelMatePRO+ is an essential RV accessory that saves you time for leveling. It provides real-time feedback on how much and which...
- SIMPLE SETUP: Simply mount this device in your vehicle with the included screws. LevelMatePRO app compatible with iOS and Android will guide you...
UPDATE: Now you can SAVE 5% on your purchase of a LevelMatePRO/LevelMatePRO+ when you buy from TechnoRV. Use the coupon code below and save:
TechnoRV.com is a supplier of leading RV technology products that are designed to enhance your RV lifestyle. That includes items like LevelMatePRO, Viair portable air compressors, connectivity...Show More
TechnoRV.com is a supplier of leading RV technology products that are designed to enhance your RV lifestyle. That includes items like LevelMatePRO, Viair portable air compressors, connectivity equipment, and more!
Use the Promo Code "RVGEEKS" to save 5% on your entire order at TechnoRV.
Show LessHave a look at this post (and/or the following video) on the LevelMatePRO and how we used it to level a travel trailer belonging to our friend Tyler from Tough Top Awnings:
How to Level Your Travel Trailer
Knowing how to level your travel trailer makes traveling more enjoyable and less stressful, and we’re all for that.
There are a few key steps to bear in mind when leveling a travel trailer, beginning with an attempt to find the flattest possible spot to park.
If possible, Find the Flattest Available Spot to Park
It probably goes without saying that you want to park your rig in the flattest spot possible. The more level the area, the easier it is to level your travel trailer. But perfectly level sites can be a rarity.
The optimal spot to park is level from front to back and side to side, with a lot of room all around to navigate parking a large rig, but as most of us know, things are rarely that simple.
But that’s why we’re here to help!
If you’re at a campsite with full hookups (or any hookups), once you’ve parked make sure your power cord, water hose, and sewer hose can reach the campground connections. Be sure to keep in mind that unless you already happen to be perfectly level side-to-side, you’ll be driving the RV a bit forward or backward to get your tires up onto the levelers on one side. Once you’re assured that you’ll be able to reach the hook-ups, you can begin the leveling process.
Level Your Trailer Side to Side
Before you unhitch, level your trailer from side to side. As previously noted, our favorite way to level our rig is to use the LevelMatePRO+. But if this technology isn’t available to you, you’ll want to begin by consulting your bubble level.
You can use a small bubble level (or more than one) mounted inside and/or outside of your travel trailer to see how far off level you are from side to side.

Leveling side to side is the first order of business when leveling a travel trailer.
If you don’t have a bubble level mounted inside your RV, you can use a carpenter’s level (the kind typically used for construction). Simply set it on the middle of the floor at the door of your travel trailer, and check to see how far off-center the liquid bubble level says you are.
If you don’t have a bubble level, you can download a bubble level app for your smartphone/tablet. Then, just launch the app and set the phone in the middle of the floor inside your trailer to see which side needs to be raised.
Once you’ve determined which side of your trailer is low (and by how much if you’re using a LevelMatePRO), you’ll need to raise that side. To do that, you’ll want to stack a series of leveling blocks in front of (or behind) the tire(s) that need to be lifted… and then back/pull the trailer onto the blocks. Continue checking your bubble level until it says you’re level. You may have to drive the trailer off the blocks and adjust if the first try wasn’t correct (that’s one of the great things about the LevelMatePRO — you’ll know beforehand exactly how high the tires need to be raised… without trial and error!
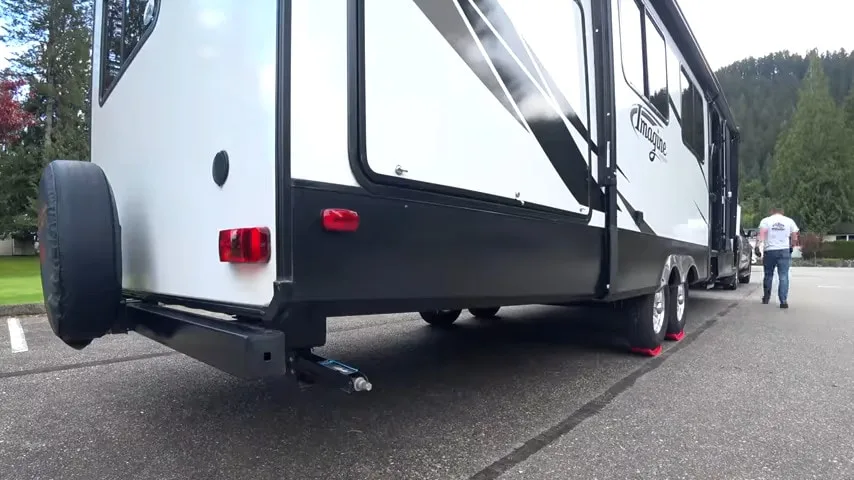
If you want to get really fancy, you can get a set of Anderson levelers, like Tyler used in the video above:
- LOOKING FOR THE BEST LEVELING BLOCKS FOR CAMPERS? LEVEL YOUR CAMPER, RV, MOTOOR TRAILER IN 5 MINUTES OR LESS WITH THE BEST LEVELER KIT ON THE MARKET!...
- EXPERIENCE THE ONLY ON-THE-FLY, PRECISE CAMPER LEVELING SYSTEM AT ANY INCREMENT BETWEEN 1/2" AND 4" (LIFTS UP TO 4") RIGHT FROM THE DRIVER’S SEAT....
These clever leveling devices are like ramps you can drive your trailer’s wheel(s) onto… and just roll as far as you need in order to get that side of the trailer raised and level (super easy while you watch the LevelMatePRO app screen from inside your tow vehicle!).
Chock the Tires of the Travel Trailer
Once level, chock the tires of your travel trailer before unhitching it from your tow vehicle. This is for the safety and preservation of your travel trailer and anyone inside of it, and it’s also for the safety of anyone who might be in the path of a rogue travel trailer should it let go and start rolling down a grade.
Remember – you might be on a seemingly small grade, but your travel trailer is heavy, and while it doesn’t take much for it to start moving, it takes a lot to stop it if it’s rolling.
Chock the tires so the travel trailer can’t move forward or backward.
Unhitch the Trailer from your Tow Vehicle
Place a jack pad/leveling pad or two under your tongue jack and lower the jack. Continue raising the front of the trailer until the tongue just clears the hitch ball by about a half-inch.
Once the trailer tongue has cleared the hitch ball by about half an inch, you can go ahead and disconnect the lights, safety chains, and stabilizers, and pull your tow vehicle away from the trailer.
LevelMatePRO Tip: Before doing anything else to level the trailer, click the on-screen button in the app to “Set” the hitch position. That will store the current height of the trailer tongue… so when you’re ready to break camp, you can “Recall” this position. The app will tell you how far to raise/lower the trailer tongue to put it right back to this height, so it’s easy to reconnect the trailer to your tow vehicle’s hitch ball!

Raising the jack until it clears the ball by about a half-inch is done by memory with the LevelMatePRO.
Level Your Trailer Front to Back
Using your bubble levels (or your LevelMatePRO) to monitor your progress, raise or lower the tongue until your trailer is level from front to back.
Deploy the travel trailer’s stabilizers (if equipped), and you’re ready to enjoy your RV.
Why is it Important to Level Your Travel Trailer?
There are a number of reasons why it’s important to level your travel trailer. The first and most obvious is comfort. No one enjoys standing or walking off-level, and sleeping off-level can be a real problem for many people, especially if the head of your bed is lower than the foot.
In addition, water pooling to one side in your shower can be annoying, especially when it can’t find the drain and you have to use your foot like a squeegee to get it all to go down!
Also, in order for a traditional propane/electric RV refrigerator to function properly, the RV needs to be reasonably level. Otherwise, the coolant (ammonia) is unable to circulate properly. Not only might your fridge stop cooling to safe levels during your camping trip if it’s several degrees off-level, but it could also sustain permanent damage, or even create a fire hazard.
There’s also a reason why many RV manufacturers tell us to level the rig before putting out the slides. Deploying your slides when the RV is at a steep angle can stress the slide mechanism and even break the shear pins on the slide-out gears. This is self-inflicted damage that can be expensive to repair, not to mention the stress of a stuck slide room.
Can You Level Your Trailer By Yourself?
You can, but it may require a fair amount of time and some back-and-forth (check your bubble levels, adjust the side of the RV that needs to be raised, check the bubble levels again, rinse and repeat).
We’ve seen our friend Tyler level his travel trailer alone – both before and after installing a LevelMatePRO in his rig. We wouldn’t want to have to do it alone without the LMP! The old way required his having to jump in and out of his rig over and over and over again to check the level. It took a lot of time and created a lot of frustration — and he’s a very patient guy.
What we can tell you is that using a LevelMatePRO, you can absolutely level your travel trailer by yourself – easily.
Again, we refer you to our video (embedded above) showing how much easier it is to level a travel trailer alone using the LevelMatePRO or LevelMatePRO+.
Should You Replace Your Tongue Jack With an Electric Version?
Again, we don’t have a travel trailer, but we do know that an electric tongue jack does the lifting and stabilizing with the push of a button instead of with your manual labor – and that’s generally easier for everyone.
An electric tongue jack raises and lowers the jack with the press of a button.
An electric tongue jack offers a stable base for your travel trailer and reduces the physical stress on you when setting up or breaking camp. With the simple push of a button, you can raise or lower your trailer tongue for leveling and hitching/unhitching.
Finally, an electric tongue jack saves time, and that means you can get your trailer set up in its new campsite faster… so you can begin enjoying yourself. We’d say it’s not essential, but still a worthwhile upgrade to consider.
Is it Hard to Level Your Travel Trailer?
Now that you know how to level a travel trailer, you can see that it isn’t difficult, though it can be a slow process (especially if you’re doing it alone). Having a companion to assist you in making adjustments and confirming whether or not you’re level is certainly helpful.
With that said, we have to say again that the LevelMatePRO is one of our favorite pieces of gear for good reason. We don’t mean to sound like a broken record here, but the LMP really is our very favorite piece of RV gear. It makes leveling a cinch for all types of RVs, including travel trailers. Level until the indicators all turn green, and you’re all set… it doesn’t get any easier than that.
And with the LevelMatePRO’s ability to store & recall your hitch height, it makes it super easy to return your trailer tongue to the exact height it needs to be for hitching back up, saving time when you’re breaking camp, too.
Conclusion
Knowing how to level a travel trailer requires some study (which you’ve just done) and some practice. But once you’ve got a system down that works well for you, you’ll be at your level best in no time. Have a motorhome (without hydraulic leveling jacks)? No problem… we’ve got you covered there, too: “Leveling a Motorhome On Blocks: A Complete Step-by-Step Guide.”
Geek Out with Us Every Week
Join our newsletter to learn about all things RV-related. Every week we offer free tips, tricks, product reviews, and more to our online community of RVers. So, whether this is your first time on the road or you’re a seasoned expert, we’d love for you to geek out with us!
Melissa
Monday 12th of June 2023
Where is the best place to put bubble levels on a travel trailer and how many do you need?
Jacques Lemieux
Wednesday 22nd of September 2021
Treasure of the Sierra Madre...Humphrey Bogart. 1948..John Ford
Greg
Saturday 18th of September 2021
As always, another great bit of info. Not just for newbies, but a good reminder for everyone. After having a motorhome for years, we "downsized" to a trailer three years ago and I had to remind myself how all of this was done. In the old days we didn’t have things like Anderson levelers and what a difference that made.
The first thing I did when I went back to a trailer as level it perfectly using large carpenters levels on the floor in more than one location. Once it was "perfect", I attached small levels on the front and rear opposite corners outside. This lets me see easily what I need to do and not run back and forth to check inside.
Next upgrade will be the Level Mate. See…you guys are still costing me money even after selling my coach ????
TheRVgeeks
Saturday 18th of September 2021
Thanks, Greg! And good suggestion about doing the leveling twice before installing your bubble levels... good way to ensure that you're happy with that target leveling. And sorry about emptying your wallet! ????
Bill Splaine
Saturday 18th of September 2021
Re the Level Mate..How do you install it? Does the rig have to be perfectly level when installing the brains in a closet.. or, are the brains smart enough to know what level is and save. I can see it a possible challenge to have the brain box knowing exactly where you are unless the trailer starts out "perfectly" level before installing the brain module.
TheRVgeeks
Saturday 18th of September 2021
Hey Bill. We have a video/post about that from when we installed it in our motorhome:Easily Leveling Your RV With The Best Technology: LevelMatePRO. Once you mount the Levelmate where you want it, you do need to get the RV level using some other technique (i.e. bubble level, carpenter's level, etc). Once done, you use the app to set that as being your target for a level RV and the LevelMatePRO will get you back to that same level every time. The instructions that come with the unit are fairly thorough and make it easy to get done.