
If you think RV slide topper replacement is beyond your DIY skill set, don’t be so sure! Our favorite type of RV DIY project is one that’s both manageable and saves a lot of money. Slide topper replacement fits that description perfectly by being much easier to accomplish than many RV owners might expect while costing as little as 1/2 to 1/3 the price of having it done at an RV shop (labor is expensive).
So, if you think replacing your slide toppers is out of your league as a DIYer, stay with us as we show you how to measure your existing slide topper for new fabric, how to order it, and how to install it. You might change your mind about doing it yourself.
- 1) What Is a Slide Topper?
- 2) Important Notes Regarding Slide Topper Fabric
- 3) How to Measure For Slide Topper Fabric
- 4) How to Order RV Slide Topper Replacement Fabric
-
5)
How to Install Dometic/A&E RV Slide Topper Replacement Fabric
- 5.1) Partially Extend the Slide-Out Room
- 5.2) Remove the Lock Nuts or Screws
- 5.3) Remove Anti-Billowing Device
- 5.4) Unroll the All of the Fabric from the Roller
- 5.5) Remove the Fabric
- 5.6) Prop Up the Metal Wrap (If Needed)
- 5.7) Inspect, Clean, and Lubricate the Top of the Slide-Out
- 5.8) File or Cover Sharp Corners
- 5.9) Feed the New Fabric Into the Track and Roller Tube
- 5.10) Cut Off Any Excess Beading
- 5.11) Center the Fabric
- 5.12) Roll the Fabric Up Onto the Roller
- 5.13) Run Your Slide-Out In and Out
- 5.14) Reinstall the Anti-Billowing Device
- 5.15) Re-install the Lock Screws
- 6) Carefree of Colorado Slide Topper Fabric Replacement
- 7) Solera Slide Topper Fabric Replacement
- 8) Tools Needed for Replacing Slide Toppers
- 9) Free RVing Tips, Tricks, Reviews & Giveaways
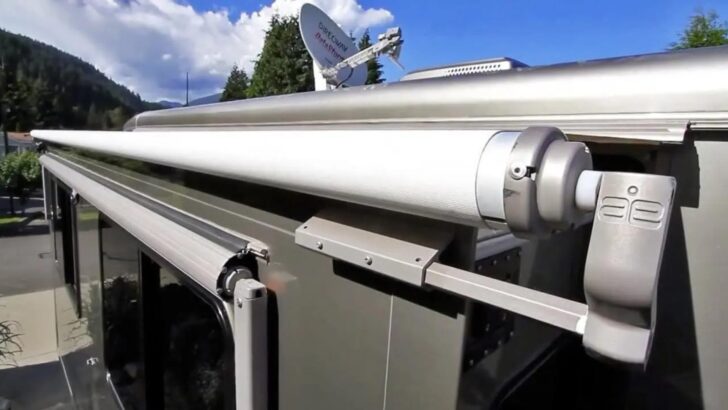
What Is a Slide Topper?
A slide topper is basically an awning for an RV slide-out room. In fact, slide toppers are sometimes referred to as RV slide-out awnings, slide-out covers, or slide-out toppers. When the RV’s slide-out is extended, the slide topper rolls out automatically and sits above the top of the slide room.
Slide toppers generally run the length and width of the slide-out roof. So they can be relatively short and narrow, or larger, like the large living room awning on our Newmar Mountain Aire.
Important Notes Regarding Slide Topper Fabric
Before we get into how to measure, order, and install your new slide topper fabric, we want to mention a few important notes.
First, we use and highly recommend Tough Top Awnings fabric, which we’ve installed on every one of our slide toppers, as well as patio, door, and window awnings. The measuring instructions we’re detailing in this post are the measurements Tough Top needs to ensure that your custom-cut slide topper (or awning) fabric will fit perfectly.
The first time we ordered from Tough Top Awnings, we noticed immediately that the material was of much higher quality than our original awning. It was double-stitched, noticeably thicker, and clearly more capable of withstanding the elements. No more flapping in the breeze, and no more mold or rotting stitching.
Buying from Tough Top was also less expensive than buying OEM (original equipment) replacement material. Think about the reason OEM gear is so often lower quality — their main goal is to keep costs down, not quality up. Tough Top even offers a 5 year warranty. The cherry on top is that their customer service is absolutely top-notch. We have so much respect for Tyler and his team that we’ve become good friends and visit their shop in western Washington whenever we get the chance.
Second, taking measurements for your new slide topper fabric does not involve measuring your old fabric. That material has likely shrunk in the sun over time, almost guaranteeing it will give you the wrong measurement.
Third, if you order your fabric from another company (though we’re not entirely sure why you would!), be sure to check to see if they have specific instructions for how to measure so they’ll send you the properly sized fabric.
Note that many places sell pre-cut widths/lengths of fabric in order to simplify their manufacturing costs. We don’t recommend this at all, because it will mean that you’re likely to end up with one or more of the following issues:
- Fabric that’s too narrow, meaning it won’t provide enough coverage to keep rain & debris off the top of your slide
- Fabric that’s too wide, which means you’ll have to cut/trim it in order to have it fit, which often results in fraying
- Material that’s too deep, which leaves excess fabric rolled up onto your slide topper’s roller, adding weight for no reason.
Finally, there are lots of super-cheap fabrics out there (including the OEM stuff from Dometic, Carefree of Colorado, and Lippert) that are not worth spending your money on because the quality just isn’t as good.
These companies are under pressure from RV manufacturers to cut costs to keep RV sale prices down, so their original fabric isn’t the best available. This also holds true for the replacement fabric they sell. This is why we use only Tough Top Awnings material for all of our awnings and slide toppers.
PRO TIP QUIZ: When is two less than one? When you’re making awning fabric! Two layers of material stitched together may seem better or more robust than a single layer. But it’s double-layer materials that have the most problems since moisture gets trapped between them, causing mold, mildew, and rot. That’s why Tough Top Awnings uses only their proprietary single-layer, heavy-duty material. Double-layer fabrics are usually a poor choice for slide toppers and patio awnings.
If you decide to go for top quality to replace your RV awnings, save yourself some cash and use our RVgeeks coupon:
The original equipment fabric that comes on RV awnings and slidetoppers is... well, how do we say this?... CRAP!. It's no surprise, since the RV manufacturers are looking to cut their costs...Show More
The original equipment fabric that comes on RV awnings and slidetoppers is... well, how do we say this?... CRAP!. It's no surprise, since the RV manufacturers are looking to cut their costs. Instead of replacing it with the same stuff that failed in the first place, get high-quality replacement fabric from Tough Top Awnings, instead.
Check out our Tough Top Awnings videos here
Plus you can save 5% on your entire order from Tough Top Awnings. The coupon code is valid online or over the phone!
Show LessHow to Measure For Slide Topper Fabric
There are a few details you’ll need to provide when ordering replacement RV slide-out topper awning fabric. First, you’ll need to take a couple of quick measurements, and then provide some other simple details.
Note that for the purpose of measuring for RV slide-out cover replacement fabric, the following applies:
- Width = width of the roller tube, measured from end cap to end cap
- Depth = depth of the extended slideout, from the RV’s sidewall out to the outer edge of the slideout wall.
To send you the correct size RV slide-out cover fabric, Tough Top will need two measurements:
Width Between the Two End Caps
Your slide topper has two end caps. Your first measurement should be from the inside edge of one end cap to the inside edge of the other end cap. In the photo below, you can see that our measurement is about 92 5/8″ (measuring to the nearest 1/8th of an inch is plenty accurate enough).

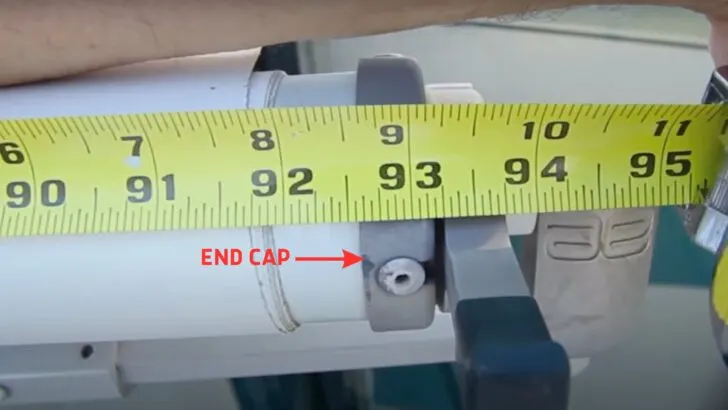
The first measurement you’ll take is the distance from end cap to end cap. Here, you can see that our measurement is about 92 5/8″.
Depth of the Slide-Out
Next, you’ll want to measure the depth of each slide-out from the wall of the RV to the outside of the extended slide room. You can see that the measurement on the slide room below is 16 3/8″.
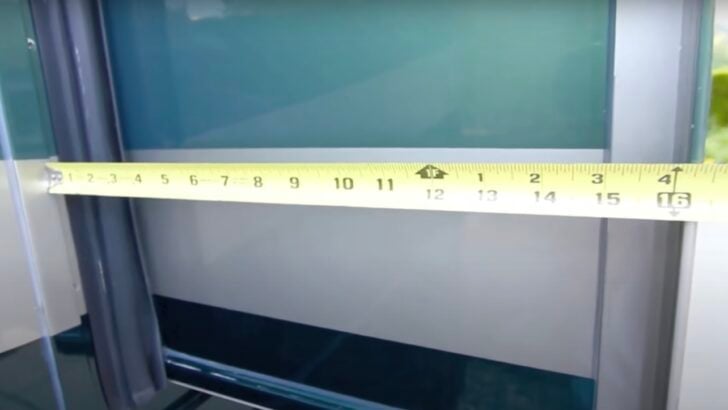
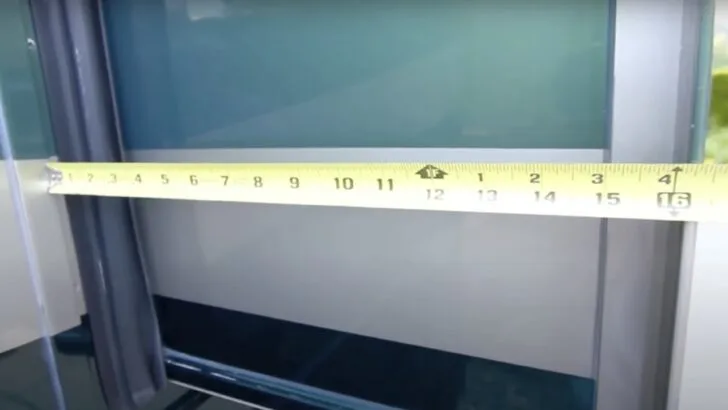
The second measurement you’ll want to take is the depth of the slide-out. Here, you can see our measurement is 16 3/8″.
Type of Awning Attachment
Another piece of information you’ll need to provide when ordering your replacement RV slide topper fabric is the manner in which your topper is attached to your RV.
You’ll need to note whether you have a metal wrap that protects the fabric by wrapping around it like the one seen in the following photo, or whether your topper fabric is attached directly to the side of the RV.
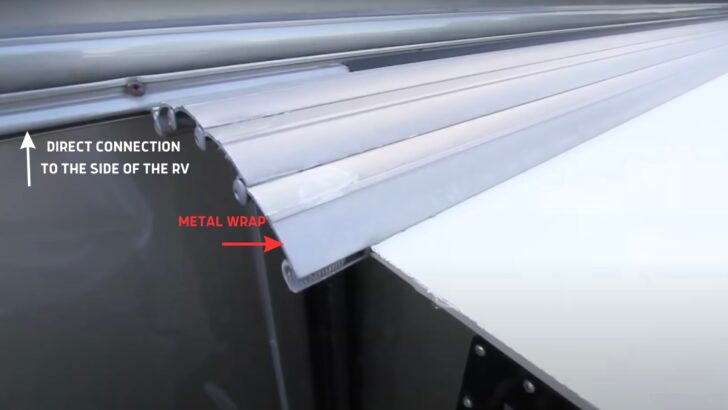
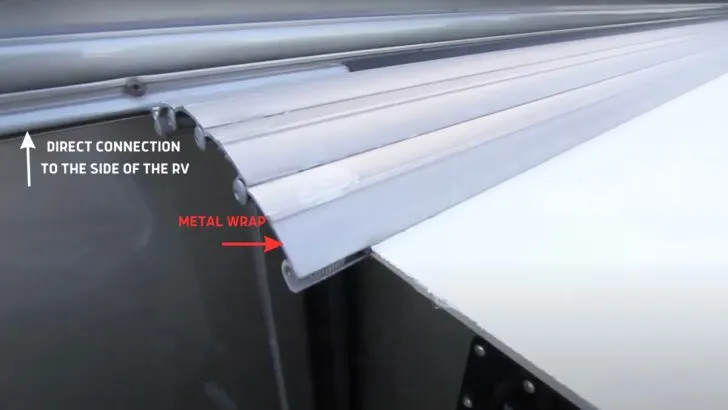
When ordering your new slide topper fabric, you’ll need to specify whether you have a metal wrap like the one shown here, or whether your slide topper attaches directly to the side of your rig.
Fabric Color
You’ll also need to provide the color of your awning or slide topper fabric. There are lots of choices, all shown on the Tough Top Awnings website. Keep in mind that lighter color material is better at reducing heat, both inside the rig and under the main patio awning.
How to Order RV Slide Topper Replacement Fabric
To order your new fabric, go to the Tough Top Awnings website. Navigate to the “Quick Quote” page. This is where you’ll enter your information to get your quote and place your order, and you’ll need to provide the following details:
- Whether your slide topper is a Carefree or Dometic/A&E, or whether it’s from some other manufacturer
- Whether or not you have a flexible metal cover/guard (a wrap, as shown in the previous photo)
- The length of your slide topper. Here, you’ll use the measurement you took from end cap to end cap and subtract 1.5″. This will leave 3/4″ at each end between the edge of the fabric and the caps.
- Slide-out depth, as shown above
- Color choice
- Name, address, shipping details, and phone number
You’ll hear back from Tough Top Awnings with a custom quote for exactly what you need. Your quote will include easy directions for how to buy online with a credit card. (Remember to use the discount code RVGEEKS to save 5%).
How to Install Dometic/A&E RV Slide Topper Replacement Fabric
Take the following steps for Dometic slide topper fabric replacement or A&E slide topper fabric replacement (Carefree instructions below).
Note that this job is best done with two ladders and two people.
To install your RV slide-out topper awning replacement fabric, follow these steps for easy installation:
Partially Extend the Slide-Out Room
While extending the slide all the way for this process is an option, we’ve found that extending it only about a foot or so makes the whole process easier.
Remove the Lock Nuts or Screws
If your topper has a metal wrap, use an Allen wrench to remove the lock nut at the very end of the fabric. If there’s no wrap, with the awning attached directly to the side of the RV, it will most likely be a Phillips head screw securing each end rather than an Allen nut. That screw will usually be installed from above, right through the metal track that holds the fabric.
Remove Anti-Billowing Device
Remove the anti-billowing device. That’s the little “arm” that’s designed to prevent the slide topper from unfurling and billowing in the wind as you drive down the highway. Use a Phillip’s head screwdriver to remove the one or two screws that hold it in place at one end of the roller tube.
Unroll the All of the Fabric from the Roller
Climb the ladder with an awl, a long nail, or a very small screwdriver in hand. You’ll need one of those to pin the roller and hold the spring in place.
Keeping a solid grip on the roller tube, unroll all of the fabric. The tube is spring-loaded with a fairly strong spring, so be sure to have a stable stance on the ladder before you get started. This is a good time to have two people working together, one on each ladder. That said, the spring isn’t so strong that a firm grip shouldn’t be enough to hold it.
When you get the fabric unwound all the way, rotate the track that the fabric is slid into as close as possible to straight up, as shown in the photo below. Facing the RV, look through the small hole in the end cap. If you roll the tube slightly up and down, you should be able to see daylight when the opening is parallel to the ground. That’s when the opening in the cap will align with a very small hole in the shaft that holds the roller tube.
This is where you’ll want to insert your awl, large nail, or small screwdriver to pin the roller tube, which locks in place to prevent it from rolling back up. It’s only necessary to pin the tube on one end. The fabric should now be piled up on top of the slide.
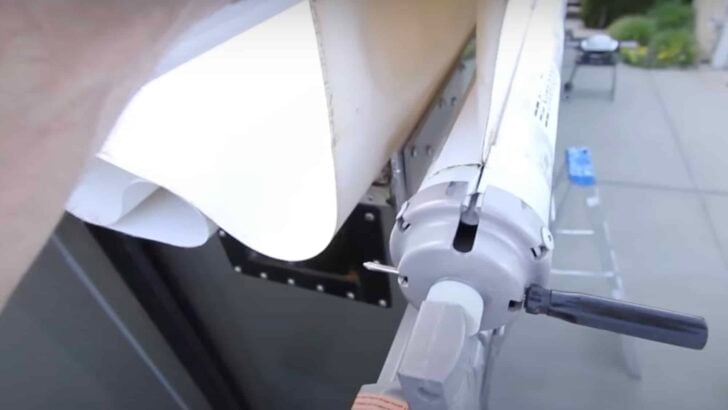
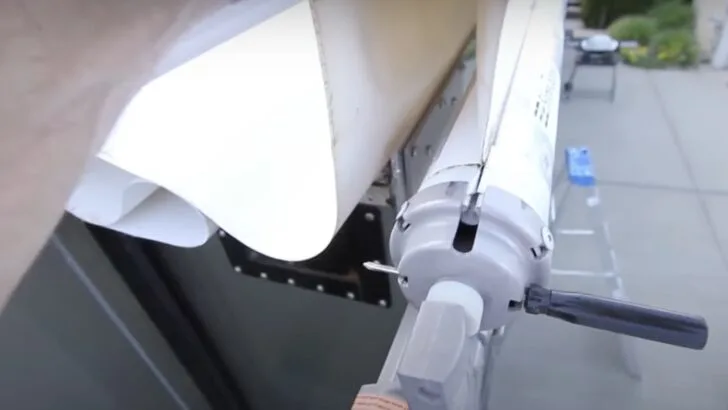
Here, you can see the fabric completely unraveled from the roller with a small screwdriver positioned in the end cap to hold the roller in position. An awl or a large nail will also do the trick.
Remove the Fabric
From your ladder at one end of the slide, grasp the fabric securely and start pulling it out from both tracks at the same time. After the initial tug, which may require a pretty solid pull to break it loose, the fabric should easily slide the rest of the way out. Then you can do the same satisfying thing we do — throw that crappy old worn-out fabric onto the ground from up on the ladder!
Prop Up the Metal Wrap (If Needed)
If your slide topper has a metal wrap, prop it up using a small section of 2×4 or something similar that’s handy. Any small rectangular item should work, like the drill bit case we used in our video, below.
Of course, if your slide topper is connected directly to the wall of the RV, there’s no metal wrap to worry about.
Inspect, Clean, and Lubricate the Top of the Slide-Out
Take a few minutes to inspect and clean the top of your slide-out room and maintain the seal, which can be difficult to access with the slide topper in place. The goal of treating the seals is to prevent them from sticking to the RV’s finish, which would pull the seals apart over time. We always followed Newmar’s recommendation to use baby power… that is, until cancer concerns eliminated talc from baby powder. We now use and recommend tire talc:

- Single 16 ounce shaker can of REMA TIP TOP's No. 63 Tire Talc for inner tube installation
- REMA TIP TOP's No. 63 Tire Talc is specially formulated for trouble free inner tube installation.
File or Cover Sharp Corners
If you notice any sharp edges on the tracks that the fabric will slide into, use a file to take the edge off them. You can cover sharp corners with masking tape to prevent them from cutting into your new slide-topper fabric as you install it.
Feed the New Fabric Into the Track and Roller Tube
Prepare the tracks by spraying the length of them with silicone lubricant. This will help ease them into place without having to pull too hard.

- Roadmaster dry silicone spray
- Great for tow bars as well as awning arms, window tracks, folding steps, or hundreds of other applications.
Note: The “bead cord” or “beading” is the semi-rigid black cord that’s sewn into two edges of the fabric. That cord is what holds the material into the roller on one side, and the metal wrap (or awning track) on the RV side.
With one person on the ground feeding the fabric up to the person on the ladder, begin sliding the bead cords into the tracks. Feed one side into the track on the roller tube and the opposite side into the track on the metal wrap… or the side of the RV if you don’t have a metal wrap.
Slowly pull one side and then the other a little at a time, feeding the fabric gently across as you go. Be careful not to catch the fabric on anything sharp along the way.
Once the material is far enough into the tracks that you can no longer push/pull it any further, have your helper switch positions. Instead of feeding the fabric up from the ground, they should get up on the roof (or other ladder) near the leading edge of the new material. As they carefully continue pulling/shimmying the fabric into the track and roller tube, you’ll stay at the leading edge of the slide, guiding the cords and material into place in the awning rail (or wrap) and roller tube.
Cut Off Any Excess Beading
Once you’ve fed the entire length of new topper fabric through the tracks to the other end, cut off any excess beading that may be sticking out from the track at the end. Leave a short piece (about 3/4″ should be good) sticking out at each end. That will help prevent the material from pulling loose from the end of the cord and coming out of the track.
Center the Fabric
Measure the distance from the fabric to the endcap on either side to get the fabric centered. Shimmy the fabric into place as necessary. Once the two ends of the fabric are evenly centered between the end caps, it should be very close to perfectly in place.
Roll the Fabric Up Onto the Roller
With both people up on ladders, firmly grasp the roller tube and rotate it upward just enough to remove the pressure from the awl, nail, or screwdriver you used to pin the tube. With that pressure off (and a good grip on the tube), remove the locking pin. Carefully maintaining control of the roller, allow the spring to roll the fabric up onto the tube, keeping it as straight as possible. Slowly let the spring tension all the way off.
Run Your Slide-Out In and Out
If you have a metal wrap, and it’s being held up by a small object, remove that now. Then, run your slide in and out a couple of times to make sure the slide topper sits nice and flat. If it doesn’t sit flat and/or roll up smoothly, adjust the position of the fabric as needed. Once it lays flat, the fabric is square to the RV, and positioned properly.
Reinstall the Anti-Billowing Device
With the slide fully retracted (in), reinstall the anti-billowing device. On the curbside, position the arm at 11 o’clock. On the street side, position at 1 o’clock. Don’t worry if the holes don’t line up with the old ones. These should be self-drilling screws, which will make new holes as needed.
Re-install the Lock Screws
Re-install the Allen or Phillips locking screws back into place at each end of the slide. Enjoy your nice new slide-out awning fabric!
If you’d like to follow along with us as we do the job, here’s our video showing us replacing one of our old slide toppers with new fabric from Tough Top Awnings.
Carefree of Colorado Slide Topper Fabric Replacement
When considering your Carefree slide topper fabric replacement, remember that there are a few different Carefree models, and you’ll need to follow the steps for your particular Carefree of Colorado slide topper.
Following are three separate videos we’ve made showing three Carefree slide topper replacement fabric jobs we’ve done — The SOK II, the SOK III, and the Omega, which doubles as a window awning.
Carefree of Colorado SOK II Slide Topper Replacement
Carefree of Colorado SOK III Slide Topper Replacement
Carefree of Colorado Omega Slide Topper / Window Awning Replacement
Are you looking to replace the fabric on your Carefree of Colorado patio awning, instead? We’ve got you covered… read this article: Carefree Awning Fabric Replacement: Manual/Powered + Soft Connect
Solera Slide Topper Fabric Replacement
We’ve never replaced a Solera slide topper ourselves, but here’s a video showing how it’s done:
Tools Needed for Replacing Slide Toppers
Following is a list of tools and supplies that may be needed to replace your slide toppers. Depending on which brand and style toppers you have on your RV, you likely won’t need all of these tools to complete the job. So before buying, be sure to watch the video about your particular slide-out awning replacement to see what tools are needed.
- Locking Oil Filter Wrench
- 7’ Collapsible Ladder
- Dewalt 20V Max Cordless Drill
- 25’ Tape Measure
- Silicone Spray
- Utility Knife
- Manual Rivet Tool
- 5/32 Inch X 1/2 Inch Rivets
- Cable Ties (11 inch)
- Diagonal Cutting Pliers (8-Inch)
- Flat File (10-inch)
- Torx Insert Bit Set
Free RVing Tips, Tricks, Reviews & Giveaways
As 20-year full-timers, we share everything we’ve learned about RVing over the years. Join our online community to receive a wealth of great RVing knowledge delivered daily to your inbox.
Whether you’re a new RVer or a seasoned full-timer, you’ll love the wide range of RVing topics we cover. Don’t miss a single article or any of our famous Giveaways. Subscribe to our newsletter today!
Deborah Allen
Sunday 4th of February 2024
What company do you recommend to buy the slideout awnings from? My 36’ 2004 Skyline Layton doesn’t have any over the bedroom or salon bump outs and I sure wish it did!
TheRVgeeks
Sunday 4th of February 2024
If you're going to install them yourself, you can get them from just about anywhere online (we'd recommend looking at the installation manual for any make/model you plan to buy, first... so you can follow their measuring instructions so you get slidetoppers that are the right size). If you want someone to install them for you, we'd suggest finding a local RV dealer. They should be able to measure, order, AND install them for you.
Sue P
Sunday 4th of February 2024
Hi guys. We redid our 4 slide toppers about 5 years ago with tough top. 2 of them are tearing and splitting already. We're going to need to redo them again soon. These don't seem as thick as the original ones were either. We are in all kinds of weather, mostly parked for the summer. Not sure if we just had a bad run but we're debating what ones to get next.
TheRVgeeks
Sunday 4th of February 2024
Hi Sue. We're sorry to hear that you had a problem, but we're also surprised since we've never heard of anyone having trouble with Tough Top fabric (including ourselves over many years). We'd suggest you reach out to Tyler at TTA to chat with him about it, as he's very responsive and will surely want to hear about what happened.
CHAS SADLER
Saturday 3rd of February 2024
I took my slide toppers off 2 years ago and am glad I did. I, my dealer and several other servicers, NEVER could get them to stay tight enough to not flap and puddle, and, I eliminated about 200 pounds of weight. We live in a 2016 40 foot class A. And, I think our coach looks better without them.
TheRVgeeks
Saturday 3rd of February 2024
We hear you, Chas! And the biggest problems stem from the cheap fabric the awning manufacturers use (the heavier-duty fabric from Tough Top Awnings is MUCH less susceptible to annoying flapping... and you save 5% with code "RVGEEKS")... and the fact that the RV manufacturers install them so that the fabric is almost parallel to the ground, so OF COURSE the water pools on them! Would only take mounting the RV-side of the awning fabric about 3-4 inches higher so that there was slope to them so the water would run off! DOH!
TucsonTom
Saturday 3rd of February 2024
My slide toppers are made by Lippert (LCI). Do you have any advice for these?
TheRVgeeks
Saturday 3rd of February 2024
Hi Tom. We haven't done a fabric replacement on a Lippert slide topper before, but from looking at them, they look the most like the Dometic/A&E slide toppers. But, if you're ordering your replacement fabric from Tough Top Awnings (which you should... it's way superior to the Lippert fabric), ask them for some guidance. They're the experts. And you can save 5% on your order with the code "RVGEEKS"!