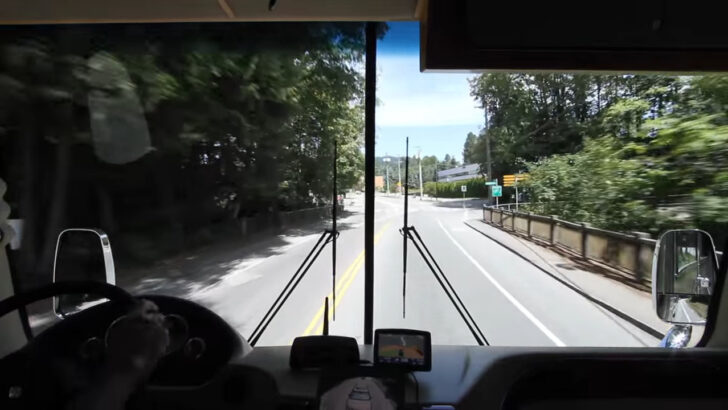

When you started RVing, did you already know how to drive an RV? Many people hit the road for the first time without experience driving anything larger than a passenger car. If this describes you, you’re not alone! We’re lucky in that we brought a professional driver along when we hit the road. But if you’re not able to do that, we’ll be sharing our tips on how to drive an RV.
- 1) We Brought Along a Professional to Drive Our RV
- 2) Is it Hard to Drive an RV?
- 3) Off-Tracking and Rear Overhang
- 4) How to Drive an RV with Off-Tracking in Mind
- 5) How to Prevent an Off-Tracking Accident When Driving an RV
- 6) Why Pivot Point and Rear Overhang Matter When Learning How to Drive an RV
- 7) The Most Common RV Accident Involving Rear Overhang
- 8) How to Prevent a Rear Overhang Accident When Driving an RV
- 9) Conclusion
We Brought Along a Professional to Drive Our RV
We had a distinct advantage when we hit the road in our first motorhome nearly 20 years ago. We had a professional driver on board at all times. Our driver not only knew how to drive an RV, but he was also a professional motorcoach operator who, before driving our rig, drove tour buses in a major metropolitan area. He was also the Safety & Training Manager for one of the largest bus companies in North America.
Our driver spent years driving buses himself and training both professional drivers and instructors. He also won a shelf full of trophies competing in driving competitions like the American Public Transit Association International Bus Roadeo, which is like the Olympics of bus driving. Taking to anything with a motor like a duck to water, he also had additional experience operating tractor-trailers, straight trucks, motorcycles, and even, as a licensed pilot, airplanes.
By now, you may be thinking that when the RVgeeks hire a driver, they don’t mess around! And you’d be right, except that we didn’t hire him. Instead, he came as part of a package deal. Half of the RVgeeks is Peter Knize, a professional driver, big rig driving instructor, and training expert. Peter drove and taught motorcoach operators for over a decade (in New York City, no less!), covering bus operating basics, all the way up through advanced defensive driving and risk management. He helped literally hundreds of new trainees to become safe professional drivers.

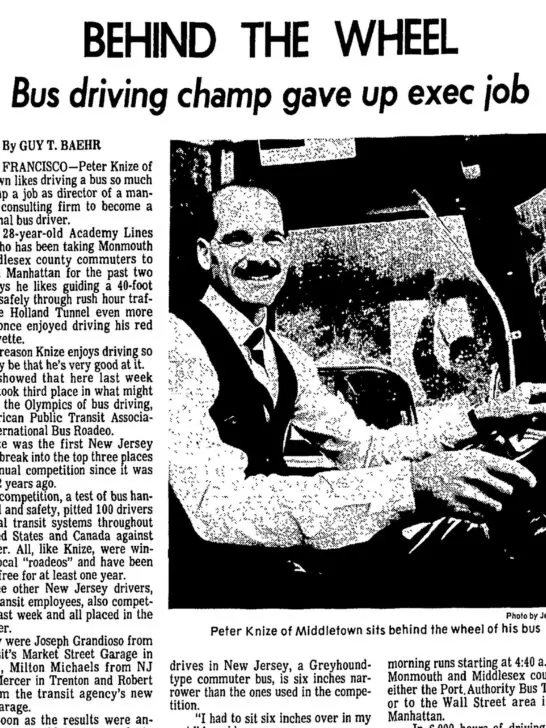
Peter Knize, behind the wheel of his MCI after competing in the American Public Transit Association International Bus Roadeo. CLICK TO READ THE ENTIRE ARTICLE AS A PDF.
So, while we’re always quick to note that we’re not trained experts in RV maintenance and repair, there is one area of RVing where we do have significant expertise to offer to our readers and viewers of our videos, and that’s in the realm of how to drive an RV.
Because Peter is often asked to lend his expertise to newer RV drivers, we thought a detailed blog post and a re-visit to one of our most popular YouTube videos might be helpful to anyone who finds themselves a bit intimidated by the thought of driving a large RV.
Today we’re happy to bring you How to Drive an RV: Off-Tracking and Rear Overhang. So, let’s get to it!
Is it Hard to Drive an RV?
Once you get the basics down and some time behind the wheel, driving a Class A motorhome isn’t really much more difficult than driving a car. It’s just different, with some additional things to learn. Do you remember being apprehensive the first time you got behind the wheel of a car? Now it’s all rote, and you don’t even think about it, right?
Once you learn to drive an RV, it will be the same. And unless the weight of your RV exceeds 26,000 pounds, you can legally operate a Class A RV in most places without a special license (with a few caveats in some circumstances… be sure you know the laws in your home state/province).
With that said, there are a few critical differences between driving a car and driving an RV, but once you’ve got those mastered, operating your RV will be second nature.
Let’s start with a couple of topics that are specifically related to driving large vehicles.
Off-Tracking and Rear Overhang
Off-tracking and rear overhang are terms familiar to those who drive big rigs. To discuss these topics, let’s first look at a few of the terms we’ll be using as we explore these important aspects of how to drive an RV.
Wheel Cut
Wheel cut refers to the number of degrees – or how sharply – your wheels can turn to one side or the other. Although a sharper wheel cut does equate to a tighter turning circle and increased maneuverability, we don’t need to worry about an exact number of degrees when discussing wheel cut. That’s because knowing that number won’t help you learn to drive your RV. But the effects of a sharp wheel cut are important – more on that in just a moment.
Wheelbase
Wheelbase is the distance between the front axle (also known as the steer axle) and the drive axle. Our RV has a tag axle, and yours may, too, depending on the length of your RV. The tag axle is the additional axle behind the drive axle, designed to help carry the weight of a larger vehicle. Whether or not your RV has a tag axle, the wheelbase is always the distance between the steer axle (front axle) and the drive axle.

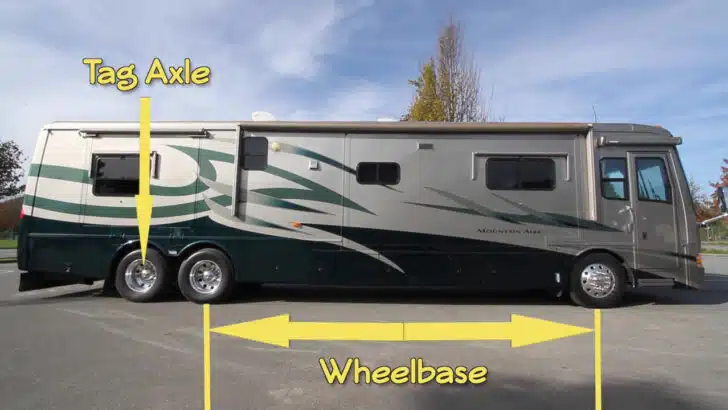
This photo shows our Newmar Mountain Aire with its wheelbase (front/steer axle to drive axle) and tag axle.
Rear Overhang
When it comes to driving the RV, the rear overhang is the part of the RV that sticks out behind the drive axle. So whether or not you have a tag axle, anything that sits behind the drive axle is considered the rear overhang for driving purposes.
For parking in a back-in campsite, the rear overhang technically refers to the distance between the rear edge of the rearmost tire (the tread on the tag axle tire in our case) to the rear bumper… or the part of the RV that sticks out over the back of a campsite.
But that’s a different topic than actually driving the RV, so when we refer to rear overhang here, we’re talking about the distance from the center of the drive axle to the rear of the RV. We’ll explain this a bit further in the next section on the pivot point.
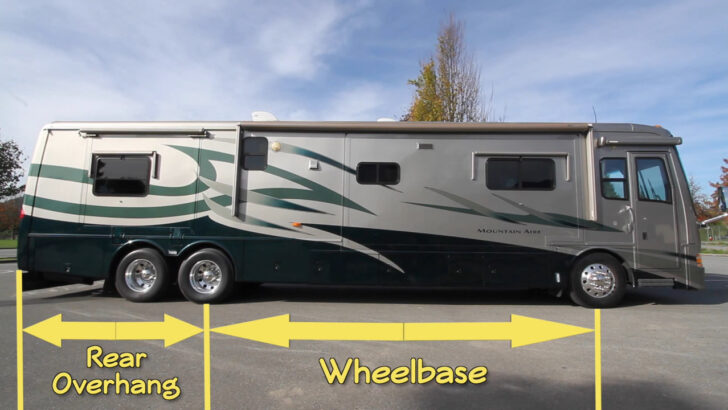
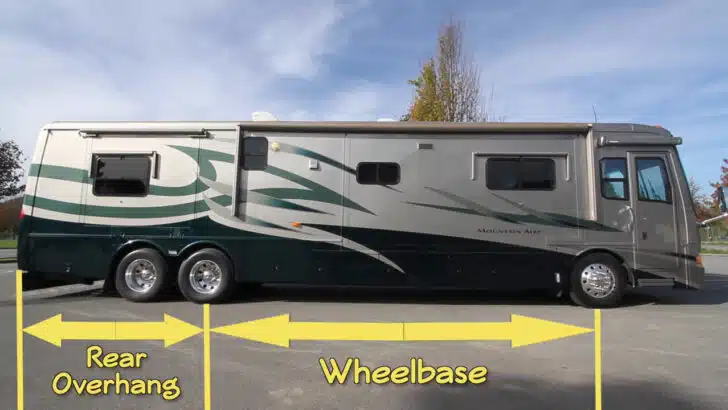
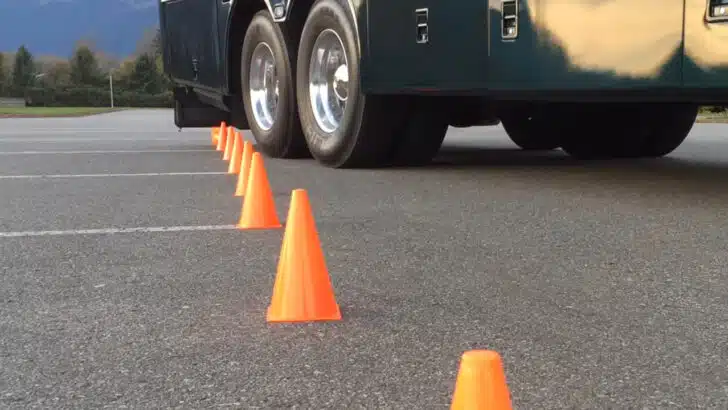
Here you see our rear overhang (everything that sticks out behind the drive axle). In our case, this includes our tag axle, but even if you don’t have a tag axle on your RV, everything behind the drive axle is your rear overhang.
Pivot Point
The drive axle is also known as the pivot point. Your RV pivots around this point whenever you go around a turn. By definition, a pivot point is a spot things rotate around, so anything on the opposite side of the pivot point goes in the opposite direction. We’ll provide more detail about this concept below.
Off-Tracking
Off-tracking is one of the most important concepts used when discussing how to drive an RV. When driving in a straight line, the rear wheels follow the same path as the front wheels. However, off-tracking occurs when you turn the RV and the rear wheels follow a different path than the front wheels.
The amount of off-tracking is the result of two factors:
- wheelbase
- wheel cut
The longer the wheelbase and the sharper you turn the wheels, the greater the off-tracking. For example, our 43-foot motorhome has a long wheelbase and a sharp wheel cut, which equals LOTS of off-tracking whenever we turn the wheel sharply.
The exact numbers don’t matter (because knowing them won’t help you learn to drive an RV, and focusing on them can actually confuse things). What’s important is to understand how your wheelbase and your wheel cut impact both off-tracking and rear overhang swing, and to practice turning with those factors in mind until you form automatic driving habits based on your RV. So let’s get to driving the RV.
How to Drive an RV with Off-Tracking in Mind
Basically, off-tracking is a situation that occurs when going around a corner. When driving in a straight line, the rear wheels follow the front wheels exactly. But when driving around a corner, the rear wheels don’t follow the front wheels. Instead, they follow a smaller diameter circle. That path (or “track”) is off from the front wheels, hence the term off-track or off-tracking.
The effect of this is the vehicle exhibiting some sideways motion rather than just moving straight ahead. The sharper the turn, the greater the off-tracking, and therefore the greater the sideways movement.
We’ll use our 43-foot Class A motorhome as our example, but the following will apply regardless of the motorhome you’re driving.
We off-track a lot based on our very long wheelbase and our sharp wheel cut. However, ALL vehicles off-track when rounding a turn (even your car, no matter how small it is!), and we’ll demonstrate that for you here in photos (and, of course, you can always watch our video above for even clearer visuals).
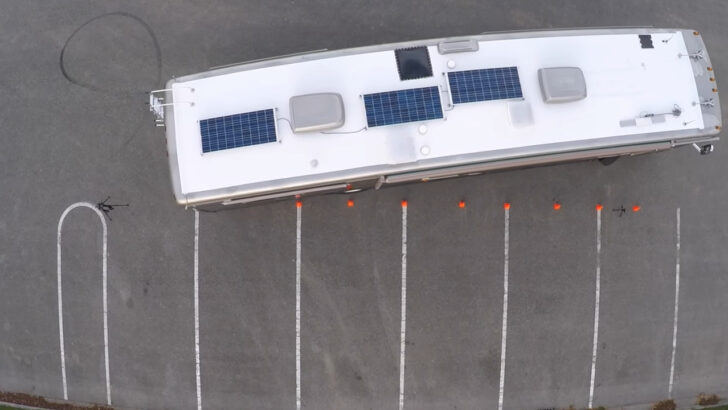
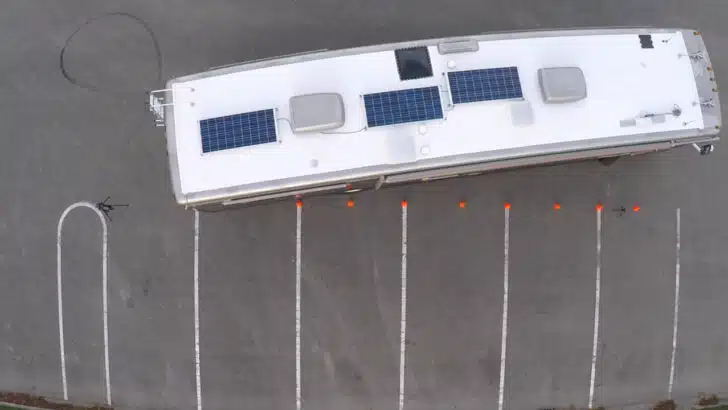
An aerial view of our RV rounding a turn with the steering wheel locked all the way over to the right. The difference between the distance the front tires and the rear tires come to the corner (cones) demonstrates how extreme off-tracking can be.
With our wheel cut all the way to the right to demonstrate maximum off-tracking, here’s what our path looks like after we’ve wet our tires to make the off-tracking clearer:
Here you see off-tracking displayed after we’ve wet our tires to illustrate the concept. The left rear tires actually followed a path (tracked) well to the RIGHT of the right fr0nt tire, much closer to the corner!
Because our motorhome is so long, and the wheels turn so sharply, we cut a 13-foot wide swath as we rounded the turn and pivoted around the drive axle.
However, off-tracking doesn’t occur simply because our motorhome is so long. All vehicles off-track, including our Honda CR-V.
Here we demonstrate how even small vehicles off-track by using our Honda CR-V. Even on our little toad (with its short wheelbase), the rear wheels come closer to the corner than the front wheels, especially during a tight turn.
With a shorter-wheelbase vehicle, off-tracking, while still present, is much less pronounced. So you don’t usually think about it much (or at all) when driving your car. Having driven cars for so long, you automatically position yourself correctly when you make a turn. This is due to muscle memory and habit. But you still instinctively know that if you position your car too far to the right when turning right, the right side of your car might impact something alongside you… or your rear wheel will hit or bump over the curb.
Given some time and plenty of practice in placing your RV correctly for turns (and monitoring your progress in your mirrors), that same instinct will eventually occur when driving your RV.
How to Prevent an Off-Tracking Accident When Driving an RV
You may have noticed that one of the most common places to see accident damage on large vehicles is on the passenger side, and usually right in front of the rear wheels. Lack of understanding of off-tracking is the reason why that’s so common.
There are two critical skills to practice to avoid off-tracking accidents:
- Proper vehicle positioning before and during turns
- Monitoring your position through the correct use of mirrors.
With the laws of physics guiding our way, there’s a basic technique to follow to properly position your RV for a turn. Keep in mind that right turns are the more challenging ones in countries where we drive on the right-hand side of the road. That’s because we’ll be both starting and ending a right turn where we’re closest to the curb. So we’re close to the curb on our right as we prepare to make the turn and end up in the same situation as soon as we complete the turn… closer to the curb on our right side.
On the other hand, left-hand turns usually allow us more space to work with since there’s at least one traffic lane on that side both before and after the turn. But, of course, one way-streets can change that dynamic, and left turns aren’t a free pass either (think about a car on your left, waiting at a stoplight on the cross street as you make your left across their nose).
So for right turns especially, we need extra space for our rear wheels to round the turn. Otherwise, we’ll run the right rear tires up over the curb, potentially striking an obstacle on the side of the road (stop sign, street light, pedestrians… you get the idea). We achieve that through two motions: 1) Staying left as we set up the turn (not swinging left… keep your RV straight as you set up the turn), and 2) Pulling forward slightly into the intersection before initiating the turn.
Three steps to a successful right turn: (1) Stay left, (2) Nose out, and (3) Monitor your right mirrors for traffic and position.
Our desired position in setting up a turn (how far to the left we stay) is primarily based on a combination of three factors:
- The tighter (narrower) the street we’re turning onto
- The longer our wheelbase
- The tighter our front wheels turn (wheel cut)
The greater the combination of 1 + 2 + 3 = the more we need to stay left as we set up the turn.
The need to stay left is one of the reasons we want to keep our rig straight in setting up the turn. Swinging left before initiating the turn creates several problems. First, it makes it more challenging to successfully execute the turn at all due to the complexity of positioning while swinging left then right. Second, swinging left positions the tail of your own vehicle in such a way that it can block your view of any traffic that might be approaching you from behind on the right side, and trying to squeeze around you on the right (just as you’re about to turn right)!
And speaking of traffic behind you, swinging left sends the exact wrong (and opposite) message about your intentions, with your move to the left conveying a left turn, not a right turn. Of course, you’ll have already activated your right turn signal (that goes without saying right?), but your “body language” says “I’m moving left, so feel free to squeeze into that space along my right side that you’ve had your eye on for the past 1/2 mile.”
This is where proper mirror use comes in, with your flat mirror monitoring traffic approaching from behind and your convex mirror monitoring traffic and 0bjects already alongside your rig. We mentioned in the video above that we’d have an updated post about mirror adjustment and use, but if you’d like to look at our video on that topic today, you can find it here.
The rule for convex mirror monitoring is “Turn right, look right. Turn left, look left.” Since you off-track in the same direction as the side you’re turning toward (off-tracking to the right on right turns and to the left on left turns), you must watch down alongside your RV on the side you’re turning toward as you navigate the turn.
Notice we didn’t say how far to stay left or how far to pull into the intersection, as it’s different for every vehicle and situation and requires practice. An empty parking lot and some traffic cones make for a great (and damage-free) practice area!
That said, here is a basic starting point (NOT the answer for every situation) for learning to make successful turns in an RV:
- Start by staying about one vehicle width from the right curb, keeping in mind that signaling early (you did your pre-trip inspection, so you know your signal is working, right?), keeping the RV straight, and monitoring BOTH of your right side mirrors (flat and convex) will protect you from another vehicle trying to sneak up on your right.
- Pull straight forward into the intersection until the back of your seat is lined up with the curb of the street you’re turning onto. Now initiate the turn. Slowly! Remember that this is only a general guideline to get started and that the narrower the street you’re turning onto, the more challenging the turn.
As you approach and observe an intersection where you’re planning to make a right turn, ask yourself the following questions:
- How wide is the street I’m currently driving on (do I have room to stay left as I set up for the turn?).
- How wide is the street I’m turning onto (do I have room to pull forward into the intersection?).
- What is the traffic control situation (uncontrolled, stoplight, stopsign… and if so, for whom?).
- Is there traffic coming from the right on the cross street (if it’s a light, can they back up for me if needed… is there anyone behind them)?
- What are my other options (can I ignore my GPS and go to the next intersection, which might be a wider street)?
- Can I pass this narrow street and make three left turns to return to this same tight intersection and drive straight through it? (Remember that left turns are usually easier than rights, and straight ahead is the easiest!)
Evaluate the situation. Think outside the box. Never be afraid to abort a turn if you realize that you set it up wrong and won’t make it… or if it’s too tight for anyone to make it!
Lastly, go slow. Take your time, and monitor the heck out of the convex mirror on the side you’re turning toward. If you see the space between your RV and the curb narrowing to a slit, STOP! NOW! Before you hit it.
Everyone around will understand…and honestly if they don’t, too bad. A sweat-inducing situation where you felt embarrassed, but avoided an accident, will be quickly forgotten. The memory of damaging your RV unnecessarily will stay with you forever.
Why Pivot Point and Rear Overhang Matter When Learning How to Drive an RV
Remember – a pivot point is a spot around which something rotates, so anything on the opposite side of that pivot point goes in the opposite direction.
When we’re learning how to drive an RV, we need to remember that our pivot point is our drive axle. We also need to remember that our rear overhang sticks out behind our pivot point.
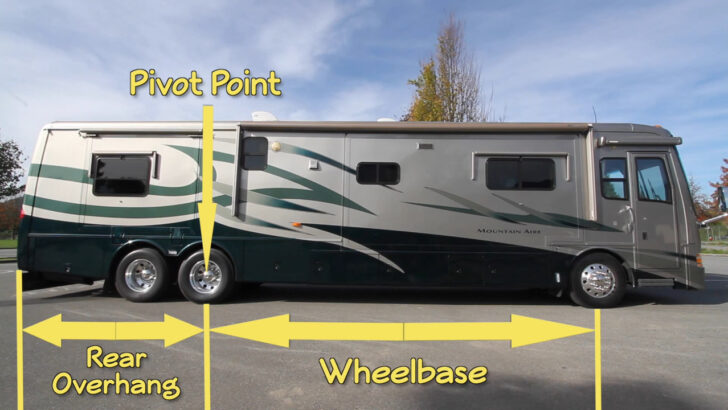

Tag axle or not, the pivot point is the drive axle, and our rear overhang sticks out behind our pivot point.
Just as with off-tracking, the sharper the wheel cut, the more pronounced the rear overhang swing. However, this time it’s not the wheelbase that factors in, but rather the rear overhang itself.
The Most Common RV Accident Involving Rear Overhang
When an RV is parked close to a curb, pulling sharply away will cause the rear overhang to swing out the opposite way toward the curb. This is a common cause of striking signs, fire hydrants, parked cars, or anything else that sits alongside the RV but behind the drive axle (pivot point) as we pull away.

Here we’ve used our orange cones to represent a curb. As we pull away sharply, note that the rear overhang swings out in the opposite direction, striking the curb… or whatever is on it.
Here’s an aerial view of the same rear overhang incident:
An aerial view of our rear overhang swinging out in the opposite direction, striking the curb. Notice how sharply our front tires are turned to the left. That mistake (pulling away too sharply) is the mistake that causes rear overhang accidents.
How to Prevent a Rear Overhang Accident When Driving an RV
The way to prevent this common rear overhang accident is to leave extra space in front of your RV whenever possible. This will allow you to avoid cutting your wheel too sharply as you pull away from the curb gradually.
Instead of using a sharp wheel cut, you’ll turn the wheel more slowly as you pull forward, allowing your rear overhang to move gradually away from the curb. Another way to prevent rear overhang accidents is by parking a little further away from the curb (if and when possible and practical) and avoiding parking with the rear of the RV alongside taller objects. If the rear of your RV is high enough off the ground (is your exhaust pipe or a rigid mud flap low down on the right side?), your overhang can swing out over a low curb. But not many street signs, telephone poles, mailboxes, or cars are short/low enough to swing your tail over!
Conclusion
When you’re learning how to drive an RV, there are many factors to take into consideration. Today we’ve looked at off-tracking and rear overhang. If you’re new to driving an RV, you may want to take some time to practice the techniques we’ve focused on today to become more comfortable with them.
You may also want to check out our post discussing 7 pro tips for backing up a motorhome as well as our post on the proper techniques for setting and using mirrors, and lane control tips. And don’t forget RV Height Clearance: Measure Your RV Height & Avoid a Crash!
No matter the size of your RV, all of these driving skills will make you a better and safer driver behind the wheel of any vehicle you drive.
Geek Out with Us Every Week
Join our newsletter to learn about all things RV-related. Every week we offer free tips, tricks, product reviews, and more to our online community of RVers. So, whether this is your first time on the road or you’re a seasoned expert, we’d love for you to geek out with us!
Kristen
Sunday 13th of February 2022
Hello! Great article, as always. :) I'm curious about the differences when pulling a single axel TT? I'm planning a lot of trips this year and next, and want to make sure I get there safely! Thank you again for everything you do. ❤️
TheRVgeeks
Sunday 13th of February 2022
Hi Kristen! Off-tracking with towables can be extreme, since going around a very tight turn causes the trailer to sweep to the side even more than a motorhome. Leave plenty room on the inside of turns (the side you’re turning toward) and be extra vigilant about checking the mirrors on that side (always remember… steering wheel to the right, eyes to the right. Steering wheel to the left, eyes to the left). After a while you’ll be more confident in your positioning as you approach turns, but checking the mirrors on the inside of the turn is a lifelong requirement for every driver of a longer vehicle, whether it’s towed or not. Safe travels!
Jim Poland
Thursday 19th of August 2021
My wife and I bought our first RV a few years ago (40' 2014 Tiffin Allegro Bus) and traded it in last fall for a newer and bigger one (43' 2019 Newmar Dutch Star). I just retired last month, we're selling our house, and by the end of September we should be full timers. In planning that move, I've been following RVGeeks for a couple years and have thoroughly enjoyed and learned so much from your content. You guys do an amazing job. But it wasn't until I read the attached "Behind The Wheel" article that I figured out why I felt a connection to you. Kent State University! I grew up in the area, went to college there, and took the campus bus on a regular basis, maybe even with you as the driver. We moved to Oregon 25 years ago but I have great memories of KSU, as I'm sure you do as well. Thanks for all the great content that you guys put out. We hope to meet you somewhere out on the road.
TheRVgeeks
Tuesday 24th of August 2021
Hi Jim! Of all the comments I somehow missed the day it posted, it had to be one from both a fellow Newmar owner AND a fellow KSU alum! So sorry I just found your comment, but boy did it bring a huge smile to my face! I drove at CBS from January, 1980 through October, 1982 on every route, working like crazy (I loved it so much - best job ever)! So if you were there during that period, odds are indeed good you rode my bus. Hope it was smooth and on time.???? Congratulations on your upcoming dive into full-timing, and thanks so much for the kind words. We spend a lot of time on the West coast, usually snowbirding in the Desert SW, so maybe we’ll see you on the road. Safe travels - Peter
Deb
Monday 16th of August 2021
Nice, thorough explanation of a few issues with driving long rigs! I’d love to hear your additional advice regarding towing a vehicle behind your RV and those unique challenges.
TheRVgeeks
Monday 16th of August 2021
Hi Deb! The best thing I can suggest when it comes to info we've posted about towing is our recent video & article about hooking up, which you can see here: https://www.thervgeeks.com/how-to-hook-up-your-car-to-your-rv-tow-bar/ It's not exactly about driving with a toad, but rather connecting one. That's because other than not being able to back up with the car connected, it's almost like it's not back there. The toad follows the RV so well that if the RV clears a turn, so will the car. Hooking up, on the other hand, is where all the important considerations are... making sure it's secured properly, breakaway cables and brake cable in place, lighting connections, etc. Hope you find it helpful. Safe Travels Deb!
Jim Yates
Sunday 15th of August 2021
Thanks guys Awesome video. I drove a 30’ straight axle delivery truck in college and never used this knowledge again until I bought a 30’ motor home 40 years later. I was surprised by how familiar I was to driving this rig. Your aerial videos really illustrate the off tracking involved and I’m glad my first motor home was not much longer. I look forward to more of your videos.
TheRVgeeks
Sunday 15th of August 2021
Thanks so much for the comments, Jim! Amazing how much driving a long vehicle is like riding a bike!