
In this post, we’ll tell you (and show you) how to change the fuel filter on an Onan diesel generator. If you’ve got a gas generator in your RV, we’ll be sure to include some information for you as well. Note that our ’05 Newmar has an Onan 7.5-kilowatt QuietDiesel generator. If you have a different model, be sure to check your owner’s manual for possible differences in the procedure.
- 1) How Often Do You Change the Onan Fuel Filter?
-
2)
How to Change the Fuel Filter on Onan Diesel Generator
- 2.1) What You’ll Need for RV Generator Fuel Filter Maintenance
-
2.2)
Steps to Change the Fuel Filter On an Onan Generator
- 2.2.1) Open the Fuel Filter Access Panel
- 2.2.2) Set the Drain Pan in Place and Clean Off the Area
- 2.2.3) Disconnect the Fuel Lines
- 2.2.4) Remove the Fuel Filter
- 2.2.5) Install the New Fuel Filter
- 2.2.6) Prime the Fuel Line
- 2.2.7) Start the Generator
- 2.2.8) Check for Fuel Leaks
- 2.2.9) Shut Down the Generator and Replace the Access Panel Door
- 3) Free RVing Tips, Tricks, Reviews & Giveaways
How Often Do You Change the Onan Fuel Filter?
As with other engines, routine generator maintenance is performed based on the service intervals set by the manufacturer. Whether it’s replacing the oil, oil filter & air filter, cleaning the spark arrestor, or flushing and replacing the generator coolant, there’s a schedule to follow. Some tasks are based on time only, and some depend on how often you run the generator.
The fuel filter on our Onan genset gets replaced every 500 hours of use, but it’s important to change it at this interval so that your generator will continue to run and reliably power your RV as ours did for the 18 years we owned it.
How to Change the Fuel Filter on Onan Diesel Generator
We’re going to take you through the steps for how to change a fuel filter on an Onan 7500 Quiet Diesel generator, as that’s the generator we had on our Newmar Mountain Aire. This is a pretty easy DIY project. Just collect your tools and your new filter, and follow the steps we’ve laid out below.
Again, if you have a different Onan generator, you’ll want to consult your owner’s manual for details on any differences. But even if you’re dealing with a different RV generator, knowing how to change the fuel filter on Onan 7500 diesel generators should be helpful as a general guide.
What You’ll Need for RV Generator Fuel Filter Maintenance
- Oil drain pan
- Set of open-end wrenches
- Socket wrench
- Disposable/expendable rag
- Nitrile gloves
- New fuel filter (NOTE: confirm the correct part… as suggested in the comments, it can’t hurt to put eyes on the existing filter so you get the correct one the first time 😉)
- A mat or pad to lie on (optional)
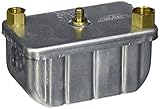
Our Onan 7.5kW diesel generator is model HDKAJ, and it uses this fuel filter:
- Country of origin : United States
- Package Dimensions : 4" L x 4" W x 4.5" H
You can also order generator parts directly from Cummins, and they often have good prices. Note that if you have the Onan 8kW diesel generator, your generator may use the same fuel filter as ours, or you may need a different one. We’ll explain:
According to our Onan generator’s owner’s manual, there are two different series or ranges of specs for Cummins Onan Quiet Diesel 8kW Diesel Generators. Basically, there are two models – the HDKAK has 120V output, and the HDKAH has 240V output. Within each model, several different versions were released over the years, (likely with minor changes and improvements over time). Cummins calls those different versions “Specs.” Spec A was the first, Spec B second, etc.
If you have an 8kW Onan diesel generator, your genset either uses part #149-2513 (the same as ours shown above) for models HDKAK and HDKAH (Spec A-K), or it uses part #147-0860, for models HDKAK and HDKAH (Beginning Spec N). This one is obviously an in-line filter, but other than the way it’s connected to the fuel lines, most or all other steps will be the same, or very similar.

- Made In China
- Package Dimensions : 10.59 H X 21.09 L X 18.29 W (Inches)
Let’s get to the steps required to remove the old fuel filter and replace it with a fresh new one.
Steps to Change the Fuel Filter On an Onan Generator
Take the following steps to remove and replace the fuel filter on your Onan 7.5kW QuietDiesel generator:
Open the Fuel Filter Access Panel
Open the access panel located under the generator by squeezing the two black indented latches together, and allowing the door to swing downward on its hinges. Once it’s open, the fuel filter, a small silver box, will be easily seen and accessible. The nut shown in the center will be removed when it comes time to remove the old fuel filter.
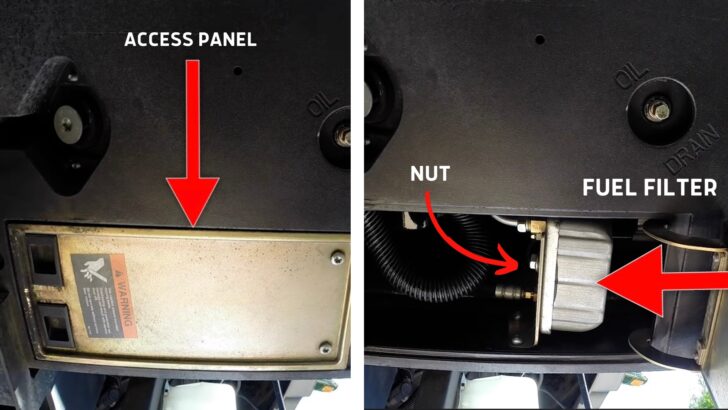

The photo on the left shows the fuel filter access panel under the generator. The right photo shows the fuel filter and nut that secures it in place.
Set the Drain Pan in Place and Clean Off the Area
With your drain pan in place to catch any oily debris, use a rag to wipe clean the old fuel filter and the surrounding area.
Disconnect the Fuel Lines
Using two appropriately sized open-end wrenches, loosen the nuts that secure the fuel lines into the filter. It doesn’t matter which fuel line you remove first. Just be aware that some fuel will drip from the first fuel line as you disconnect it. Once you’ve disconnected the first fuel line, allow the fuel to drain into your oil pan until it’s barely dripping. Then, disconnect the second fuel line. There will be additional fuel dripping, so keep that drain pan in place.

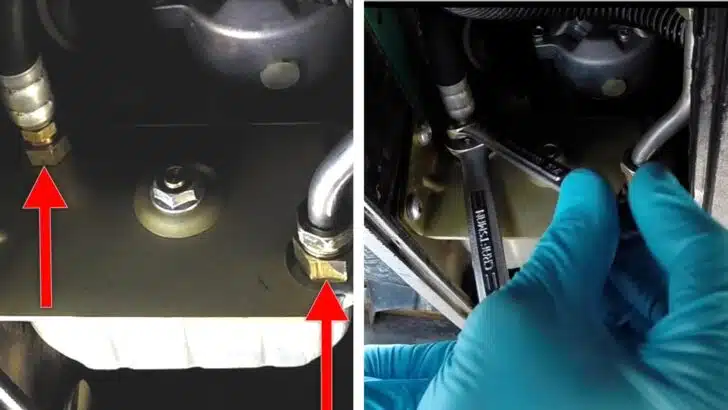
The left photo shows the inbound and outbound fuel lines identified with red arrows, as well as a close-up of the center nut holding the filter securely in place. On the right, you can see the process of disconnecting one of the fuel lines using two open-end wrenches.
PRO TIP: To prevent fuel from running down your arm to your elbow as you loosen the fuel lines, wrap/tie an old rag around your wrist to catch as much of the fuel as possible. Keep in nmind that diesel fuel is considered toxic waste, so try to avoid getting it on yourself, or the ground, and dispose of it properly (along with used filters and fuel-soaked rags) at an approved disposal or recycling center.
Remove the Fuel Filter
Use your socket wrench to remove the nut at the center of the fuel filter. Remove the fuel filter carefully because it will still be full of fuel. Lower the fuel filter down into your drain pan, turning it face down so it will drain as much as possible. Keep your drain pan in place because some fuel will continue to drain from the fuel lines for a short time.
Install the New Fuel Filter
Hold the new fuel filter in place and finger-tighten both of the fuel line nuts as well as the nut in the center. To avoid cross-threading, you want to always start nuts by hand.
Use your open-end wrenches to secure the fuel line nuts, tightening them one more flat (1/6 of a turn) after they’re seated against the fitting. Tighten the center nut and use your rag to clean up any fuel drips. Leave the access panel open for now, as you’ll need to check for leaks.
Prime the Fuel Line
Of course, the new filter will have no fuel in it when it’s first installed. You’ll need to re-prime the filter and fuel line, which is done by holding down the generator stop switch for one minute. You’ll hear the clicking sound of the fuel pump running as the system re-primes.
Start the Generator
Start the generator. If it doesn’t fire up after several seconds, you may need to prime the system a second time by holding down the stop switch again.
Check for Fuel Leaks
Once the generator is running, look underneath and check for fuel leaks. Carefully check both fuel connections for dripping. If you see any drips coming out of either connection, shut down the generator immediately and re-torque the nut.
Let the generator idle for a while to warm up, and then turn on two or three high-power items in your RV, such as air conditioner(s) and water heater (on electric, of course, not propane). This will put a load on the generator, ramping up the RPMs.
Allow the generator to run for 5-10 minutes under load while you continue to check for any fuel leaks. Again, any fuel leak, even a single drip, requires checking and re-torquing the fuel line nut(s) on the filter as needed.
Shut Down the Generator and Replace the Access Panel Door
Turn off all loads to the generator and let it idle for two minutes to cool down. Then, shut down the generator and check one final time for any leaks. If there are none, you’re good to go. Swing the fuel filter access panel door back up into place, making sure it’s latched securely. Don’t forget to dispose of used fuel, oil, filters, and oily rags at an appropriate disposal/recycling center.
Congratulations! You’ve just successfully replaced your Onan generator’s fuel filter.
If you’d like to see a great visual of the process, follow along with us as we replace the Onan RV generator fuel filter on our motorhome by watching our video showing every step:
Be sure to also see our post on how to do an Onan diesel generator oil change, as well as our post on how to do an Onan Quiet Diesel 7500 coolant change.
And if you happen to have the Onan Quiet gas generator (for gas-powered RVs), this video might be helpful to you:
The bottom line is that if you take good care of your Onan RV generator, it’ll take good care of you!
Free RVing Tips, Tricks, Reviews & Giveaways
As 20-year full-timers, we share everything we’ve learned about RVing over the years. Join our online community to receive a wealth of great RVing knowledge delivered daily to your inbox.
Whether you’re a new RVer or a seasoned full-timer, you’ll love the wide range of RVing topics we cover. Don’t miss a single article or any of our famous Giveaways. Subscribe to our newsletter today!
sparky1
Friday 19th of January 2024
thanks; great information I need to change the FF on my Generator . sparky1.
TheRVgeeks
Saturday 20th of January 2024
Hope our timing was helpful, Sparky!
Howard
Friday 19th of January 2024
Be sure to confirm your filter type before starting the process as the manual can be misleading. Yesterday I changed the oil in my QD 6000. This was the first time I changed it myself since buying the coach last summer. While the fuel filter was not due to be changed, I had ordered one when ordering the oil filter to have it on hand. Based on the manual, I ordered the box style filter. Well, that was wrong as I need the inline style.
It would have taken me about 2 minutes or less to get under the coach, open the access door and easily confirm the style before ordering. My advice is to do so prior to ordering the filter. The Cummins website is a bit confusing to use even when you enter your GSN. So, the best bet is to put your eyes on the one already installed.
TheRVgeeks
Saturday 20th of January 2024
Good point, Howard... we've updated the post to recommend putting eyes on the existing fuel filter before ordering the replacement... JUST to be sure! 😉
Richard Davis
Saturday 15th of June 2019
These videos have saved me so much. The plastic latch on my Onan generator, just like the one in the picture, has broken. Any idea on the part# or where I can get a replacement? Thanks
TheRVgeeks
Saturday 15th of June 2019
Hi Richard. It's always nice to hear we've been helpful. We THINK this is the latch for the access door on OUR generator for the fuel and oil filters - Onan part #406−0612 which we found here: https://www.rvpartscountry.com/Service-Panel-Latch-for-Onan-Generators_p_34087.html If yours is a different model generator, you can start by visiting the Onan Parts page, clicking Power Generation, and entering your serial number. Everything should flow from there! Hope this helps. https://parts.cummins.com/?_ga=2.166163390.183289350.1560648306-1606850432.1560648306#/
Highwayman
Sunday 1st of July 2018
I have the exact same generator in my 2000 Discovery, Serviced the complete system, oil / filter and diesel filter. The generator would not start prior and it still won't with it flashing 3 times on the switch which I read it means it 'needs service'. Question, is that an additional filter in line to the right in your video (and on my generator) the copper colored one that looks an inline filter round and a couple inches long?
TheRVgeeks
Monday 2nd of July 2018
Hi Richard. We don't believe there is any additional fuel filter. The one we showed being replaced in this video is the only one. About the code you're seeing... there should be two codes, not just one - a first stage code, followed by a second stage code. If you look in the manual, you'll see directions for how to get the second digit (second set of flashes) that you need. Three flashes is only the first stage, so you need the second stage number to hone in on the problem in more detail.
Jimmy
Wednesday 18th of October 2017
I have a 1998 Georgetown motorhome and a cant get gas to the gen. will not come out of the gas line. where is the fuel filter locateed
TheRVgeeks
Wednesday 18th of October 2017
Hi Jimmy! Unfortunately we don't have a gas rig, so we only have experience with a diesel generator. That said, there is one thing that's probably the same on both types of rigs, and the first thing we would check: the fuel level. Since they don't want someone to accidentally use up so much fuel by running the generator that the tank runs dry, the fuel pick-up for the generator is usually located higher on the tank. So you can only run the generator down to about 1/4 tank or so, before the gas level falls below the generator pick-up line. So the very first thing to do is make sure you have enough fuel in the tank to be above the generator pick-up line (if you have half a tank of gas or more, then that certainly can't be the problem. If that's not it, we'd suggest checking out the website of our good friend Brian of RV With Tito (www.rvwithtito.com). He has a Class C gas motorhome with an Onan gas generator. We just checked, and he has a video about troubleshooting the generator fuel pump that might have some useful information for you. That video is here. If that video doesn't help, he may have other related videos that do. Barring that, Brian is a very handy DIY RVer, who would be happy to try to help if you contact him through his website. Tell him the RVgeeks sent you, and said Hi!