
Like the rest of our equipment, we take very good care of our batteries. But there comes a time when even well-maintained batteries start to lose their juice. That’s why knowing how to replace an RV battery is important.
In this post, we’ll show you exactly how to do that, even if your battery bank has several batteries that appear to have a complex configuration.
- 1) What Is an RV House Battery?
-
2)
How to Replace Your RV Batteries
- 2.1) Take a Photo of Your Current Battery Bank
- 2.2) Draw a Diagram of Your House Batteries
- 2.3) Create a Tab on Both Ends of Every Cable
- 2.4) Turn Off All Power Coming to Batteries
- 2.5) Begin Removing the Cables
- 2.6) Disconnect the Main Negative Cable Leading to the RV
- 2.7) Disconnect the Remaining Cables and Remove the Batteries
- 2.8) Clean Your Battery Box and the Cable Ends
- 2.9) Install Your New Batteries
- 3) How Can You Tell If Your RV Battery Is Bad?
- 4) How Long Should an RV Battery Last?
- 5) Can I Replace My RV Battery with a Lithium Battery?
- 6) Have You Replaced Your RV Batteries as a DIY Project?
- 7) Free RVing Tips, Tricks, Reviews, Giveaways & More
What Is an RV House Battery?
As you may recall from our RV Battery Guide: House, Chassis, Lithium & More, the “chassis” battery (starting battery) starts your RV’s engine, and the “house” batteries power the interior lights, vent fans, water pump, and other 12-volt equipment.
Through the use of an inverter, which converts 12-volts DC into 120-volts AC, they can also power your coffee maker, hair dryer, TV, microwave, and other household appliances.
One of the greatest things about RVing is the ability to travel widely with all or most home amenities handy.
However, you need a working house battery bank for all of these amenities to work (especially when you love boondocking the way we do). There are different types of 12-volt batteries, but again, our Battery Guide post can sort all of that out for you in detail.
It’s easy to be intimidated by the prospect of replacing batteries, especially if you’ve got a complex setup such as a bank of four or more 6-volt batteries wired in series-parallel. Just the sight of all that wiring is enough to tempt many people to walk away.
But as long as you follow a few simple guidelines and precautions, getting new RV house batteries installed can be a pretty easy DIY job.
Let’s show you how replacing RV house batteries is a manageable task that can ensure your power needs are met.
How to Replace Your RV Batteries
We’ve been on the road full-time for 20 years, so we’ve had to replace our RV batteries more than once.
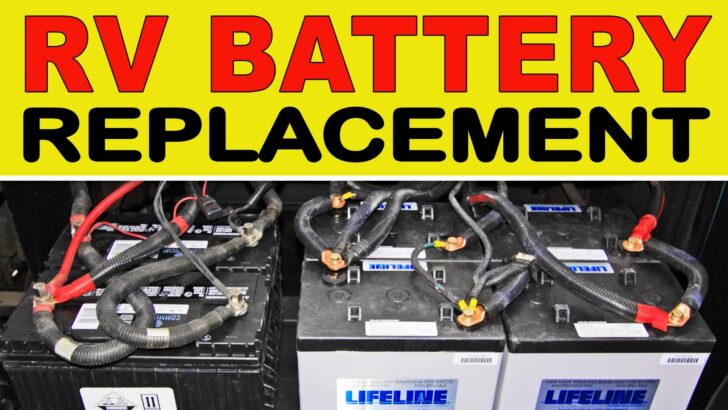
Our rig came from the factory with four 6-volt flooded lead-acid house batteries, wired in series-parallel, which is like having two large 12-volt batteries.
When the time came to replace them, we installed four Lifeline AGM (absorbed glass mat) batteries. They’re also 6 volts, vs 12 volts, so wired in the same series-parallel configuration.
The AGM batteries were more expensive but superior to traditional “wet” lead-acid batteries. They’re completely sealed, accept a charge faster, and perform better in every way. They’re also maintenance-free, so well worth the added cost.
We’ve since switched to the ultimate: lithium batteries, which, while even more expensive than AGM, work incredibly well with our new, larger array of solar panels.

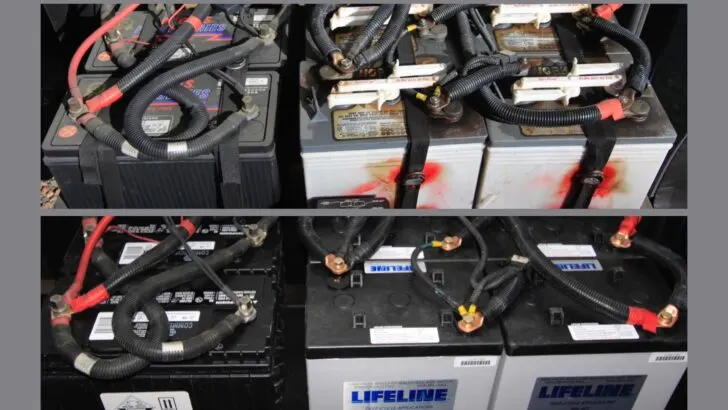
In both photos, you can see our chassis batteries on the left. On the right side of the top photo, you see our old flooded lead acid batteries, with the newer Lifeline AGM batteries at the bottom.
Regardless of what kind of batteries you choose, here’s how to replace them:
Take a Photo of Your Current Battery Bank
As with most projects, planning is a crucial part of the job. And among the most important steps in the planning process is taking a photo of what you’re about to replace so that you’ll have a reference to look back on, should you need it.
Take a clear photo of the top of your current battery bank so you’ll have a record of the wiring layout, allowing you to safely route the cables for the new batteries in the exact same way.
But a simple photo isn’t enough…
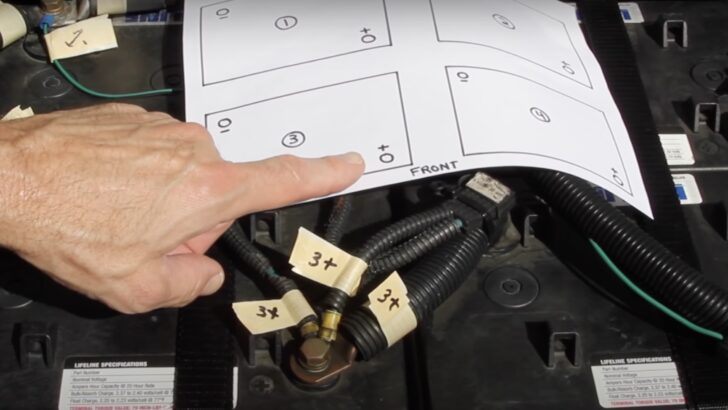
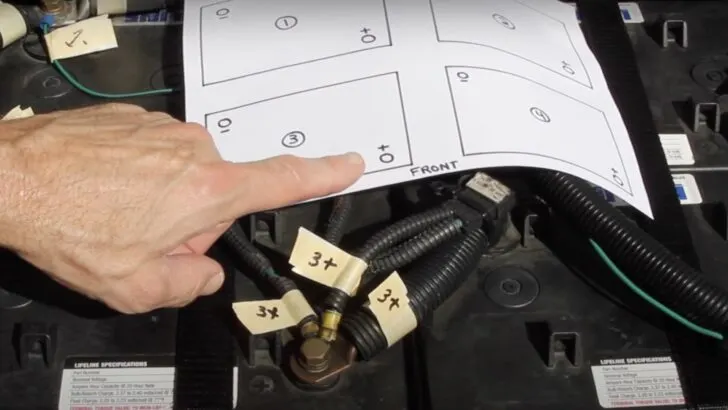
Draw a Diagram of Your House Batteries
Despite having a photo to refer back to, it’s best to draw a diagram of the layout of your house batteries as well.
If your RV battery replacement project also includes your chassis batteries, be sure to include those in the diagram. Note: We were only replacing our house battery bank at that time, so our diagram included only those four batteries.
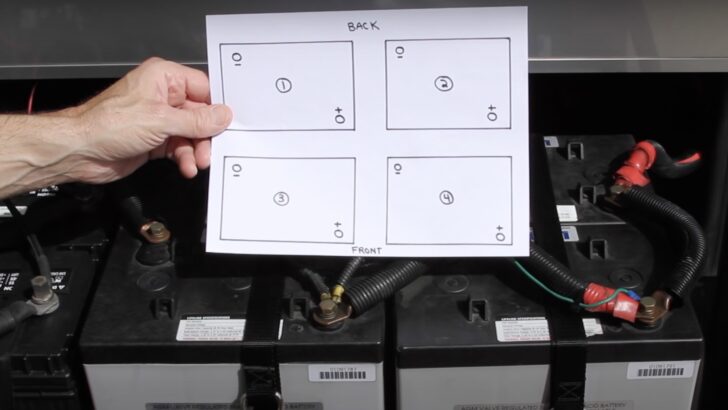
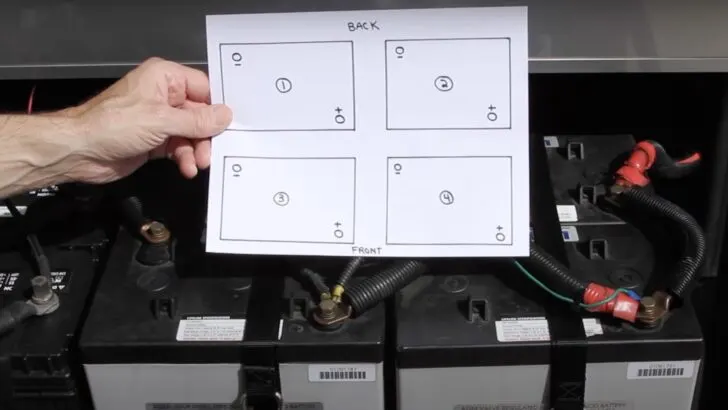
Create a diagram of the batteries you’re replacing. This will be VERY helpful during installation.
Number the batteries on your diagram, and be sure to include the battery posts and mark them positive and negative.
Be sure not to skip this step. We know it’s tempting, but the diagram really is crucial, so take the time to sketch one out before you begin the battery replacement process.
Create a Tab on Both Ends of Every Cable
Use masking tape to create a tab on both ends of every cable on every post.
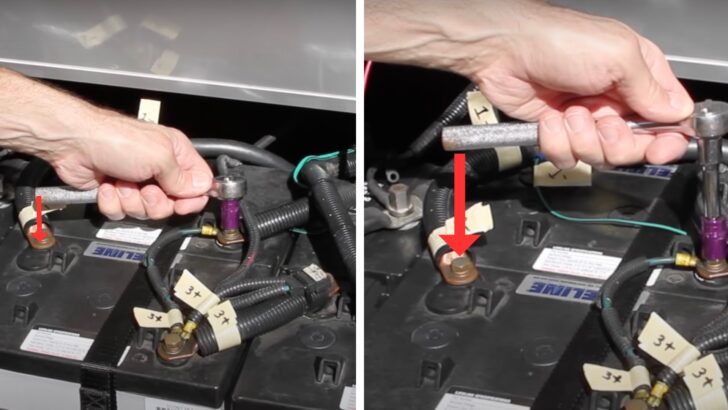
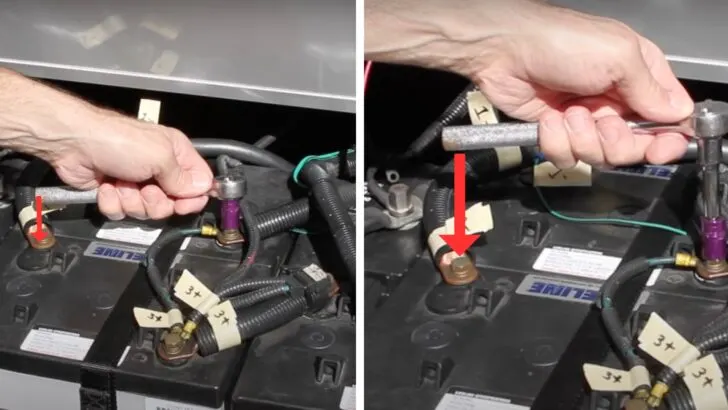
We used a Sharpie to mark the tab for the negative post on battery #1 with a 1- (to indicate battery 1’s negative post).
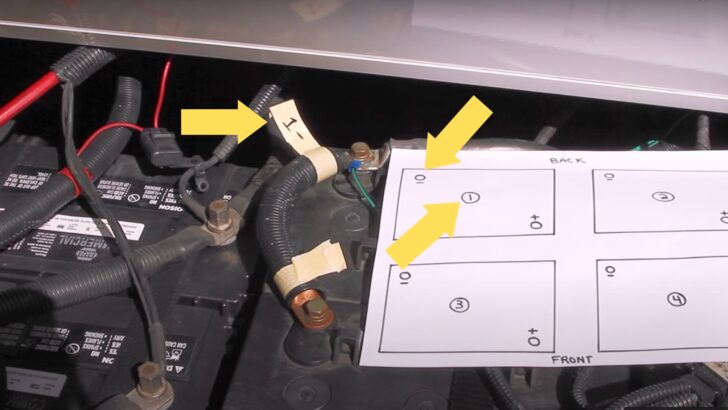
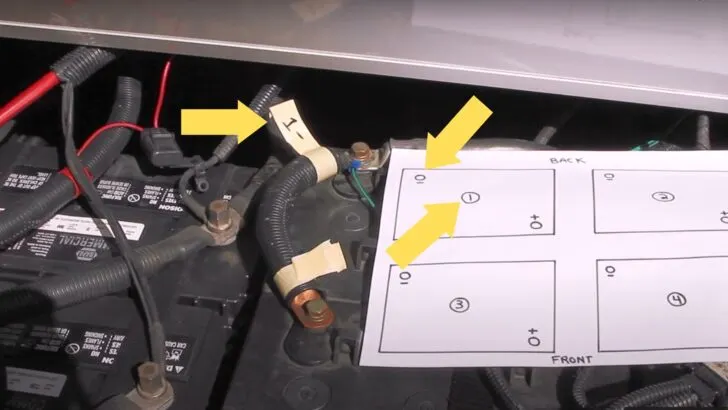
We used a Sharpie to mark the tabs on the ends of each cable with a number corresponding to the appropriate battery and positive or negative post. Here you see we’ve marked the tab for the negative post on battery #1 with a 1- (to indicate battery 1’s negative post).
Next, we marked the other end of the same cable with a 3-, to indicate battery #3’s negative post.
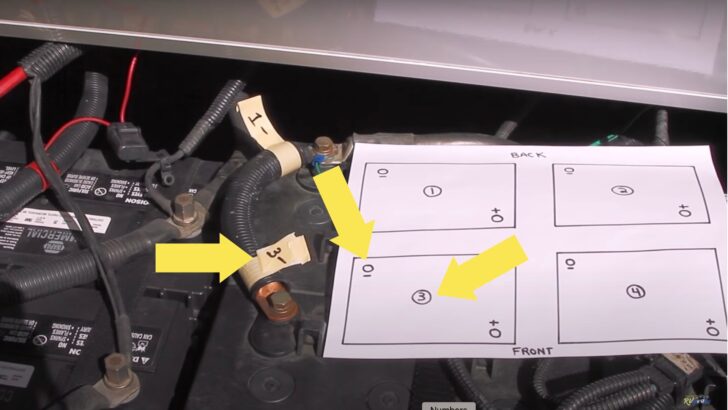
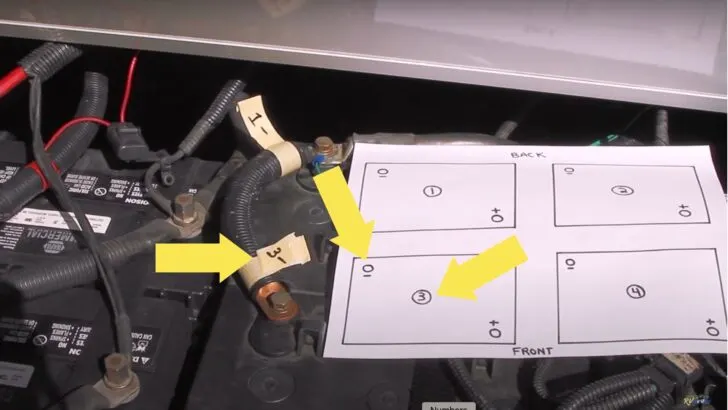
Here we’ve marked the tab for battery #3’s negative post with a 3-.
Note that each end of every single cable connected to a post gets labeled.
So, for example, every cable end that’s connected to battery #1’s negative post gets the label “1-“.

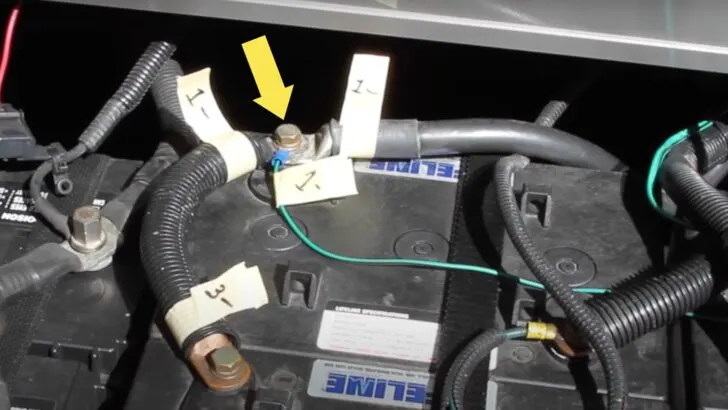
In this example, all cables that attach to battery #1’s negative post are labeled “1-“. You’ll do this with all cables on each battery’s positive and negative posts.
In this example, you see all cables attached to the positive post of battery #3 labeled “3+”.
Continue in the same manner, making sure to tag every end of every cable on every post. Did we already mention that? You’re darn right we did! If you fail to tag all the cables, you’ll know why we’re making a big deal about this when it comes time to re-install everything.
If you plan to remove/replace your chassis batteries, be sure to tag and mark them as well.
Turn Off All Power Coming to Batteries
Before going any further in this project and removing a single cable, be sure to turn off all power coming into the batteries.
Switch off the circuit breakers and unplug your power cord from the pedestal. Make sure your generator is off, and any solar panels are disconnected.
If you have solar panels but don’t have an on/off switch or breaker to disconnect the power, use towels to cover the panels to prevent them from sending power to the batteries, especially if it’s a sunny day.
Also, turn off all power coming from the batteries inside the RV and at your battery disconnect switch(es).
Begin Removing the Cables
Using a socket wrench, begin removing the cables, starting with the main negative wire leading out to the RV. Be sure not to accidentally allow the ends of your socket wrench to touch a positive and negative post at the same time.

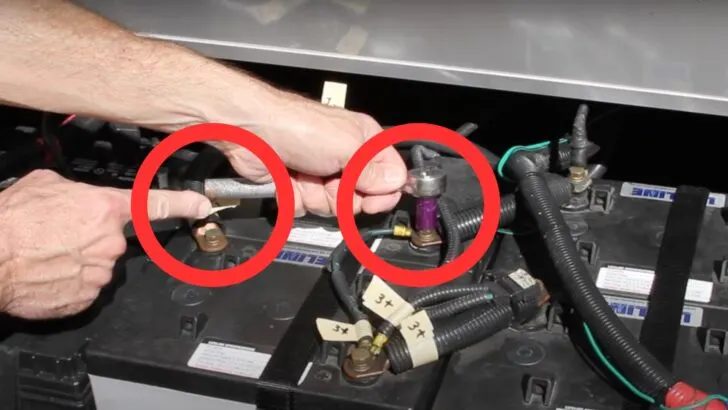
Use caution when removing the cables, making sure the ends of your socket wrench never accidentally touch a positive and negative cable at the same time.
Touching hot and cold terminals at the same time is dangerous and will cause sparks to fly. This could cause a fire or even an explosion.
Using a socket extension is a good idea to keep the end of the wrench further away from the terminals. Better yet, wrap the entire handle of the socket wrench with electrical tape.
Using a socket extension makes touching positive and negative terminals at the same time far less likely. Wrapping the handle with electrical tape is also a great idea.
Disconnect the Main Negative Cable Leading to the RV
Always disconnect the main negative cable leading to the RV first. It’s likely one of the thickest black cables in the bunch, and will lead from the battery bank into the RV.

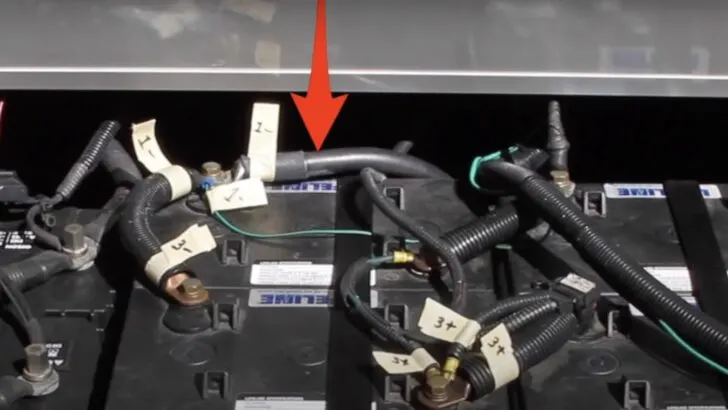
This is the main negative cable leading into the RV. It’s the FIRST one you should DISCONNECT and also the LAST to RECONNECT at the conclusion of the project.
The main negative cable is not only the first one to disconnect but also the last one to reconnect at the end of the job.
Disconnect the Remaining Cables and Remove the Batteries
Once you’ve disconnected the main negative cable, you can continue disconnecting the cables one by one until they’ve all been removed from every battery.
Then you can remove the batteries from the RV and set them aside.
Clean Your Battery Box and the Cable Ends
This is the perfect time to clean your battery tray. A paste of baking soda and water neutralizes battery acid. We also used a wire brush to remove loose paint and any rust, then painted ours with black Rustoleum paint. Then we used the wire brush to clean the ends of all the cable ends until everything shines like brand new!

- Soft Grip Stainless Steel Stripper Brush, 5x11 rows, lableled, 12/Cut Carton
- We call it the Warner Way. We’re SMARTER, STRONGER AND BETTER at making tools and giving our customers the support they need to be successful.

- One 14 oz. box of ARM & HAMMER Baking Soda Fridge-n-Freezer Odor Absorber
- FLO-THRU TECHNOLOGY: The only baking soda brand with Flo-Thru technology that has dual panel vents for maximum odor control

- Weather and corrosion resistant coating protects exterior/interior surfaces like wood, metal, concrete, masonry and more
- Oil-based formula provides a durable protective coating with excellent rust prevention
Install Your New Batteries
Place your new batteries into the RV, and connect all the cables in accordance with your diagram and the tags you created with the masking tape.
Remember to connect the main negative cable that goes into the RV last.
Note: If you’re installing regular lead acid batteries, slide a felt battery washer down over each post before reattaching the cable will reduce corrosion.

- Quantity: comes with 6 pieces battery anti-corrosion washers include 3 red and 3 green
- Features: the battery washers can prevent corrosion around the battery terminals, prolong battery life, for use with 6 and 12-volt battery
Finally, remove all the masking tape tags and turn the power switches back on.
We hope these steps and the accompanying photographs have been helpful. But if you’d prefer a more visual tutorial, check out our video:
How Can You Tell If Your RV Battery Is Bad?
It may be very easy to tell that your RV batteries are failing. Signs such as lights being dim or vent fans running more slowly than they typically do can be nagging indications that your batteries need replacing.
To check the condition of your RV batteries, you can test the voltage of each battery using a multimeter. Using a hydrometer, you can also check the specific gravity of the electrolyte in flooded lead-acid batteries.
Conduct either or both of these tests when the battery is fully charged and “at rest.” That means no power coming into the battery and no loads coming out.

- Measures both ac & dc current up to 400 amps, ideal for vehicles, rvs, marine boats & etc
- Ac/dc voltage, current, resistance, frequency, continuity, duty cycle & diode check

- Professional Battery Tester
- Compact hand held tester reads specific gravity of battery acid
How Long Should an RV Battery Last?
The answer to this question depends on the type of RV batteries you have, how they’re used, and how well you maintain them. But we can give you some generalizations.
Typically, a well-maintained flooded lead acid battery should last anywhere from 4-5 years.
AGM and Gel batteries tend to last a bit longer, often in the neighborhood of 6 years or more. The Lifeline AGM batteries we had before we upgraded to lithium lasted us 7 years… and still had some life left in them.
Lithium batteries have the longest lifespan, and often have a 10-year manufacturer’s warranty.
Can I Replace My RV Battery with a Lithium Battery?
Although many lithium battery manufacturers advertise their batteries as “drop-in replacements,” that primarily refers to the battery’s physical size.
They may be designed to fit into a standard flooded lead acid battery’s space. Still, there are other components of your rig’s electrical system that are likely to require upgrading, such as the converter/charger, solar charge controller, and possibly other charging components.
Even the charger that takes power from your chassis battery and alternator to charge your house batteries while you drive may need to be upgraded. So, you may be able to fit a lithium battery into the space where your lead acid battery sits, but other factors also need to be evaluated.
Have You Replaced Your RV Batteries as a DIY Project?
Did you replace RV batteries yourself? If so, we’d love to hear about your experience and the type of batteries you chose. Leave a comment below with the deets!
Free RVing Tips, Tricks, Reviews, Giveaways & More
Subscribe to our daily newsletter! We’ve been full-time RVers for 20 years (!) and share everything we’ve learned about RVing in our daily blog posts. Join our online community to receive a wealth of great RVing knowledge delivered right to your inbox.
Whether this is your first time on the road or you’re a seasoned full-timer, you’ll love the wide range of RVing topics we cover. Don’t miss a single article or any of our famous RV gear Giveaways — Subscribe today!
Bob Sunday
Sunday 8th of October 2023
Trying to find r-vision condor Coach battery location. Help!!
Ted E Phillips
Wednesday 21st of June 2023
Somewhat new to RVing .... I will be installing new Lithium batteries to replace my worn-out AGMs(2). I plan on going bigger to 200ah batteries(2) for a total of 400ah ...the unit is a 2001 Coachman class A with the WFCO Wf-9800 series converter/charger with a Progressive Industries 50-amp electrical management system. there is also a solar panel(1).
My question is, and I believe I know the answer is, will I need to replace my converter for it to recognize the Lithium batteries?
Thanks, Ted
TheRVgeeks
Wednesday 21st of June 2023
As a follow up, @Ted... found this thread about WFCO's "Auto Detect" feature: https://diysolarforum.com/threads/wfco-auto-detect-converter-does-not-auto-detect.45508/ Not sure if they've fixed/updated their units since this was an issue, but it doesn't sound like it's the best bet for ensuring your batteries stay properly charged if they're lithium. If you're going to upgrade the converter/charger, you may want to look into other options (like Xantrex or Victron) instead. They may not be drop-in replacements for what you have, but they'll do a better job keeping your lithium batteries healthy.
TheRVgeeks
Wednesday 21st of June 2023
Hi Ted,
Can't say 100% for sure on that, but it's quite likely you'll need to replace the converter/charger. The CURRENT version of the WFCO WF-9800 lists that it's Lithium compatible... but, assuming you have the original one installed back in 2001, we'd doubt that it was back then. So your best bet would be to try contacting WFCO (have the model and serial number of your unit handy) and see if they can advise you. You'll definitely want the answer to that before going ahead with the battery upgrade... so you don't risk damaging your new Lithium batteries.
Ben Benson
Saturday 10th of June 2023
Just a reminder, verify 6volt vs 12volt on your replacement batteries, when you soxument tour diagram and wiring set up, you can use 12volt in lieu of 6 volt but you have to wire them differently, i good idea, if your in a jam and cant locate 6volt batteries
Rick Dowling
Saturday 10th of June 2023
I changed my original wet cell batteries (6-6 volt) to 6 Lifeline AGM and I used your video as my guide. Thanks once again guys!! Even though I wired it all up the same, I learned a bit ago that the temperature line from my Magnum remote was put in the wrong spot when it was built(I also learned my coach wasn’t the only incorrect one). So, I need to fix that. Quite a bit quicker job though. ????
Bob Garbe
Saturday 10th of June 2023
Lithium batteries rock for all the reasons stated here and elsewhere.. Charging acceptance rate, depth of allowable discharge, weight and length of service are the primary ones. Minimal changes do have to be made in order to get most of the advantages depending on the charging equipment you have, but more changes allow the maximum benefit of this great power source. This was a really great article and I will share with the Forum that we have on our specific rig. THANKS