
As we head into the season when many (but not all!) RVers store their rigs for the winter, this is a good time to create a post about the RV battery disconnect switch – an easy, inexpensive way to preserve the life and good health of RV batteries.
Let’s get right to it before the snow flies for you northerners!
- 1) What Is an RV Battery Disconnect Switch and What Does It Do?
- 2) How Does a Battery Disconnect Work?
- 3) When Should Disconnect Your RV Battery?
- 4) Do All RVs Have a Battery Disconnect Switch?
- 5) Where Can I Find My RV’s Battery Switch?
- 6) How Do You Install a Battery Disconnect on an RV?
- 7) Which RV Battery Disconnect Switch Should I Buy?
What Is an RV Battery Disconnect Switch and What Does It Do?
A battery disconnect switch is a convenient way of cutting off the electrical power to a circuit temporarily while preventing you from having to manually disconnect your RV battery bank.
In the case of an RV, a battery disconnect switch quickly and easily cuts off the battery from the main circuits in the RV. There are several reasons why one might want to do this, and we’ll get into those in just a moment.
But first, let’s take a look at exactly how an RV battery disconnect switch works.
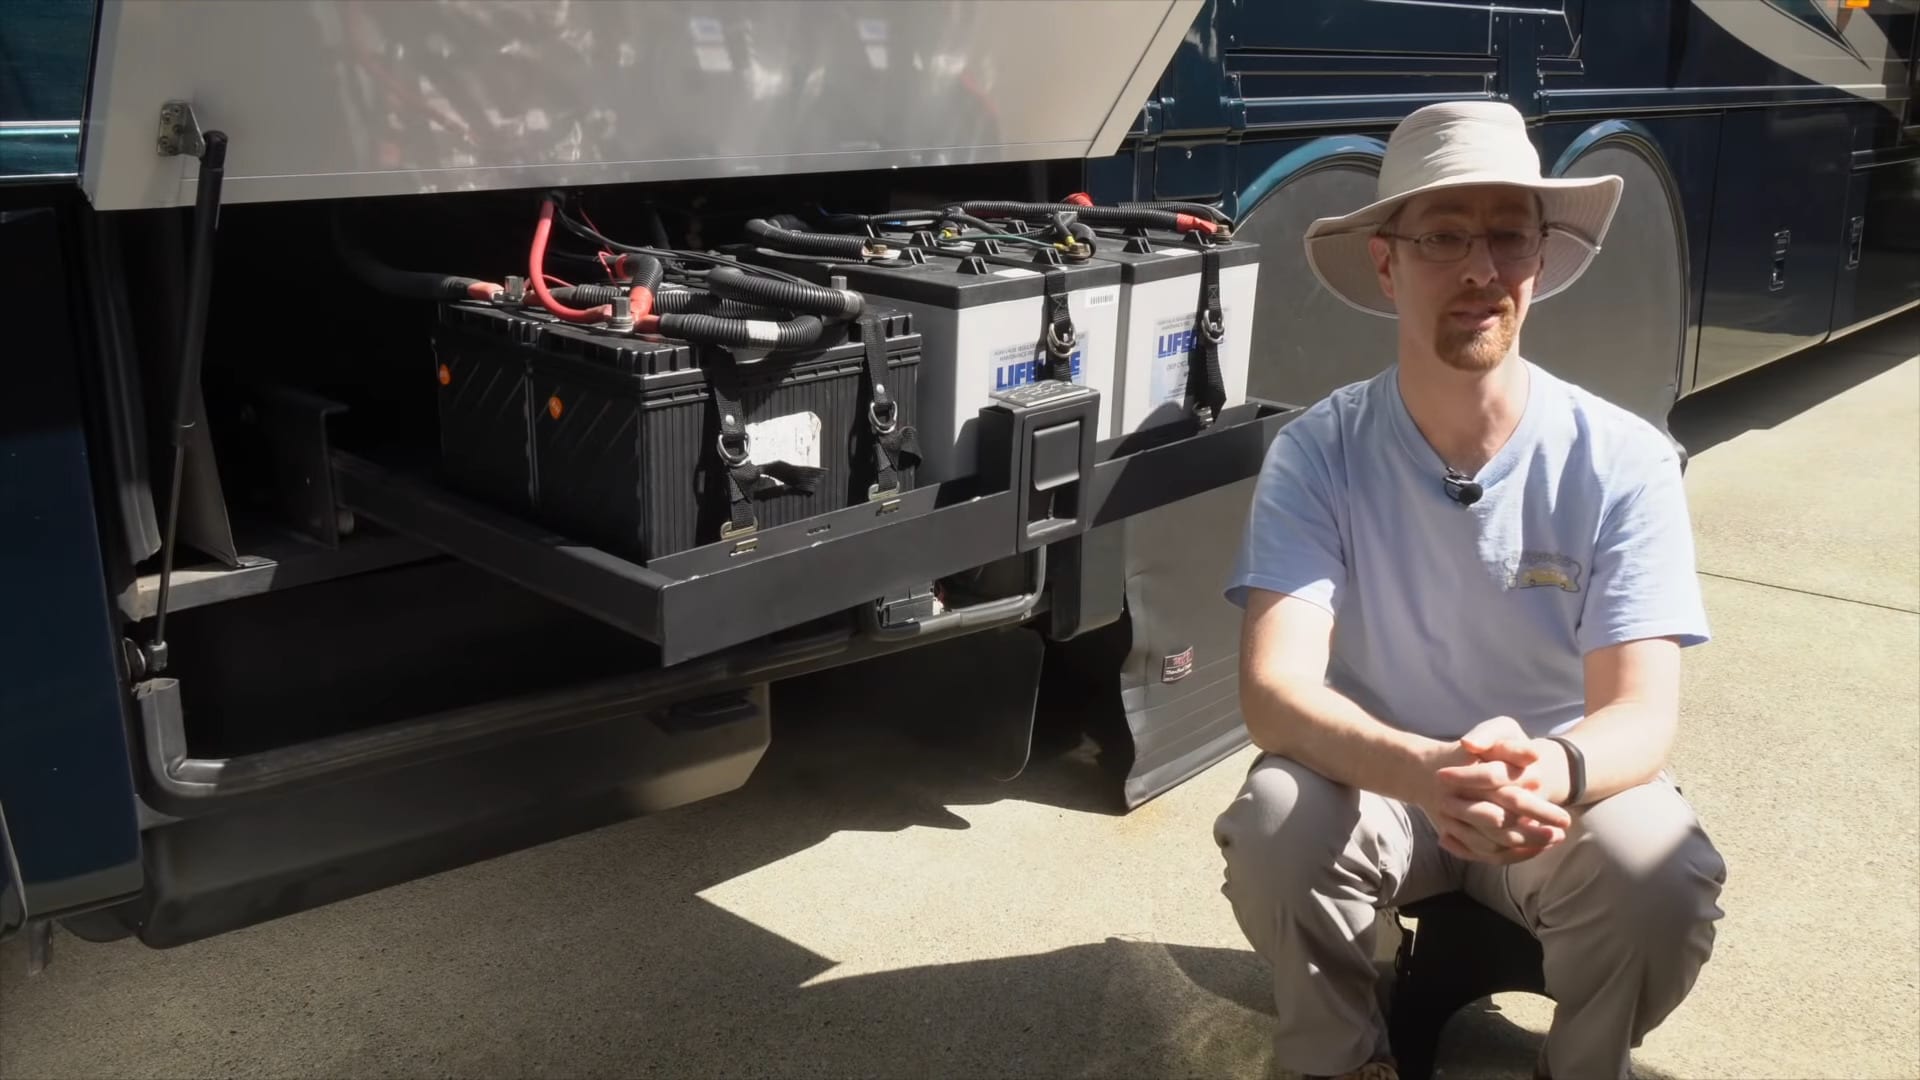
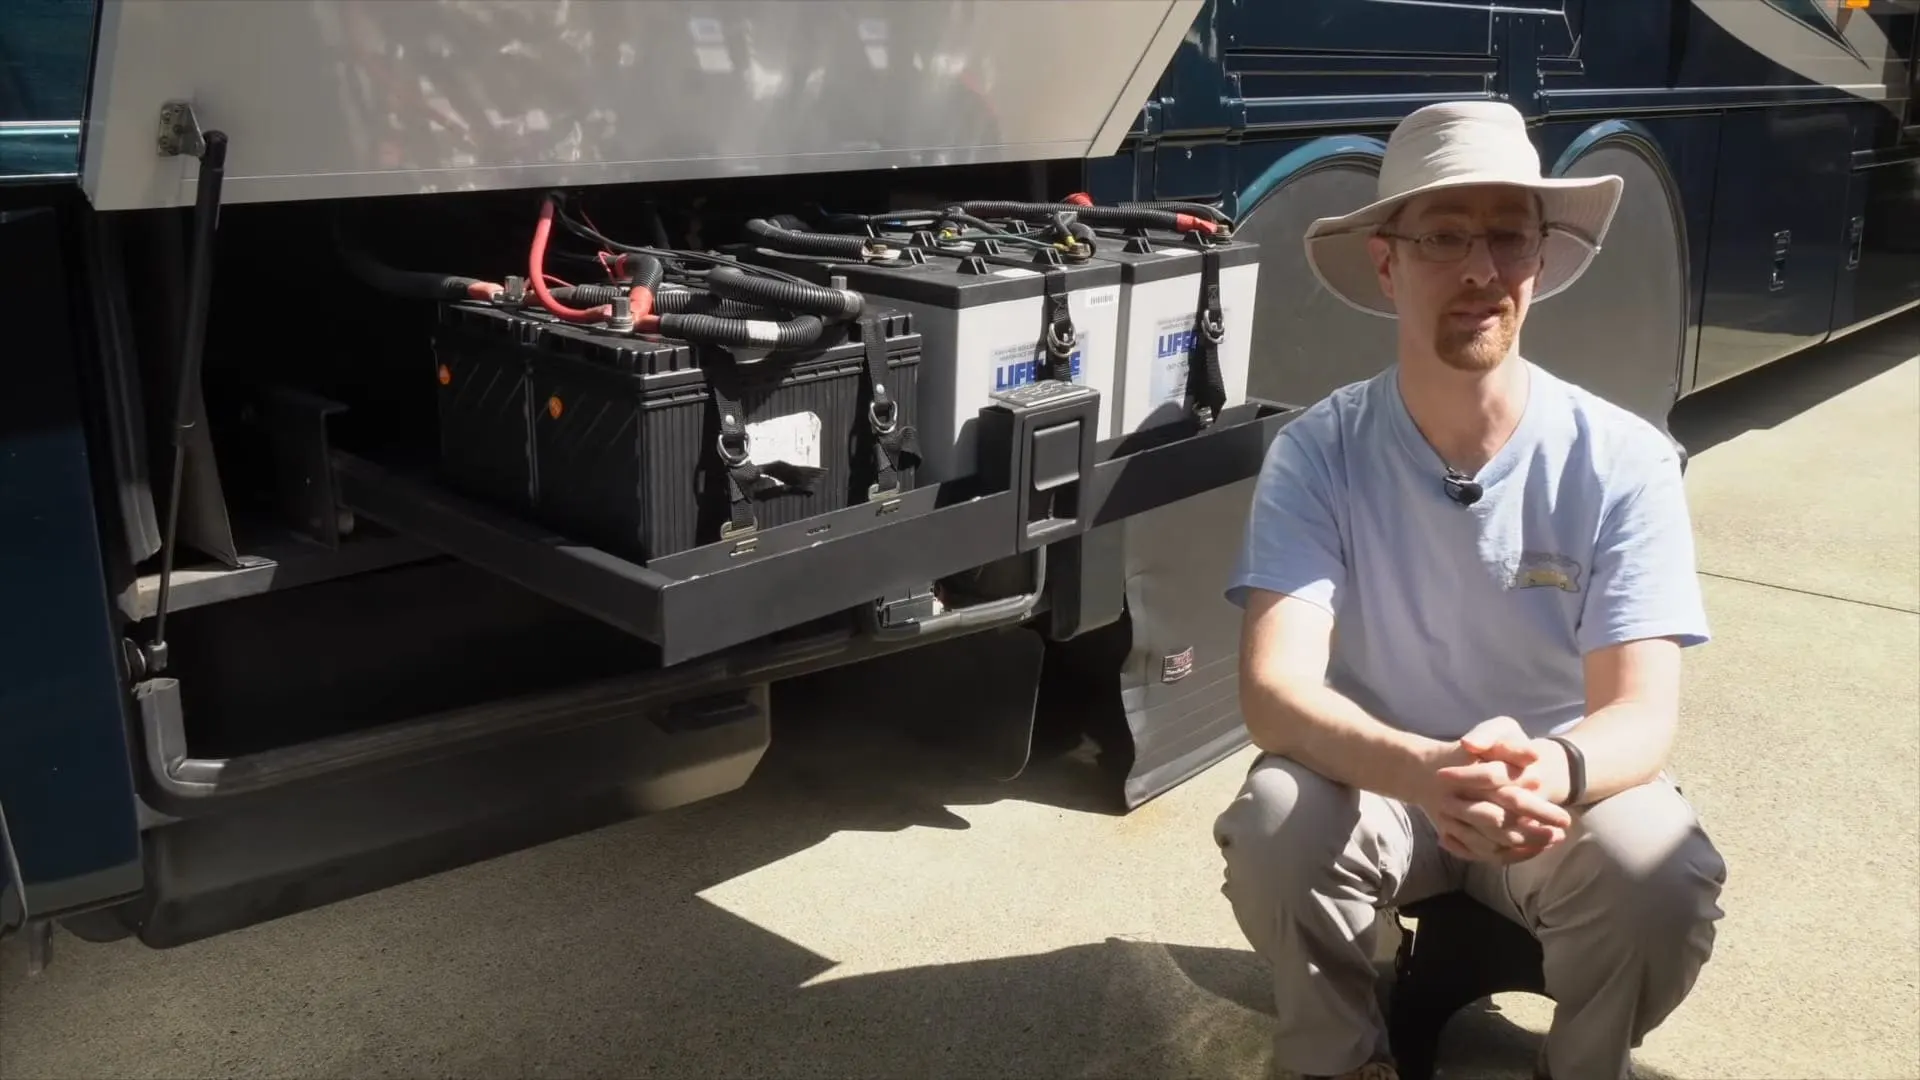
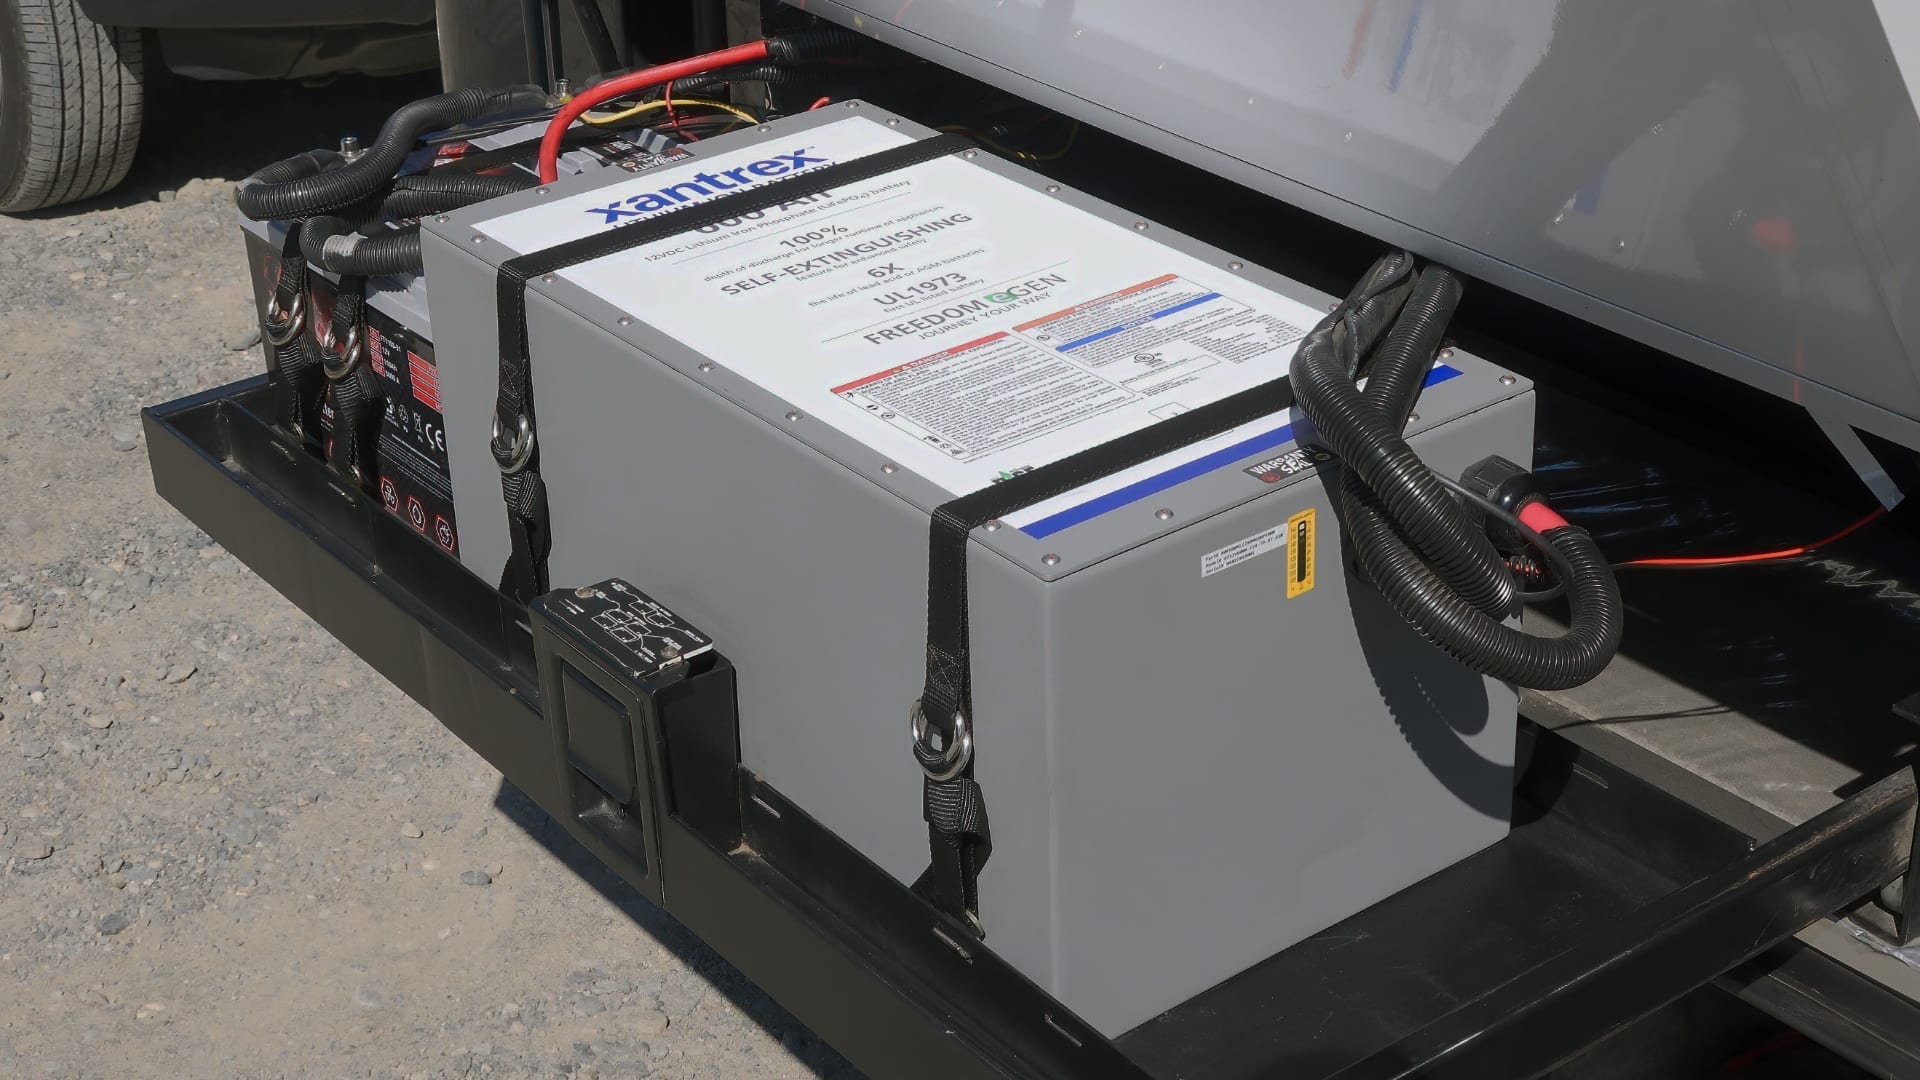
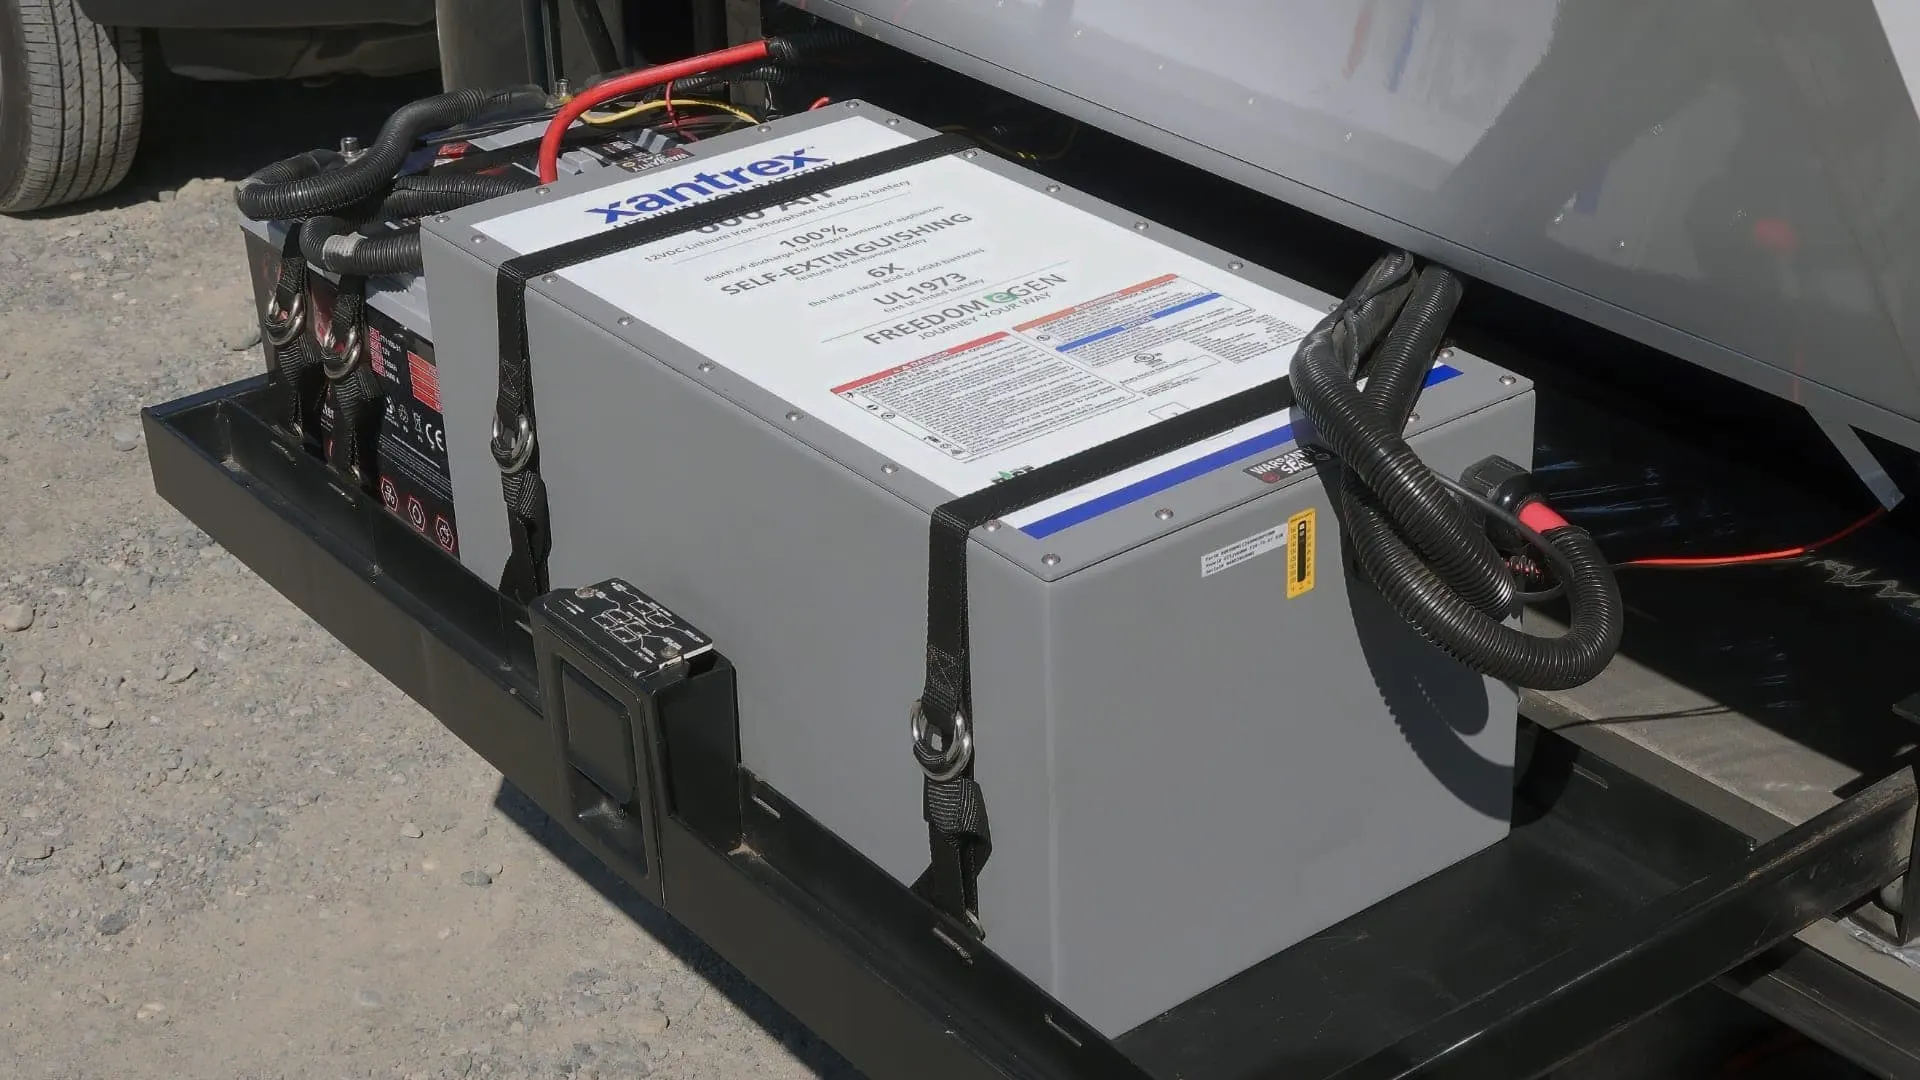
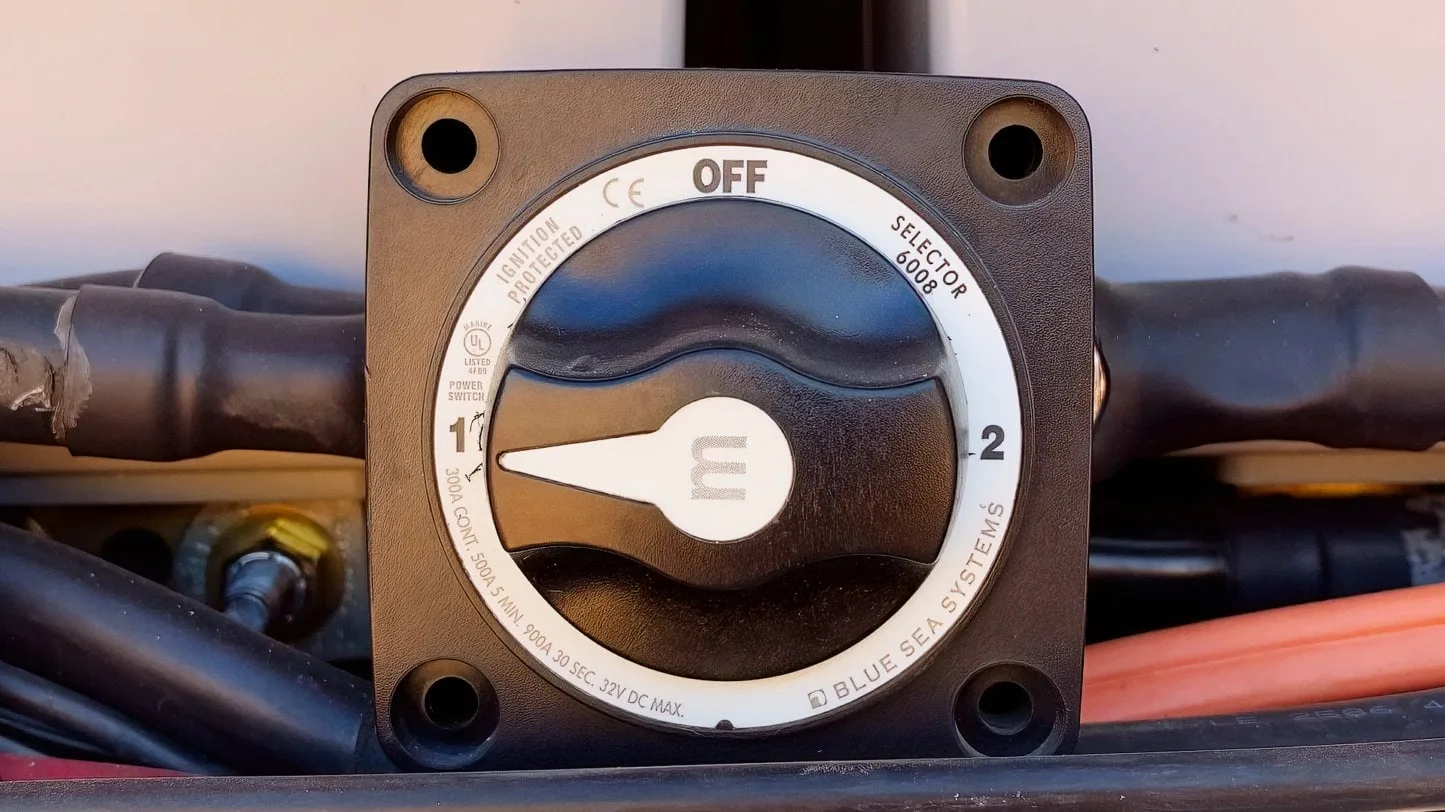
John explains the setup of our old AGM battery bank, prior to our upgrade to our 600 Ah Xantrex Freedom eGEN lithium house battery.
How Does a Battery Disconnect Work?
A battery disconnect switch is strategically placed between the negative battery terminal and the cable.
When used on an RV battery, it stops the flow of power through the negative battery cable, thus severing the connection between the battery and the 12V fuses distributed throughout the RV that provides power to the outlets, appliances, and amenities.
So, an RV battery disconnect switch offers an easy way to disengage the power flow to all 12V circuits in the RV. This, in turn, keeps the battery from draining.
When Should Disconnect Your RV Battery?
Perhaps the most obvious time one would consider using an RV battery disconnect switch is when storing the RV for an extended period of time, as we mentioned at the beginning of this post.
The reason for this is that batteries will discharge and degrade over time when left unused. This occurs due to the parasitic drains in the RV, and can also occur when the batteries are exposed to freezing temperatures. All of this can damage a battery’s overall health, and most certainly impacts the longevity of the battery.

Batteries can be discharged or even destroyed when left unattended in storage for long periods of time due to parasitic drains in the electrical system.
However, there is an important caveat to note here if your RV is connected to shore power while in storage:
If your batteries are the lead-acid type and your RV uses a multi-stage converter/charger with a mode for storage and you are connected to shore power during the period of storage, then you’ll want to leave the battery disconnect switch closed, (meaning you do not want to use the switch to disconnect the battery bank).
If you store your RV without a connection to shore power, then by all means open your battery disconnect switch (disconnecting the system loads from the batteries) to prevent the parasitic drains on your batteries.
If your RV has an older, single-stage converter/charger, then you’d be better served to disconnect from shore power, open your battery disconnect switch (disconnecting the system from the batteries), and use a battery tender on your battery bank.
If you have lithium-ion batteries, note that they don’t require a trickle charge during periods of storage, and you can (and should) use your battery disconnect switch.
Lithium-ion batteries like our Xantrex Freedom eGEN don’t require a battery tender while in storage for extended periods, but the battery disconnect switch should be engaged/opened, disconnecting the flow of power between the battery and the RV.
That covers RV storage, but when else might you want to use an RV battery disconnect switch?
A battery disconnect switch is also useful anytime you’re working on the electrical components of your RV. In this case, the RV battery disconnect switch acts as a safety mechanism, protecting you from the possibility of electrical shock while you’re working on the electrical system for maintenance, repair, or modifications, or while you attempt to troubleshoot a particular issue.
A good RV battery disconnect switch will not only prevent battery drain, but will also ensure safety during maintenance work, and could even guard against electrical fires.
A battery disconnect switch can also be installed on an engine battery allowing you to disconnect the engine battery for extended periods of storage. This prevents the engine battery from draining as a result of parasitic loads from electronic circuit boards and computers, etc. If the storage period is long, you may want to use a battery tender in this situation as well, as batteries do tend to lose charge naturally over time.
A battery disconnect switch can be installed on an engine battery so that parasitic drains from computers, etc. don’t drain the battery while in storage for extended periods of time.
Do All RVs Have a Battery Disconnect Switch?
Newer RVs are more likely to come with battery disconnect switches installed by the manufacturer.
For RVs that did not come equipped with a battery disconnect switch, installing one is neither complicated nor expensive. However, it’s important to be sure to use a battery disconnect switch rated for your vehicle’s battery and the maximum DC loads your RV’s electrical system may experience.
Our rig came from the factory with an Intellitec Battery Disconnect. The switch in our control panel turns a master solenoid on/off, enabling/disabling most (but not all) 12V power in the RV. It’s often called “the salesman switch” because RV salespeople use it to turn the power on/off in the RV when on the lot. This is done to keep the house batteries from being drained by lights and other electronics left on in the RV by customers who visit.


The switch in our Intellitec control panel turns a master solenoid on/off, enabling/disabling most (but not all) 12V power in our RV.
On our RV (and likely most others that come with this option), the disconnect doesn’t disable ALL power draws. Certain items (like slide-outs, power steps, awnings, etc) aren’t wired to the disconnect, so they remain powered on even when the switch is set to “Store”.
This is done partially for safety reasons – having the steps extend when the door opens is pretty important, for example! But with this type of battery disconnect system, the RV owner needs to be aware that the switch on the control panel isn’t completely disabling all potential power draws.
The type of switches that install inline with the negative terminal on a battery (or battery bank) ensures that you have a means of disabling ALL potential loads.

Switches that install inline with the negative terminal on a battery/batteries ensure that you have a means of disabling ALL potential loads.
Where Can I Find My RV’s Battery Switch?
Typically, an RV battery disconnect switch is located in the battery compartment.
If you look at your batteries’ wiring, you may see the disconnect switch located immediately off the wiring, before anything else, including the ground. This is so that the entire system can be shut down when the battery disconnect switch is engaged.
If you have a maintenance bay located in the vicinity of your batteries, you may also find your battery disconnect switch located there.
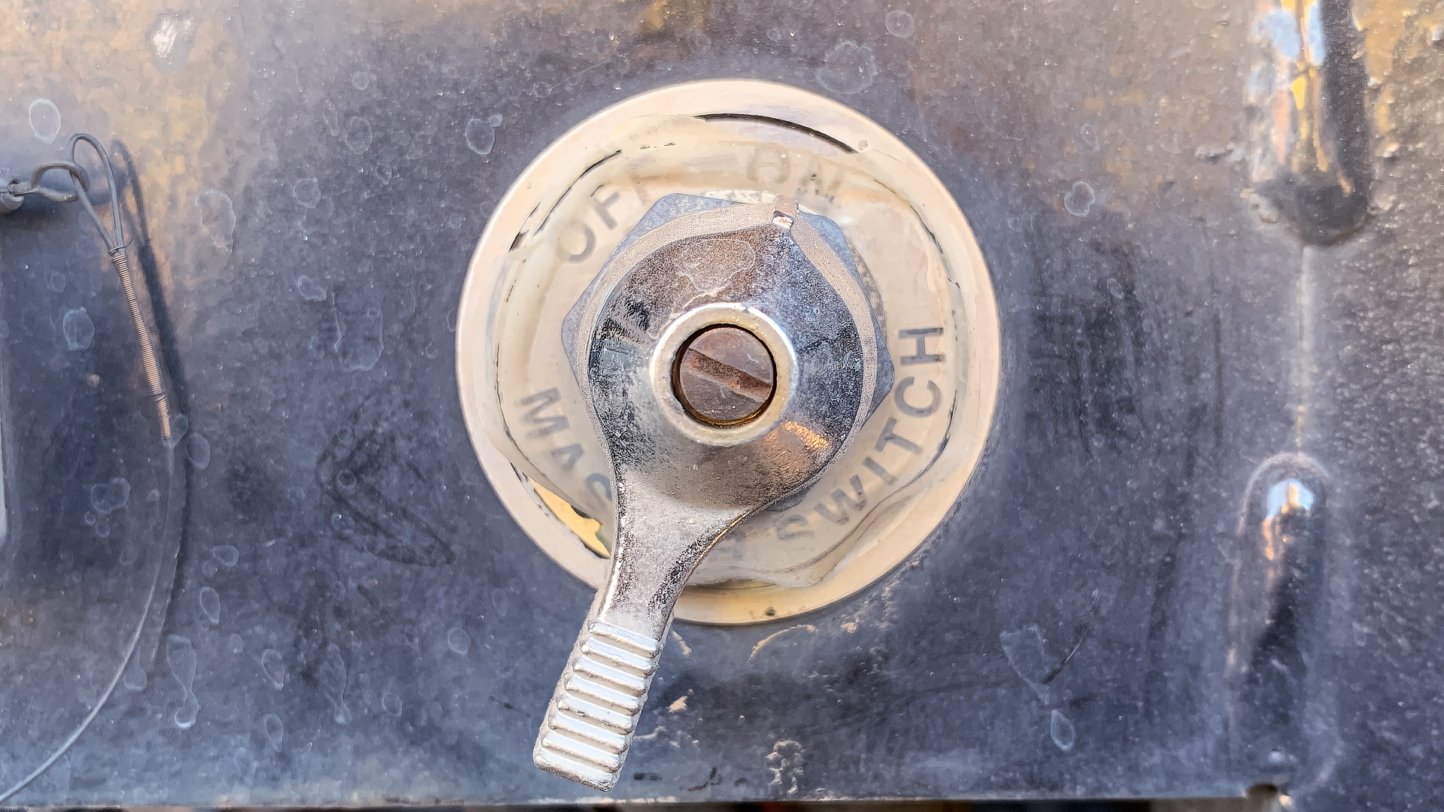
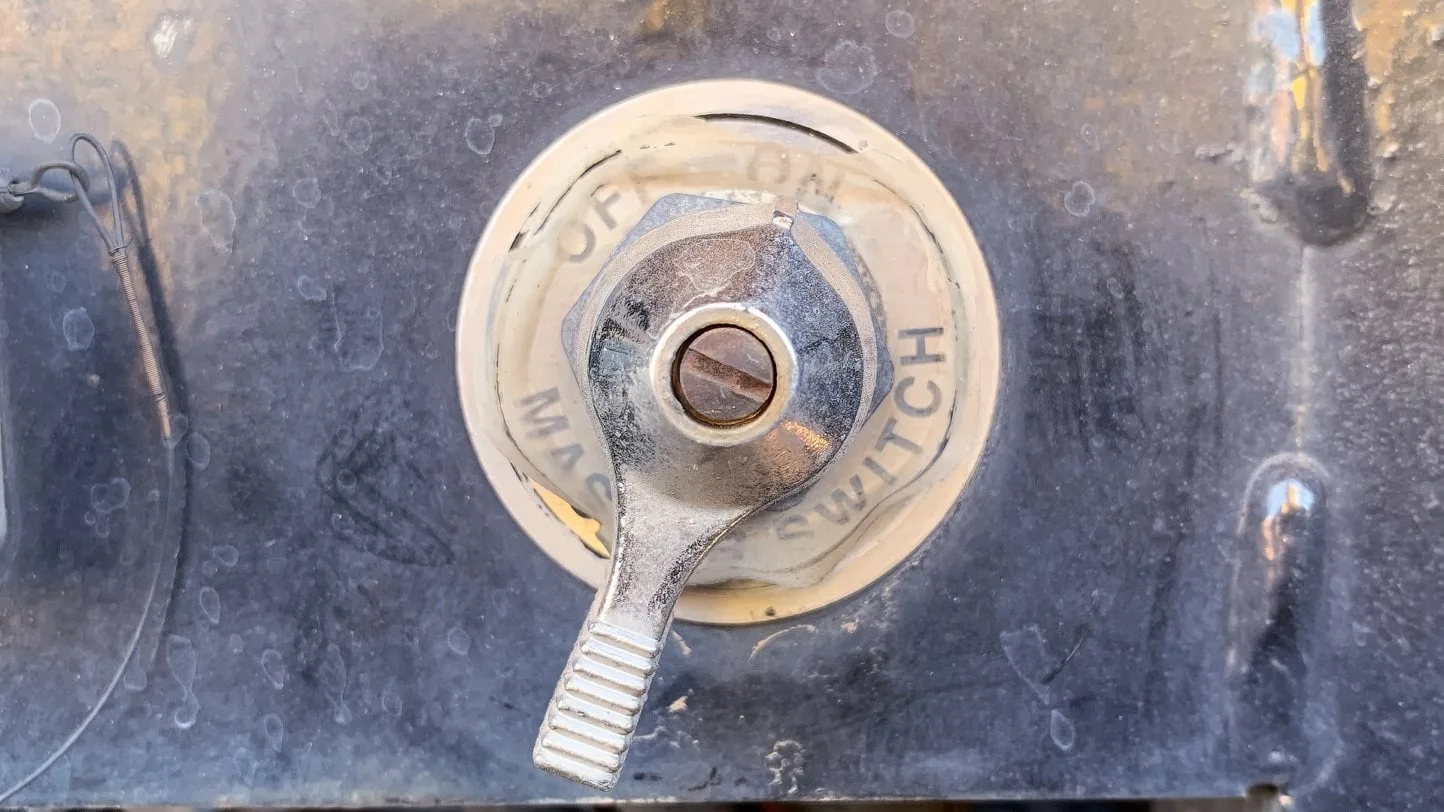
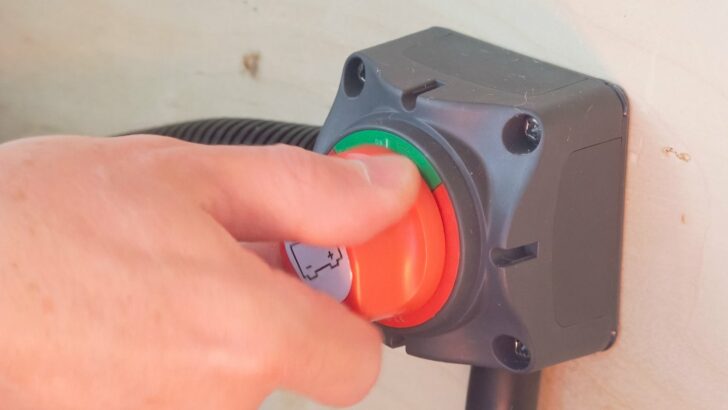
Your master battery disconnect switch may look something like this, and is likely to be found in the bay where your RV batteries are located. This switch is located on our engine compartment, and disconnects the chassis/starter batteries.
It could also be located on a battery itself, especially if a previous owner has installed one directly on the battery. This might be more common on an engine battery.
How Do You Install a Battery Disconnect on an RV?
Installing an RV battery disconnect switch is not complicated, but you do want to be sure to do it properly and to use a switch that is rated to your RV’s electrical system.
In short, you’ll be disconnecting the negative cable from the RV side of the system and connecting it to the disconnect switch. Then, a shorter negative cable will connect the switch to the battery bank. Engaging the switch will stop the flow of 12V power in the RV.
Allow us to be redundant here for a minute because the terminology can be confusing:
When the switch is open/off, (disengaged), no power will transfer to the RV. When closed/on, (switch engaged), power will flow and the 12V systems in your RV can operate.
A good battery disconnect switch will be clearly marked so that you know whether you’re opening or closing the circuit.
An important note:
Some RVs are equipped with battery disconnect switches that have been installed on the positive battery lead going into the RV. There’s nothing wrong with this and the result of engaging the switch is the same, but installing your battery disconnect switch on the negative side is preferable. Here’s why:
If you need to work on your battery wiring at any point, the negative side should be disconnected. Otherwise, a short circuit can occur if the positive lead touches the frame of the RV.
Of course, you can avoid this situation entirely by disconnecting the negative side before conducting any work, but if your battery disconnect switch is installed on the negative lead, you not only relieve yourself of the risk of a short circuit, you also don’t need to bother with the step of removing and isolating the negative cable. That disconnect is made by engaging your battery disconnect switch.
So – three steps to installing an RV battery disconnect switch:
- Disconnect the negative cable from the house (RV) side of the system – (coming from the RV to the battery).
- Connect that negative cable to the output side of the disconnect switch.
- Attach one end of a short length of cable to the input side of the switch, and the other end to the negative terminal of the battery bank. NOTE: This cable may be provided with your switch. If not, you need to buy the same gauge wire that is currently on your system, and you may want to buy your wire with the lugs already attached to the ends for ease of use.
Depending on what type of switch you’ve purchased, you may need to mount the switch itself inside your electrical bay, on top of your battery case, or in whatever location works best for your particular situation.
Which RV Battery Disconnect Switch Should I Buy?
Battery disconnect switches are generally inexpensive. Though they may have different appearances, they work similarly in that they cut off power to the RV from the battery bank.
Following are a few options with many excellent reviews. All are easy to install, but one type may work better than another for your particular application based on the design of the switch mount.
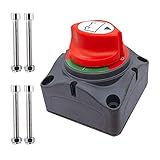
Blue Sea Systems 300 Amp m-Series Battery Switch
This is a single circuit ON-OFF switch, though other types are available by selection once you’re on the Amazon page. This unit switches a single battery to a single load group.
This switch is IP66 waterproof and has a continuous rating of 300A, with a maximum voltage of 48V DC.
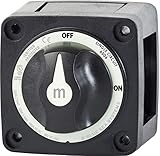
- Blue Sea Systems Battery Switch m-Series ON/OFF with Knob, Black, part number 6006200, is a Single Circuit ON-OFF switch. Switches a single battery to...
- IP66 waterproof, ISO 8846 and meets ABYC requirements. Ignition protected—safe for installation aboard gasoline powered boats
Ampper Battery Switch, 12-48 V Battery Power Cut Master Switch Disconnect Isolator
Similar to the previously noted switch, this is a single circuit on-off switch, but additional types can be chosen at the time of purchase.
This is a heavy-duty switch with ABS plastic housing. Somewhat unusual with this type of switch, the rear and sides can be fully covered, (or not), insulating the terminals against short circuits.
This switch offers an easy-to-use rotary knob that is also easy to read – red is “off” (power is cut off), green is “on” (power is flowing).
This switch is 275A continuous at 12V DC, 455 A intermittent at 12V DC, or 1250A momentary at 12V DC. It can be used for 12V-48V systems and can also be used together with a second switch.
- Heavy Duty: ABS plastic housing, durable made for safety use, rear cover insulates terminals against any short of circuits, equiped with 4 sets of...
- Operation: On/Off 2 positions, 275 A continuous at DC 12V, 455 A intermittent at DC 12V, 1250 A momentary at DC 12V.
Top Post Knife Blade Master Switch, Ampper 12V / 24V Battery Disconnect Switch
This is a blade type on/off switch that sits on top of the negative post only and is appropriate for a single-battery situation.
Appropriate for a 12V-24V DC system, this switch offers 200A continuous and 600A momentary at 12V DC.
Made of rust and corrosion-resistant solid brass, this blade switch needs room for the blade to be lifted, as shown in the photo.

- Compatible: used for top post terminal, 15-17 mm cone / tapering battery NEGATIVE post only, DC 12V-24V system, 200A continuous and 600A momentary at...
- Convenience: vertical knife blade type, easy to install & simple to use. Lift the knife, then power will cut.
We hope this helps to familiarize you with your RV battery disconnect switch and its purpose, and also with the process of installing a disconnect switch if your RV doesn’t already have one.
The convenience and safety offered by these simple cut-off switches is well worth the minimal effort it takes to install them. Their affordability seals the deal, making an RV battery disconnect a great DIY project to add convenience and safety to your RVing experience.
Geek Out with Us Every Week
Join our newsletter to learn about all things RV-related. Every week we offer free tips, tricks, product reviews, and more to our online community of RVers. So, whether this is your first time on the road or you’re a seasoned expert, we’d love for you to geek out with us!
Kelli colle
Thursday 28th of September 2023
This is all great information very detailed and easy to understand when you even know the basics is there anybody out there with photographs of older disconnect switches I'm having a heckuva time finding one on my RV but according to everything I've been told there is one thank you for any help
TheRVgeeks
Thursday 28th of September 2023
Thanks, Kelli. Glad you found this article helpful! And sorry you're having trouble finding your RV's disconnect switch. Unfortunately, every manufacturer does it a bit differently, and there's no one "standard" location for them. You might have the best luck posting your question in the appropriate owner's forum over on iRV2.com (here's a direct link to the "Owner's Corner Forums" where there's one for each specific brand: https://www.irv2.com/forums/f8/). The forums are free to join and free to post on... and we'd bet that someone else with the same make/model/year of RV could point you to your shutoff switch in no time.
Eileen Heagerty
Monday 29th of November 2021
This was very helpful! I’m a brand new RV owner. I’ve got a gently used 2017 LVT wonder turbo Diesel. It’s being stored in my pole barn in chilly central NY. I’ve been trying to figure out what to do with winter storage and batteries. Once disconnected, are the house batteries safe in cold weather for several months? I plan on putting a trickle charge on the chassis battery. I have access to the rig and will be able to start her up once a week of that is advised. I’m assuming it’s also a good idea to run the generator once a month?? I will have power but, it won’t be 30 amp. I’ll have a 120 volt outlet. Plug it in??? Any advice is greatly appreciated. Your land in Tennessee is gorgeous!!! Thanks for all the tips in your articles. Best, Eileen
TheRVgeeks
Monday 29th of November 2021
Hi Eileen,
First, congrats on your Wonder. Leisure makes a really nice motorhome, so we're sure you're going to be very happy.
Second, a couple of notes for you about storing the RV:
Yes, flooded lead acid batteries CAN be damaged by being stored in very cold climate. But that's if they aren't being maintained with a charge. When just sitting, without a charge/load on them, the electrolyte in the battery cells can freeze. But a maintenance/float charge actually helps to keep them warm, so they shouldn't have a problem. We assume you are planning to winterize the plumbing in the coach... either by blowing out the lines with compressed air or by pumping RV plumbing antifreeze into the system. Either works, though using the antifreeze means you'll need to flush it out come spring. Even with only a 15-amp (normal 120V outlet like you have in your house) available to you, it's a good idea to leave the Wonder plugged in to keep the house batteries charged up (assuming it has a 3-stage charger that has a "Float" mode, so the batteries don't get overcharged while in storage). You'll want to be sure that the refrigerator is turned off completely, so it doesn't switch over to 120V power to cool down with which might cause too large a load and trip the breaker for the outlet. And be sure that the 120V heating side of the water heater is turned off (same reason). IF so equipped, you may even be able to tell the Wonder's charging system to limit its power consumption to only 10-15 amps, so you can be sure it won't ramp the 12V charger up too high and... you guessed it... trip the breaker. ???? Set up like that, the "Float" charge from the onboard charger will keep the house batteries properly charged and warm enough that they shouldn't freeze. If your pole barn has a dirt of asphalt floor, you'll also want to put some kind of plastic barrier between the tires and the ground. The tires can be aged faster by exposure to a lot of moisture (more likely with a dirt floor) and petroleum distillates (can leach out of asphalt/blacktop). We've used large plastic cutting boards we bought cheap on Amazon (something like these could work: https://amzn.to/3pg1msh). Also with the tires... for long-term storage, it's a good idea to inflate them to the maximum pressure that's listed on the sidewall of the tires themselves (there's often a LOT of writing embossed into the tire, but look carefully, it's always there). That makes sure that you don't end up with a flat spot on the tire from it sitting for extended periods in one spot. At maximum allowed pressure, it keeps the tire round... and keeps less of the tire in contact with the ground. There are a LOT of schools of thought when it comes to running engines when in storage/sitting for long periods of time. We'd recommend you check with Leisure Travel Vans to see what they suggest for your Wonder chassis & engine. But we can tell you what we do for our Spartan Chassis with Cummins Turbo Diesel engine and our Onan diesel generator... once a month, we take it for a drive to get the engine fully up to temperature (failing to get the engine fully warm can do more harm than good... oil is cold and lubricates less until then... and moisture can just be distributed throughout the engine, doing more harm than otherwise), get the tires warmed up and flexed, and get all of the lubricated bits of the drivetrain and suspension run through their paces. While we're doing that, we also run the generator and put about a 50% load on it for an hour. Since our 7.5kW generator can output about 60amps at max, we try to load it with about 30-amps of load... charging batteries and running the A/C or Heat Pump. Just firing up the engine and letting it idle for a while isn't likely doing much good. Same for the generator... don't just fire it up, let it run a few minutes, and shut it down. Put a load on it and let it really warm up to be sure it's helping. Cummins & Spartan actually told us with our RV that if we CAN'T do that (run the coach till it's fully warm, etc) that we were better off NOT running it at all while stored/parked. Others may disagree... but it's what we've always done with our RV... and we've had it since new (2005) and at 16+ years old, it's still running strong!As for land in Tennesse... we think you may have us confused with Mike & Jennifer Wendland (of RVLifestyle) who just posted a video about property they bought there! ????
Hope all of this helps!
RAYMOND C CALDWELL
Monday 15th of November 2021
Will disconnecting the house batteries require anything to be reprogrammed? I'm thinking mainly of our heat pumps/furnace controls. I know that's tricky because we had our rooftop units replaced and the controls had to be reprogrammed. I never knew if it was because the power was disconnected when they did that. Other than that the batteries have never been disconnected yet and I want to change them out this winter. But don't want to lose the HVAC programming or anything else that I might not be aware of. Thanks!
TheRVgeeks
Monday 15th of November 2021
Good question, Raymond. We haven't had many issues with needing to reprogram much of anything in our coach when we use our battery disconnect... other than a couple of clocks and one setting in our in-dash display for our backup camera, where we just need to tell it we HAVE one, so it shows. We've never had any issues with our thermostat or HVAC controls needing reprogramming... and think that may only be an initial install configuration, not a result of the power being off. You should be just fine when you change out your batteries... just be sure to make a diagram and take lots of pictures before you disconnect ANY cables from your batteries. It will save you a lot of frustration if you do (we have a video about what we did here). We've heard from too many people who DIDN'T take photos & make diagrams who are then left trying to figure out which cables went where... and that's not a headache ANYONE needs.
Will Belden
Sunday 14th of November 2021
I know that Grand Design's battery disconnects also always leave the CO2 detector powered.
TheRVgeeks
Sunday 14th of November 2021
Good to know, Will. While not, generally, a big drain... anything, in the right (or wrong?!?!) circumstances could leave you with a dead battery. And, usually, that'll happen at the least opportune time, too!
Mike R
Sunday 14th of November 2021
Thanks for all of your great articles and videos!! Amazing!!!
TheRVgeeks
Sunday 14th of November 2021
Thank YOU for the nice words, Mike! Glad someone out there's enjoying all of this! ????