
Dumping tanks on an RV is no one’s idea of “fun.” RV dump stations at RV parks, rest areas, or truck stops aren’t full of people with excited, eager smiles, raring to get to the task. That noted, knowing how to dump RV tanks properly makes the dreaded deed much easier.
In today’s post, we’re laying out the steps in both written and video format so you’ll know how to dump your black and gray tanks the right way, leaving your rig odor-free and your RV’s waste system running smoothly.
-
1)
A Step-By-Step Guide to Dumping Tanks On an RV
- 1.1) Connect Your Sewer Hose and Clear Elbow to the RV’s Holding Tank Drain Outlet
- 1.2) Connect the Other End of Your Sewer Hose
- 1.3) Connect a Garden Hose to Your Sewage Tank Rinse Outlet (or Rinse Wand)
- 1.4) Pull the Black Tank Valve
- 1.5) Turn on the Water to the Black Tank Flush System or Wand
- 1.6) Close the Black Tank Valve
- 1.7) Re-open the Black Valve
- 1.8) Close the Black Valve
- 1.9) Re-Open the Black Valve
- 1.10) Turn Off the Water To the Black Tank Rinse and Close the Black Valve
- 1.11) Open the Gray Valve
- 1.12) Close the Gray Valve
- 1.13) Add Water and Treatment to the Black Tank
- 2) Free RVing Tips, Tricks, Reviews & Giveaways
A Step-By-Step Guide to Dumping Tanks On an RV
You may be thinking to yourself, “I already know how to empty the black tank on an RV.” For sure, it isn’t rocket science. But, knowing how to empty RV tanks and taking the proper steps to do it correctly could be two different things.
This is the way to get your tanks as clean as possible, to keep sewage from leaking onto the ground (or onto you!) during the dumping process, and to keep the system running smoothly.
Note: RV systems vary. So, although the steps in the process are likely to be similar, there may be minor variations in how your RV looks and functions. This is the process we’ve used during more than 20 years of full-time RVing, and we never had a single “black tank incident” in all those years.
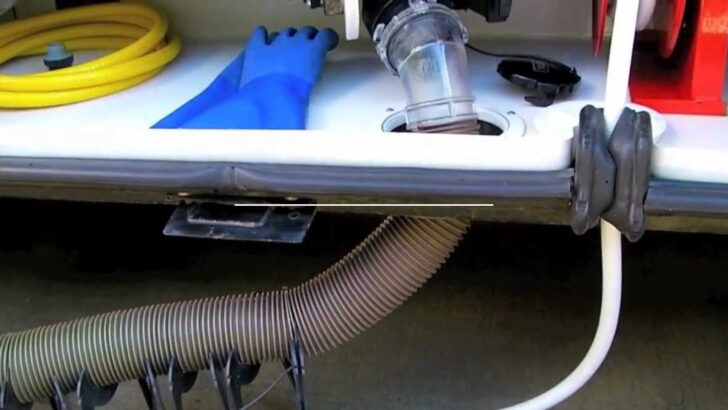
Connect Your Sewer Hose and Clear Elbow to the RV’s Holding Tank Drain Outlet
To begin the tank dumping process, connect the sewer hose to the RV’s holding tank drain outlet. We suggest using a clear elbow on the outlet end of your sewer hose so you can see when the tank is draining clear. That’s the best indication that you’ve gotten things as clean as possible during the dumping process.
Here’s the type of clear elbow and sewer hose we’ve been using since we hit the road:
- Clear RV Sewer Hose Adapter: See-through hose adapter allows you to see when your RV sewer system is clean
- Compatibility: Fits 3-inch diameter RV sewer hoses

- RV heavy-duty hose is 15 mils of brown HTS vinyl
- Perfect for the seasonal RVer
For additional sewer hose options, see our post on the 5 best RV sewer hoses.
PRO TIP: Whenever possible, we do our best to dump black water only when we’re at a full hook-up campground. There are three advantages to avoiding dump stations when dumping black water: 1) A solid threaded connection to the park’s sewer outlet (which isn’t an option at a dump station) means we don’t get a nasty whiff during dumping, 2) A readily available source of fresh water for connecting a hose to our black tank flush system, and 3) No lines of other RVers waiting behind us, so we can take our time and flush the black tank without being rushed. Dump stations are fine for gray water, but we rarely dump the black tank at them if we can possibly avoid it.
Connect the Other End of Your Sewer Hose
If you’re at a full hook-up, connect the other end of your sewer hose to the sewer outlet in the park. Many states require a solid, continuous connection from the RV to the sewer outlet. If you’re at a dump station, place the end of the hose into the sewer opening, making sure the end of the hose won’t pop out of the opening when you open the drain valve.
Many dump stations have heavy brass covers over the opening that you step onto to open. Those covers are usually fine for holding the hose in place. Barring that, you can hold one foot onto the hose to keep it from coming out if you’re able to stand close enough. The potential for the hose to pop out of the opening is one reason we avoid dumping black water at dump stations.
We once witnessed a fellow RVer dumping their black tank at a dump station in Yosemite National Park. But they neglected to insert the end of the hose securely under the brass cover. The moment they pulled the black valve, the hose popped out, the cover closed, and a disgusting lake began to fill the dump area. We then watched in horror as they waded in to find and step on the pedal to re-open the sewer inlet! 😳 This is what is known as a “black tank incident” among RVers. Again, we’re very happy to have never experienced one!
Connect a Garden Hose to Your Sewage Tank Rinse Outlet (or Rinse Wand)
We start by connecting a garden hose from the park’s water supply to the sewage tank rinse outlet on the RV. The purpose of this is to flush the RV waste tank well, and it’s an important part of keeping things as clean as possible to keep your RV odor-free. Even though the black tank flush system has a built-in backflow preventer, we always include a second one in the line as a double-check against any black water backing up into the park’s water system.
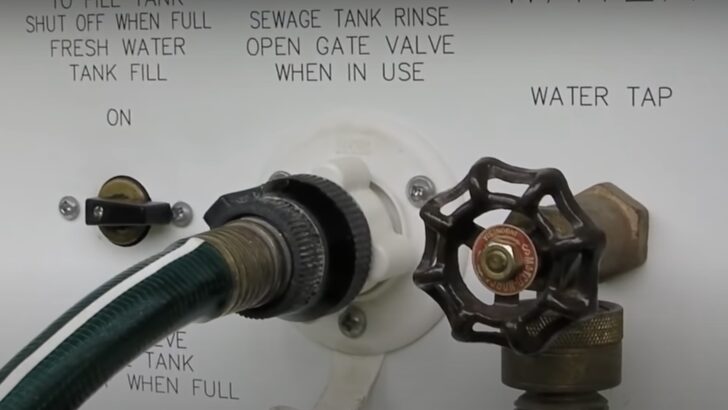
Connect your rinse hose to the sewage tank rinse on your RV. If your RV isn’t equipped with a black tank flush system, you can use a hose with a tank-flushing wand aimed down into the toilet. The black plastic fitting between the hose and the RV is a backflow preventer (anti-siphon valve).
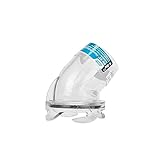
Not every RV has a sewage tank rinse system. That’s not a problem. If your rig isn’t equipped with one, you can buy an inexpensive rinsing wand like the one below to put down the toilet to rinse & flush out the black tank. You’ll also need a dedicated flush hose. We suggest choosing a color for your hose that indicates that it’s your sewer flush hose. This isn’t one you want to mix up with your fresh water hose.

- Tank black water flushing hose: 15 ft length, 5/8" ID, 3/4" standard connectors.
- Designed for non-drinking water, this orange hose is ideal for flushing RVs black water, gray water, tote tanks.

- POWERFUL ROTARY CLEANING ACTION: Enjoy superior cleaning power with this RV tank cleaner. Its powerful rotary cleaning action shifts even the toughest...
- FLEXIBLE REACH: The black tank rinser has a 34" flexible section that is perfect for hard-to-reach RV tanks. Get into those offset basement tanks with...

- Package Dimensions: 4.5 L x 1.5 H x 3.75 W (inches)
- Package Weight: 0.1 pounds
For much more detail on this, see our post about RV black tank flush systems.
PRO TIP: Before you open the black valve or turn on the tank rinse hose, now is a great time to open your gray tank valve for a few seconds, and then close the valve again. This uses gray water to test your sewer hose connections to make sure they’re watertight before dumping your black tank. Note that you’re not dumping the gray tank yet. You’re just using a short gush of gray water to be sure all the connections are good. Better to leak a little gray water than black water any day!
Pull the Black Tank Valve
Once you’ve done your brief connection test with some gray water, it’s time to open the black tank valve. This is where your clear sewer elbow comes in to show you the color of the contents coming from your black tank. The initial contents will be dark, of course, until the water running through the valve is clear, indicating that you’ve cleaned out the contents of the black tank sufficiently.
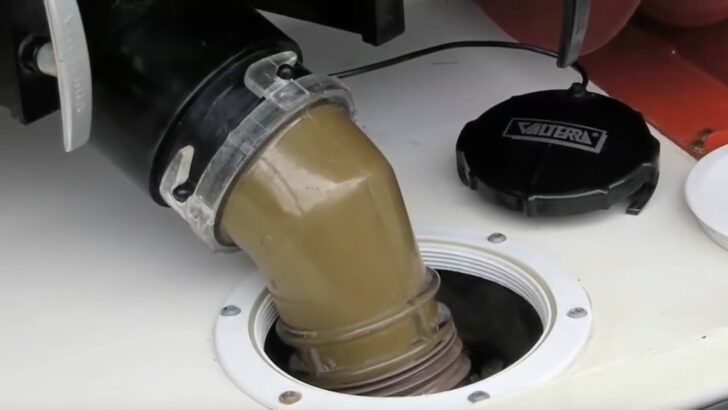

This clear sewer elbow allows us to monitor the contents being drained from the black tanks so we’ll know when it’s as clean as possible.
Turn on the Water to the Black Tank Flush System or Wand
If you’re using a black tank flush system, turn the water on slowly. You don’t want to turn it on suddenly for two reasons:
- There’s a vacuum breaker for the tank rinsing system inside the RV that prevents siphoning. If you turn the water on full force instantly, there’s the potential for the breaker to jam in place. Don’t ask us how we know this. 😉
- Since there’s no valve to shut off the flow of water, it’s very unlikely you could build up enough pressure to burst the plumbing in the black tank flush system. For that reason, we’ve never used a pressure regulator on the black tank flush. Instead, we turn the water pressure up slowly until the hose feels firm when squeezed. We don’t let it get hard as a rock, just in case. That method has worked flawlessly for us for over 20 years, but of course, feel free to use a pressure regulator on your black tank flush if you’re concerned about high water pressure there.
If you’re using a tank rinsing wand, stick it down into the toilet and turn it on.
Either way, this will start the flushing process. Let the water run for about 3 or 4 minutes until it runs mostly clear, as viewed through the clear elbow. This is definitely easier with a built-in tank rinsing system, avoiding the need to go into and out of the RV.
Close the Black Tank Valve
Close the black tank valve and stand by for about 3 minutes while the sewer rinse hose partially fills the black tank.
Re-open the Black Valve
Open the black valve again. What you’ll note at this point is that the water running through the clear elbow will be brown again, because the first flush of the tank (the first time you pulled the black valve) did not completely clean out the tank. This is the reason for partly re-filling the tank with fresh water after the first dump.
Close the Black Valve
As soon as the water runs clear, close the black valve and stand by for another 3 minutes while the tank partially fills again.
Re-Open the Black Valve
This time, you should see the water running clear through the elbow almost immediately when you open the black valve. If not, repeat the process one more time.
Note: The trick to keeping your black tank as clean as possible avoiding issues related to build-up is to allow the tank to fill and refill partially to get good flushing action. However, without a clear sewer elbow, you won’t know when you’re getting clear water running from the tank.
There may be some black tanks that are shaped in a way that allows them to completely flush out waste without closing and partially refilling the tank. If you close your black valve, refill the tank for three minutes, and then open it to find completely clear water running through the clear elbow, congratulations! You probably don’t have to bother with this process, since your tank flushes out clean without bothering.
Turn Off the Water To the Black Tank Rinse and Close the Black Valve
Turn off the water to the black tank flush connection. As soon as you see that the water has stopped coming through the clear sewer elbow, you can close the black valve. In the unlikely event that you haven’t already heard, you should never leave your black valve open, even when connected to a full hook-up.
If you thought our story about the RVer strolling around in black water in Yosemite was bad, you certainly don’t want to deal with pyramiding, where liquids run out of the tank and solids build up into a mountain. That is one of the worst self-inflicted wounds an unsuspecting RVer can make. That would definitely require an RV colonoscopy at the very least.
Open the Gray Valve
Open the gray valve to empty the gray tank while also flushing out the sewer hose. It’s important to leave the dumping of the RV gray water tank for last so that the gray water flushes out your sewer hose after you’ve dumped your RV black water tank.
Close the Gray Valve
If you’re connected to a campground sewer system or septic tank, you may decide to leave the gray valve open or closed. If you’re not hooked up, you should obviously close the gray valve. Did we mention that the black valve should always stay closed?
Add Water and Treatment to the Black Tank
To complete the process, be sure to add about a gallon of water to your black tank directly through the toilet. There should always be water in your black tank. Leaving it completely can cause buildup that’s very difficult to remove. This is also the time to add your favorite tank treatment to the black tank.
After more than 20 years as full-time RVers, our favorite treatment is Happy Campers.

- Powerful Odor Control: Say goodbye to unpleasant odors with our powerful formula that neutralizes and eliminates foul smells, leaving your RV smelling...
- Effective Waste Digestion: Happy Campers breaks down waste and toilet paper quickly and efficiently, preventing clogs and ensuring smooth tank...
If you’d like to see a short step-by-step visual about dumping tanks on an RV, check out our video RV Holding Tank Dumping:
Also, see our posts on the 5 best RV sewer hoses and the 3 best portable RV dump tanks. And keep our post on how to unclog an RV black tank handy as well… just in case.
Free RVing Tips, Tricks, Reviews & Giveaways
As 20-year full-timers, we share everything we’ve learned about RVing over the years. Join our online community to receive a wealth of great RVing knowledge delivered daily to your inbox.
Whether you’re a new RVer or a seasoned full-timer, you’ll love the wide range of RVing topics we cover. Don’t miss a single article or any of our famous Giveaways. Subscribe to our newsletter today!
Mike
Sunday 14th of January 2024
After hooking everything up I always pull the gray valve to fill the dump hose and MAKE SURE THERE IS NOT A LOOSE CONNECTION. Only 3 seconds or so. Once I see no water or connection issues, close the gray and start the black. I have seen some unwelcome surprises at the dump stations.
OhioBob
Friday 12th of January 2024
I empty my black tank. With the black tank valve open, I raise my waste tube higher than the valves. I open the grey tank valve and flood the black tank with grey water. I do this several times till I get clear water out of the black tank. Then close the valve to black tank and empty the grey tank.
TheRVgeeks
Monday 15th of January 2024
Awesome tip. Thanks, Bob!
Mike
Wednesday 10th of January 2024
My wife and and I prefer to boondock western states as public land is conveniently plentiful. I carry a 45 degree elbow with a gate valve and use that valve to backflush the black with gray water when at a dump station. When in an RV park I can then use the tank flush on my own time effectively. Thanks for posting the setup and sequence.
TheRVgeeks
Monday 15th of January 2024
Great tip about using the gray to backflush the black tank, Mike! Thanks for sharing!
Bruce
Tuesday 9th of January 2024
Always entertaining to read about dumping holding tanks and you were right, I did learn something new. We've come across the remains of "black tank incidents" and to avoid those we use the clear elbow at the end of the hose into the sewer inlet to make a secure, worry free connection.
Ray Davis
Tuesday 9th of January 2024
Always wondered about the chemicals when on FHU? Certainly a plus, however, when boondocking. Figured that it would help with the breakdown of anything that may attach to the walls of the tank when stationary, facilitating a clean tank. Ice and drive for an hour that was mentioned, uh-un,too much work that I have never needed to consider. I meter the water during the black tank rinse/flush to 85% of my capacity, then dump. Four years and all my sensors still work well.