
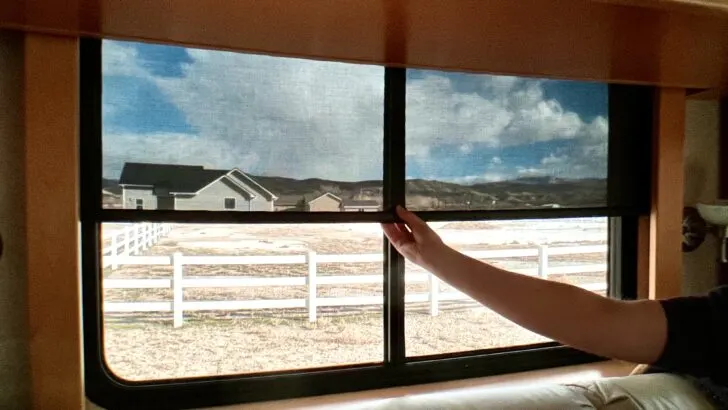
Our motorhome came with one of the most common types of RV window coverings: pleated day/night shades. Anyone else who has them will likely agree with us that they kinda suck (poor design, generally cheap, and all-too-frequent re-stringing required). We’ve talked about RV replacement blinds for years, but we just hadn’t gotten around to making the switch… until now!
We recently upgraded our whole rig to modern roller shades and we’re incredibly happy with the results. So, we decided to share our experience for our fellow RVers who may be considering a similar upgrade… now or in the future.
Do we have any regrets? Just one — we wish we’d done it sooner. A LOT sooner!
So, let’s talk RV replacement blinds…
- 1) Why an RV Blinds Replacement?
- 2) What RV Replacement Blinds Did We Choose and Why?
- 3) Which AutoMotion Roller Shades Did We Install?
- 4) What Do We Like About AutoMotion Shades?
- 5) What’s the Installation Process for AMS Roller Shades?
- 6) Our Final Thoughts on AMS RV Replacement Blinds
- 7) Our Visit to Bradd & Hall
Why an RV Blinds Replacement?
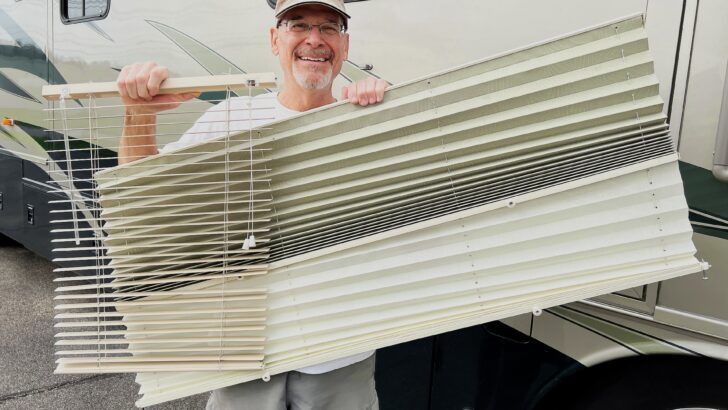
We’ve had pleated day/night shades (similar in design to cellular shades, but with visible strings) on our windows for nearly 20 years. We had them in our Fleetwood Bounder for 2 years, and we’ve had them in our current Newmar Mountain Aire for nearly 18 years.
From the start, we knew that they aren’t a great design. With strings that wear out and break from sliding through metal eyelets, they’re destined for failure.
Here’s what we disliked about the pleated day/night shades we originally had in our RV:
- The strings break! (Did we already say that? It’s worth mentioning again because it’s infuriating — they’re designed to fail.)
- They use a stacked setup, with the room-darkening portion above the light-filtering material. This requires moving both the day & night sections of the shade each time a window is completely covered or uncovered. That generally happens every morning and every evening, which adds to the wear on the strings and is less convenient.
- The string tension has to be juuuuust right. Too loose, and the blind won’t stay where you put it. Too tight, and the blind is difficult to open and close. That tension increases the wear & tear on the strings, causing them to wear out even sooner.
With our old pleated day/night shades, the strings would wear out and break — by (inferior) design! Over and over and over again. Re-stringing these d*mn blinds has always been a regular ongoing nuisance.
- Wider windows require more tension on the strings to keep them up, increasing cord wear. Those wider blinds also have two knobs for each section (day or night), which requires two hands to open or close them. That requires you to position yourself properly in front of them (reaching up from the sofa with one hand at an odd angle to open or close a wide pleated blind generally doesn’t cut it).
- They look dated and cheap. (that’s our personal opinion, of course, but we think lots of people would agree with us)

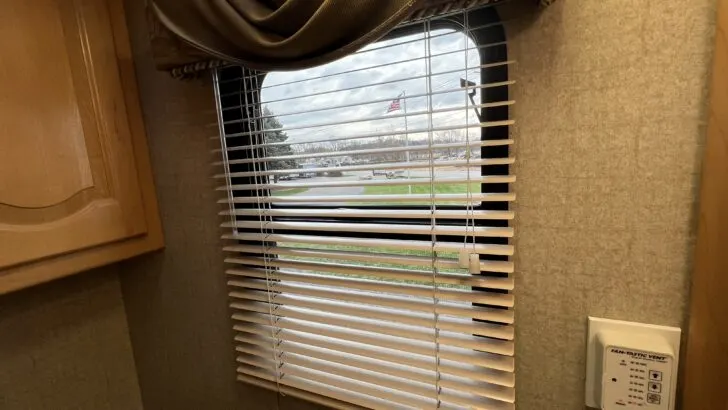
In addition to an RV full of pleated blinds, we also had two windows with mini/Venetian style blinds (our kitchen window, and this one, in our bathroom). They’re just as cheap and dated as the pleated blinds.
- They’re hard (practically impossible) to clean due to the fabrics used and the pleated shape.
- They require strings installed along the sides of the window, from top to bottom. These are unsightly if left uncovered and require holes in the wall for the hold down brackets that secure the bottom of each string.
- Did we mention that the way they work (strings sliding through metal grommets) makes them designed to fail?!?!
We can’t even begin to count the number of times we’ve had to re-string our pleated shades over the years. Literally dozens and dozens of times. Most of our blinds have been re-strung repeatedly over the years.
Our solution today is different. Rather than restringing the typical RV pleated shades over and over again, we finally upgraded our RV blinds and shades to modern roller shades. Our only question now is “Why did we wait so long?!”
Knowing what we know now, if we had to do it over again we definitely wouldn’t wait.
What RV Replacement Blinds Did We Choose and Why?
The two best-known brands of roller shades for RVs on the market are AutoMotion Shades and MCD Innovations. We decided to go with AutoMotion Shades for a couple of reasons:
1. Our RV came from the Newmar factory with motorized AutoMotion shades/visors in the cockpit, and we felt they were a quality brand (in fact, we replaced those with brand-new AutoMotion shades as part of our RV renovation… stay tuned for an upcoming post about them). With AutoMotion Shades we feel we got the highest-quality roller shades available.
2. We sourced our new blinds from an amazing family-owned business right in the RV capital of the world — Elkhart, Indiana. Bradd & Hall has a stellar reputation for providing top-quality RV and marine furniture, decor, and parts for the past 40 years. They carry AutoMotion Shades exclusively, making it an easy choice to go with two companies we already trust.
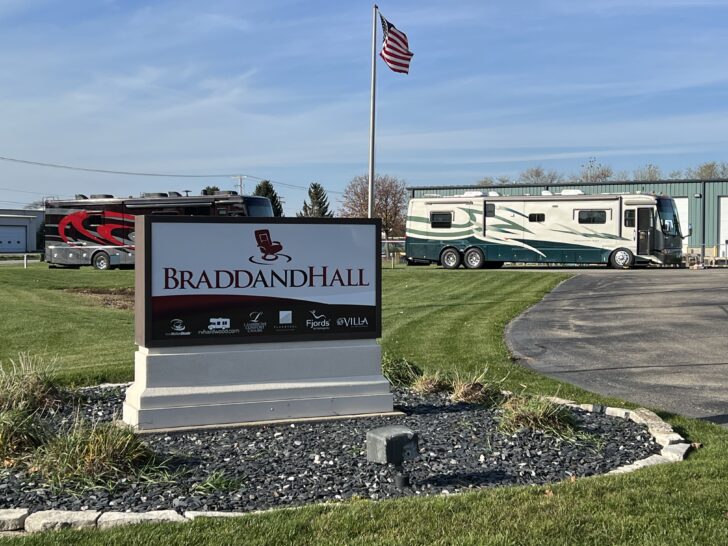
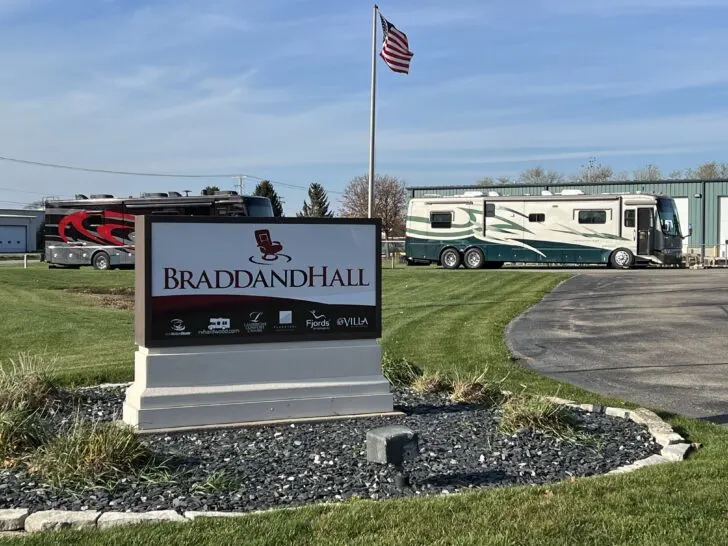
Our motorhome at Bradd & Hall’s facility in Elhart, Indiana. They can ship furniture, blinds, flooring, and lots of great interior decor products to DIY RVers like us. But their techs also do full installations right here in Elhart.
Which AutoMotion Roller Shades Did We Install?
AMS roller shades come in your choice of either single or dual rollers, and either manual or motorized shades.
We went with manual shades in the living room, bedroom, kitchen, and bathroom areas. That’s primarily because we don’t have power available at each location and didn’t want to run new wiring. We also don’t have any particular desire or need for power blinds while we’re stationary. We reserved the power shades for the cockpit area, but that’s a topic for a future post!
We primarily used dual-roller shades. With these, the rollers are stacked one above the other which helps to keep the mechanism from intruding too far into the RV from the window. (Note: You do need to plan for this with your window covering if you don’t want the roller to show.)

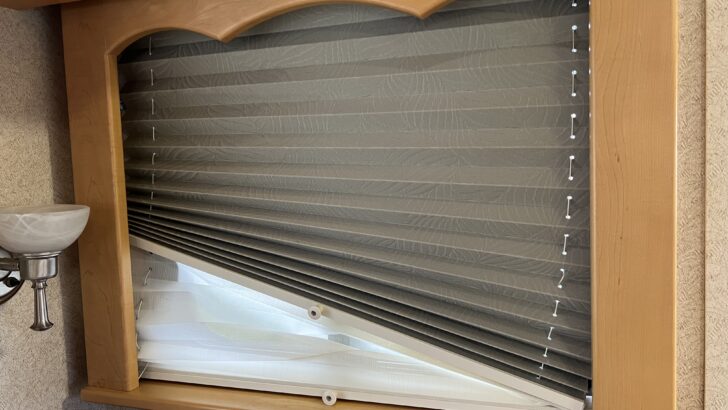
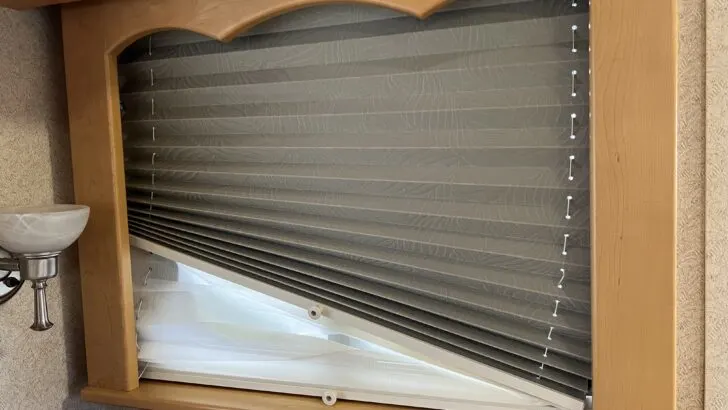
Here’s the day shade portion of our new AMS roller shades. We chose manually-operated dual/stacked roller shades (one for light-filtering & privacy during the day and the other for complete privacy and blackout at night).
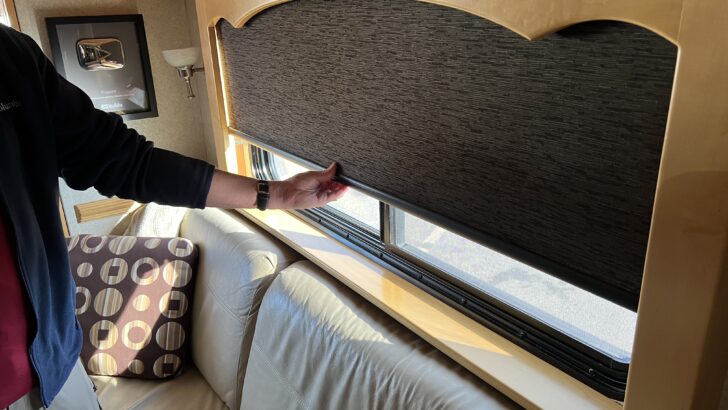

Here’s the “night” portion of our AMS roller shades. Not only are they easier to operate than our old pleated blinds, but they also have more modern, elegant styling. And no strings attached! Hooray!
We also chose single-roller light-blocking shades in two locations – one over the kitchen sink and the other in the bathroom. We have narrower window coverings (not as tall) in these locations so a stacked dual roller would have been more visible. These are also the locations where we had miniblinds before, and didn’t feel the need for day/night shades.
What Do We Like About AutoMotion Shades?
In addition to the fact that they’re such an improvement over our old pleated blinds, there’s a lot to like about these roller shades. Here are some of the features we like best about our AMS shades:
- They’re easily operated with one hand: a single pull fully opens or closes the blind of your choice (either light filtering or light blocking).
- They have a sleek, modern look so they provide an aesthetic upgrade to our RV.
- High-quality, silent operation.
- There are no strings to break! ???? (aren’t you impressed that we waited until this far down this list to mention that?) ???? And the lack of strings also means nothing to worry about tensioning correctly.
- Complete blackout blinds are available. (When our new night shades are down, it’s like night in here any time of day!)
- The durable fabrics used, and the smooth non-pleated design, makes them so much easier to clean.
- No attachments or strings along the side of the window because the rollers are fully mounted and self-contained at the top.
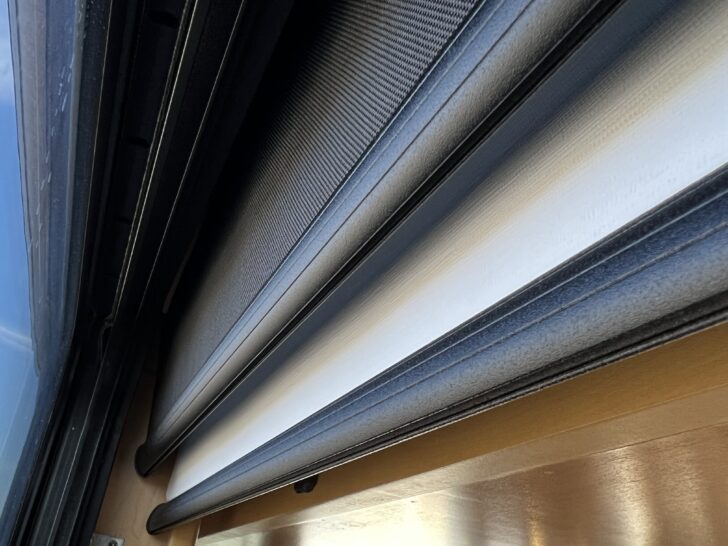

Here’s a closer look at our new AMS roller shades, seen from the window side. The black mesh is the “day” light-filtering shade. The solid white material is the back of the “night” shade, which helps reflect sun & heat during hot weather. They’re beautifully made and the quality is evident.


The fabric on the top roller was our choice to complement our RV’s interior, and the black mesh on the lower roller filters light and provides privacy during the day. The high quality of AMS shades is obvious when you see them.
What’s the Installation Process for AMS Roller Shades?
So, here’s the deal regarding installation.
First of all, we installed all of our blinds ourselves, so we can attest to the fact that DIY installation is absolutely possible. But we’d rate it as a job for confident DIY RVers because each installation (even each window!) can vary. That can call for some ingenuity, which we definitely had to employ in our case!
For example, we installed a total of 10 blinds, completely replacing all of the shades throughout the living area of our RV. We found that even on a single RV, mounting methods vary based on the window treatment, cabinet locations, and available space.
AMS dual-roller shades are primarily designed to be hung from clips that are mounted above them rather than side-mounted to the wall. So the typical installation process is to screw the included mounting clips into a solid surface above the window… then clip the header rail of the roller shades into those mounts.
But wall mounting can be accomplished with optional clips/brackets (ordered separately), or a little DIY creativity.
While the locations for most of our shades were fairly accessible and easy to install, two of them (in the driver’s side slide-out in our living room) were located where there wasn’t a good horizontal mounting surface directly above the window. And there was very little room to work, up behind the cabinetry.
So we MacGyvered some brackets with a few simple items from a home improvement store. We then mounted those brackets to the back of the cabinets.
This was the most challenging mounting location of all our windows. But we were able to create the necessary mounting points for the black spring clips that AMS includes to mount the blinds.
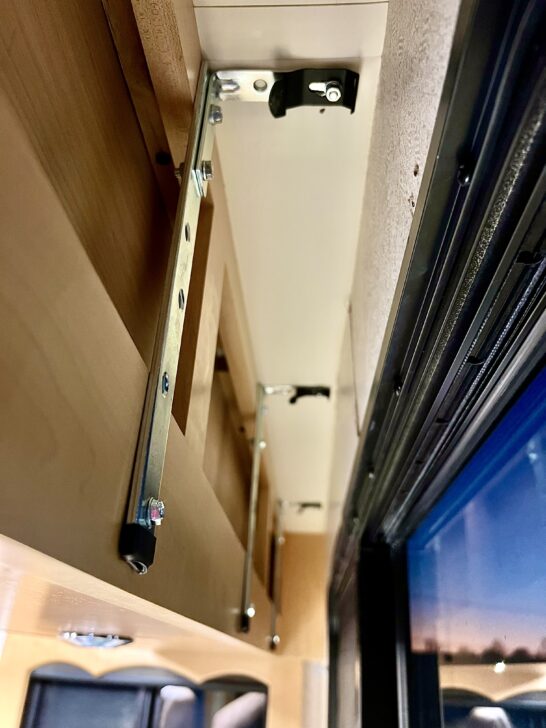

With a little ingenuity and a trip to Lowe’s, we created brackets to hold our two large living room shades. This was the most challenging spot in the whole rig — behind the cabinetry. We assembled six of these (three for each shade) and attached the black spring clips (which come with the shades) at the top, to hold the shades from above.
If you’re wondering how we were able to screw into the back of our (extremely hard wood) maple cabinets in such a narrow space, the following right-angle adapter is one of our favorite tools, along with our Dewalt 20V drill and a long magnetic extension that we used to drive it. Sometimes it’s all about having the right tools on board!

- The right angle drill attachment has magnetism for fastener retention
- DEWALT right angle attachment is engineered for use in Impact Drivers, allowing users to drill or drive

- Dewalt drill has compact and lightweight design that fits into tight areas.NEW 18V XR Li-Ion compact drill driver featuring XR 1.3Ah Li-Ion battery...
- High performance motor of the power drill delivers 300 unit watts out (UWO) of power ability completing a wide range of applications
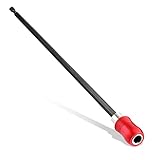
- [Extension Bit Holder] It can be flexibly used in situation of narrow space, extensions in lengths 300mm (12 inch) for superior access for...
- [High Quality] Made of premium Chrome Vanadium Steel and Stainless Steel material. Heat treated high hardness, wear resistance, sturdy and long...
If you’re not confident in your window-shade-installing skills (or would simply rather leave it to the pros), Bradd & Hall provides complete installation services at their facility in Elkhart, Indiana. You can simply call them at (800) 445-1830 to discuss your needs, pricing, etc. Or you can stop by their showroom to go interior shopping!

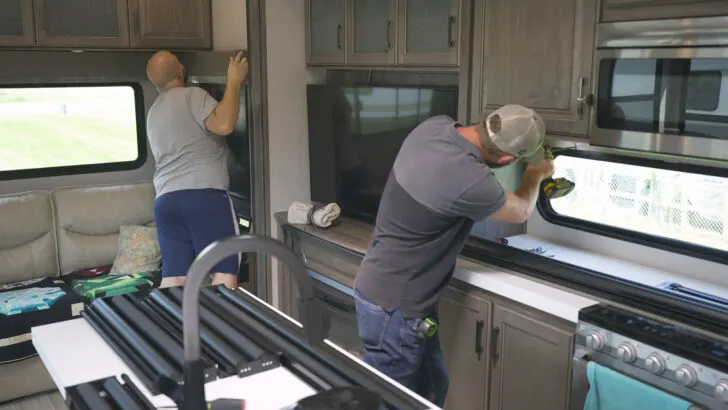
Bradd & Hall’s expert installation techs installing AMS shades in a customer’s RV at their facility in Elkhart, IN.
Our Final Thoughts on AMS RV Replacement Blinds
Having completed the installation and lived with our new AMS roller blinds for a bit, we’ve concluded that pleated shades suck and roller blinds rule! We’re also kicking ourselves for not making this upgrade years ago.
We love our new roller shades for several reasons: there are (finally!) no strings to break, they’re very easy to clean (and don’t really get dirty in the first place), and they’re so much more modern and stylish. It’s also great that they’re available in both power and manual styles.
We’ve found that the manual AutoMotion Shades are very easy to operate. With one hand, you simply pull them down to where you want them and let go. To retract them, we give a light tug and release. That’s it.
Bradd & Hall even has some gorgeous hardwood valences that’ll complement the AutoMotion Shades beautifully, if you need them.
All in all, we’re patting ourselves on the back for choosing such great roller blinds and buying them from a company we’ve come to trust and appreciate over the years. We’re also taking two pats on the back for our installation job!
Our Visit to Bradd & Hall

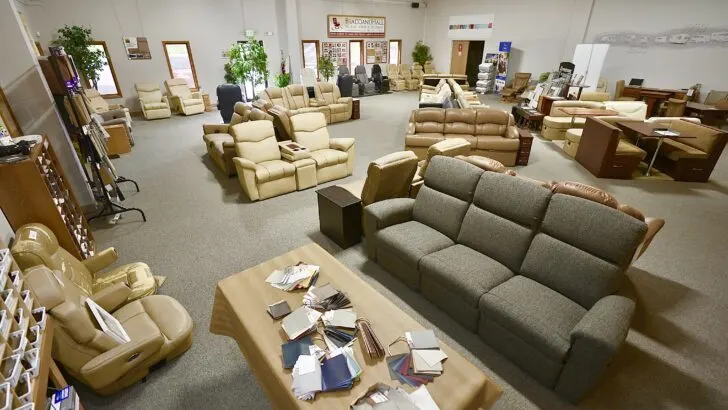
The Bradd and Hall showroom in Elhart Indiana. Want to spruce up your RV? They carry a wide range of interior decor items, including blinds, seating, tables, flooring, and more. You can select and/or pick up your order locally, have it shipped to you, or have Bradd & Hall’s installation team do everything for you right here in Elkhart.
We enjoyed our visit to Bradd & Hall’s facility so much that we decided to make several other upgrades while we were already in Elkhart. We’ll be reporting on those in future posts, but overall we felt that Bradd & Hall made the trip to Indiana well worth our time.
This enduring family business has earned its stellar reputation for the highest quality RV (and marine) furniture, decor, and parts over the past several decades.
They’re wonderful to work with, and they offer a wide array of RV interior products, including captain’s chairs, sofas, recliners, dinettes, tables, computer desks, flooring, and even mattresses (all great ways to help modernize that ugly RV interior!). And Bradd Neidhamer just might be one of the nicest people we’ve ever met.
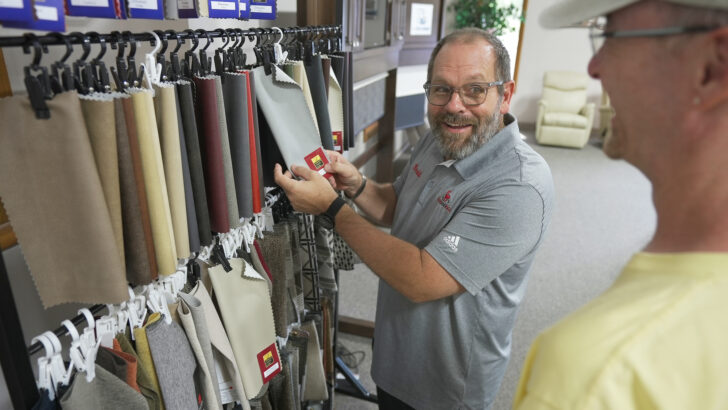
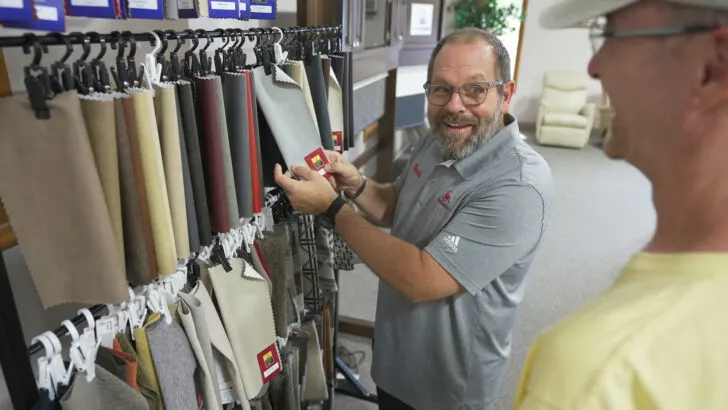
Bradd & Hall’s owner, Bradd Neidhamer, shows John a variety of fabric options. They carry a wide array of furniture, window blinds, flooring and other interior appointments for RVers looking to rejuvenate their rigs.
Bradd and Hall also offer repair parts, seatbelts, and several innovative items they designed themselves… how about a small convertible table that doubles as an armrest on your sofa, and holds your coffee securely in place?
Combining all this with the fact that we like to take our business to people we trust made the drive to Indiana well worthwhile. Of course, if you’re not near (or planning a trip to) Indiana, you can order directly from Bradd & Hall and have everything shipped to you, too. If you’re looking to upgrade your RV’s blinds/shades (or any number of other great interior upgrades) look no further than Bradd & Hall!
Looking back on how many times we had to re-string our old pleated day/night shades, it’s no wonder we made a video about how to do it. We knew that if we were re-stringing our RV’s pleated window shades over and over again, other RV owners were very likely having the same issue. So we wanted to share our technique for re-stringing pleated RV window shades. (This should hold you until you get your order for roller shades in to Bradd & Hall! ????)
The video below says it all — a big pain in the butt on a fairly routine basis!
Geek Out with Us Every Week
Join our newsletter to learn about all things RV-related. Every week we offer free tips, tricks, product reviews, and more to our online community of RVers. So, whether this is your first time on the road or you’re a seasoned expert, we’d love for you to geek out with us!
Ken
Monday 12th of February 2024
I love reading and watching all your posts and emails. They are very helpful. I am in the process of replacing our pleated shades in our 2007 Dutch Star with Automotion Shades we ordered through Bradd and Hall. I have installed all except the two large ones on the driver side. Can you elaborate on the brackets you made? In the picture, it looks like a 3" L bracket. Is the metal strip a 10" mending brace? Did you install the bracket and then snap the shades in place? Any help/suggestions will be greatly appreciated. Thanks
Ken
Monday 12th of February 2024
@TheRVgeeks, wow, thanks for the quick response. It's off to Lowes tomorrow.
TheRVgeeks
Monday 12th of February 2024
Hi Ken! Thanks so much for the nice comment and great question. Automotion and Bradd & Hall are an awesome combination! We're sure you'll be as happy with your new blinds as we were. That area behind the front cabinets was a head-scratcher for us all right! We wanted something very robust, as easy as possible to install, and out of sight. It sounds like you have a great idea of the pieces we used.
We're attaching two more detailed photos of the brackets here — one assembled but not installed, and the second photo showing all three of them in place before clipping the shade into them. They did indeed have to be assembled and installed prior to clipping the shade in, since once the shade is clipped in place, the screw we used at the top to secure it to the cabinetry is no longer accessible. That does make it a bit challenging to get the blind clipped into place, but with some effort and a few contortions, it was doable. Each of the three brackets is secured to the cabinetry with hex-head screws, because we had to use our 90-degree Dewalt attachment to reach up there with our cordless drill. And only two were needed because maple is so hard.
FYI... the little black section at the very bottom of each bracket is a piece of large heat-shrink tubing (the kind that's used on electrical wiring connections). We used that to cover the lower edge of the bracket so that if anyone should reach up there, they wouldn't risk cutting their hand on the sharp bottom edge of the bracket. Unlikely, we know, but we had the tubing on hand, so thought "Why not?!" LOL Hope this helps.
Carla Mason
Sunday 19th of November 2023
I am ready to replace our pleated with AMS but cannot find that 30% discount coupon anywhere. How do I get one? Looking for a dealer who will honor it and install new shades in our 2008 Tiffin Phaeton 40" here in San Diego County. Thank you for anyone who can help.
TheRVgeeks
Sunday 19th of November 2023
Hi Carla. Sorry, but we're not sure what discount coupon you're referring to. Can you let us know where you saw that?
Geri
Monday 18th of September 2023
Great article! I’m tired of our pleated day night shades as well. Just curious how you handled covering the holes left in the wall from the tie down string brackets that secure the string for the pleated shades. I’d like to replace our RV pleated shades with roller blinds but I’m not sure what decorative item to use to cover the holes.
TheRVgeeks
Monday 18th of September 2023
Hi Geri! Good question! Because our windows have hardwood valances that extend from top to bottom on each side of the window, we didn't worry too much about the holes left by those brackets for the strings. But, obviously, lots of RVs don't come with those kind of window coverings. How you address the holes will likely depend on your walls... both color and material. The easiest would likely be to try and find a matching caulk and just fill the holes in with it. If nothing else, it will make them less noticeable.
George McClendon
Wednesday 30th of November 2022
Started RVing in 2001. First one Monico knight, Second on Damon Astoria pacific, which has pleated blinds that thanks to you guys I was able to restring myself (thanks guys). I am now considering installing roller shades (again thanks guys). After years and watching numerous RV blogs on line, I now primarily watch the RVgeeks witch I see as one of the best if not the best one out there. I do follow your advice on places to have my RV serviced. I scheduled an appointment at Cummins Coach Care at the end of March to have work accomplished on my rig. (Thanks for the info.) Keep on providing useful and valuable information for the RV community.
TheRVgeeks
Monday 18th of September 2023
Thanks so much for the kind words, George! It's always nice to hear that we've been helpful!
Joe Curbelo
Tuesday 22nd of November 2022
Great article, Gentlemen. When we bought our coach two years ago (2013 Tiffin Allegro) I was pleased to see that it did not come with those horrible pleated shades. It has stacked Night and Day shades all around (except for the "doggie window"). The windshield has the same product motorized, much better than some of the motorhomes out there with hideous curtains!