
We’ve talked before about the importance of a working RV roof vent fan, and we recently posted about the best options for roof vent fan replacement.
Today’s post more specifically addresses the actual replacement itself – the DIY steps to take to successfully replace your RV roof vent fan, should you need to do so.
Let’s get to it!
- 1) What is an RV Roof Vent Fan?
- 2) Is RV Roof Vent Fan Replacement an Easy DIY Project?
-
3)
How Do I Upgrade My RV Roof Vent Fan?
- 3.1) 1. Remove the Old RV Roof Vent Fan
- 3.2) 2. Clean and Investigate the Area Around the Vent Opening
- 3.3) 3. Apply Butyl Tape to Your New RV Roof Vent Fan
- 3.4) 4. Install the New RV Roof Vent Fan
- 3.5) 5. Seal the New RV Roof Vent Fan Properly
- 3.6) 6. Engage Your Battery Disconnect Switch or Remove Negative Cable from Your RV Battery
- 3.7) 7. Follow Your New Fan’s Instructions for Making Proper Electrical Connections
- 3.8) 8. Disengage Your Battery Disconnect Switch or Replace the Negative Cable from Your RV Battery
- 3.9) 9. Test Your New RV Vent Fan and Reinstall the Trim Ring
- 4) Why is a Working RV Vent Fan Important?
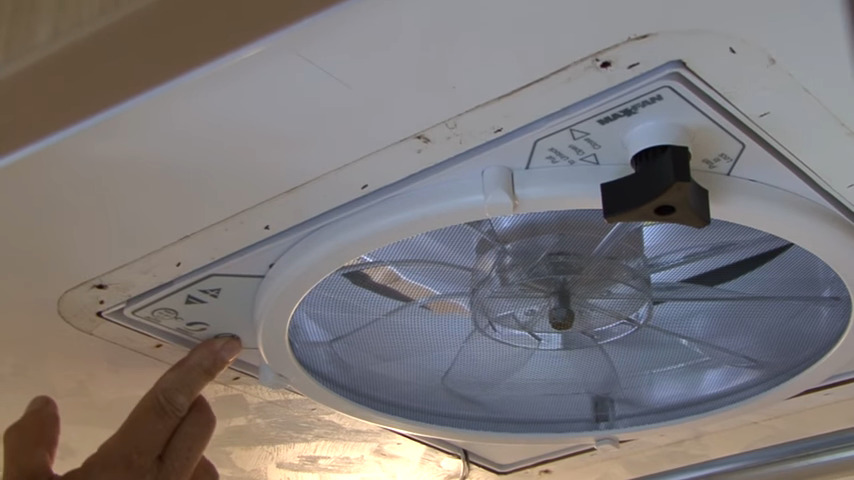
What is an RV Roof Vent Fan?
The purpose of an RV roof vent fan is air circulation. In fulfilling this purpose, roof vent fans allow an exchange of air throughout the RV to cool the rig, remove steam/moisture, and remove cooking odors.
Some rigs have more than one vent fan – which is often dependent on the size of the rig. Some vent fans blow out only, and others have a reverse function that allows them to pull air in or out.
Many RV roof vent fans even have rain and temperature sensors. A thermostat stops the fan from running once the temperature in the RV reaches a predetermined level, and a rain sensor triggers the rooftop lid of the vent to close when it senses the presence of rain.
The functions of an RV roof vent fan are important… and if yours stops working, you’ll want to replace it.
Is RV Roof Vent Fan Replacement an Easy DIY Project?
RV roof vent fan replacement is a relatively simple DIY project with one caveat – you need to be able to work on the roof of your RV. For some people (and some RVs) that’s not a big deal, but for others, it’s a tall order, in which case having the installation completed by a professional would be the way to go.
But if you’re able to get up on the roof of your rig and you have a basic few tools, you’re quite likely to be capable of performing a DIY replacement of your RV roof vent fan.
How Do I Upgrade My RV Roof Vent Fan?
There are several steps to upgrading an RV vent fan, but in the end, it’s not a difficult project. Other than working on the roof (always use caution there – slipping/falling can lead to serious injury), the most challenging part of the replacement is wiring in the new fan, and directions are provided with whatever new fan you purchase, making it an easy-to-follow part of the process. Plus they’re 12-volt DC, which is a lot less intimidating than 120-volt AC household current.
If you need to choose a new RV roof vent fan, we suggest you check out our post on the three best RV roof vent fans on the market, with specific information on each fan to help with your decision.
Let’s get started.
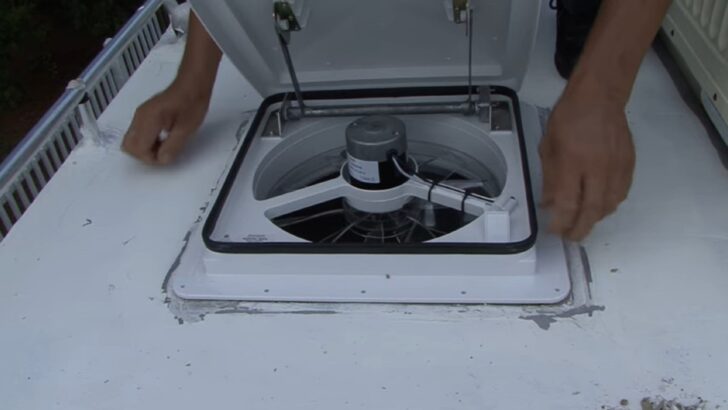
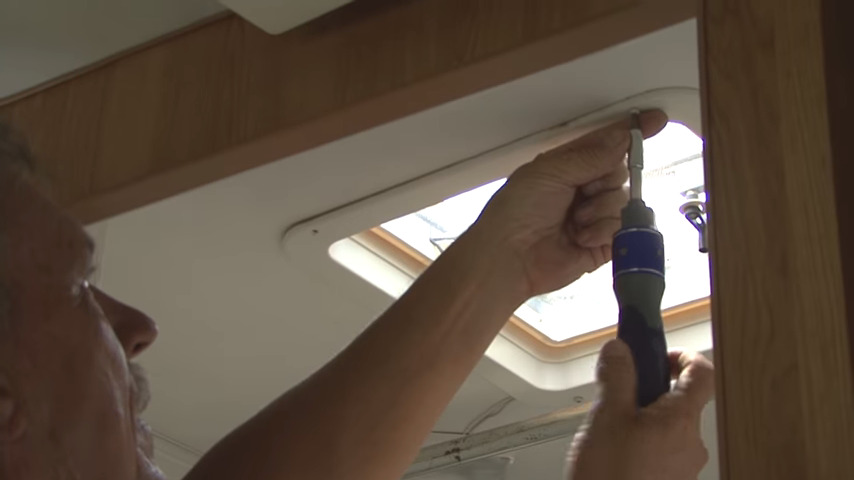
1. Remove the Old RV Roof Vent Fan

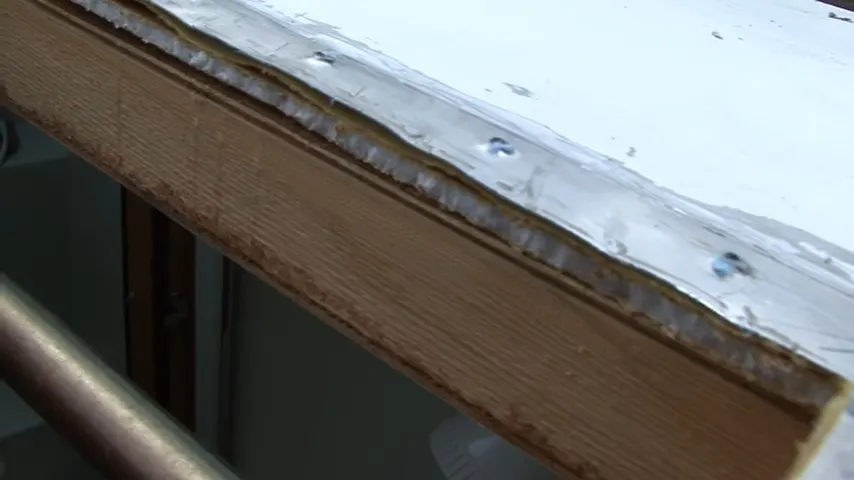
Start by unscrewing the vent frame from inside the RV. Then head up onto the roof and remove all of the old roof sealants. If your RV has a “rubber” roof, use a plastic putty knife and be careful not to damage the rubber membrane as you’re removing the old sealant. If you’ve got a fiberglass or metal roof, you can use a regular metal putty knife.

After removing all of the screws around the perimeter of the vent fan, carefully remove all of the old sealants from the roof.
Remove the screws that are securing the vent to the roof. Be sure to get them all – there’ll be a lot of them. A cordless drill similar to this one that we have is excellent for jobs like this.

- Dewalt drill has compact and lightweight design that fits into tight areas.NEW 18V XR Li-Ion compact drill driver featuring XR 1.3Ah Li-Ion battery...
- High performance motor of the power drill delivers 300 unit watts out (UWO) of power ability completing a wide range of applications
Remove the old fan and any old butyl tape that might be left behind.
Now’s a good time to place your new vent into the opening to make sure it fits properly before going any further. Remove the vent to continue prepping the area for installation. There should be no problem here, as RVs have pretty universal 14″ x 14″ openings for fans (which air conditioners also fit into).
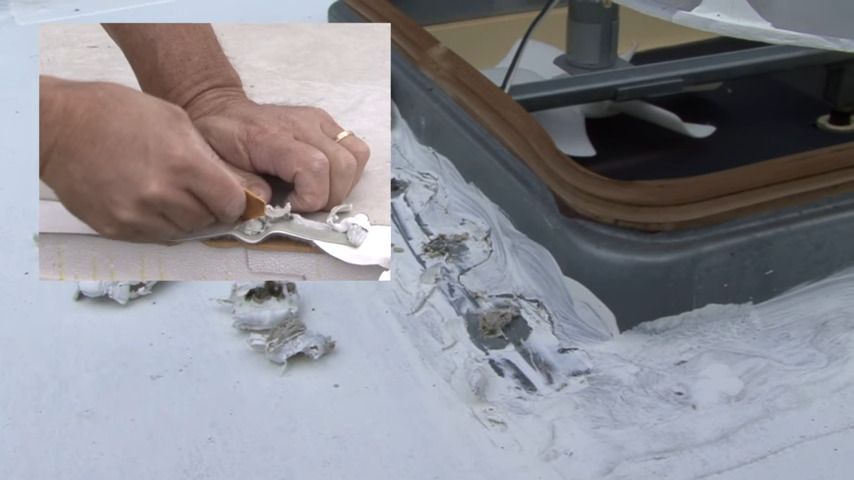
2. Clean and Investigate the Area Around the Vent Opening
Use mineral spirits or denatured alcohol to clean the area around the vent opening, wiping away any debris or leftover sealant.
Always use caution (and the least amount of product necessary) when using mineral spirits or alcohol on your RV roof. Some roofs (such as TPO or EPDM… better known as “rubber” roofs) are made of materials that can be damaged by excessive use of products like these. Just a little on a rag should do the trick nicely.
Take a couple of minutes at this point to look carefully at the frame around the opening. Check for any damage or mold that might be evident. Having the vent removed gives you the opportunity to inspect and tend to any issues that may have occurred over time, and aren’t normally visible.
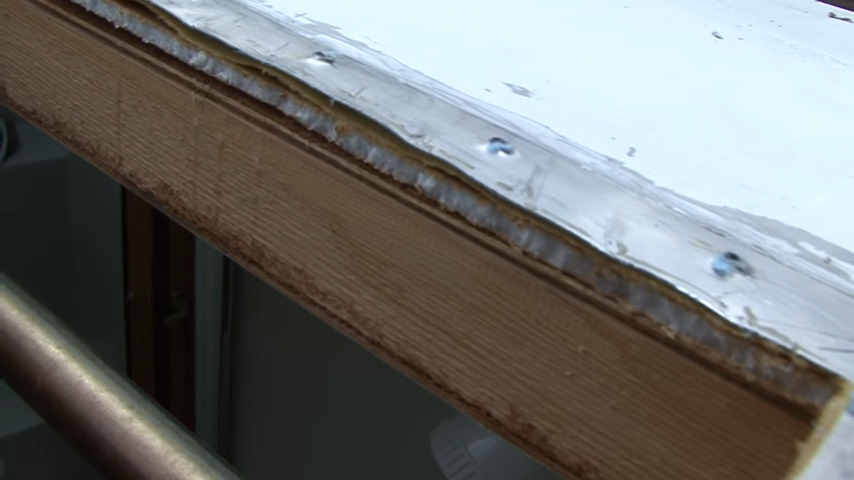
When the old vent fan has been removed, use the opportunity to check for damage or areas where leaks could occur, and repair the damage prior to installing your new vent fan.
You want to look for any evidence of water intrusion in the past, and also for damage to the area around the opening that might leave the area vulnerable to leaks once the new fan is installed. Should you find any damage, make any necessary repairs prior to installing your new vent.
3. Apply Butyl Tape to Your New RV Roof Vent Fan
For this step, you’ll need good quality butyl tape (often referred to as “Putty tape). We’ve used this product and have found it to work well for our applications:

- VERSATILE BUTYL PUTTY TAPE. Butyl sealing tape is a versatile sealing solution commonly used in construction, automotive, and marine applications.
- RELIABLE RV WINDOW SEALANT. It is made of a synthetic EDPM rubber material resistant to water, chemicals, and extreme temperatures, making it a...
Apply the butyl tape to the bottom flange of the roof vent, all the way around the vent.
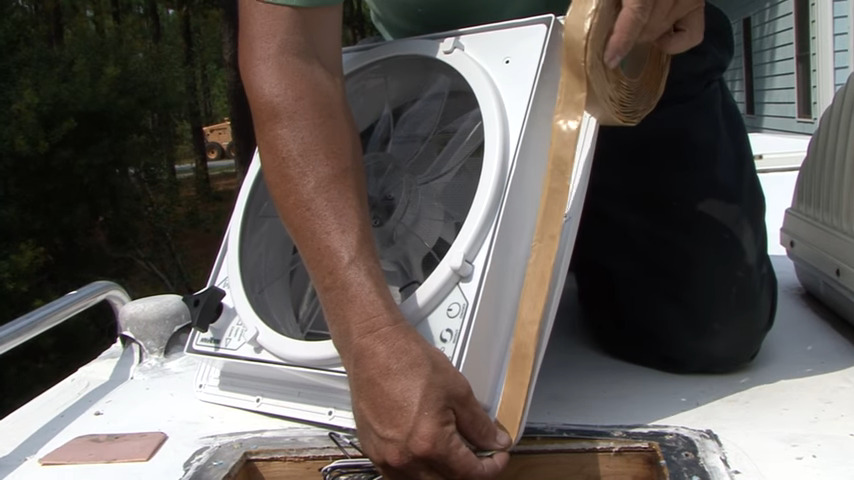

Apply butyl tape all the way around the underside of the vent fan’s flange, making sure to cover all of the screw holes.
Make sure the butyl tape covers the screw holes so you’ll have a good seal all the way around when you install the new vent.
4. Install the New RV Roof Vent Fan
Move the wiring out of the way and fit your new vent fan into the opening, making sure the fan’s lid opening is facing the rear of the RV.
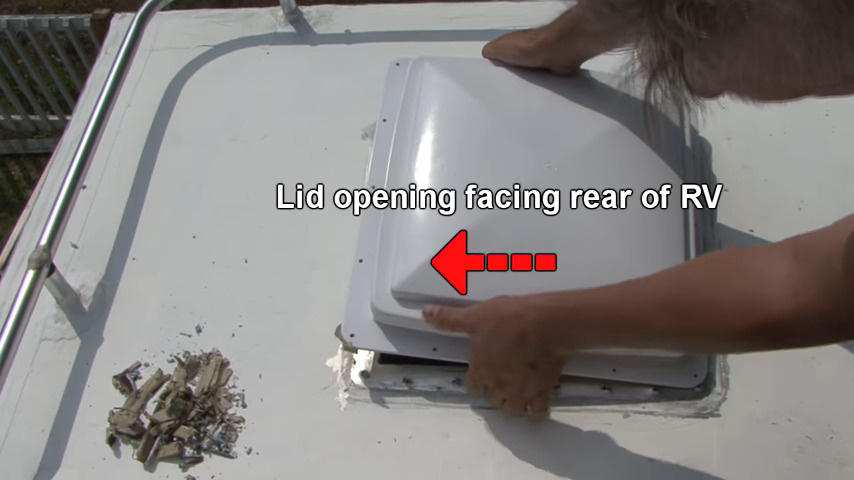
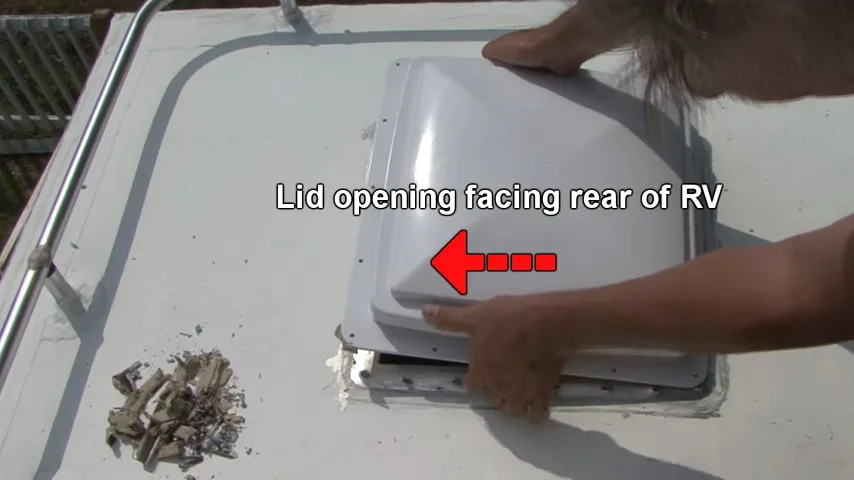
When you set your new RV roof vent fan into the opening, make sure the lid opening is facing the rear of the RV.
Once the fan is properly set, secure the new vent fan to the roof. Install the screws and tighten them just until you see a bit of butyl tape squeezing out past the vent flange. Be careful not to over-tighten the screws.
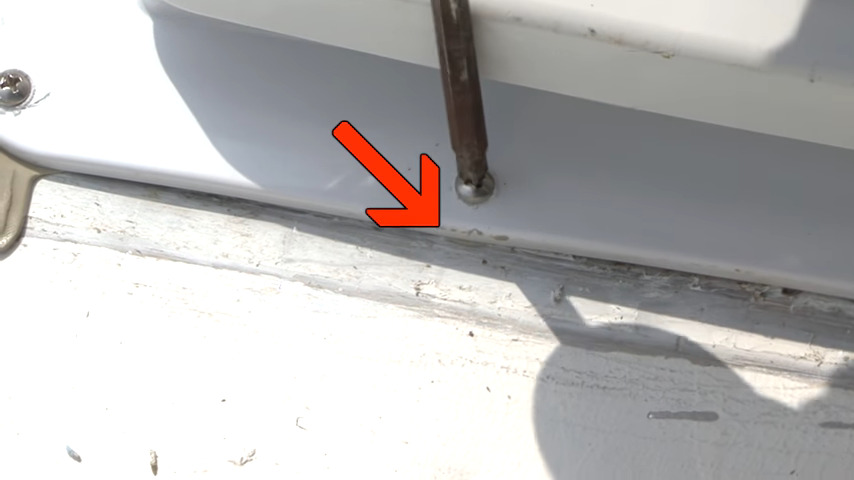

Tighten the screws just until you see a bit of butyl tape squeezing out past the vent flange as shown with the red arrow. Be careful not to over-tighten the screws.
When you’ve finished tightening all of the screws, remove any excess butyl tape that has squeezed out around the vent flange. A plastic putty knife is perfect for this task.
5. Seal the New RV Roof Vent Fan Properly
As always, it’s very important to use the proper sealant around your new vent’s flange. Do NOT use silicone or any general caulk. You need a high-quality self-leveling lap sealant to do the job right. We highly recommend Dicor self-leveling lap sealant, and always keep a supply of it on board our rig.
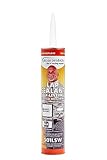
- RV ROOFING USE: Lap sealant is sun-ray stabilized to avoid spoiling and discoloration; Plus, it will not stain or discolor any roofing material to...
- COLOR: White hue for stylish and beautiful RV roof
First, cover each of the screw heads with lap sealant. Then, run a good bead of lap sealant all around the flange. Don’t be shy here. You want the bead of sealant to connect the flange to the roof, so go slowly and allow for good coverage.
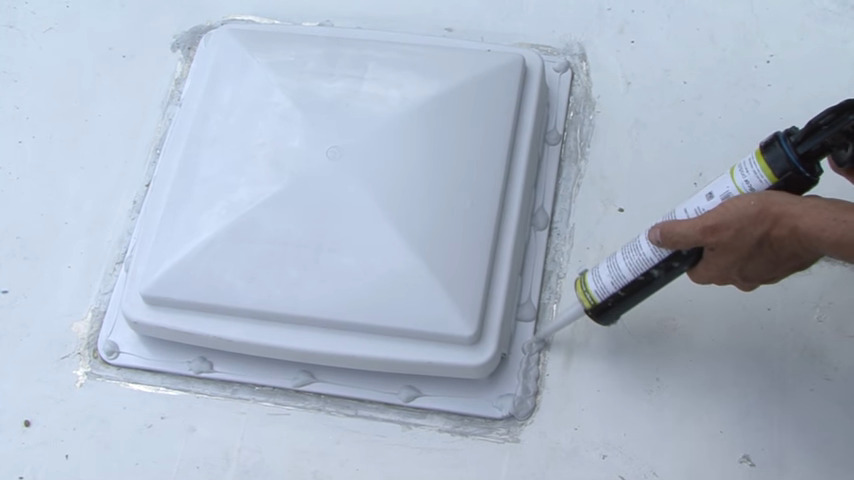

Generously cover each of the screw heads with lap sealant and run a good bead of Dicor self-leveling lap sealant all around the flange.
6. Engage Your Battery Disconnect Switch or Remove Negative Cable from Your RV Battery
Before working on any wiring in your RV, you’ll want to either engage (turn off) your RV’s 12V battery disconnect switch (if you have one) or remove the negative cable from your RV’s house battery bank.
Your new RV vent fan runs on 12V power, and so you’ll need a 12V power source to wire your new fan. The existing wiring for the old 12V roof vent fan should work perfectly.
7. Follow Your New Fan’s Instructions for Making Proper Electrical Connections
Whichever new vent fan you buy will include instructions for wiring your new fan to the old wiring. Follow those instructions to wire up the new fan.
You’ll need to strip a couple of wires for this process, so a wire stripper is a helpful tool here.
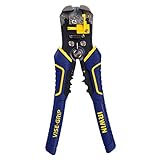
- SELF-ADJUSTING: Strip wire from 10 to 24 AWG with our self-adjusting mechanism. Jaw Width: 2 inches
- ADJUSTABLE STOPPER: Control the length of the core strip with the built-in adjustable stopper
8. Disengage Your Battery Disconnect Switch or Replace the Negative Cable from Your RV Battery
Once you’ve completed the wiring according to the directions that accompanied your new vent fan, disengage (turn on) your 12V battery disconnect switch or replace the negative cable to your 12V battery bank.
9. Test Your New RV Vent Fan and Reinstall the Trim Ring
Prior to completing the installation, test the functions of your new RV vent fan.

Be sure to test the functions of your new RV vent fan before reinstalling the interior trim ring.
Once you’ve confirmed that the fan is working properly, reinstall the trim ring. Use caution when tightening the trim ring screws. Overtightening can crack the trim ring.
All photos and video courtesy of RV Education 101.
Why is a Working RV Vent Fan Important?
RV roof vent fans contribute to climate control within the rig, which is certainly important from the perspective of comfort. And the removal of cooking and other odors makes RV living more pleasant for everyone.
But perhaps the most important remedial function of a roof vent fan is the removal of moisture within the RV, moisture being a precursor to potentially serious problems if it’s allowed to linger, causing mold and mildew.
Any way you cut it, the RV roof vent fan is among the most important features of any RV, which is precisely why most RVs are equipped with them. If in time, or due to an electrical issue or other cause, an RV vent fan ceases to function, RV roof vent fan replacement is not only easy but very important for an RVer’s quality of life.
If you’re more of a visual learner, we encourage you to watch this video from our friend Mark Polk of RV Education 101 installing an RV roof vent fan:
Geek Out with Us Every Week
Join our newsletter to learn about all things RV-related. Every week we offer free tips, tricks, product reviews, and more to our online community of RVers. So, whether this is your first time on the road or you’re a seasoned expert, we’d love for you to geek out with us!