
Knowing how to clean an RV vent fan is more important than you may think. This maintenance task doesn’t need to be done often, but if you don’t do it at all, you’re missing out on the benefits of your vent fan, one of the most-used devices on many RVs.
We’re not talking about a regular dusting, though. We’re talking about a good deep cleaning so that you can continue to reap the benefits of your RV’s vent fan, including keeping you cooler and preventing moisture build-up in your rig.
Not only does this remove dust and allergens, but it also keeps your vent fans doing their intended job.
Our RV has two Fantastic vent fans, so this post will show us cleaning that brand. But your vent fan(s) may be different. Still, the basic steps for deep cleaning the fan should be similar.
So, in today’s post, we’ll demonstrate how to remove, clean and reinstall an RV’s Fantastic vent fan.
- 1) What Is an RV Vent Fan?
-
2)
How to Clean an RV Vent Fan
- 2.1) Remove the Inside Screen
- 2.2) Remove the Vent Cover
- 2.3) Remove the Bracket from the Fan Lid
- 2.4) Lift the Lid Up And Re-Tighten the Lower Screw
- 2.5) Remove Fan Screws
- 2.6) Disconnect Power Wires
- 2.7) Remove the Fan
- 2.8) Clean the Area Surrounding the Fan
- 2.9) Disconnect the Fan Blades from the Motor
- 2.10) Thoroughly Clean the Fan Blades and Motor Assembly
- 2.11) Clean the Vent Fan Screen
- 2.12) Put the Fan Blades and Motor Back Together
- 2.13) Replace the Fan and Reconnect the Power Wires
- 2.14) Reattach the Screw that Holds the Lid in Place
- 2.15) Close the Lid and Replace the Vent Fan Cover
- 2.16) Replace the Interior Screen
- 3) Free RVing Tips, Tricks, Reviews, Giveaways & More
What Is an RV Vent Fan?
Most RVs have at least one vent fan. The primary purpose of a vent fan is two-fold (though there are a lot of reasons proper ventilation is important in your RV):
- First, your RV vent fan is designed to circulate fresh air through the RV, which helps keep you cool inside the rig when the weather is warm.
- The second purpose is to keep moisture from accumulating in your RV. Showering, cooking, and even breathing produce moisture throughout your RV. And as you may know, moisture is an enemy of RVs. Not only can it lead to mold and mildew in an RV, but it can eventually lead to a breakdown of the materials used to build the rig. Moisture can do some real damage over time.
So, having an exhaust fan in your motorhome, travel trailer, or fifth wheel is terrific for reducing summer air conditioning use and removing moisture from the camper in all seasons.
As we noted, we’ve got Fantastic brand fans in our motorhome. Your rig may have a MaxxAir fan or maybe some other brand of RV vent fan. Either way, the steps to clean them should be fairly similar.
Some vent fans may allow you complete access from inside the RV. In fact, you may be able to clean the fan blades fairly well from right inside the RV with a little finesse. However, most vent fans we’ve seen require heading up to the roof to get them completely clean.
How to Clean an RV Vent Fan
RV vent fans are used so often and move so much air that they get really dirty. So we thoroughly clean ours once or twice a year.
Removing and replacing the fans to give them a really good cleaning requires no special tools or knowledge and can easily be completed in a half hour or less with the following steps.
Remove the Inside Screen
In most rigs, removing the interior screen of a vent fan involves removing some screws around the perimeter of the frame.
We upgraded our fans with Fantastic Pop ‘N Lock screens shortly after we bought our rig. They make it easy to simply pop the screens out for regular cleaning without unscrewing anything, and we absolutely love them.

Remove the Vent Cover
Next, we head up to the roof to remove the vent cover. MaxxAir vent covers are probably the brand most commonly seen on RVs, but we found a different one that we prefer — Camco Aero-Flo roof vent covers.
First, these vent covers provide easy access to the fans. Just loosen a couple of Phillips head screws, lift the top right off, and you’re in and ready to start cleaning.
We’ve also found that Aero-Flo vent covers allow for great air distribution due to the large louvers at the front. They offer about 30% more open vent area than other brands on the market. These are also lower-profile covers, and we like that about them as well.
- Offers 30 percent more open vent area than other brands
- Mounting hardware included; Mounts to existing 14” x 14” roof vents
Remove the Bracket from the Fan Lid
With the fan fully open, use a Phillips screwdriver to loosen (but don’t remove) the screw at the lower end of the support bracket. Then remove the screw at the top of the bracket. This will allow the lid to open more fully for better access.
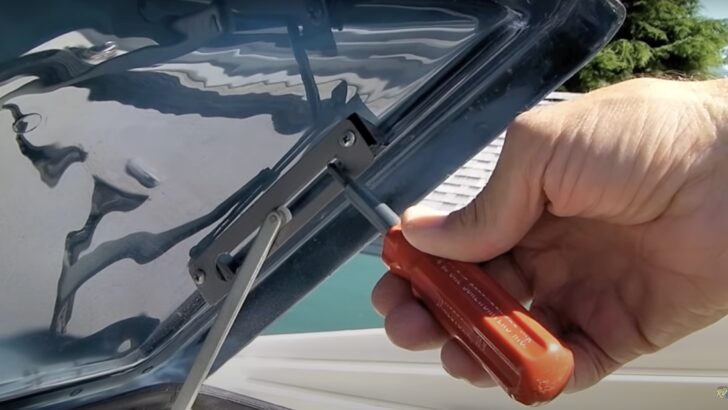

Use a Phillips screwdriver to loosen the bottom screw and remove the top screw from the bracket. This allows better access to the fan and keeps the lid out of the way during cleaning.
Lift the Lid Up And Re-Tighten the Lower Screw
Lift the fan lid up and out of the way as far as it will go. Then snug the lower screw back into place to hold the lid open. This will keep it as far out of your way as possible, allowing better access to the fan during cleaning.
Remove Fan Screws
Remove the four Phillips head screws that hold the fan in place.
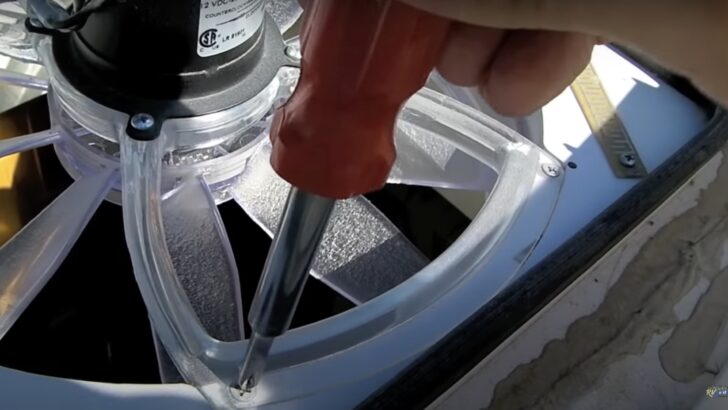

Remove the four Phillips screws that hold the fan into the housing.
Disconnect Power Wires
Disconnect the wires that power the fan. There may be one or two plastic clips holding the wires to a track in the fan. Simply remove it (or them), then disconnect the wires by separating the plug connectors, noting which wire is positive (usually red) and which is negative (usually black or white).
NOTE: Some fans may have been installed at the factory without plug-in connectors in the wires. In that case, you can either cut the wires and install connectors yourself, or complete the cleaning process using as much slack in the wires as you have available. That just makes it a little more awkward, but not a big deal.

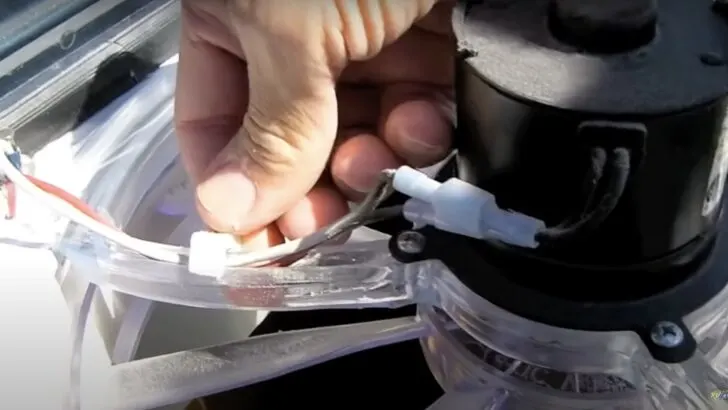
Remove the small retaining clip holding the wires in the track. Then pull apart the two power plugs, noting which wire is positive and which is negative.
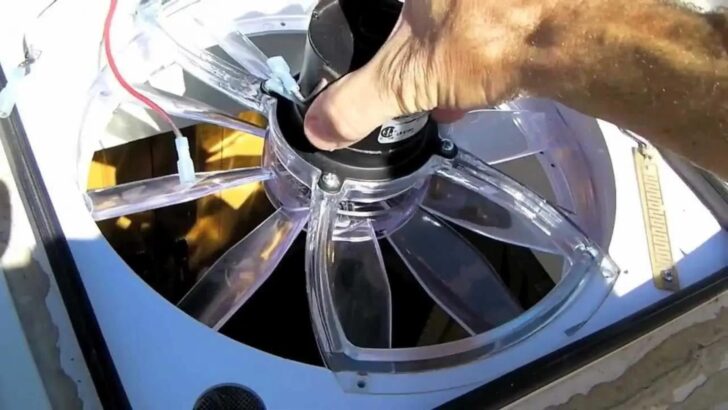
Remove the Fan
Remove the fan by tilting it and lifting it up and out of the opening. It may take a little wiggling, as the fan blades are just about the same size as the opening.
Clean the Area Surrounding the Fan
Use a damp rag to clean out the inside of the lid and the inside of the fan casing. Note that this is a step you’d be unable to do if the fan were to remain in place during this deep cleaning process.
Disconnect the Fan Blades from the Motor
Looking between the fan blades and the motor, you’ll see a small Allen nut that secures them together.

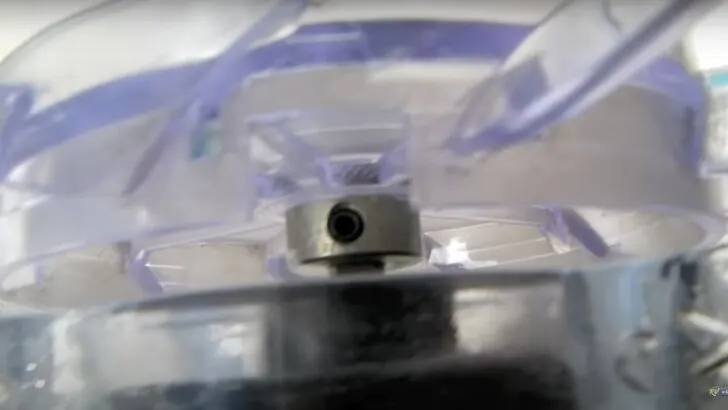
You’ll need a 3/32 Allen wrench to loosen the nut that holds the fan blades and motor together.
Use a 3/32 Allen wrench to loosen (but not remove) the Allen nut. Then slide the fan blades off the post. Unless you have a very long Allen wrench, you’ll probably need to use a pair of pliers to loosen the Allen nut. Now you should be able to separate the fan blades from the motor easily.
Thoroughly Clean the Fan Blades and Motor Assembly
Use a damp cloth to clean the fan blades and the motor assembly thoroughly. We often hand the fan blades down from the roof to clean them in the kitchen sink. Along with the screen, that’s the part of the entire fan assembly that gets the dirtiest by far.
Clean the Vent Fan Screen
Rinse the vent fan screen thoroughly so that all of the dirt, dust, pollen, etc have been removed.
Put the Fan Blades and Motor Back Together
Reconnect the fan blades and the motor assembly, using your Allen wrench and pliers to tighten the nut snugly. Be sure to install the blades in the same location on the post (not too close, or far from, the motor assembly).
Replace the Fan and Reconnect the Power Wires
Tilting the fan at an angle, set it back into the vent fan hole until it’s properly seated. Again, it will be tight, so many require some gentle wiggling to fit into place. Be sure not to force it.
Replace the four screws that hold the fan in place. Reconnect the power plugs and replace the plastic clip that holds the wires in the track. Be sure to reconnect the power plugs to the correct wires (negative/positive).
Reattach the Screw that Holds the Lid in Place
Loosen the Phillips screw on the back of the bracket that you tightened to hold the lid up during cleaning. Lower the lid enough to align the upper hole with the bracket. Then reattach the screw at the top of the bracket, and tighten down both screws.
Close the Lid and Replace the Vent Fan Cover
Close the fan lid and then replace the top of the vent fan cover. If you have the same Camco Aero-Flo fan cover we do, that simply requires aligning the hinges and tightening the two Phillips screws.
Replace the Interior Screen
Replace the now-clean screen on the interior of the vent fan.
That’s how you super clean one of the dirtiest parts of your RV in less than 30 minutes. If it’s been a while since you last cleaned your fans, you’ll immediately be amazed at the difference, with so much more light coming in!
If you’d like to watch this DIY project being done, check out our video and follow Peter as he thoroughly cleans our RV vent fans.
Free RVing Tips, Tricks, Reviews, Giveaways & More
Subscribe to our daily newsletter! We’ve been full-time RVers for 20 years (!) and share everything we’ve learned about RVing in our daily blog posts. Join our online community to receive a wealth of great RVing knowledge delivered right to your inbox.
Whether this is your first time on the road or you’re a seasoned full-timer, you’ll love the wide range of RVing topics we cover. Don’t miss a single article or any of our famous RV gear Giveaways — Subscribe today!
Stephen Klinger
Monday 19th of June 2023
Very informative, as usual. I hope it's not too far off-thread to ask about installing a new vent fan in a space that currently has only an unpowered roof vent. Could the fan be safely powered by connecting the wires to a nearby 12-volt ceiling light or would the wires need to go directly to the converter/charger ?
TheRVgeeks
Wednesday 21st of June 2023
Hi Stephen... no, not at all. Short answer would be "Maybe"... would depend on the gauge of wiring used to bring power to that light. It's possible that the fan could draw more current (especially if the fan and light are on at the same time) and exceed the ampacity of the wire. IDEALLY? You'd run new wiring to the fuse block and add a new fuse to protect the wiring and fan. BUT... knowing the challenges of running new wires through walls/ceilings in an RV, that's not likely.
IF you can leave the light off when the fan is on... and IF you can leave the fan on lower settings so its not pulling too much power... you should be fine.
Pat Parker
Monday 19th of June 2023
Good information thanks
TheRVgeeks
Monday 19th of June 2023
Thought you’d find that timely, @Pat! ????