

Harnessing the energy from the sun to power your RV is a fantastic feeling. We think that installing RV solar panels is one of the best upgrades you can make to any rig. But, what’s the best way to connect them? Wiring solar panels in series vs parallel is an important consideration.
In this post, we’re investigating the details, the pros & cons of wiring solar panels in series vs parallel, how to wire in both configurations (or even a combination of both!), and much more.
To introduce the topic of solar panels – series vs parallel, cue John, Paul, George & Ringo, because Here Comes The Sun! ????????????????=????


There’s nothing like harnessing the awesome power of the sun to power a home, on wheels. Let’s wire up those solar panels!
- 1) What’s the Difference Between Wiring Solar Panels in Series vs. Parallel?
- 2) How to Wire Solar Panels in Series
- 3) What Are the Pros and Cons of Wiring Solar Panels in Series?
- 4) How to Wire Solar Panel in Parallel
- 5) What Are the Pros and Cons of Wiring Solar Panels in Parallel?
- 6) Can I Mix Rigid and Flexible Solar Panels?
- 7) Can I Mix Solar Panels from Different Manufacturers with Different Electrical Ratings?
- 8) Can I Wire Solar Panels in Series AND Parallel?
- 9) Is It Better to Wire Solar Panels in Series or Parallel?
What’s the Difference Between Wiring Solar Panels in Series vs. Parallel?
The most significant difference between wiring solar panels in series vs parallel is the output voltage and amperage (also known as current).
If you wire several panels in series (connecting the wiring positive-to-negative, positive-to-negative down the line), the output voltages of the panels add together, but the output amperage remains the same as it is for a single panel.
If you wire your solar panels in parallel, the opposite occurs. Here, you’re adding output amperages together, but the output voltage of the combination remains the same as it is for a single panel.
For example, let’s say you’re wiring up two solar panels and each panel has an output of 18V/6A. If you wire them in series, you’ll be getting an output voltage of 36V (18V x 2) while the output current will remain 6A. If, however, you wire your panels in parallel, your output voltage will remain 18V, but your output current will double to 12A (6A x 2).
How to Wire Solar Panels in Series
To wire solar panels in series, you’ll connect the positive terminal on one panel to the negative terminal on the second panel.
If you’re wiring multiple panels, you’ll simply continue this pattern of connecting all of the panels, from the positive of one panel to the negative of the next, and so on. When you’re done, you’ll have a single positive connection at one end of the series, and a single negative connection at the other.


Wiring solar panels in series, you’ll connect the positive of one panel to the negative of the next, and so on. You’ll be left with a single positive connection at one end of the series and a single negative connection at the other.
What Are the Pros and Cons of Wiring Solar Panels in Series?
If you wire your solar panels in series, you’ll have a low-amperage solar system. (Remember – wiring in series doubles the voltage but keeps the amperage of a single panel.) Lower amperage means that you can use smaller gauge wiring, which is not only easier to work with but is also less expensive. (Copper isn’t cheap!)
Wiring in series is a good choice if you’re unlikely to be in shaded conditions. If you’re able to keep all of your solar panels completely in the sun for the greatest part of the day, wiring your panels in series may be advantageous.
But, if your solar panels are likely to be in shaded conditions at times, you’ll be at a distinct disadvantage if you wire them in series. That’s because if even a single panel of your solar system is shaded, even partially, the power output of the entire system will be reduced, sometimes significantly.
For more on this important concept, see our posts Should I Tilt My RV Solar Panels? and Boondocking – Why We Face East.
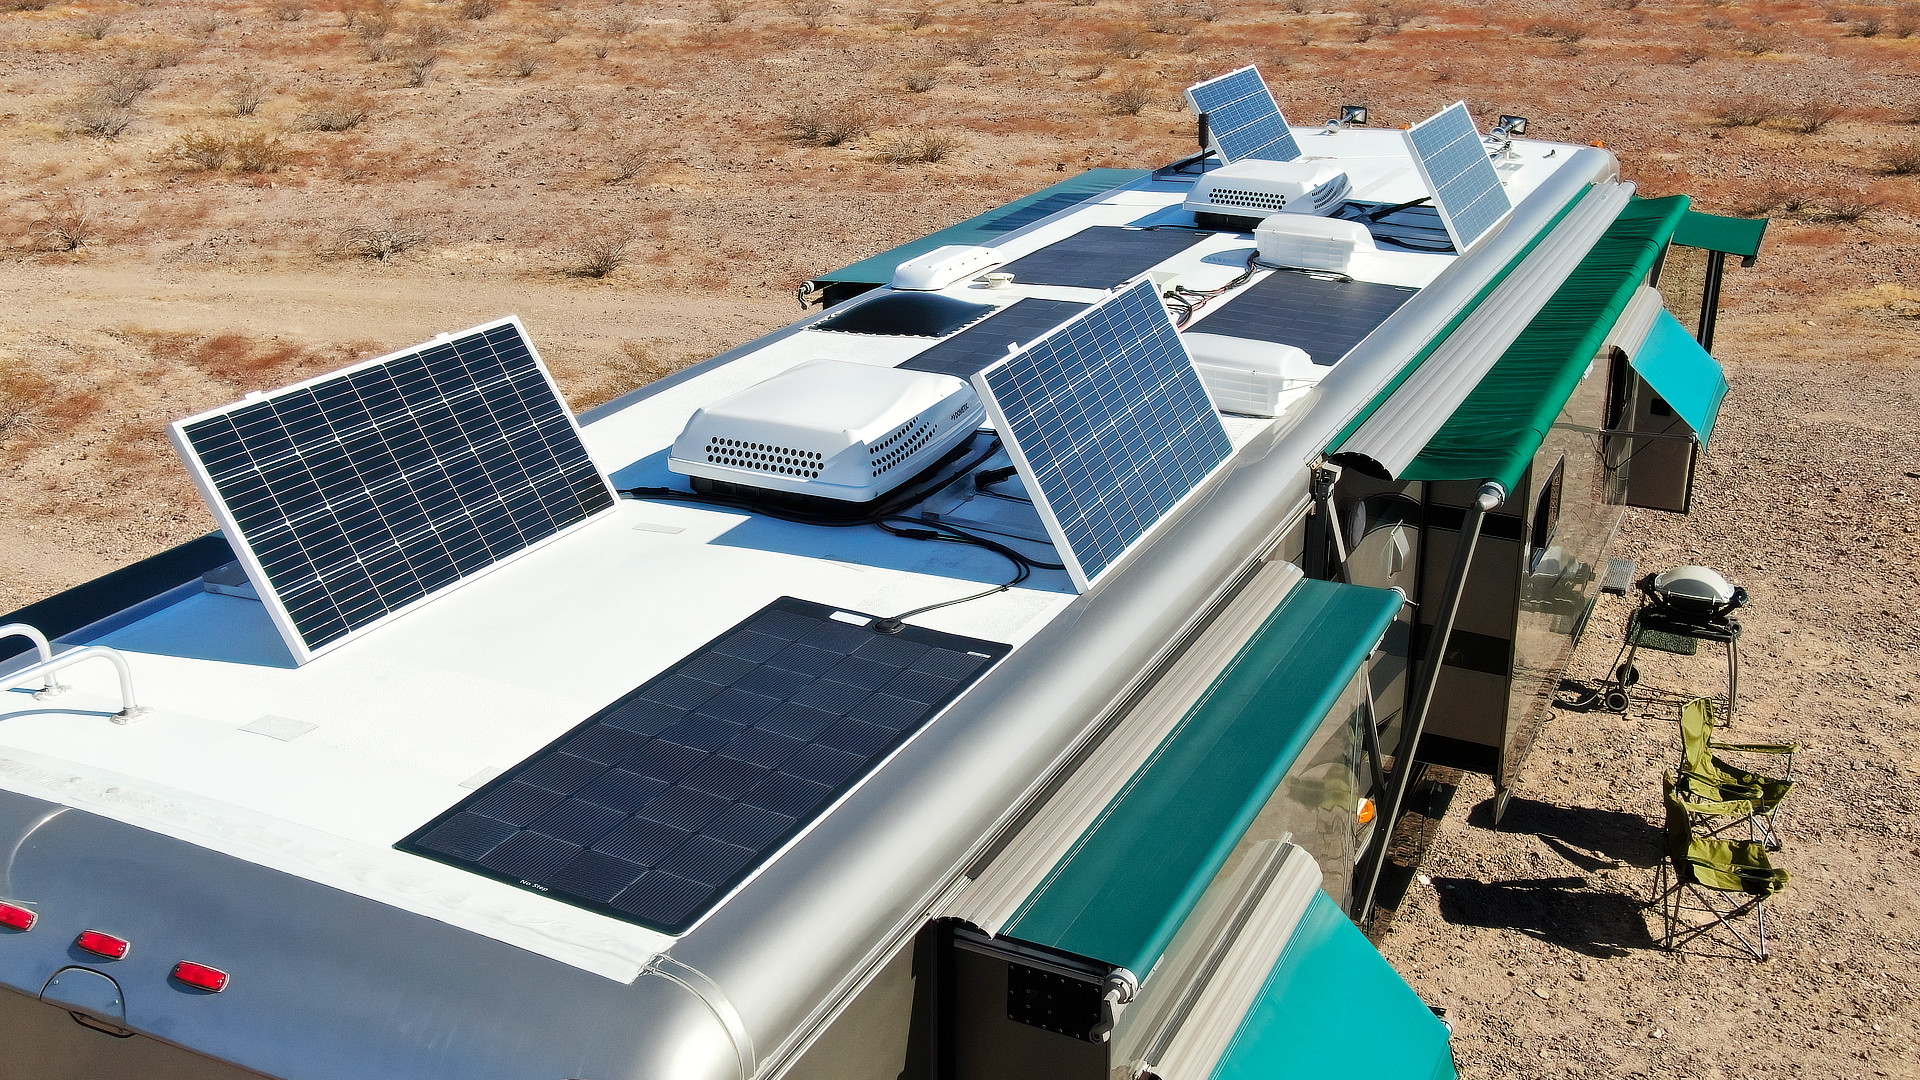

Tilting the rigid panels of our solar array allows us to take maximum advantage of the sun, especially during short winter days, when the sun stays low on the horizon.
Another important thing to consider when wiring your solar panels in series is that it will enable you to benefit from using an MPPT solar charge controller. This type of RV solar charge controller is typically more expensive. But it’s more efficient because it can take advantage of the higher voltage output from a series array of solar panels. MPPT charge controllers convert that excess voltage into additional charging current. Since you’ll experience less loss by running high-voltage/low-amperage current from your panels to your charge controller, you’ll have more power available to charge your batteries.
How to Wire Solar Panel in Parallel
To wire solar panels in parallel, you’ll connect the positive terminals of all of the panels together and all of the negative terminals together.
So, if you have several solar panels in your array, you’ll connect the positive terminal of one panel to the positive terminal of the next panel, the positive terminal of that panel to the positive terminal of the next panel, and so on. You’ll do the same with the negative terminals.
Connected this way, you’ll be adding the amperages of all of the panels in your array, but the voltage will remain the same as the voltage of a single panel.
For example, if you’re wiring four 18V/6A panels in parallel, you’ll end up with a current output of 24A (6A x 4), with an output voltage of 18V.
What Are the Pros and Cons of Wiring Solar Panels in Parallel?
When you wire your solar array in parallel, each panel will effectively operate independently of the others. This is a good approach if you’ll be in locations where one or more of your panels could be shaded. Or if you have several things protruding from the roof that can cause shading (think satellite dish, air conditioner, or roof vent cover). Unlike with a series array, where shade on a single panel can affect the entire system, parallel arrays function much better under partial shading conditions. Only the shaded panel’s output will be affected, while the remaining panels can continue putting out their full power.

When you wire solar panels in parallel, the panels function independently of one another. This means that if one panel is shaded by a tree, or something sticking up off your roof, the other panels will not be affected and can continue to harness the power of the sun.
With a parallel setup, you’ll have a lower-voltage system, which will allow you to choose a lower-cost PWM controller. That’s because the primary benefit of a higher-cost MPPT controller is its ability to take advantage of the higher voltage found in series-wired systems. Also, wiring in parallel means you’re unlikely to exceed the voltage limitations of your solar charge controller.
The disadvantage of wiring your solar panels in parallel is that more wire may be required to construct the parallel array. And, because the output from the system will be at a higher current, the wiring you need to use has to be higher gauge (thicker) to handle it. That typically makes the wiring required for parallel systems both more expensive and more challenging to work with (Cutting, routing, crimping, etc all increase in difficulty the thicker the wiring.)
And while you always want to design your system so that the runs of wire are as short as possible, this is particularly true with parallel arrays of solar panels. The higher the current, the greater the loss (from resistance in the wire). So short runs reduce that loss, ensuring the largest amount of power reaches your batteries to charge them.

- Are you ready to take your solar energy game to the next level? Using a multi-stage, adaptive charging algorithm, the Victron Energy SmartSolar MPPT...
- With the latest and fastest technology, this MPPT charge controller maximizes energy-harvest from your solar panels, intelligently driving it to...

- 【12V/24V Automatically Detect】Automatically detects 12V or 24V DC system voltages (for non-lithium batteries). The LCD screen and multiple LED...
- 【Smart 4-Stage PWM Charging】Smart 4-Stage PWM charging (Bulk, Boost, Float, and Equalization) increases battery life and improves system...
Can I Mix Rigid and Flexible Solar Panels?
You absolutely can mix rigid and flexible solar panels! In fact, we’ve done just that in the ultimate RV solar panel system on our motorhome.
There are, of course, advantages and disadvantages to flexible solar panels vs rigid, and for us, a combination of both has proven to be a winning approach.
With the advancements in the construction of flexible solar panels for RVs and with prices coming down as supply grows, using flexible panels as well as rigid panels in a solar array has become more practical.
We’ll let John explain our ultimate 1,300-watt RV solar system and how we installed and wired it:
Can I Mix Solar Panels from Different Manufacturers with Different Electrical Ratings?
The answer to this question is a qualified… yes you can. And though it’s best to wire solar panels in series or parallel using identical panels in each group if possible, it isn’t an absolute requirement.
While you can mix solar panels from different manufacturers and with different electrical ratings, you’ll need to follow some important guidelines.
If you’re wiring your solar array in series, all of the panels need to have the same current (amperage) rating. The voltages of the panels will add together, but the current output will be equal to the lowest rated panel in the series.
If you wire your solar array in parallel, then all of the panels should have the same voltage rating. Here, the current output will add together, but the system output voltage will be equal to the panel with the lowest voltage rating.
To maximize the solar output when mixing solar panel types, you’ll want to use multiple charge controllers, with each panel array on its own controller. This ensures that each array can operate most efficiently.
Can I Wire Solar Panels in Series AND Parallel?
Absolutely! In fact, that’s exactly how we wired ours. Larger solar systems often use both series and parallel wiring.
It’s important to remember that wiring in series will increase your voltage, enabling you to use smaller gauge wiring and making your MPPT charge controller more useful and effective.
Also remember that wiring in parallel will increase your amperage, requiring larger cabling. But this prevents the shading of one panel from dramatically affecting the other panels.
You need to consider both voltage and amperage when designing your RV solar system. This is especially important when choosing your solar charge controller.
Voltage and amperage are key when designing your RV solar system, and especially important when choosing your solar charge controller.
Often a solar installer chooses to design a system with a combination of series and parallel connections. This allows the system to operate at a higher voltage AND at a higher amperage, without exceeding the maximum rating of either the charge controller or the wiring. This allows your solar panels to perform optimally.
Is It Better to Wire Solar Panels in Series or Parallel?
This really depends on your specific situation and the size of the RV solar system you’re installing.
Wiring in series, you’ll have the advantage of being able to use smaller gauge wiring due to the lower amperage involved. Smaller gauge wire is both easier to work with and less expensive.
Another benefit to wiring in series is that you’ll be able to take advantage of the efficiency of an MPPT charge controller because of the higher voltage involved.
But… an MPPT charge controller is more expensive, and wiring in series increases the risk posed by shade. Shading on any one of your solar panels will reduce the output of the entire system.
Wiring in parallel eliminates the shading issue because each panel acts independently. Shading on a panel will reduce output for only that one panel.
However, you’ll need to use a larger gauge (thicker) wire due to the increased amperage, and you’ll also lose the primary benefit of an MPPT controller which works best at higher voltages.
A common solution is a “series-parallel” system. This can give you the benefits of both types of systems. For instance, you could wire two panels that are mounted next to each other (let’s say at the front of your RV) in series. Then do the same thing with a second set of panels mounted at the rear of your RV. Then, wire those two sets of series panels in parallel with one another.
Now, you have the advantage of higher voltage (so you can use an MPPT charge controller and lower gauge wiring), with some improved shade tolerance (since only two panels would be affected by shade at a time… if the front of the RV is in shade, those panels would have reduced output, but the rear panels would perform fine).
We hope this overview of solar panels – series vs parallel helps you plan your system. Both wiring techniques have their uses, pros, and cons. But with careful planning and a mix of both, you can design a system that provides your RV with the power it needs, in as many conditions as possible (other than at night ????).
Geek Out with Us Every Week
Join our newsletter to learn about all things RV-related. Every week we offer free tips, tricks, product reviews, and more to our online community of RVers. So, whether this is your first time on the road or you’re a seasoned expert, we’d love for you to geek out with us!
Jay Manges
Saturday 29th of July 2023
I wish I had found this valuable information earlier. I was having a problem connecting four 24v 200W solar panels in parallel to a 3600W solar generator. I knew something was wrong because I couldn't get more than 360W out of the system.
I contacted technical support for the solar generator and they had no answers. It wasn't until I read deeper into the specs of the solar generator that I discovered the maximum input into the built in MPPT controller on the unit was 15A. Using an online watt to amp calculator, 24V at 15A is exactly 360 watts. Mystery solved.
My problem was quickly fixed by changing the panels wiring to series. I am not sure why technical support did not catch this. I told them three times that the panels were connected in parallel but it appeared to have gone right over their head. I am not an electrician so I didn't know. Now my solar generator is soaking up 650W of free energy from the sun that I will be plugging my RV's shore power into.
Ryan Rodriguez
Wednesday 5th of July 2023
The primary advantage of an MPPT system is that it actively modulates the frequency of the PWM to probe where the maximum power for a given system is. An MPPT converter is essentially a PWM converter with a closed loop control system wrapped around it.
The max power of a panel is not found at either the open circuit voltage, or the short circuit current, it's somewhere in the middle, and the relation is not linear. So the closed loop control of an MPPT takes the modulation frequency of the PWM and tweaks it until it that point is found. A standard PWM converter does not do this, it just work's toward a voltage target. MPPT is a more complicated circuit and controller, and is more efficient.
John Schretlen
Sunday 27th of March 2022
This was a very well written article for those looking to add some solar panels to their RVs.
I know that you have a one-of-a-kind-RVgeeks-designed-series/parallel solar system. Each set of solar systems has it own controller and then each goes to a battery charger controller to charge the battery. Am I right so far?
Since I imagine that you can monitor each system independently, one question that I don't remember you answering is: When you are boondocking in the sunny, rain-free, treeless, desert south west which system produces more battery charge?
TheRVgeeks
Sunday 27th of March 2022
Hi John! You remember correctly. Each of our banks of panels, rigid and flexible, feed into their own independent solar charge controller. During the summer, when the sun is high in the sky, we rarely tilt the rigid panels, and the output of the two sides is just about the same. During the short winter days we spend down in the desert when the sun stays low in the sky, we face east, tilt the rigid panels to the south, and those rigid panels far outperform the flexible panels due to being aimed at the sun much better.