
If you’re considering or are currently undertaking a van conversion, you may also be thinking about installing windows in the van. Before you start cutting a giant hole through the wall of your rig, we’ve got a step-by-step tutorial on how to install windows in a conversion van.
Van life/Class B living is a huge and growing part of the RVing community. We’ll show you exactly how to help transform a dark, windowless van into a bright, airy custom Class B rig.
After our stellar experience with a replacement window for our own RV (which turned out to be the highest-quality window in our entire rig!), we went back to Peninsula Glass in Vancouver, WA. With their assistance, we’ll not only show you exactly how to complete this project, but we’ll share their professional tips and tricks that will help make the job a big success.
-
1)
How to Complete a Van Conversion Window Install
- 1.1) What You’ll Need
- 1.2) Create Window Templates
- 1.3) Remove the Ribs From the Inside Van Walls
- 1.4) Trace the Template Outline Onto the Inside of the Van Wall
- 1.5) Drill Pilot Holes
- 1.6) Transfer the Outline to the Outside of the Van
- 1.7) Outline the Window Area with Thin Film and/or Painter’s Tape
- 1.8) Hang an Old Blanket or Large Towel Inside the Van
- 1.9) Cut the Window Opening
- 1.10) Prepare the Opening for Installing the Van Window
- 1.11) Install the Window(s) in Your Conversion Van
- 1.12) Clean Your New Windows
- 2) Free RVing Tips, Tricks, Reviews & Giveaways
How to Complete a Van Conversion Window Install
If you saw our post on our RV window replacement, you already know that it’s not as difficult a DIY job as it might seem. But in this post, we’re not replacing a window but are instead adding one where there hasn’t been one before. That, of course, means sawing right through the side of the van! 😳🙈
While we’re demonstrating this conversion van window installation on a Ram ProMaster, we also cover the minor differences in installing a window into a Sprinter or Transit van conversion. Metris vans are very similar, so you should have no problem with this project no matter what type of van you have.
What You’ll Need
- Painter's Tape
- Utility Knife
- Cold Chisel
- Putty Knife
- Hammer
- Work Gloves
- Liquid Paint Marker
- Cordless Drill
- Angle Grinder
- Drill Bit Set
- Cutting Wheels
- Jigsaw
- Fine Jigsaw Blades
- Flat Metal File
- Invisible Glass
- Pencil
- Suitably-sized cardboard (the size of your windows)
- An old blanket
- Face mask with eye protection
- Hearing protection
Create Window Templates
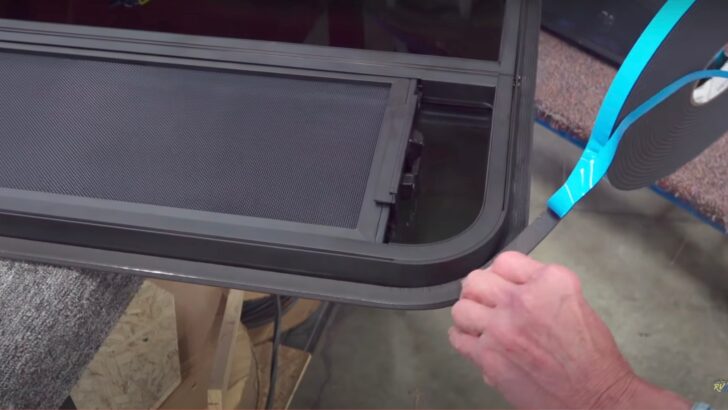
Motion Windows, the Peninsula Glass brand for RV, boat, and specialty vehicle windows, has two main pieces — the window itself and the clamp ring that holds the window in place. The rings for smaller windows are a single piece, while larger window clamp rings come in two sections.
The first step is to make a cardboard template. Set the ring down on a suitably sized piece of cardboard with the smaller inner portion of the ring (that has the screw holes) facing down. Hold the ring firmly and trace around the outside edge. Note that the larger two-piece rings can be temporarily connected together with masking tape to hold them in position for tracing.
Next, use a sharp utility knife to cut right along the line that you drew. The result will be an exact template for the cut-out you’ll be making in the van wall.

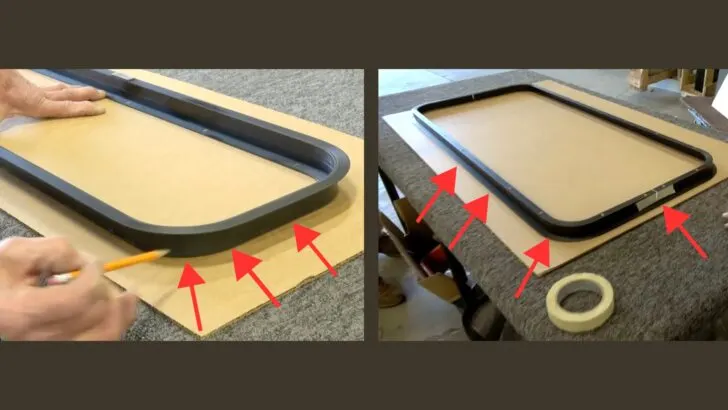
On the left, a template is being made for a smaller window using its single-piece clamp ring. On the right, the two sections of a larger clamp ring are temporarily connected with masking tape to form the template.
Remove the Ribs From the Inside Van Walls
Because we’re working on a Ram ProMaster van, we removed the ribs from the inside of the van walls at both window locations. We’ll illustrate how to do that now, and then we’ll explain how Sprinter, Transit, and some other vans are slightly different.
You’ll need a hammer, a cold chisel, and a putty knife. Protective work gloves are also recommended for this part.
Four metal tabs—two at the top and two at the bottom—and some sealant hold the ribs in a Ram van in place. Use the hammer and chisel to cut the tabs one at a time. They’re made of sheet metal, so they’re fairly easy to cut through without a lot of force.
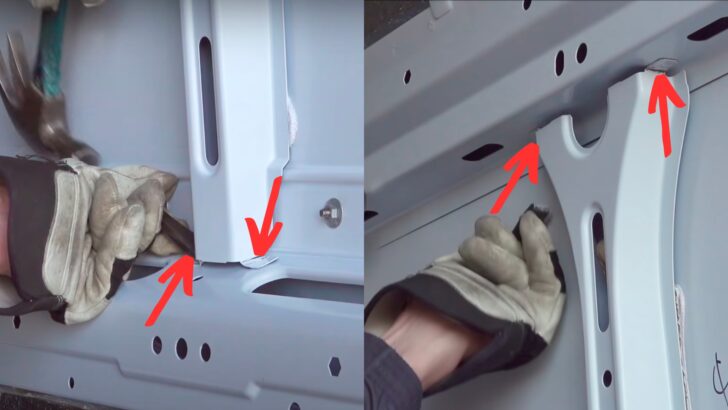

Use a hammer and cold chisel to cut through the four tabs on the rib, leaving only the sealant holding it to the van wall.
Use a hammer to tap your putty knife between the rib and the wall to cut through the sealant. You should then be able to remove the rib. Chisel away whatever pieces of the metal tabs are left. Then use your putty knife to scrape off the rest of the sealant that remains on the van wall.
Note: Sprinter, Transit, and Other Vans
The ribs of Sprinter, Transit, and other vans aren’t as deep/thick as the ribs of the Ram ProMaster. So, with these vans, you don’t need to remove the ribs because you can cut right through them. This means you can simply place your template right over the ribs and trace the outline.
Trace the Template Outline Onto the Inside of the Van Wall
With the rib removed from the ProMaster, trace around your template, marking the van wall. If it makes it easier, you can use painter’s tape to hold the template to the van wall while you trace around it.
Position the window template to line up with the bodywork and to look aesthetically pleasing from inside and out. The reason you work from the inside is to make sure the window opening doesn’t conflict with any other structural components. Take measurements as needed to make sure your template is exactly where you want it.
NOTE: It’s important not to position the template no closer than 3/4″ from any structural component, leaving adequate space for the trim ring.
Drill Pilot Holes
We begin the process of cutting the window opening by drilling eight small holes in the van wall in specific locations along the template border. Use a 3/32″ bit to drill holes at the point where each curved section meets the straight lines. Do this at all four corners of the template outline.
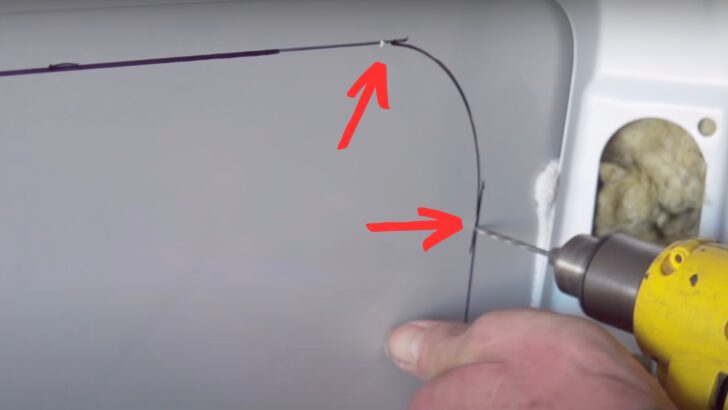
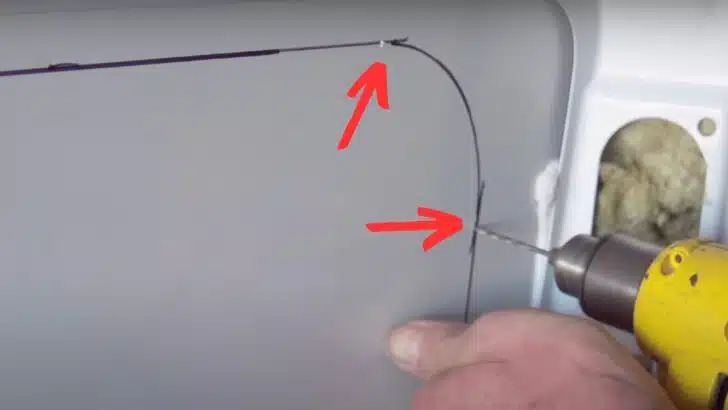
Before cutting the window opening, drill holes at the point where each curved line meets the straight lines of the template drawing. That means you’ll drill 8 holes in total, 2 at each corner.
You should drill a total of eight holes, one at each edge of each radius on all four corners. Note that doing this on a Sprinter or Transit van would be the same, except the ribs would still be in place.
Transfer the Outline to the Outside of the Van
Next, you’ll use the holes to transfer the outline to the outside of the van. Move outside and use a straight edge to connect the holes you just drilled.
First, use your straight edge to draw a horizontal line connecting the two upper holes and then connect the two lower holes. Then draw vertical lines connecting the holes on the left and the right sides.
Verify the correct radius using the radius template that you can print from the Motion Windows website and cut out. Print the Motion Windows Radius Template here.
The radius will be either 2 1/2″ or 3″ which you can confirm by comparing the template to a corner of your new window.
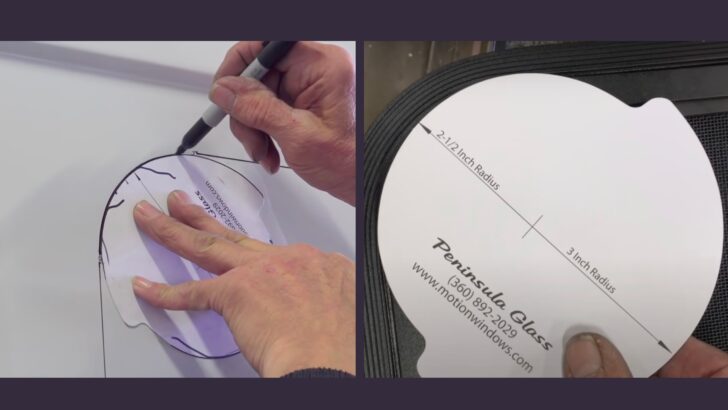

The radius will be either 2 1/2″ or 3″ which you can confirm by comparing the Motion Windows template to a corner of your new window.
When this process is complete, you’ll have a near-perfect outline of the window on the side of your van. However, there are a few more preparations to make before cutting, These steps will help protect your van during the cutting process.
Outline the Window Area with Thin Film and/or Painter’s Tape
Next, place painter’s tape all around the outline that you’ve traced onto the side of your van. Make sure you don’t cover the lines you’ve drawn, and be sure to avoid using masking tape, which can leave you with a sticky mess.
Note: A professional installer will likely have a roll of light-adhesive thin film on hand, which we show the Peninsula Glass installer using in the video below to protect the van’s paint job. If you don’t have that type of film around, no worries. Just use another line or two of painter’s tape (or wide painter’s tape).
- Premium grade painter’s tape for most common paint applications
- Treated with PaintBlock Technology that seals tape edges for very sharp paint lines
Hang an Old Blanket or Large Towel Inside the Van
To catch the metal shavings that will fall inside the van during cutting, tape along one edge of an old blanket or large towel and hang it just under the bottom of the lower line that you’ve made inside the van.
Then attach the loose/lower end of the blanket above the top window line you drew, using a couple of spring-loaded clamps or tape. This will catch the metal shavings as they fall inside the van, avoiding a mess.

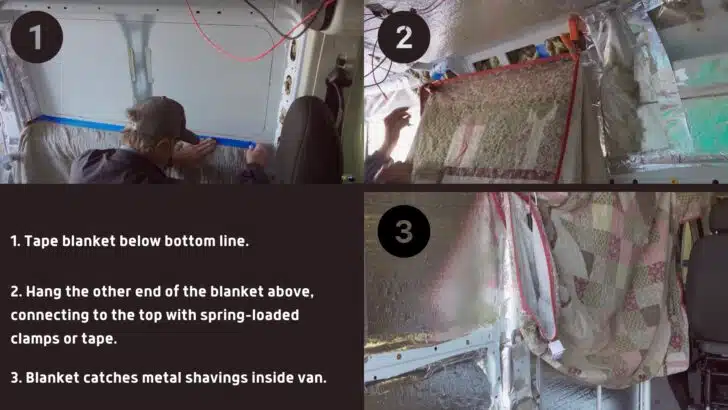
Hang an old blanket or large towel inside the van to catch the metal shavings that will fall when you cut the hole for the window.
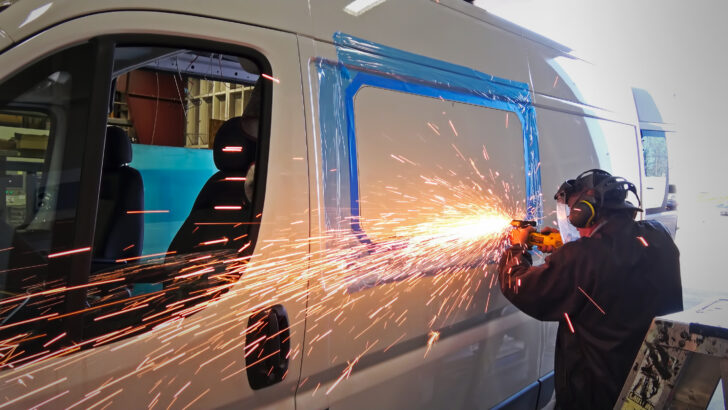
Cut the Window Opening
For this step, you’ll need an angle grinder, a jigsaw, a face mask with eye protection, and hearing protection.
PRO TIP: Measure and mark the center of your window outline at both the top and bottom using a felt-tip marker. Then make two short horizontal marks just above the lower outline, one on each side, which will identify the location for your angle grinder cuts.
Use your angle grinder to cut through those two lower marks, just above the lower edge of the window outline. Those two slots will be your starting point for sawing through the metal.
Use a jigsaw with a fine metal blade (24 teeth per inch). Start at the left cut you made with the angle grinder and move your blade onto the line you drew with the template. Move to the left as you cut around the lower left corner, and then head straight up along the left side of the outline.
Continue cutting up along the entire left side, and around the upper-left corner of the outline.
NOTE: Never remove the saw from the cut until the blade has completely stopped moving, and remove it slowly so you don’t bend the metal if the blade catches in the cut.
Place a piece of tape over the straight part of the cut from the lower left corner to the upper left corner.
Now, do the same thing on the right side, starting your cut at the lower right, rounding the corner, moving upward, then around the upper right corner. When finished on the right side, place a piece of tape over that cut as well.
Next, cut from the lower-left and lower-right corners inward toward the center, stopping just short of the center line you drew. Stopping before completing the cut leaves a couple of inches of metal connecting the van wall to the section that you’re cutting out.
Then do the same thing at the top, stopping just short of that center line as well. This leaves the entire cutout held in place by a narrow section of metal at the top and bottom and by the tape at both sides. This will keep it stable for as long as possible so that the metal piece doesn’t flap around as you attempt to cut it.
Now all you need to do is complete the cut at the bottom (that one short center section that’s left) and then that one small section at the top. Now you can remove the tape and pull off the piece you’ve cut out, revealing the opening you’ve made for your window.
PRO TIP: Tape over the sharp edges of the rectangular section you just cut out. That will prevent you from cutting yourself on any jagged metal left by the jigsaw blade.
Prepare the Opening for Installing the Van Window
Run a file over the edges of the opening to remove any loose or sharp metal. Then, run your liquid paint marker along the edge of the metal to protect it and prevent rusting.
Remove all protective tape and film, and be sure the surface is clean before installing the window. Remove the blanket from inside the van, being careful not to shake any metal filings onto the floor.
PRO TIP: If you’re cutting more than one window, simply move the blanket carefully (without scattering any metal filings) over to the second window and rehang it. You can now repeat the entire process above and cut the second opening before dispposing of the filings.
Clean up the area and you can then begin installing your conversion van window(s).
Install the Window(s) in Your Conversion Van
To install your window or windows, you’ll need the following:
- Lacquer thinner
- Window cleaner
- Cordless drill
- Drill bits
- Pair of scissors
- Foam tape and screws that come with your Motion Window
- Pair of plyers with protective foam or tape on the jaws
Start by cleaning metal all the way around the window’s edge with lacquer thinner to prepare the surface for the foam tape.
Beginning at the center of the bottom edge of the window, apply the foam tape. Adhere the straight sections with the paper backing in place, and then peel it back. To help the foam round the corners smoothly, peel back the paper before pressing the tape into place.
To help the foam round the corners, peel back the paper first, and then press the foam into place.
Tape the entire perimeter in one unbroken piece. When you get back to the beginning, overlap the tape just a small amount to ensure a tight seal.
Because you completely remove the ribs on a Ram ProMaster van, you’ll install the window first, before installing the clamp ring.
NOTE — RE: Sprinter or Transit Vans: Because the ribs on Sprinter and Transit vans are cut but not removed, the clamp ring is installed first on those models. You’ll slide the edges of the clamp ring underneath the remaining edges of the ribs. Then, the window will be installed from the outside with the clamp ring already in place.
Spray the foam tape around the window perimeter lightly with the window cleaner. It may seem counterintuitive to get adhesive tape wet, but the moisture will allow minor adjustments in position during installation, and then it will evaporate.
Have a helper insert the window into the opening and hold it in place for you. Opening the slider makes it easier to hold and handle the window during placement.
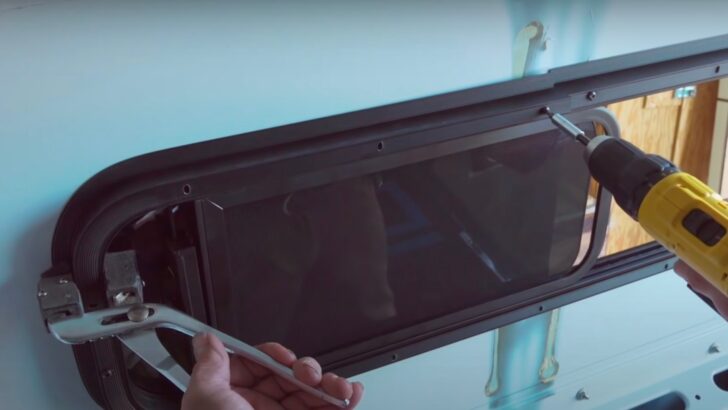
Measure to confirm that the window is centered and level. There should be a little play for positioning it properly. Place the clamp ring on and lightly install one screw on each side. Before tightening the screws, do a final alignment check by verifying measurements inside and outside.
The screws must go into the channel at the edge of the window. The arrow on the window in the photo below shows where that channel is.
This arrow shows the channel at the edge of the window where the screws get installed.
Make sure the two edges of the clamp ring sections line up but don’t overlap. Then continue installing the rest of the screws.
When installing the smaller window, follow the same procedure —install the window first, followed by the clamp ring. Before installing the clamp ring, remove the adhesive strip that holds the seam together.
Start by securing the right side of the ring into place. To bring the left side firmly against the right side and close any gap in the seam, use your pliers with protective foam or tape on them to squeeze the trim ring against the window frame. This way you can install the screw to lock it into place. Then you can install the remaining screws.
On smaller windows (with a single-piece clamp ring), use your covered/protected pliers to press the left side of the ring against the right side, closing the gap between them. Then install the screw closest to the seam to secure it in place. Check to make sure there’s no gap at the top, and install all remaining screws.
Clean Your New Windows
The final step is to give your new windows a good cleaning, then enjoy your bright new conversion van!
If you’d like to follow along with our professional window installer, check out our video showing you every step in the process:
We hope this post and video on how to do a conversion van window installation help you complete your project no matter what van you have and what type of window you’re installing.
If you want to replace a window, be sure to check out our post and video where we demonstrate how to replace an RV window.
Free RVing Tips, Tricks, Reviews & Giveaways
As 20-year full-timers, we share everything we’ve learned about RVing over the years. Join our online community to receive a wealth of great RVing knowledge delivered daily to your inbox.
Whether you’re a new RVer or a seasoned full-timer, you’ll love the wide range of RVing topics we cover. Don’t miss a single article or any of our famous Giveaways. Subscribe to our newsletter today!