
This post is a guide to draining, flushing, cleaning, and descaling an RV water heater. We’ll show you the method we’ve used for years to effectively flush and clean our tanked water heater and how to descale a tankless one, too (like our new Truma AquaGo Comfort Plus on-demand water heater).
Our method for our annual water heater flushing/cleaning evolved over our first few years on the road through a little trial and error. Flushing and cleaning a water heater isn’t difficult, but it is important to do it regularly – and correctly – especially if you have a heater with a hot water tank.
After many years with a traditional tanked water heater, we had an RV tankless water heater installed (the Truma). Since we have experience with both tank-style and on-demand models, we’ll explain how to flush a Suburban RV water heater, how to flush an Atwood RV water heater, and how to descale a tankless water heater.
-
1)
How to Flush an RV Water Heater
- 1.1) Gather the Tools and Items Needed for the Job
- 1.2) Prepare your RV the Night Before You Flush & Clean Your Water Heater
- 1.3) Turn Off the Water Supply and Water Pump
- 1.4) Remove the Access Panel
- 1.5) Open the Overpressure Relief Valve
- 1.6) Remove the Drain Plug/Anode Rod
- 1.7) Flush the Tank Using the Flushing/Rinsing Wand
- 1.8) Install the Drain Plug
- 1.9) Flip Your Winterizing Bypass Valves
- 1.10) Add the Vinegar Into the Tank
- 1.11) Turn on the City Water Connection
- 1.12) Close the Overpressure Relief Valve
- 1.13) Turn on the Water Heater’s Electric Heating Element or Propane Burner
- 1.14) Turn Off the Water Heater
- 1.15) Turn Off the City Water Feed and the Water Pump
- 1.16) Open the Overpressure Relief Valve (Wearing Gloves if Needed)
- 1.17) Remove the Drain Plug
- 1.18) Flush the Tank
- 1.19) Install Your New Anode Rod (Suburban) or Drain Plug (Atwood)
- 2) How to De-scale a Tankless Water Heater
- 3) Free RVing Tips, Tricks, Reviews & Giveaways
How to Flush an RV Water Heater
The following steps cover draining the tank, flushing and cleaning it, and, in the case of a Suburban water heater, inspecting and replacing the anode rod.
Whether you’ve got a Suburban water heater or a Dometic/Atwood unit in your RV, the following steps will apply. The only real difference between the two is that a Suburban RV water heater has an anode rod, while a Dometic/Atwood unit only has a drain plug.
It’s a good idea to drain and flush your RV water heater at least once a year and/or anytime you’re storing your rig long-term. If you’re storing the RV in cold temps for the winter, you’ll want to drain and flush that stagnant water out of your water heater as part of the winterization process.
Gather the Tools and Items Needed for the Job
As with any DIY project, you’ll want to start by gathering the items needed to get the job done so you’ll have everything right on hand.
Here’s what you’ll need regardless of whether you have a Suburban or Atwood water heater, with links for most items. (At the end of the list, you’ll find additional items needed only if you have a Suburban water heater, and items only needed if you have an Atwood water heater.)
- Enough white vinegar to fill the tank about halfway (determine the amount you’ll need based on the size of your hot water tank).
- Reduced with water to 5% acidity
- Great for food or cleaning
- Socket wrench with a short extension
- Water heater tank-rinsing wand

- EXTENDS THE LIFE OF YOUR WATER HEATER: The tank rinser lifts sediment that collects at the bottom of water heaters and flushes it out. This Camco RV...
- IMPROVES WATER HEATER FUNCTION: This camper accessory helps prevent tank corrosion and also restores your hot water tank’s heating efficiency by...
- Garden hose/flush hose to connect to your water supply

- 15-Foot length
- Brass couplings
- Brass Y Valve (not essential, but it’s very handy to avoid tying up the only water outlet at a campsite).
- DOUBLE YOUR WATER SOURCE: Instantly create two tap outlets with this ultra-durable Y hose splitter. The dual-valve design features built-in shut-off...
- UNIVERSAL COMPATIBILITY: Fitted with US Standard NH 3/4" threads for use with most water source fittings.
- Teflon plumbers tape
- ❤Superior Quality: ❤Thread sealant tape is made of teflon,is suitable for most kinds of soft water pipes, creating airtight seals between threaded...
- ❤Multi-Use: ❤Working for both air and water , plastic and metal pipe fittings.good for gas, drinking water pipes and garden hose faucets .
- Heavy-duty rubber work gloves

- PROTECTIVE PVC COATING: Liquid and chemical resistant gloves. Effective against adhesives, detergents, and diluted bases and acids. Gauntlet cuff...
- EXTRA DURABLE: Resistant to cuts, abrasions, punctures and heat; stays flexible even at lower temperatures
We bought a borescope to inspect the inside of our water heater, but you don’t need one of these to do the job. We’re providing this link in case you want to inspect the interior of your tank, too.

- 【Ultra HD 5MP (2592*1944) Camera】: The borescope camera with 0.33in ultra thin probe can inspect any hard-to-reach places without efforts. 5.0MP...
- 【USB Connection, Easy Set-up】: This endoscope camera can connect with Android smart phone, windows computer and MacBook via the micro USB, USB and...
For Suburban Water Heaters Only:
- Suburban Water Heater Anode Rod (Magnesium)

- Easily installs
- Extends tank life
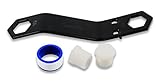
- 1 1⁄16″ Socket (for Suburban anode rod)

- CORROSION RESISTANCE: The Shallow Socket Has Full Polish Chrome Finish
- QUICK ENGAGEMENT: 12 Point Socket with Fastener
- 3⁄4″ PVC Drain Plug (for use while vinegar solution is in the tank)

- Plug for closing the end of a pipe or fitting
- Male NPT threads for connecting to female NPT threaded pipes
- 1 1⁄8″ Socket (for 3⁄4” PVC Drain Plug)

- CORROSION RESISTANCE: The Shallow Socket Has Full Polish Chrome Finish
- QUICK ENGAGEMENT: 12 Point Socket with Fastener
For Atwood Water Heaters Only:
Atwood RV Water Heater Drain Plug and Wrench Kit (7/8″ & 15/16″ Drain Plugs)
- Easy to Use Kit: Helps you easily remove and replace your RV's water heater drain plugs
- Compatibility: Included wrench fits both 7/8-inch and 15/16-inch drain plugs
Prepare your RV the Night Before You Flush & Clean Your Water Heater
The night before flushing our water heater, we turn it off (both propane and electric power) and allow it to cool overnight. This avoids the possibility of being scalded by hot water when you drain the heater.
Turn Off the Water Supply and Water Pump
On the day when you’re doing the job, turn off the water at the city water supply and turn off your RV water pump.
Remove the Access Panel
Remove the water heater access panel on the outside of the RV. This usually requires no tools, only needing a quarter-turn of the latch, by hand.
Open the Overpressure Relief Valve
Pull outward on the overpressure relief valve to release any pressure in the tank and allow the water to run out. There won’t be much water, but stand to the side to prevent getting splashed (or burned if you weren’t able to wait for the water to cool down before starting the job). This is where heavy-duty rubber gloves come in handy.
Remove the Drain Plug/Anode Rod
If you have an Atwood water heater, remove the drain plug, which is usually white nylon/plastic. If you have a Suburban water heater, remove the anode rod. During this step, be sure to stand to the side to avoid getting splashed (this is where the most water pressure/flow will occur, as the entire tank empties). Let all of the water drain out of the tank.
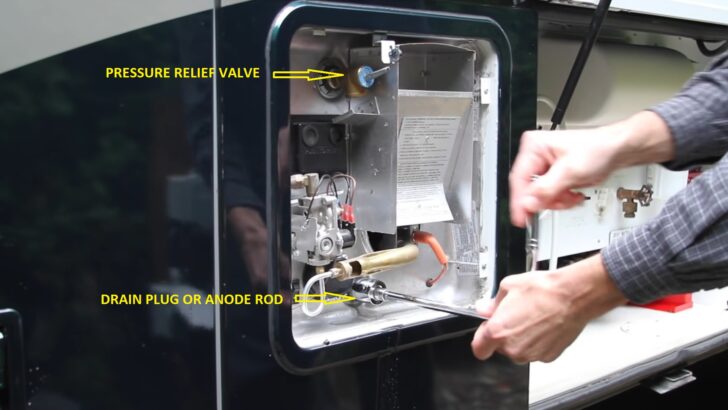
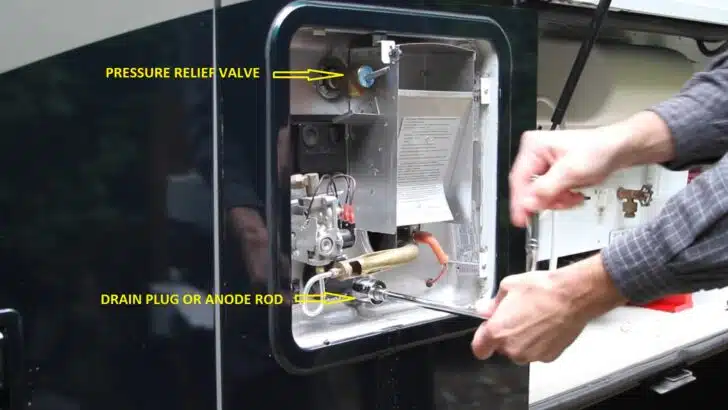
Here, you can see the pressure relief valve at the top and the anode rod at the bottom. Note that this is our Suburban water heater. An Atwood RV water heater has a pressure relief valve like this one but has a drain plug instead of an anode rod. From the outside of the hot water tank, these two items look very similar.
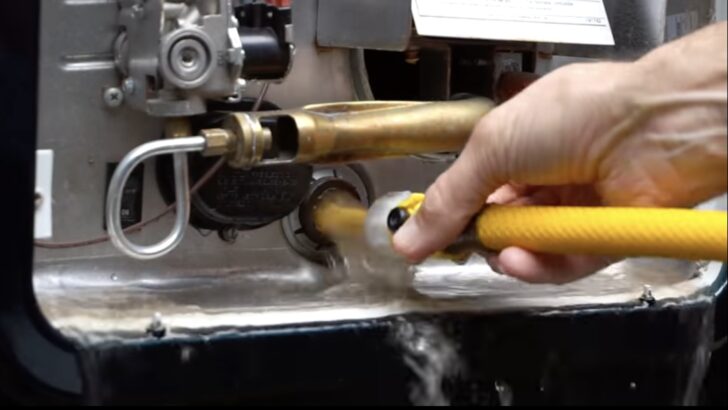
Flush the Tank Using the Flushing/Rinsing Wand
Connect your flushing wand to the end of your hose. Insert the wand into your water heater’s tank through the anode/drain plug opening at the bottom and turn on the water system to begin flushing the tank.
READER’S TIP: Ed F. commented below that some people have reported that the wand tube CAN shoot off the end when turning the water pressure on… so be sure to keep a hand on it so that it doesn’t get blown off and into the water heater’s tank! It can be retrieved, but why make a simple task harder than it needs to be?!
You’re likely to see scale and other debris flushing out of your water heater and onto the ground. This will be especially apparent when you first begin the flushing process, with more white limescale visible as it first starts flushing. The longer it’s been since you flushed the heater and/or how hard the water is where you’ve been RVing, the more scale will be present.
Continue to move/rotate/push/pull the wand around inside the tank, flushing it out as thoroughly as possible until the water running out of the tank is mostly clear. This usually only takes about two or three minutes but might take longer if your tank is really full of scale.
Below are photos from our first borescope inspection, taken after initially flushing our water heater tank with a wand. The photos from the borescope are a little blurry, but you can see that a lot of limescale remains in the bottom of the tank (left) and on the heating element (right). The flushing/rinsing process can’t flush the tank out well enough to thoroughly descale the tank and heating element.
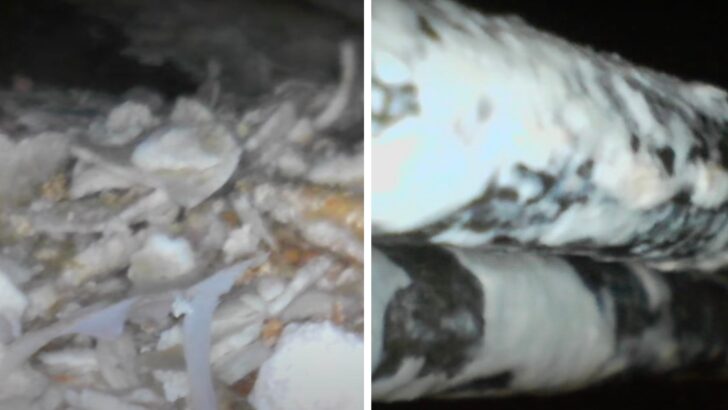
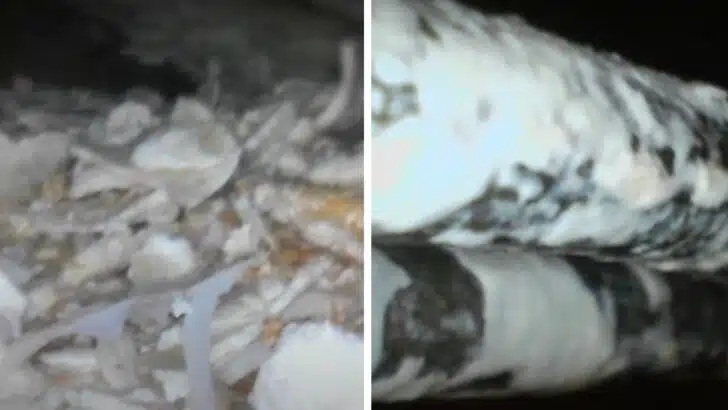
These photos, taken with our borescope after initially flushing our water heater tank, show the remaining limescale in the bottom of the tank on the left and all over the heating element on the right. This shows how an annual rinsing with a wand may not fully flush or descale the tank or heating element.
This is why it’s important to take the following steps — using white vinegar to thoroughly clean the tank. The acetic acid in the vinegar is needed to dissolve the limescale in the tank and on the heating element and other internal components.
Install the Drain Plug
Wrap 4-5 turns of plumber’s tape around the plastic plug, install it, and tighten it in place of the anode rod if you have a Suburban water heater. If you have an Atwood water heater, you can use the original drain plug for this purpose.
If you’re wondering why Suburban water heater owners can’t simply use the anode rod instead of having to buy a separate plastic plug, it’s because the acetic acid in the vinegar and the magnesium anode rod react together.
If you used a brand-new anode rod with vinegar in the tank, you’d remove the rod afterward to find that it had already been partially eaten away, reducing its lifespan. If you use the old rod, the process of it breaking down would “use up” some of the vinegar’s acetic acid, reducing its effectiveness at descaling the tank.
If you want to know how we figured out that we should use a plug for this purpose instead of an anode rod, refer to our old saying, “We learned about RVing the hard way so that you don’t have to.” 😉
Flip Your Winterizing Bypass Valves
Flip the bypass valves on your winterizing kit as necessary to draw liquid into the system. If you don’t have a winterizing kit/bypass valves, you may need to remove the overpressure relief valve and add the vinegar there through a flexible funnel.
Add the Vinegar Into the Tank
Since you’ll want a 50/50 mix of vinegar & water, you’ll need to know how large your water heater is. For a 6-gallon heater, use 3 gallons of vinegar. For a 10-gallon heater, use 5 gallons of vinegar, etc.
If you have a winterizing kit, put the end of the tube into a jug of vinegar and turn on your RV’s water pump. That will draw the vinegar into the system, which will deliver it directly into the water heater tank. Again, if you don’t have a winterizing kit, you may need to use a flexible funnel to pour the vinegar into the tank through the overpressure relief valve opening after removing the valve.
Turn the pump off after each container of vinegar empties to move to the next container. When all of your containers of vinegar have been added to the heater, fill one of the empty containers with clean water and again turn on the pump to add that gallon of water to the tank. This will clear any residual vinegar from your winterizing kit.
You can now put away your winterizing kit.
Turn on the City Water Connection
Turn on the city water connection to the RV and allow the water to flow. Because the overpressure relief on the hot water tank is open and the tank is only about half full of vinegar, the water will flow into the heater’s tank. The water knows where to go because it will take the path of least resistance. That half-empty heater tank will be that path.
Close the Overpressure Relief Valve
Allow the tank to fill until the water/vinegar mix begins to pour out of the overpressure relief valve. As soon as that happens, flip the valve closed, which will stop water & vinegar from continuing to overflow. Closing the valve will also pressurize the plumbing system.
Turn on the Water Heater’s Electric Heating Element or Propane Burner
Turn on the power to either the water heater’s electric heating element or to the propane burner. Either is fine. You’re simply heating up the water/vinegar solution in the tank to speed up the action of the acetic acid. Keep the heater on at least until the water is fully hot (or longer… see below).
Turn Off the Water Heater
Turn off the water heater, making sure both the electric and propane sides are off. If you’re leaving the mixture in the heater overnight, like we do, this can be done either before you go to bed, or first thing in the morning.
This requires keeping a few things in mind. First, if you don’t complete the water heater flushing process in one day, you won’t have hot water that evening or the next morning for cooking, showering, etc. We solve this issue easily by flushing our water heater when staying at an RV park with shower facilities. We eat out that night, shower in the park’s bathroom, and have a light breakfast the next morning.
One other thing to keep in mind is how much time has passed between the time you turned off the water heater after flushing, and when you plan to drain the vinegar out of the tank. RV water heaters are very well insulated, so it can take a long time for the contents to cool.
Turn Off the City Water Feed and the Water Pump
In preparation for draining the vinegar mixture from the heater’s tank, turn off the city water and turn off the RV’s water pump.
Open the Overpressure Relief Valve (Wearing Gloves if Needed)
Wearing gloves to protect your hands from the hot water as needed, open the overpressure relief valve. Be prepared for the hot water/vinegar solution to spray and be foaming as it comes out of the valve.
If you do choose to drain the vinegar out of the tank shortly after turning the heater off, make sure to avoid getting scalded. This is the main reason we keep heavy-duty rubber gloves around — to protect our hands if we don’t want to wait all day for the water/vinegar to cool down.
This is one time you’ll really want to stand off to the side to avoid getting sprayed by smelly (and possibly hot) vinegar.
Remove the Drain Plug
Once the foaming and spraying from the overpressure relief valve subside, leave the valve open and remove the drain plug. Again, stand clear so as not to get burned. Again, this is where you’ll see the largest rush of water as you let the entire tank empty out all at once through the drain plug opening.
Flush the Tank
Use your hose and flushing/rinsing wand to again flush out the tank for about three minutes until the water runs clear. This time there should be a lot less scale, but lots of vinegar smell. Keep aiming the wand all around the tank to flush everything until the water coming out of the drain runs completely clear.
After leaving our tank on to heat the vinegar solution for about 16 hours and then draining and rinsing it, here’s the difference in the limescale on the bottom of our tank and on our heating element:
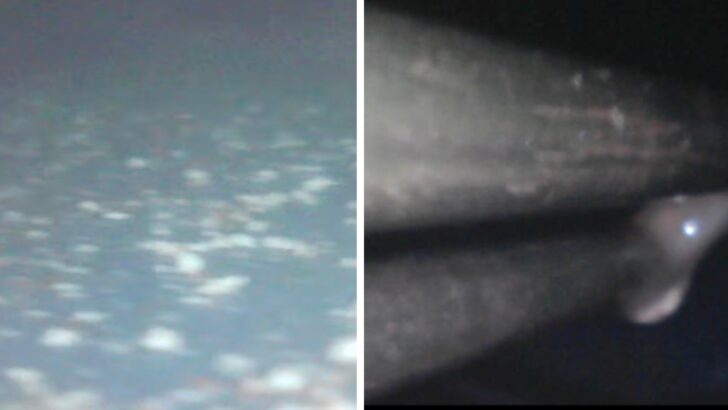

With these images from our borescope, you can see the difference in limescale on the bottom of the tank (left) and on the heating element (right) following the vinegar treatment, as compared to the pre-cleaning photos above.
Results will vary based on how often you thoroughly clean your RV water heater and on the water quality in the areas where you travel most frequently.
We did try using the vinegar treatment without heating the vinegar, but the process took twice as long because heating the solution dramatically increases the action of the acetic acid. After our first few years on the road (before we figured out the vinegar technique), the amount of limescale in our tank was dramatically reduced each year by our much more thorough annual cleanings.
Install Your New Anode Rod (Suburban) or Drain Plug (Atwood)
If you’ve got a Suburban water heater, this is the time to install a fresh anode rod. We replaced ours once each year like clockwork, even if it wasn’t fully decayed yet (once it’s all gone, it can’t protect your steel tank anymore). If your water heater is at Atwood, you’ll reinstall your drain plug now. Either way, be sure to wrap a few turns of Teflon plumber’s tape around the anode rod or the drain plug to ensure it doesn’t leak.
To see us doing this whole process ourselves, check out our video, which takes you through it, including before and after borescope views:
How to De-scale a Tankless Water Heater
Tankless water heaters need to be descaled, too, but the process will differ from brand to brand. We’ll lay out the steps to cleaning and descaling (decalcifying) a Truma AquaGo on-demand RV water heater, which is what we switched to after the above video was made. If you have a tankless water heater from another manufacturer, your owner’s manual may contain a few differences in the process.
First, when descaling is needed, the internal control (if yours is so equipped) of the Truma AquaGo flashes a red light to let you know it’s time. Follow these steps to de-scale your Truma AquaGo:
- Buy the required cleaning tablets from Truma
- Let the water heater cool
- Turn off the water
- Flip out the drain valve and drain the water heater
- Remove the filter
- Insert the cleaning tablets
- Reinstall the filter and close the drain valve
- Turn the control knob to “Clean”
- Wait for the cycle to finish, and run fresh water through the system.

Here’s a video from our friends Tom & Cait of Morton’s On the Move to give you a visual guide to follow:
Free RVing Tips, Tricks, Reviews & Giveaways
As 20-year full-timers, we share everything we’ve learned about RVing over the years. Join our online community to receive a wealth of great RVing knowledge delivered daily to your inbox.
Whether you’re a new RVer or a seasoned full-timer, you’ll love the wide range of RVing topics we cover. Don’t miss a single article or any of our famous Giveaways. Subscribe to our newsletter today!
Ed Fogle
Saturday 27th of January 2024
Bear in mind some people, myself included, have had the Camco tank rinsing wand nozzle end blow off on first use when opening the valve. It goes straight into the tank to live there forever. What a worthless profuct.
TheRVgeeks
Wednesday 31st of January 2024
Oh no, Ed! What a pain! Thanks for the heads up... we've never had that happen with ours, but we've had it for... gosh, a long time! So maybe they've changed something with the way it's manufactured! We'll add a note so people are aware to keep a hand on it... or turn it on BEFORE pointing it into the tank, just to check! 😉
Karon McCartney
Friday 26th of January 2024
This was so informative and very easy to understand! Thank you!! A quick question .. If water is filtered going into the RV 100% of the time, do you still recomend cleaning?
TheRVgeeks
Wednesday 31st of January 2024
Hi Karon. Thanks, glad this was helpful. And, yes, regardless of whether or not you filter the water, your water heater's tank should be cleaned. The filters are removing particulate matter (and, if its charcoal block, chlorine and other chemical contaminants), but not minerals. So the limescale will build up in your tank the same way, regardless of filtering or not.
Jan Smith
Friday 29th of October 2021
How do I get the vinegar into my water heater if I don't have a "winterizing kit"?
TheRVgeeks
Friday 29th of October 2021
Hi Jan. Without a winterizing kit, it’s definitely more challenging. You could use something like a drill pump (here’s one on Amazon: https://amzn.to/2ZFMgDv ) to pump the vinegar in using your city water connection. Or you can remove the overtemp/pressure valve at the top of the water heater and add the vinegar from the top of the water heater. Read through the comments here (and on YouTube) to see what others have tried/suggested.
Pat Tighe
Sunday 10th of October 2021
Good morning, just a quick question about the hot water tank rinse. You use a plastic plug instead of using the anode rod. To save 35 dollars why can’t I just cut the anode rod off of the nut and use that instead of a plastic nut? Thank you
TheRVgeeks
Sunday 10th of October 2021
Hi Pat! We’re not actually using a plastic plug to save money on this one. It’s just that Atwood heaters don’t require anodes at all because of their aluminum tanks, and come from the factory with a plastic plug. We really like the fact that Atwood heaters don’t have to mess with anodes at all because of that, and the plastic plug simply goes along with the aluminum tank. Hope that answers your question!
Nick
Tuesday 18th of February 2020
My t&p valve leaks water rapidly when the water heats up. I'm guessing a new tp valve is needed for this to stop? I tried emptying and refilling the to make the air gap but it still leaks when the water heats up? Is there anything I need to know before suggesting i have a bad to valve??
TheRVgeeks
Tuesday 18th of February 2020
Hi Nick. Sorry to hear you're having trouble. We'd try letting some water out of the tank again to try and flush any possible debris that could be stuck in the Temperature & Pressure (T&P) relief valve. If that doesn't work, try making sure it's sealing tightly... let it "snap" back down into place. And even try pushing in on the stem where the flip handle is attached. It may be having trouble seating properly. Then, if those two things don't work, we'd go ahead and replace (and even if they DID work, we'd likely order a replacement to have on hand... because if it's started to leak, even if it goes away, it's likely to come back).
Also... check to see if you're having the trouble regardless of which heating source you use (propane or electric). If it's only happening on one, it's also possible that the thermostat for that heat source is going bad, letting the system heat too high... and thus causing the leaking. If it's happening for both heat sources... then it's more likely that the T&P valve is the trouble.
Hope this helps!