Being frequent boondockers, (for the uninitiated, that’s camping off the grid without hook-ups, usually in beautiful, remote locations), we’re always looking for ways to conserve resources. Even though our RV came equipped with some fairly energy-efficient fluorescent lighting, 12V LED lights for RVs are the reigning champs of miserly power consumption. They use about a third of the power of fluorescents, and a tiny fraction of incandescent or halogen lighting.
Besides saving power, LEDs produce far less heat than other types of lighting. So, there came a time when we realized that fully switching every light in our entire RV to LEDs would benefit us tremendously. We did just that, and we learned a lot along the way.
This guide (along with the YouTube videos included with it) will share what we learned with any of you who may have an interest in converting to 12-volt LED lights for RVs.
We hope this guide lights the way for you when you’re ready to upgrade!
- 1) What Are LED Lights and How Are They Different?
- 2) How Do LEDs Benefit RVers?
- 3) Do LED Lights Come in Different Color Tones?
- 4) Where Can I Buy 12 Volt LED Lights for My RV?
- 5) Incandescent and Halogen
- 6) Fluorescent Tubes
- 7) Docking and Patio Lights
- 8) Security, Entry, and Reading Lights
- 9) Basement and Utility Lights
- 10) RV Headlights
- 11) Increasing Exterior Visibility
- 12) LED Review
What Are LED Lights and How Are They Different?
“LED” stands for “light-emitting diode”. With an LED light, an electrical current passes through a microchip, illuminating the LEDs to produce the light.
LED lights are different from the incandescent, fluorescent, and halogen lights often found in RVs in a number of ways. LEDs are more efficient and more durable (they last longer). And because they’re directional, they emit light in a specific direction (i.e. toward where you need it) rather than emitting light in all directions. That trait, along with radiating very little heat, is a key to their efficiency.
You can learn much more about RV LED lights, including information from our comparison chart, in our post entitled, “RV LED Lights Technology: Everything You Need to Know”.
Installing LED lights is generally an easy project with multiple benefits to RVers including saving power and money.
How Do LEDs Benefit RVers?
As all boondockers know, conserving power when you’re off the grid is an essential part of the experience. The more energy you can conserve, the more freedom you have to camp anywhere for long periods of time.
And even if you’re not an avid boondocker like we are, you may overnight here and there without being connected to shore power. And you certainly don’t want your RV lighting to suck up more power than necessary. That can leave you without enough to power other amenities like your water pump or vent fans… or having to run a generator to juice things back up.
LED lights are up to 90% more efficient than incandescent light bulbs. They not only use far less power but stay far cooler. That means that when you’re camping in the summer heat, your lights aren’t increasing the temperature in your rig (as much)…IF you have LED lights.
And again, properly designed LED lights last a lot longer than any conventional light bulb. This is because with sufficient heat sinks to provide correct thermal management, LEDs won’t overheat and burn out prematurely, greatly increasing their lifespan.
These are the main reasons why one of the first upgrades many RVers make is the switch to LEDs throughout the rig. Converting to low-power 12 volt LED lights conserves energy, reduces heat, and leaves more power available for your other systems and appliances.
Do LED Lights Come in Different Color Tones?
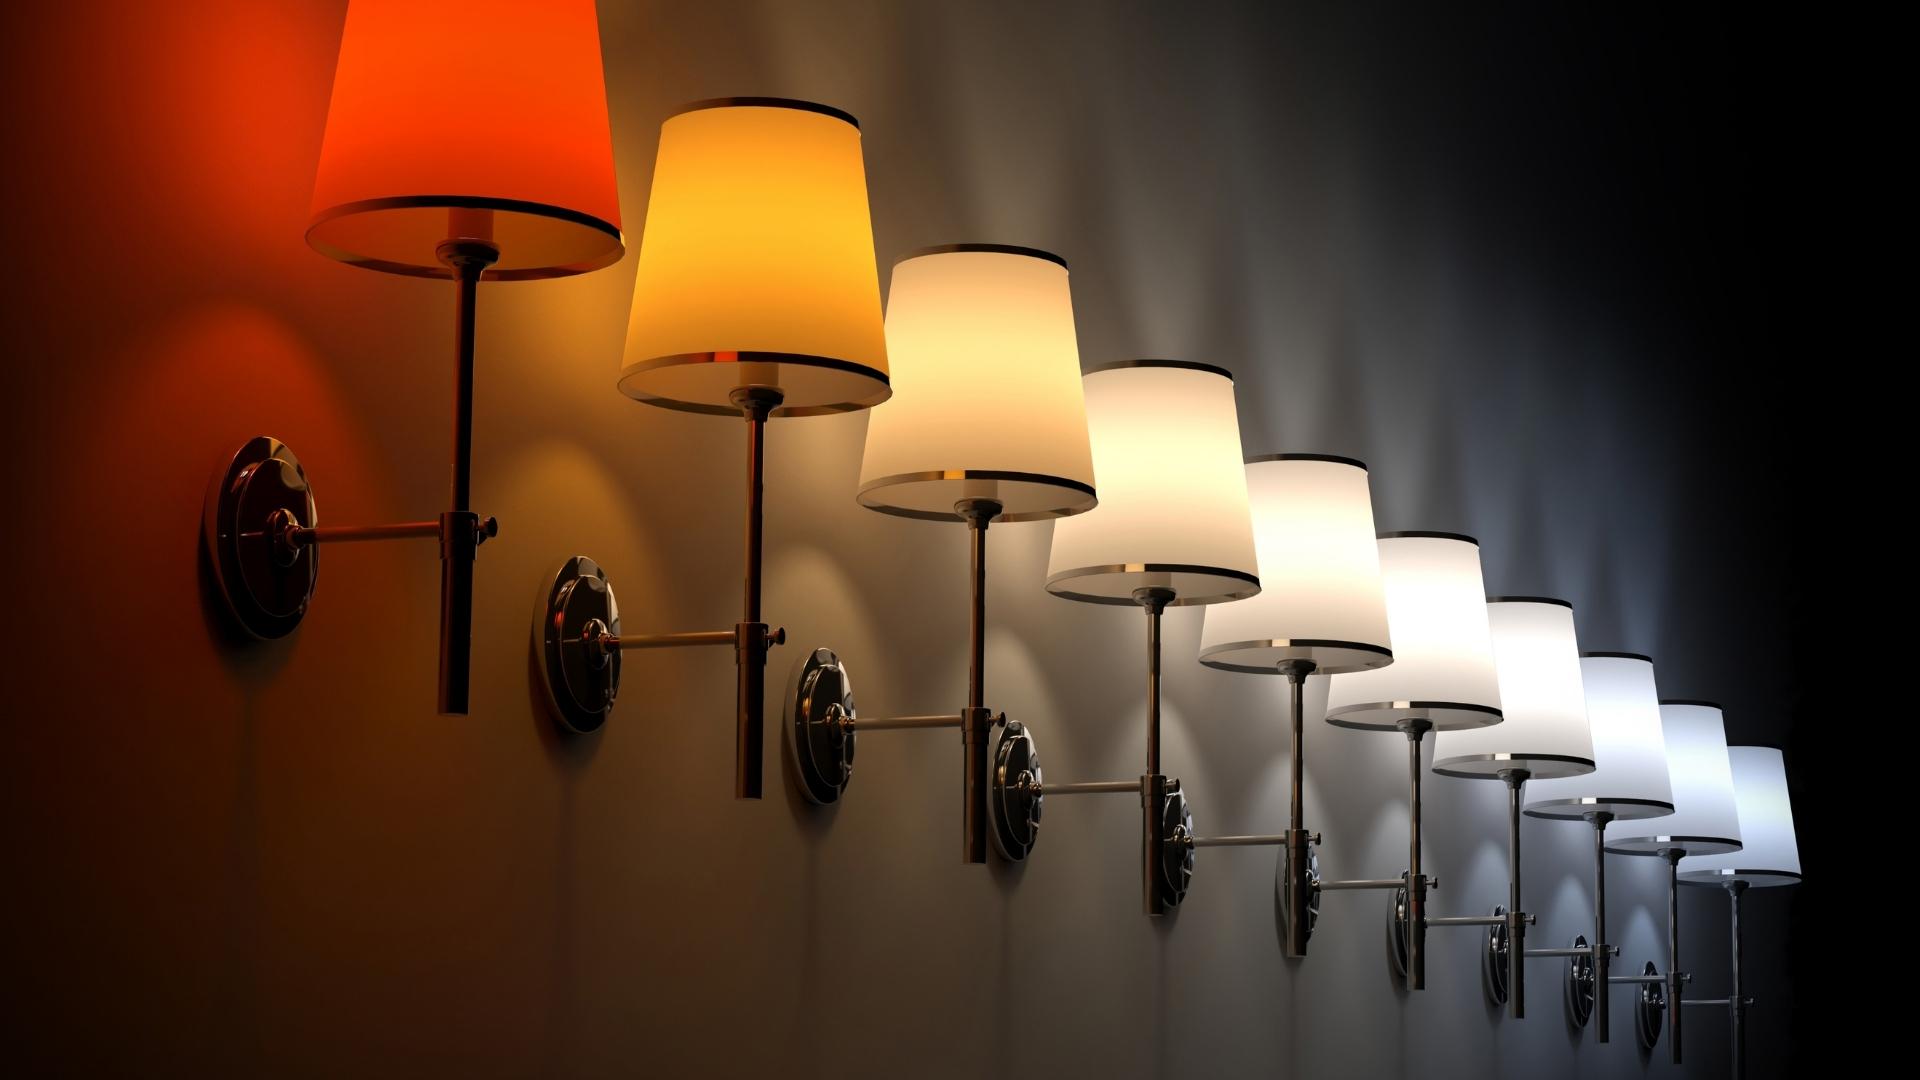

The color temperature of LED lights ranges from warm to cool, with warmer temps having a yellowish appearance and cooler temps having a white appearance.
LEDs are available in a range of colors from cool to warm, which are listed as “K” ratings. These refer to the color temperature of the light in degrees Kelvin.
We suggest considering “natural” or “warm” color LEDs (in the lower Kelvin temperature range), as very cool-color LED light (confusingly, higher K) is similar to very cool fluorescent light in that it can make your RV too bright white (with a blue cast, like a laboratory). Since “warm” LEDs do tend to be a little “yellower” we’ve equipped the vast majority of our RV with “natural” LEDs (which are more like natural daylight white) and think they’re perfect for almost everything. Nice bright light. Perfect daylight color.
The general range of color runs from about 6,000 – 7,000 K (very cold blue cast) to about 2,500 – 3,500 K, which is much warmer and has a yellow cast similar to traditional incandescent light. If you think you’d like something in between, 3500 – 4500 K has a warmth that isn’t too yellow in color and is closer to natural daylight. Again, those “natural” color LEDs are our personal choice, so we bet you’d like them, too.
Where Can I Buy 12 Volt LED Lights for My RV?
Before finding a truly superior brand of LEDs, we tried (like many other RVers), the discount ones commonly found in many places online. But they have cheap electronics and heat sinks, making them prone to failure, or even heating up enough to risk causing a fire. And, due to cheaper manufacturing standards and less quality control, we found that the light color they reported often didn’t match our expectations (with some even having a greenish cast… YUCK!).
When we decided to upgrade to LEDs, we did quite a bit of experimenting. The process of converting our RV’s halogen, incandescent, and fluorescent lighting to LEDs was frustrating because options for LED color and brightness can be confusing. And the quality was a crapshoot.
Many suppliers don’t accurately convey the information you need to choose the color temperature and brightness you want, so we ended up spending unnecessary time and money ordering various options online.
One day, on an iRV2 discussion forum, we read some rave reviews about an LED provider called M4 Products. We took a look at their website and found the information to be very thorough. We asked some questions, and the owner’s fast, detailed responses left us confident that M4’s lights would be the color and brightness we wanted, along with being higher quality than others we’d tried.
After way too much trial & error, we decided to buy some LEDs from M4, and it was hands down the best experience we’d had. We happened to be heading toward southern California, where M4 is located, so we made an appointment to stop by to see about upgrading more of our lights. We learned that M4’s owner, Steve, is a fellow RVer, which explained why he’d understood our questions and concerns so well when we initially reached out to him.
We found Steve to be incredibly knowledgeable about LED applications for RVs, and the quality of his products was obvious. He’s also such a great guy that over the years we’ve become close friends with him, his wife Terri, and their two sons. But the initial source of that friendship was the quality of his lights and the way he treats his customers. Providing a seriously superior product, and being a seriously decent person, are both key qualities for a successful business.
We’ve looked at and tried our fair share of LED bulbs from various sources. M4 LEDs are by far the best quality and value we’ve found. You can visit the website of M4 Products and take a look around.
Steve offers a special discount for RVgeeks readers, where you’ll save 5% on your entire order using this discount code:
We’ve replaced virtually all of the incandescent, fluorescent, and halogen bulbs in our RV with high-quality M4 LEDs. In addition to the power savings while dry camping, we haven't had a single...Show More
We’ve replaced virtually all of the incandescent, fluorescent, and halogen bulbs in our RV with high-quality M4 LEDs. In addition to the power savings while dry camping, we haven't had a single LED bulb fail since upgrading.
Check out our M4 LED videos here
Use the discount code listed here to save 5% on your entire order!
Show LessMeanwhile, we’ll take you on a tour of our LED lighting upgrades.
If you’ve been wanting to make the switch to LEDs, check out the included videos to see if you’d feel comfortable doing the upgrades yourself as a DIY project. Again, it’s easy (most lights are simply plug-in replacements).
But some, particularly the fluorescent upgrades, require some wiring. Although it’s only 12-volts, we recognize that not everyone is comfortable working with electricity.
You won’t need a lot of fancy tools for these projects – just your new LEDs. It’s always good to have a quality digital handheld multimeter around when you’re working with electricity. They can measure both AC and DC current and are great for all sorts of projects at home AND on RVs, boats, and vehicles.
Something like this would be perfect:
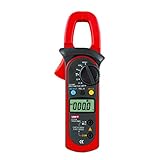
- Measures both ac & dc current up to 400 amps, ideal for vehicles, rvs, marine boats & etc
- Ac/dc voltage, current, resistance, frequency, continuity, duty cycle & diode check
Incandescent and Halogen
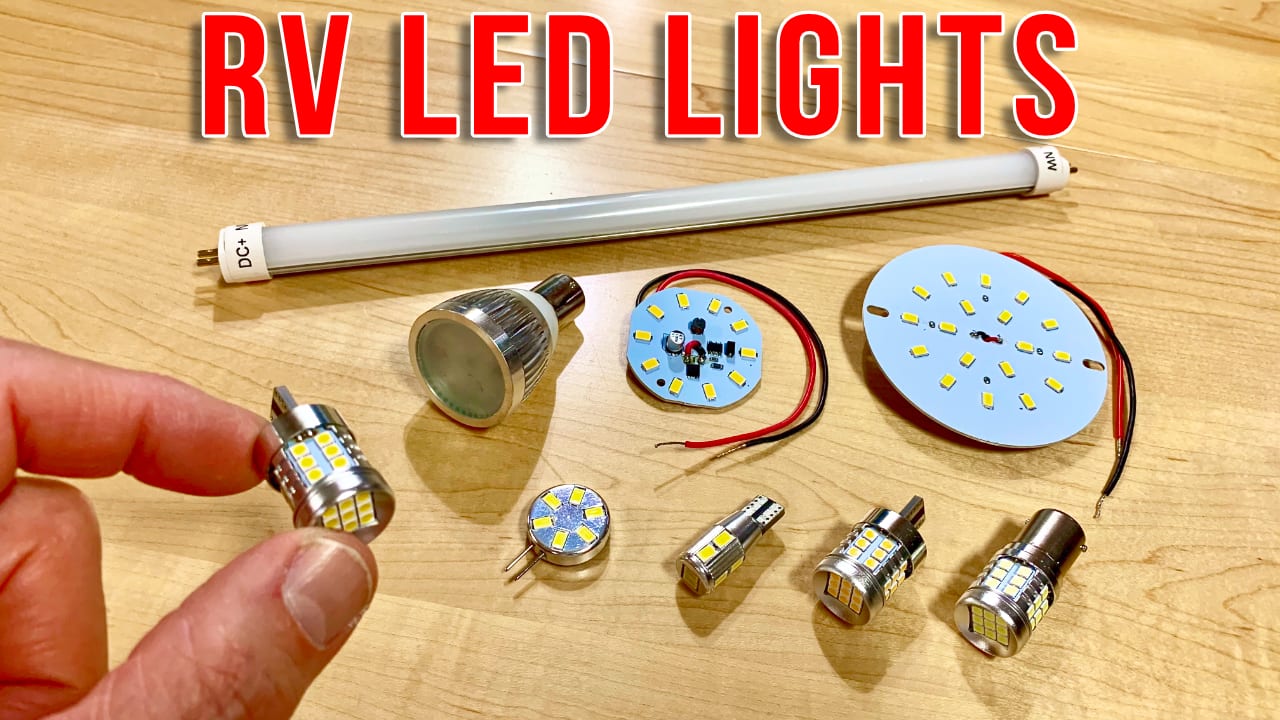
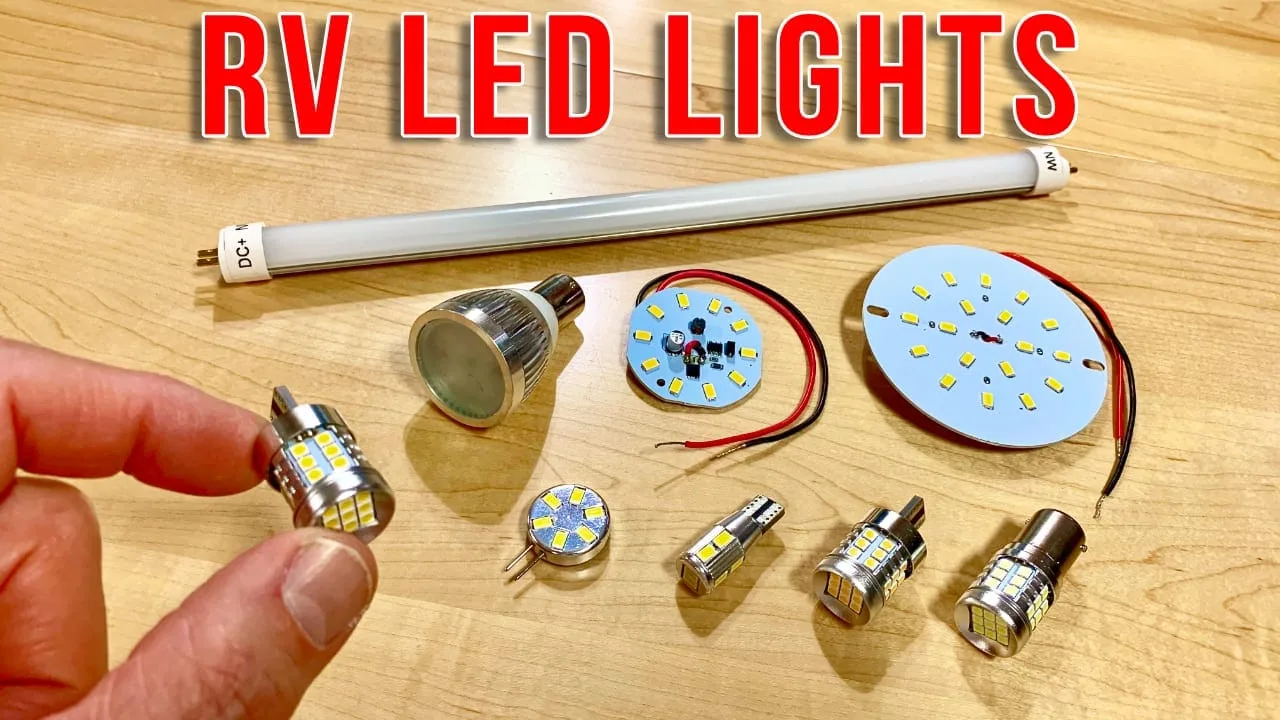
Our first lighting upgrade was to replace our RV’s incandescent & halogen bulbs with LEDs. This is a very easy project, since most of them are just plugin replacements.
In this video, we show you how to choose bulb sizes, colors, and brightness to match or improve your existing lights while using a fraction of the power.
After we posted the video above, we received a lot of questions from viewers, all of which we were happy to answer. In our next video, we focused on LED color and brightness in response to many questions on this topic, and we provided additional details about the exact choices we made regarding color temperature, brightness, and style of LEDs.
Also in this video, as we upgraded our wedge-based incandescents and pin-based halogens, we included a demonstration of the differences in LED colors so that you can see them for yourself.
Fluorescent Tubes
In this next video, we’ll show you how we originally converted our RV’s fluorescent bulbs to LEDs. This is another easy DIY project, and we’ll show you the steps required to convert 18” fluorescent tubes to elegant new LEDs.
Originally, we had converted our fluorescent tubes to LEDs by using adhesive strip lights. It’s an economical way to upgrade the tubes to LEDs because the strip lights were relatively inexpensive. But it wasn’t without its issues, due to problems with the connectors that attach the strips to the light’s wiring, poor quality adhesive that allows the strips to come loose from their mounting point, and more.
But once we visited M4 Products and saw what they had to offer, we decided to opt for their high-quality LED tubes with robust aluminum heat sinks and high-end electronics – and boy, are we glad we did.
18″ fluorescent fixtures are upgraded to M4 LEDs in a different way than 12″ fixtures are, so we created a separate video all about How to Convert a 12″ Fluorescent Fixture to LED, which you can view below. Because the 12” LED tube lights are smaller, they don’t have room to house the necessary electronics, so there are a few additional steps to get them taken care of and properly installed. Again, it’s not hard, it’s just a little bit different.
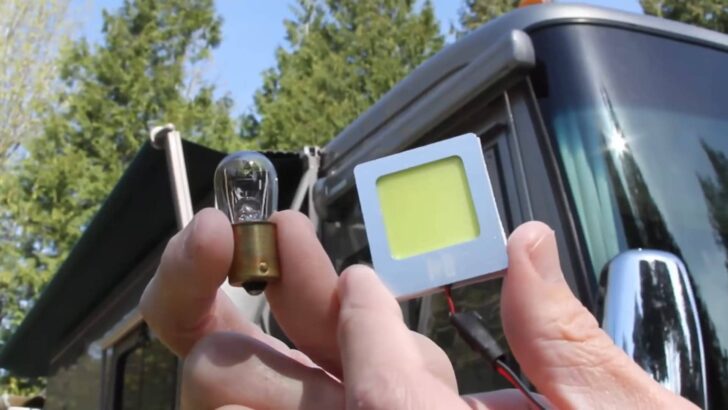
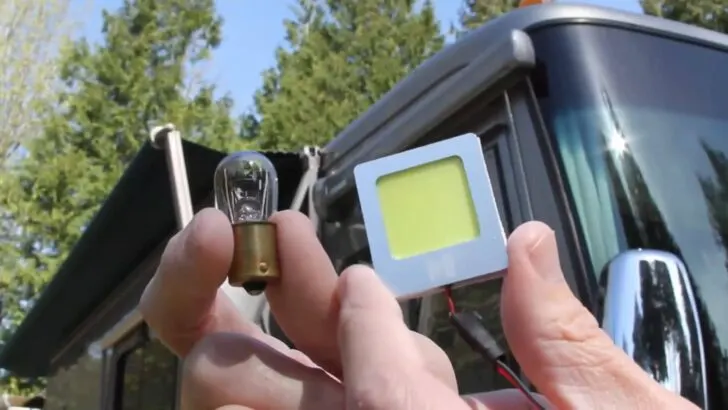
Docking and Patio Lights
Because LEDs are much brighter, while only using ¼ to ⅛ of the power of incandescent exterior RV lights, we decided to replace our RV’s docking and patio lights with cool, bright, low-power LEDs.
We chose to do this because we love boondocking, where we not only have no access to an external source of electricity for our RV, but there’s also no external source of outdoor lighting. So, we wanted LED lights in order to provide plenty of exterior light (to combat the darkness, when needed) while also using as little power as possible.
In this video, we’ll show you how easy it was to upgrade our incandescent patio and docking lights to LEDs.
Important Note: while increasing the brightness & amount of light your exterior lights provide can be a huge benefit when RVing in remote and very dark locations, please use this new power wisely. Be considerate of others who may be near you. Many people boondock to ENJOY the dark and to appreciate the night sky. But even when you’re not out in the boonies, having bright lights that are shining on neighboring RVs (especially if you leave them on all night) can be rude.
Security, Entry, and Reading Lights
Next, we replaced our security, step well (entry), and reading lights.
We’ve already talked about the fact that LEDs are famous for their energy efficiency, and these are certainly no exception. But other factors, including heat output, are at least as important as power consumption.
For example, you’d think a simple reading light wouldn’t draw much power or produce much heat. But if you decide to read a book in bed on a hot summer night, you’ll realize that the heat really pours off of traditional bulbs.
That said, if you look at a single bulb from a power and heat perspective, you might not think it’s worth the upgrade to LED. Let’s take the little incandescent light in our step well, for instance. That bulb alone wouldn’t present much of an issue for either heat or power.
But when you add up the power consumption and heat output of all the traditional bulbs onboard a typical RV, you’ll find that you’re reducing both heat and your overall power draw substantially by upgrading them to LEDs.
So, in this video, you’ll find us upgrading our security, entry, and reading lights… so that whether we need lots of bright light outside, are coming back to the rig at night, or we’re reading a book, we use as little power and generate as little heat as possible.
Basement and Utility Lights
After we’d upgraded much of our motorhome’s lighting to LEDs, we realized that we’d neglected to upgrade the lights in our basement compartments.
Natural White is generally our bulb color of choice in the living area, but for work areas, we prefer Cool White. It’s much brighter than the old incandescent bulbs, which is very helpful in a work area, and the LEDs use a fraction of the power.
Appreciating the brightness of the LEDs and the reduction in power consumption, we also upgraded the lights in both our engine and generator compartments. While we were shopping on the M4 website, we also spotted a sleek LED fixture that was just the ticket for pumping up the poor light level in our bedroom closet. This larger, brighter fixture has made a world of difference.
Here’s our video demonstrating all of these upgrades:
RV Headlights
We generally prefer to drive during the day, but our schedule sometimes dictates staying on the road after dark, especially during the winter when the sun sets so early. We’d been very unhappy with the performance of our stock halogen headlights for a long time, so when M4 started offering LED headlights, we jumped at the opportunity.
As you’ll see in the video, these LEDs are almost as easy to install as direct incandescent replacement bulbs, but with light output similar to HIDs. Our experience with these LED headlights has been fantastic – so good, in fact, that we decided to also upgrade the headlights of our Honda, too!
Here we swap out our RV’s headlights for some fantastic new M4 LEDs:
Please Note: changing the style/technology of your headlight bulbs can result in a light pattern that can blind oncoming drivers, which you DEFINITELY want to avoid. Be sure to check the pattern of light your headlights produce when using LED bulbs, and adjust their alignment as necessary to keep them functioning properly. In our case, our light pattern was still fine after upgrading (and improvements in new LED headlight upgrades are continuing to improve this aspect), but don’t just put the new bulbs in and drive away. Some fine-tuning may be required.
Increasing Exterior Visibility
When we began upgrading our lights to LEDs, we started with the lights we used the most, and we made the switch primarily for power savings and heat reduction. Once we’d experienced the differences, we continued by replacing all of our incandescent, halogen, and fluorescent bulbs with cool, modern, energy-efficient LEDs.
Next in the upgrade process, we targeted visibility – how well we can see, and how well we can be seen by others while on the road.
LED Review
For a review of the benefits of 12-volt LED lights for RVs, have a glance at our post, “What Are RV LED Lights?”, and feel free to drop your comments and questions in the comments section below!
Geek Out With Us Every Week
Join our newsletter to learn about all things RV-related. Every week we offer free tips, tricks, product reviews, and more to our online community of RVers. So, whether this is your first time on the road or you’re a seasoned expert, we’d love for you to geek out with us!
Scott K.
Tuesday 1st of August 2023
Throughout the years I have replaced nearly all of the original interior lighting in my 2005 Monaco Dynasty; upgrading to LED for the benefits that most people understand. I have also installed Wi-Fi switches/relays behind the factory switch panels on the most commonly used lights (living room, bedroom & kitchen) and enjoy the "smart home" benefits. I'm wondering if you are aware of any direct replacement switches that would include Wi-Fi connectivity? It seems that by now, companies such as Carling, Cherry etc. would have considered incorporating IoT connectivity features directly into their panel mount switches.
Additionally, if you can point me towards dimmer switches, and the installation practices currently being used, I would greatly appreciate it.
Scott Space Coast Florida
TheRVgeeks
Tuesday 1st of August 2023
Hey Scott. We're not aware of any aftermarket smart switch options for RVs. Seems most of the systems and manufacturers are focussing on adding that kind of functionality to new RVs built with multiplex wiring systems. So, for the most part, you're on your own for adding smart home functionality.
We've never found any LED dimmer switches that we liked for in-wall installation (i.e. no direct replacement for existing 12V wall switches). In our 2005 Mountain Aire, we had Hi-Off-Low three-position wall switches that supplied 12V for high and 6V for low power (for the original incandescent bulbs). In our toilet room cabinet, there's the fuse blocks for all the internal 12V systems... including one whole block designed to provide the 12V power. When we switched from 4 x 6V AGM batteries to one large lithium, we lost 6V power. So we installed one single dimmer (this one from M4: https://m4products.com/pca-3-wire-rotary-dimmer-silver-knob/?aff=4 and use code "RVGEEKS5" at checkout to save 5%!) that supplies "dimmed" 12V power for all the LEDs on the old 6V circuits. Doesn't provide individual dimming for each location, but it replicates what we had before switching to lithium.
Maybe something like that would work? Might also be a good location for installing smart relays of some kind to interrupt/activate power to individual circuits... instead of installing them at the switches.
Hope this helps (some)!
Tom McMahon
Monday 24th of April 2023
Our Phaeton has over 50 lights in the ceiling, making the change to M4 LED lights made a huge difference in power consumption. Replacing the headlamps is the next project. We appreciate the rv geeks discount!
TheRVgeeks
Tuesday 25th of April 2023
That's great to hear, Tom! We love our M4 LEDs!
SMD
Thursday 22nd of September 2022
Unfortunately LED replacement bulbs ARE NOT durable, as advertised. The 22 year lifespan is a complete marketing scam. We have several brands of replacement LED bulbs, both cheap and expensive, and durability is NOT one of their qualities. I replace 4 - 5 every season so regularly that when I buy replacements, I always buy hot spares as I know I will no doubt need them while camping. The reason I ended up here is because I'm looking for replacements again as I write this.
TheRVgeeks
Thursday 22nd of September 2022
Sorry Steve, but we're not aware of a specific claim about longevity. The main benefit of LEDs is 1) lower power consumption, and 2) low heat output. Yes, they are usually more expensive, but there are some VERY high quality brands out there. We've been using M4 bulbs throughout our rig for many years, and literally have never had to replace a single bulb. If you're buying quality LEDs (not the cheapies) and they're burning out with any regularity, you almost certainly have a voltage regulation issue in your rig. That can burn out even very good quality LEDs that would otherwise last a VERY long time.
Jim T.
Monday 25th of April 2022
Hi guys,
Thank you for the nice series of information on LED lights!
This year at the Quartzsite RV show, we upgraded most of our lights to LED's. All went well except... If we're watching TV over the air and we turn on our dining table light (2 LED's) the TV will lose signal. When we turn off the light, the TV comes right back on. My guess is that we got what we payed for and the LED's we purchased were low quality and have enough signal noise to cause the TV interference. Even though the lights are 12 volt and the TV is 120 volt, I believe the antenna amplifier may be on the same circuit as the TV and the LED are somehow causing the issue.
Thank in advance for any thoughts/ideas.
Bruce H.
Monday 24th of April 2023
@Jim T., LED's require a power driver circuit to properly operate. Sometimes its as simple as a resistor (less efficient), but many use a constant current driver circuit (more efficient). The constant current circuit "chops" the DC power up to regulate the current. But this "chopping" circuit creates Radio Frequency (RF) noise which can interfere with the TV signal (or any RF signal like radio stations). The FCC (and Industry Canada) regulate the amount of RF noise that a device can emit into the air. I suspect your dining table LEDs have a driver circuit that is emitting RF and is very likely not FCC/IC approved. You must eliminate the RF noise at the source (the LED fixture). Once the RF noise is emitted into the air, no amount of filtering at the TV is going to cure your issue. Look for FCC/IC approval statement on your replacement LED fixtures to assure you will not have this problem with your new fixtures. Note that florescent lamps are notorious for causing RF noise as well. I was in radio communications for 40 years and have lots of experience in hunting down RF noise!
TheRVgeeks
Monday 25th of April 2022
Hey Jim. Sorry to hear about your issue. Definitely sounds like an interference or "noise" issue happening on the circuit for your antenna amplifier. We've heard of others having similar issues (even with M4 LEDs on occasion), and it can be caused by any number of things. Sometimes, it's a sign that your 12V converter/charger is producing "noisy" power... and that's being amplified by the circuitry in the LED bulbs. Other times, it seems to be the bulbs, themselves.
You could TRY to isolate and/or "clean up" the power being supplied to your TV amplifier... with something like these cheap options available on Amazon (haven't tried them ourselves, so we can't guarantee they'll work): https://amzn.to/3vg6jWf -or- https://amzn.to/3Lj5bGD
They'd get wired inline with the power supply to the TV amplifier, and should help isolate it from the "noise" being generated on that line. Before buying, you could test by supplying 12 power to the amplifier from a different circuit... like maybe from the 12V outlet in the dash?
Hope something here helps!
Kelley S
Monday 25th of April 2022
As always, y'all are such an amazing resource for RVers - thank you! I have been fulltime for 4 years, but have just been getting around to trying to change out my 2008-era light sources. With a lot more boondocking in my future (made it out west and fell in love with New Mexico!), I will make this my next project!
TheRVgeeks
Monday 25th of April 2022
Aw, thanks Kelley. We really appreciate you saying that, it means a lot. So glad we could be helpful, and hope your LED upgrade project goes smoothly (and helps you stay out in the boondocks that much longer ????)!