
If you’ve got a Carefree of Colorado awning that’s faded from exposure to UV rays or the fabric is damaged and needs to be replaced, you’ve come to the right place. You can replace your RV awning’s fabric as a DIY project (and save a LOT of money in the process). Today we’re covering Carefree awning fabric replacement for manual/pull-down awnings, as well as powered RV patio awnings.
Also, if you’ve got a “Soft Connect” that attaches your awning’s metal Uniguard to the side of your RV, we’ll show you exactly how to replace just the Soft Connect without needing to replace the entire awning.
Replacing awning and slide topper fabric is one of our favorite DIY RV projects because it saves so much money, yields superior results, and is easier than it looks — when you know how (which we’re about to show you).
Replacing awning material isn’t that difficult and it’s very rewarding. We understand that not everyone is confident, competent, or physically able to replace their own awning or slide topper fabric. But many RVers have friends who could do it for them for the cost of some pizza & beer (after the installation please)!
We’ll provide step-by-step instructions and videos for all of these Carefree of Colorado awning fabric replacements. We’ll also tell you where to get high-quality replacement fabric instead of the low-quality, over-priced OEM (Original equipment manufacturer) fabric most RV shops would replace your awning’s fabric with.
So, if you need to know how to replace Carefree of Colorado awning fabric for either manual or powered Carefree RV awnings or just the Soft Connect, read on. We’ve got you covered with easy-to-follow step-by-step tutorials for each of these three DIY projects.
- 1) Manual/Pull-Down Awning Fabric Replacement
- 2) Powered Awning Fabric Replacement
- 3) Replacement Fabric for Carefree of Colorado Awnings
- 4) How to Replace the Soft Connect on a Carefree of Colorado Electric Patio Awning
- 5) How Can I Do Other DIY Carefree Awning Fabric Replacement on My RV?
- 6) Where To Buy Carefree of Colorado Awning Replacement Fabric
- 7) Free RVing Tips, Tricks, Reviews & Giveaways
Manual/Pull-Down Awning Fabric Replacement
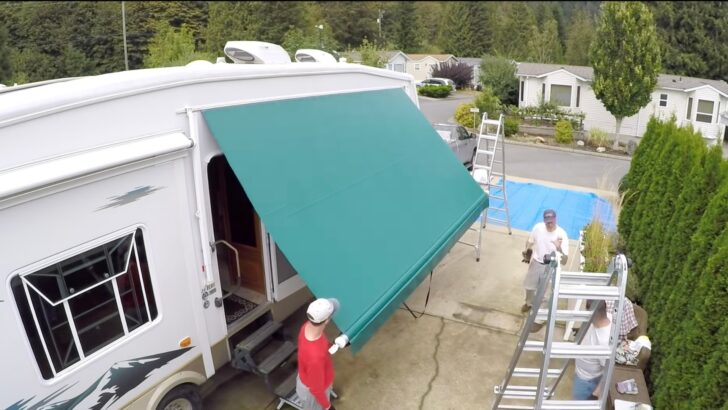
Here’s a step-by-step guide for replacing the fabric on a Carefree of Colorado manual pull-down RV patio awning. Note that we’ll be removing the old fabric (and installing the new material) from the front of the RV. Some RVs may be better suited to sliding the fabric on and off to the rear. If that’s the case with your rig, you will obviously reverse some of the steps below to “left” vs. “right” and vice versa.
What You’ll Need
- A pair of work gloves
- Silicone Spray
- A flat-blade screwdriver
- Cordless drill
- Tape Measure
- Sharpie or other felt-tip marker
- A sturdy stepladder (or two)
- A tarp to protect your new awning material while you’re working
- A helper (or two)
- Replacement awning fabric (We’ve used and highly recommended Tough Top Awnings for years. They custom cut and sew their exclusive heavy-duty fabric for each order.)
Here’s a special Tough Top Awnings discount code:
The original equipment fabric that comes on RV awnings and slidetoppers is... well, how do we say this?... CRAP!. It's no surprise, since the RV manufacturers are looking to cut their costs...Show More
The original equipment fabric that comes on RV awnings and slidetoppers is... well, how do we say this?... CRAP!. It's no surprise, since the RV manufacturers are looking to cut their costs. Instead of replacing it with the same stuff that failed in the first place, get high-quality replacement fabric from Tough Top Awnings, instead.
Check out our Tough Top Awnings videos here
Plus you can save 5% on your entire order from Tough Top Awnings. The coupon code is valid online or over the phone!
Show LessStep-by-Step Replacement of Manual/Pull-Down Awning Fabric
Don’t get overwhelmed by the number of steps here… we’re being very thorough and walking you through everything. Take your time, follow along, and you’ll be enjoying your new patio awning fabric in no time.
Remove Mounting Track Set Screws & Extend the Awning.
Start by removing the set screws that prevent the fabric from shifting/sliding in the mounting track on the side of the RV. There’s likely one at each end of the awning, most commonly using Phillips head screws. Then extend the patio awning all the way out.
Remove Both Roller Tube Set Screws
Remove the set screws that secure the fabric in place at each end of the roller tube.
Remove Both Awning Arm Bolts
Remove the bolts that hold each end of the roller tube to the end of the awning arms.
Remove the Left (Rear) Awning Arm From the Roller Tube
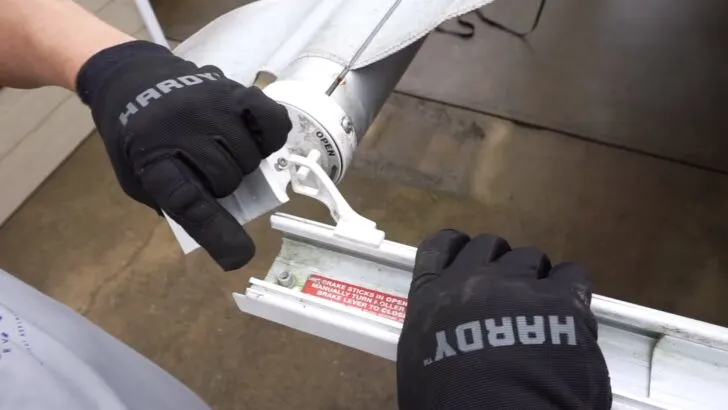
Keep a firm grip on the bracket at the left end of the roller tube to prevent the spring from suddenly unwinding, and remove the bracket from the end of the tube. While you hold the bracket firmly, have a helper take care of the next step.
Fold/Stow the Left Awing Arm
Again, while you keep a firm grip on the awning arm bracket, remove the arm from the bracket and have your helper fold the arm up against the side of the RV, where they’ll latch it into place.

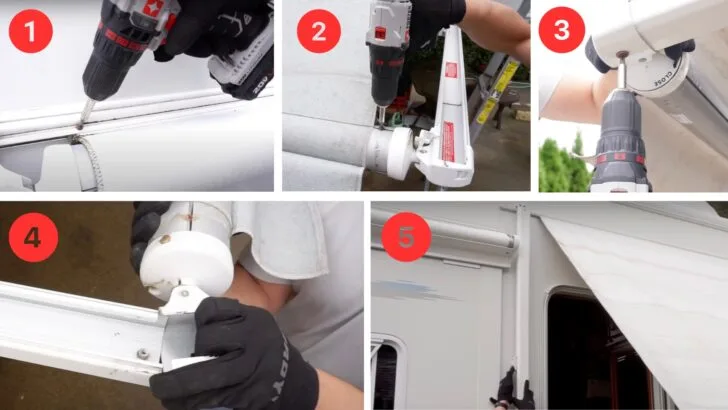
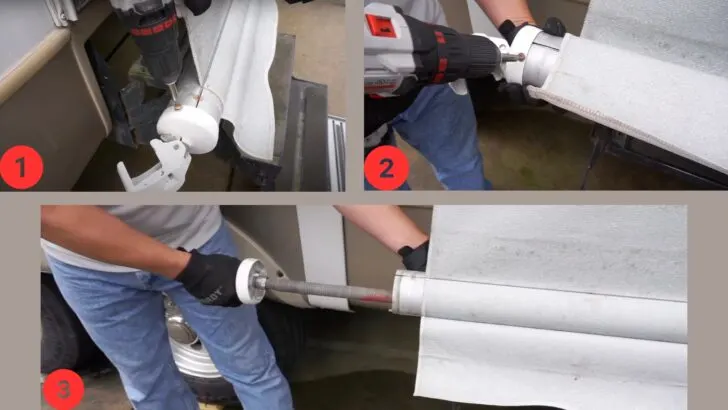
Here is a visual reference of the first 5 steps of the process.
Unwind the Spring
Again keeping a firm grip on the bracket so it won’t jump out of your hands, carefully unwind the spring. It’s important to count the exact number of turns as you go so you’ll know how many turns to use when you re-tension the spring during reassembly.

As you slowly unwind the spring, carefully count and note the total number of rotations required so you’ll know how many turns will be required during reassembly to return it to its original state of tension.
Note: The bracket isn’t that hard to hold as long as you have reasonable hand strength and keep a good grip on it. The spring tension simply isn’t as strong as you may have heard. That said, keep a firm grip!
Remove the Right Awning Arm From the Roller Tube
With a helper holding the left side of the roller tube, walk up front to the right side (front) of the tube and remove it from the awning arm. Just pull the bracket off the arm, rotate it up a little, and swing the arm away from the roller tube. Now you can fold and latch the arm against the side of the RV, and let the awning fabric hang straight down against the side of the RV.
Remove the right (front) awning arm from the roller tube. Pull the bracket off the arm, rotate it up a little, and pull the arm away from the tube.
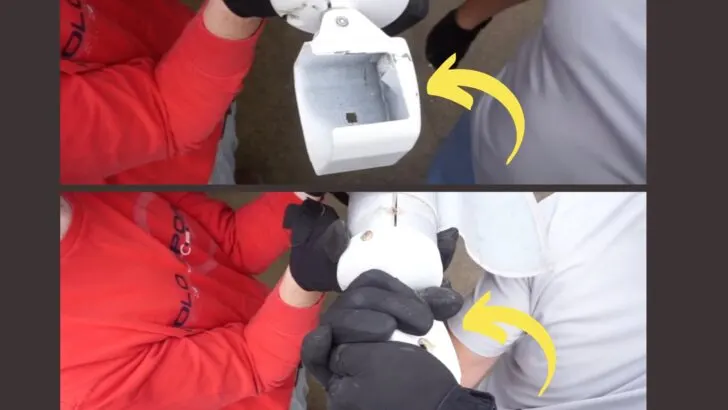
Remove the End Cap and Spring From the Left Side of the Tube
Remove the screws from the endcap on the left side of the roller tube. Then remove the cap and attached spring, sliding the assembly out of the tube toward the left (rear) of the RV.

To remove the end cap and spring assembly from the left side of the roller tube, remove the screws that hold the cap in place, then pull the cap and spring to the left (toward the rear of the RV). The spring should easily slide right out.
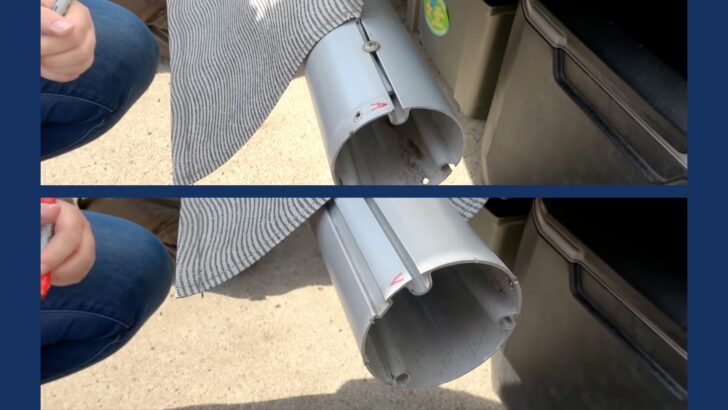
Mark the End of the Awning Tube
Using a felt-tip marker, put an “A” next to the track that the awning goes into. Then, put a “V” next to the track that the decorative valance goes into. This will let you know which track to use for each during reassembly.
Making these two marks at the very end of the tube will ensure that they won’t be visible when you’re done, as they’ll be covered by the cap once it’s been reinstalled.
Slide the Roller Tube Off the Fabric
With your helper holding the fabric at the rear of the awning, pull the roller tube out toward the front of the RV. Be sure to support the entire weight/length of the tube. Even a long awning shouldn’t be too heavy, as the roller is made of aluminum. But if you do have an additional helper, this might be a good time to have them take a break from “supervising” 😉 and support the left side of the tube as it exits the awning fabric.
Remove the Front Awning Arm
Since we’ll be installing the new fabric from the front end of the RV, we’ll need to remove that front awning arm. Begin by unclipping it at the bottom. Then remove the two bolts that hold the top of the arm to the side of the RV. You can then set the arm aside, being careful not to scratch it.
Slide the Old Fabric Out
Since we’re removing and reinstalling the fabric at the front of the RV (to our right as we’re working), we’ll simply slide the old material to the right and all the way out of the track.
Prepare the Track for the New Awning Fabric
Use a flat-blade screwdriver to gently spread/open the end of the track where the new material will be installed. If the corners are especially sharp, you can file them and/or cover them with masking tape to prevent them from snagging the new fabric. Then spray the entire track with silicone to make it easier to slide the new awning in.
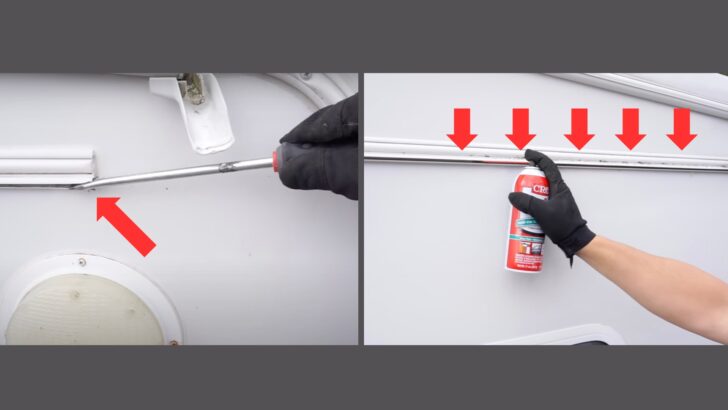

You’ll prepare the track for the insertion of the new awning fabric by slightly opening the end of the track with a flat-blade screwdriver and lubricating the entire length of the track with silicone spray.
Insert the New Fabric Into the Track
Standing on a ladder near the front of the awning track, insert the new fabric into the end of the track. Carefully begin sliding it in with your helper feeding it up to you as you go. Keep going until you have the new awning material all the way in. You don’t need to worry about getting it perfectly centered just yet. Just get it approximately centered between the arms.
Install Your New Awning Strap
Now would be a perfect time to install a new awning strap, which you can also order from Tough Top Awnings. Slide the old strap out and slide the new one into the same track on the roller tube.
Prepare and Install the Roller Tube
Spray both the “A” and “V” tracks of the roller tube with silicone, and position the tube to the front (right side) of the new fabric. Insert the bead cord on the valance side into the “V” track and the cord for the awning side into the “A” track. Holding the end of the material with one hand, slide the roller tube all the way onto the bead cords. Keep going until the tube sticks out the other side.
Reinstall the Spring
Insert the spring and end cap into the left side of the roller tube and line up the two screw holes. It’s easy to tell which way they go because the track for the awning strap is open at the end. Now install both screws securing the cap and spring into place on the tube.
Center the New Awning Fabric
Use a tape measure to center the fabric on the roller tube, sliding the tube left or right as needed. Then install the set screws at each end of the tube. They go right through the beading, locking the fabric into position to keep it centered.

Here we’re centering and securing the new awning fabric onto the roller tube.
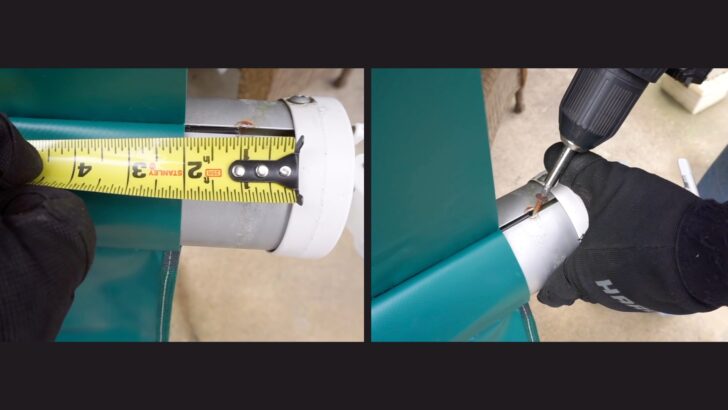
Next, measure from the inside edge of the lower awning arm mount to the fabric. In the following photos, you can see that we’re just about 4 1/4 inches on the right side and just about the same on the left side. Slide the fabric left or right along the mounting track as needed to get it perfectly centered between the arms.
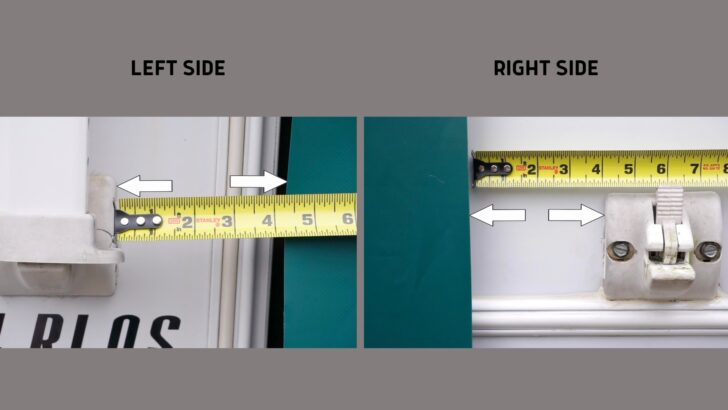

Measure the distance between the fabric and the awning arm mounts on both sides. Slide the fabric left or right along the upper mounting track as needed to get the new material perfectly centered between the arms.
Reinstall the Right Awning Arm
To reinstall the right awning arm, click the lower end into the lower mount on the side of the RV. Then reinstall the two bolts at the top. Unlatch and lower the right awning arm into position as you and your helper swing the roller tube and fabric out and away from the side of the RV.
Reinstall the Bracket
Make sure that the release control mechanism on the end of the awning arm goes over the control rod/pin at the end of the roller tube. Reinstall the bracket onto the end of the arm. Then reinstall the bolt that holds the bracket to the arm.

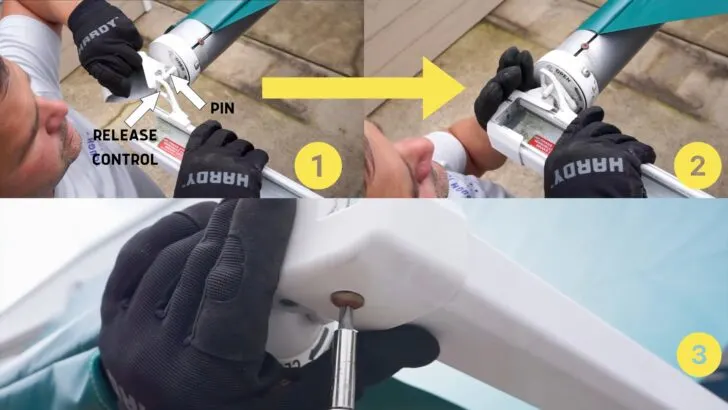
Reinstall the bracket making sure the release control on the end of the awning arm goes over the pin on the roller tube, Then reinstall the screw that holds the bracket to the arm.
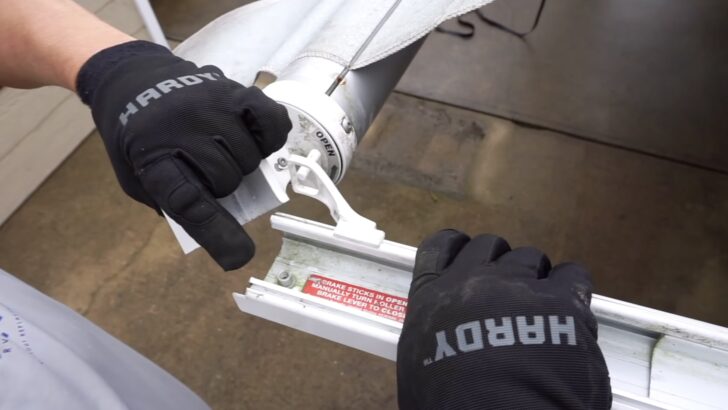
Re-tension the Roller Tube Spring
Next, re-tension the spring at the left side of the roller tube. Make sure to rotate the fitting in the correct direction as indicated by the word “wind” (with arrows) on the bracket. Rotate the fitting in the direction of the arrows.
Count the exact number of turns, making sure to match the number of rotations you unwound it during disassembly. If you need a little extra leverage, you can insert your flat-blade screwdriver into one of the holes and wind the fitting using the screwdriver handle.
Note: If your awning wasn’t winding up as tightly as it should have, now’s a great time to add another rotation or two to compensate for an aging spring.
Reconnect the Left Bracket to the End of the Arm
Hold tightly onto the roller tube bracket while your helper unlatches the left awning arm and swings it down. Then, insert the bracket onto the end of the arm and reinstall the bolt that secures it into place.
Retract the Awning
Retract/stow the awning to confirm that it rolls up smoothly and that the arms line up as they close. If not, just pull the fabric slightly forward or back in the mounting track. It’s not unusual for there to be a few wrinkles until the new fabric settles into place.
Reinstall the Set Screws
Reinstall the set screws into each end of the awning track. They go right through the bead, locking the fabric into position so it won’t shift.
Pull the awning back down and admire your handiwork!
Watch The Manual/Pull-Down Awning Fabric Replacement Video
If you’d like to follow along as we replace the fabric of a Carefree of Colorado manual/pull-down awning, check out our video below and we’ll guide you through the process visually:
Powered Awning Fabric Replacement
Next we’ll provide a step-by-step tutorial for replacing the awning fabric on a Carefree of Colorado powered awning that does NOT have a Uniguard. A Uniguard is a protective metal wrap that goes around the awning when it’s closed. If your Carefree of Colorado powered RV patio awning has a Uniguard, continue reading, and we’ll show you how to replace the Soft Connect in another section below.
First, let’s look at replacing the awning fabric on a Carefree electric awning without a Uniguard.
What You’ll Need
- Long Cable Ties
- A flat-blade screwdriver
- A pair of snips/cutters to cut the zip ties
- Cordless Drill
- Silicone Spray
- A Sharpie or other felt-tip marker
- A couple of sturdy step ladders
- A helper (again, or two)
Step-by-Step Replacement of Powered Awning Fabric
Again, this may seem like a lot of steps, but none of them are particularly hard… just follow along.
Partially Extend the Awning and Secure Both Arms
Start by extending the awning approximately one foot. Using two large zip/cable ties, secure both awning arms, wrapping one around each arm to hold it loosely in place.
Remove the Fabric Set Screw On One Side
Climbing a ladder at one side/end of the awning, remove the set screw that holds the end of the fabric in place on the awning rail or gutter.
Remove the End Cap Screws
Remove the screws that hold the end cap to the roller, starting with the one that’s more difficult to reach. There should be two screws directly opposite each other.
Come down off the ladder and have your helper climb up and hold the end cap onto the roller tube. This will prevent the tube from falling out of the cap while you’re working on the other end.

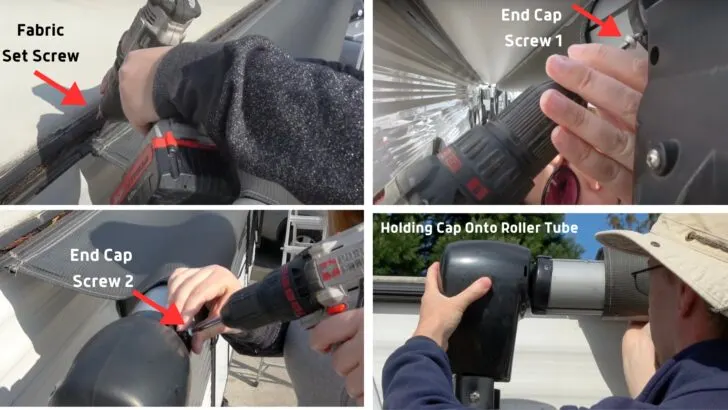
Here are the steps noted above to begin the process of removing the Carefree of Colorado powered awning fabric.
Repeat Steps 2 & 3 At the Other End Of the Roller Tube
Climb the ladder on the other end and repeat steps 2 and 3 noted above. First, remove the set screw that holds the end of the fabric in place on the awning rail or gutter.
Then remove the screws that hold the end cap to the roller, again starting with the one that’s more difficult to reach, so that you can easily remove the final screw while you keep one hand under the tube at the same time. This is to make sure it doesn’t fall when the last screw is removed.
You and your helper should keep a hand on the roller tube to support it just in case it slips out of the end cap before you’re ready.
Remove the End Caps and Unroll the Fabric
While continuing to support the roller tube with one hand, you and your helper should pull both end caps off at the same time. Now you can both unroll the fabric while descending the ladders together. Unroll the material all the way and leave the roller tube hanging at the bottom.
Remove Any Gutter Extension
Determine which end you’ll be sliding the fabric off (some RVs will be easier pulling it toward the front, and others toward the rear). If there’s an extension at the end of the rain gutter on the side you’ll be sliding the fabric off of, remove it now. It’s probably held in by a single screw.
Enlarge the Opening of the Track
Using a flat-blade screwdriver, gently spread the opening of the track to allow the new fabric to slide in without catching or tearing on the corners.

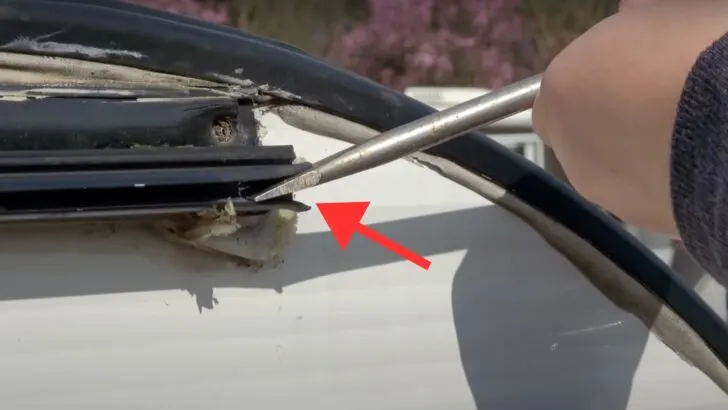
Prying open the end of the track will ensure that the fabric slides in more easily and doesn’t catch on a sharp edge.
Mark the Awning and Valance Tracks
Since the roller is hanging down, the track at the top is the one that the awning is in. Use your felt-tip pen to mark that track with an “A” for “awning” at the very end of the tube. Roll the tube toward you 1/3 of the way until the track with the decorative valence in it is facing up. Mark it with the letter “V” for valance, again at the very end of the tube. A valance is a decorative flap that hangs out over the awning.
It’s possible that your old awning doesn’t use both of the tracks (if it has no decorative valance). But your new one from Tough Top Awnings will. The letters you draw will be hidden by the end caps when you’re done, so don’t worry about them being visible right now.
Marking the tracks “A” and “V” will let you know which track is for the awning and which is for the valance. They’ll be covered by the end caps when we reinstall them, so don’t worry about how the letters look.
Remove the Roller Tube
Remove the set screws that hold the material into the roller tube. There will likely be one at each end. With a helper holding the fabric at one end, slide the roller tube out the other side.
Remove the Old Awning Fabric
Lift the fabric up over the awning arm and pull it all the way out of the rail. Depending on how old it is, you may need to tug on it a bit to get it loose. Pull the material all the way out and say goodbye to that old awning.
Lubricate the Rail
Lubricate the entire length of the rail with silicone spray, moving the ladder along as needed. This makes it easier to slide the new awning into place. If the ends of the rail are sharp, you can file them lightly and/or cover them with two pieces of masking tape to prevent the fabric from catching as you slide it into the rail.
Install the New Awning Fabric Into the Rail
With your helper(s) holding the far end of the fabric, carry the end of the new material up the ladder, keeping it off the ground as much as possible.
Insert the bead cord of the new awning into the track on the side of the RV and start sliding it into place. Have your helper(s) feed the material up to you as you go. Once you’ve gotten enough of the material into the track, have a helper on another ladder pull the end as you continue feeding it in from the front, helping it slide smoothly into place.
Little by little, keep feeding it into the track as your helper on the other ladder continues to pull. Feed it in until it’s approximately centered between the two arms.
Install the Roller Tube
Spray the entire “A” track and “V” track of the roller tube with silicone. The “A” track is where the awning slides in and the “V” track is where the valance slides in.
Now slide the beads into the awning and valance tracks. It can be a bit tricky to get started. Take your time and carefully wiggle the bead of the awning and valance into the proper tracks and slide them along as you go. Once you get the first foot or two of the tube onto the fabric, it’s a breeze to get the rest of the way on. Once it’s started, firmly hold the end of the awning right at the roller and have a helper push the tube all the way in.
Measure the ends of the roller tube so they stick out equally on both sides of the fabric, adjusting as needed. Shimmy the entire awning left or right as needed until the gap between each arm and the edge of the fabric is the same.
Roll Up the New Awning Fabric
With ladders in place at each arm, you and your helper (one at each end) can begin rolling the tube inward toward the RV. As you roll it up, carefully start your way up the ladders holding your ladder with one hand and the roller with the other. Slowly climb the ladders together, rolling up the fabric as you go.
Install the End Caps
When you both reach the top of the ladders, insert both ends of the tube into the end caps. While your helper holds their end in place, use the cordless drill to reinstall the screws into the tube. Start with whichever one is easier to reach. Once you’ve finished securing the first cap, install the two screws in the second end cap, again starting with whichever screw is easier to reach.
Release the Arms and Extend the Awning
Cut both zip ties off the arms and extend the awning fully, confirming that it lays perfectly flat and square. If not, pull the fabric slightly to the left or right at the roof rail as needed. Once it lays flat, roll the awning all the way up to confirm that the arms line up and close correctly.
Reinstall the Set Screws
Reinstall the set screws at the end of the awning rail/gutter to prevent it from shifting. If you had a gutter extension, reinstall that as well.
Now you can enjoy your new awning!
Watch The Powerd Awning Fabric Replacement Video
If you’d like to follow along visually as we replace Carefree of Colorado power patio awning fabric, check out our video below.
Replacement Fabric for Carefree of Colorado Awnings
Not to be too blunt, but Carefree of Colorado acrylic fabric isn’t exactly famous for its quality. The last time we checked, their OEM replacement awning material was pretty expensive too. Since RV manufacturers are highly motivated to keep costs down, it’s not unusual for just about any OEM replacement part to fall behind aftermarket gear in quality.
So, unless you want to replace awnings more often than necessary, we suggest durable vinyl fabric from Tough Top Awnings for all of your awnings and slide toppers. We’ve always loved vinyl awnings. They’re more practical and durable than anything else we’ve used, and Tough Top has earned our respect over many years of full-time use. Again, be sure to use our RVgeeks coupon (posted below) to save some cash when you order.
How to Replace the Soft Connect on a Carefree of Colorado Electric Patio Awning
If you need to know how to replace only the Soft Connect piece on your Carefree of Colorado patio awning, this section is for you. Let’s start by looking at what a Soft Connect is, and then we’ll show you exactly how to replace it without having to replace the entire awning.
Soft Connect Fabric: What Is It?
If you’ve got a Carefree of Colorado power patio awning on your RV, you may also have a “Uniguard.” That’s a protective piece of metal that wraps around the awning to prevent it from billowing in the wind while driving down the road. It also protects the material from UV rays.
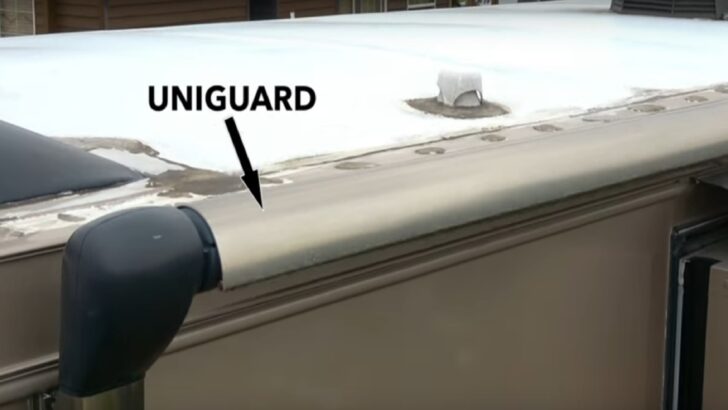
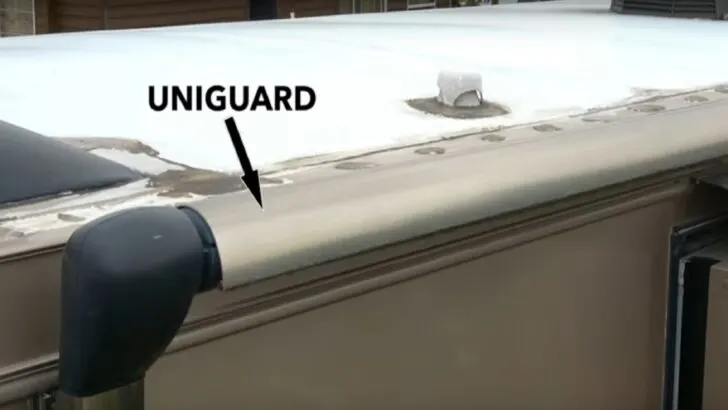
This is a Uniguard, a metal wrap covering a retracted Carefree of Colorado powered RV patio awning.
If you’ve got a Uniguard on your RV awning, then you’ve also got a long, narrow piece of fabric that sits between the Uniguard and the side of the RV, connecting the two. This fabric piece is the Soft Connect, which we’ll show how to replace… without removing the awning!

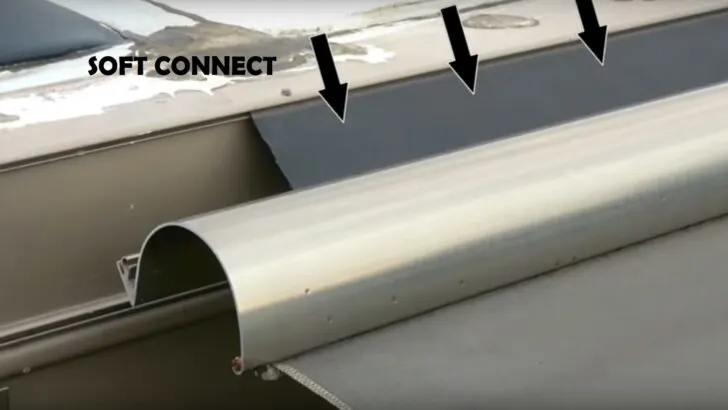
The fabric between the RV and the Uniguard is called the Soft Connect. This fabric is constantly exposed to the sun, so it is usually the first part of an awning to fail due to UV exposure.
Replacing this fabric is usually necessary because it’s the first part of your Carefree RV awning to fail.
What You’ll Need
Here’s a list of the items most commonly required to replace your RV’s soft connect fabric:
- Silicone spray
- 16-inch Zip ties (or you can link two smaller ones together if you already have some)
- Wire cutters
- Cordless drill
- File
- Tall ladder
- New soft connect fabric (custom cut and sewn for your RV by Tough Top Awnings)
If your RV’s awning has one, the soft connect is usually the first piece of a Carefree of Colorado RV awning to fail, since it’s always exposed.
Step-by-Step Replacement of a Carefree Awning Soft Connect… Using Longer Lasting Fabric
Here’s a step-by-step guide to replacing your RV’s soft connect without removing your awning.
- Remove the two set screws that keep the soft connect from sliding in the track on the roof. There should be one on each end.

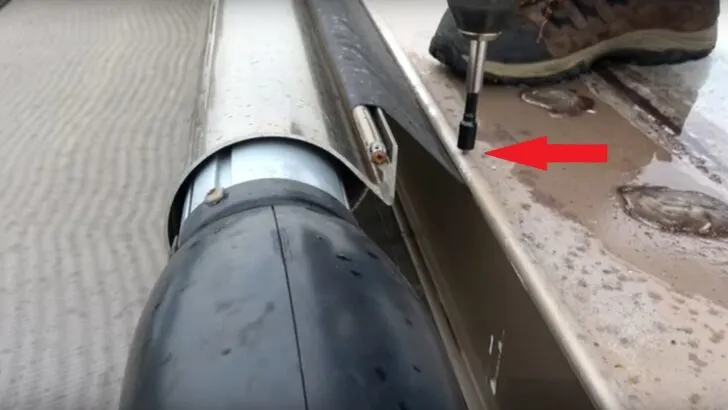
There should be two set screws, one on each end of the RV side of the awning. Both need to be removed.
- Remove the two screws that lock the soft connect into the Uniguard. Again, there should be one at each end.
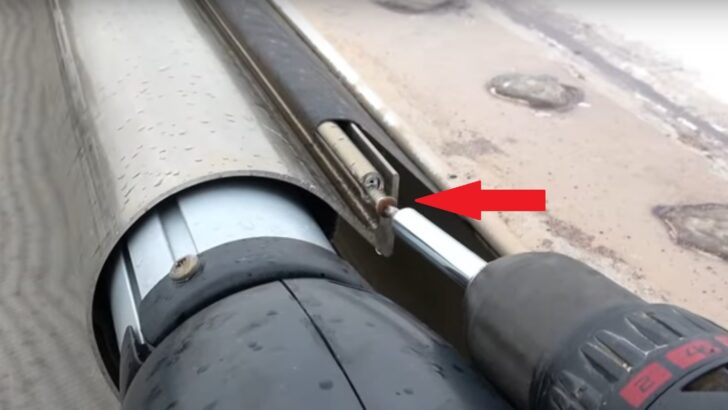
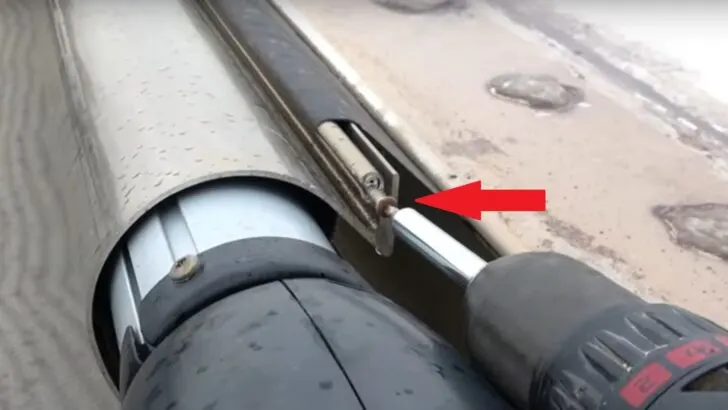
There are also two set screws on either end of the awning side, both of which need to be removed.
- Open the awning just a bit and install a large zip tie around one of the arms (you’ll see a notch behind the arm, which is the perfect place for the zip tie). Cinch it down tightly, then do the same with the other arm. There should be a bit of play in the soft connect now.
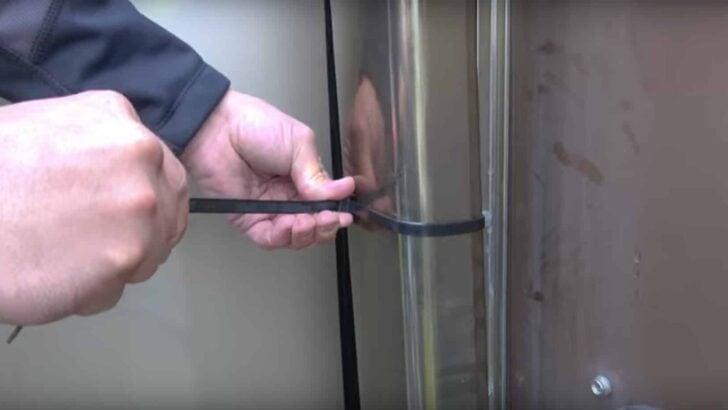
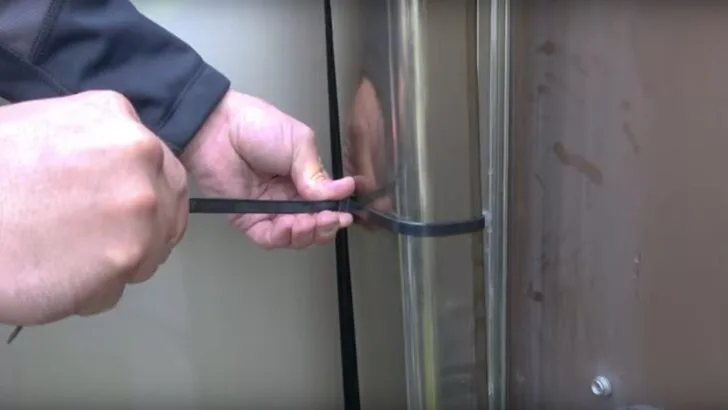
After opening the awning just slightly, zip-tie the arms, cinching it tightly.
- Slide the soft connect about halfway out one side and leave it there. This will hold the Uniguard and the awning in place as you begin to install the new heavy-duty soft connect. Sliding it out only halfway avoids the need to remove the awning!
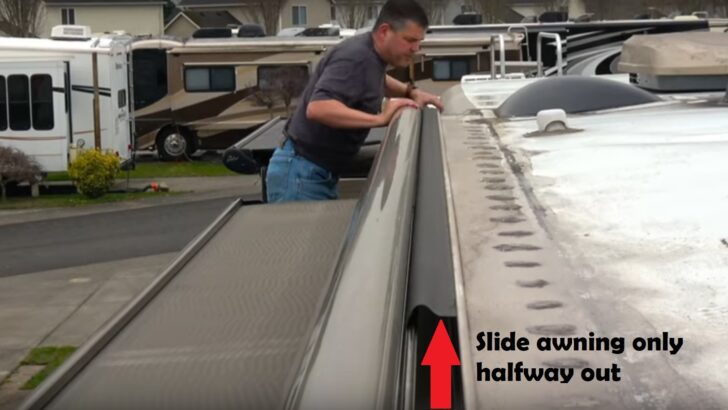
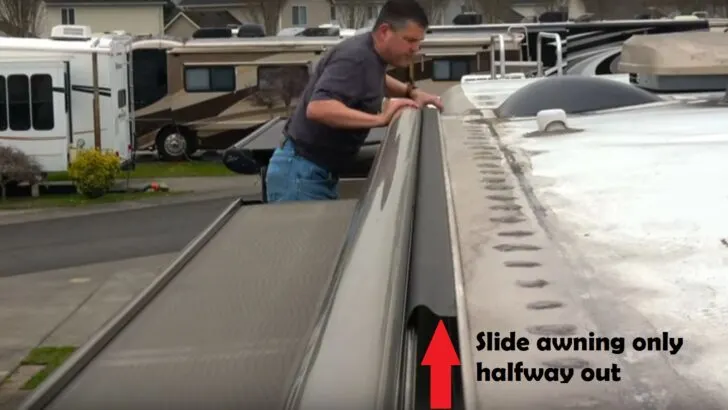
Sliding the old soft connect just halfway down the track holds everything in place while the new soft connect is being installed.
- File the edges of the track on the RV and on the Uniguard. This protects the new fabric from snagging during installation. (If you’d like some extra protection, you can also use some masking tape on the corners.)
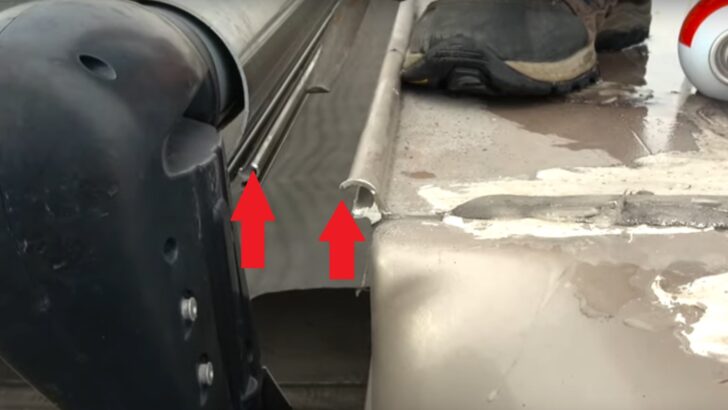

These ends of the tracks should be filed to prevent the new fabric from snagging on them during the installation.
- Spray some silicone into the Uniguard’s track, as well as the track on the RV. This will make it easier to slide the new soft connect into place.
For the next step, having a helper makes the process much easier.
- With the thicker bead cord on the RV side, and the thinner cord on the Uniguard side, start sliding the new soft connect into the two tracks with your helper feeding the material in from one end. Slide the fabric into the tracks until the new soft connect is close to the old one.

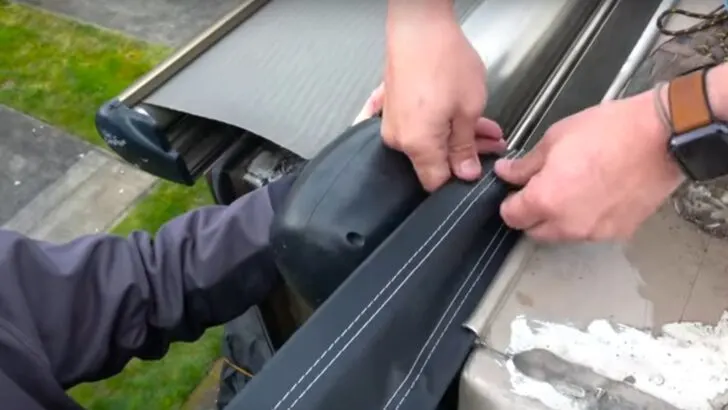
It’s helpful to have a helper feed the new soft connect into the tracks and down the length of the awning.
- With the new material in place to hold the Uniguard, you can slide the old soft connect the rest of the way out the other end.
- To help the new material slide freely, spray silicone into both tracks as you go. Have your helper keep feeding the fabric in as you continue to pull. Keep going until the new soft connect is centered in the Uniguard’s track.
- Snip off any bead cord sticking out from the end.
- Cut off the zip tie from one arm, and reinstall the set screw into that end of the Uniguard. Then reinstall the set screw on the RV. Do the same on the other end of the soft connect.
- Extend your awning and admire your new and improved soft connect! You’ve just completed your own Carefree awning fabric replacement — Soft Connect edition!
Watch The Soft Connect Fabric Replacement Video!
For those of you who learn best visually, here’s our video, so you can follow along step by step!
How Can I Do Other DIY Carefree Awning Fabric Replacement on My RV?
We’ve got several posts and videos about replacing the fabric on other Carefree of Colorado awnings/slide toppers. We’ll link to them here so you can consult them as needed.
- Carefree of Colorado Omega Slide Topper Fabric Replacement
- Carefree of Colorado Slide Topper Fabric (Model SOK III) Replacement
- Carefree of Colorado RV Slide Topper (Model SOK II) Replacement
If you have Dometic / A&E slide-out awnings (toppers) or patio or window awnings, we’ve got you… covered… there, too!
Whether you need replacement fabric for a motorized retractable awning, a manual awning, a door awning, window awnings, or slide-out awning/canopy replacement fabric, we’ve created DIY how-to posts/videos on many of them:
Where To Buy Carefree of Colorado Awning Replacement Fabric
Whether you’re replacing a soft connect, main patio or window awnings, or your RV’s slide topper fabric, Tough Top Awnings material will outlast any fabric we’ve ever seen. They offer free shipping on all RV awnings to the Lower 48, plus a special discount for RVgeeks readers.
Don’t forget to save when you order your replacement awning fabric factory-direct. Tough Top Awnings are manufactured in the USA.
The original equipment fabric that comes on RV awnings and slidetoppers is... well, how do we say this?... CRAP!. It's no surprise, since the RV manufacturers are looking to cut their costs...Show More
The original equipment fabric that comes on RV awnings and slidetoppers is... well, how do we say this?... CRAP!. It's no surprise, since the RV manufacturers are looking to cut their costs. Instead of replacing it with the same stuff that failed in the first place, get high-quality replacement fabric from Tough Top Awnings, instead.
Check out our Tough Top Awnings videos here
Plus you can save 5% on your entire order from Tough Top Awnings. The coupon code is valid online or over the phone!
Show LessFree RVing Tips, Tricks, Reviews & Giveaways
As 20-year full-timers, we share everything we’ve learned about RVing over the years. Join our online community to receive a wealth of great RVing knowledge delivered daily to your inbox.
Whether you’re a new RVer or a seasoned full-timer, you’ll love the wide range of RVing topics we cover. Don’t miss a single article or any of our famous Giveaways. Subscribe to our newsletter today!