

We’ve talked many times about how replacing RV awning fabric is one of our favorite DIY projects. It’s easier than you might think, saves a ton of money, and produces results that are superior to having a shop do it. That last point may seem hard to believe, but the reason is that they all use the same crappy OEM (Original Equipment Manufacturer) material that failed in the first place.
We’ve covered these steps so many times because each awning (and slide topper) model is different. Today, we’re providing simple step-by-step instructions for replacing A&E Dometic Two Step awning fabric. The Two Step is a fairly common model, and like most OEM awnings they can get worn, torn, or moldy over time.
Keep in mind that RV manufacturers have a vested interest in keeping costs down. That means they’ll use the cheapest available awning material, even if it’s poor quality. They probably figure that it will be your problem when it fails, and expect they’ll make even more money when you have to buy replacement fabric… from them.
We’re here to tell you — don’t do that. Most OEM fabric is not only inferior, but they charge more for it. Not only can you avoid the entire cost of labor by doing it yourself (which is usually the lion’s share of what you’ll pay a shop to do anything), but you can choose better awning fabric than originally came on your rig.
This is a winning money-saving DIY project, so let’s get started replacing that old A&E/Dometic Two Step awning fabric with bright new higher-quality material that’ll protect you and your rig for many years. Details on the best fabric (IOHO), including a special discount, are below. We’ll also include our video showing the whole process at the end of the post.
-
1)
How to Replace A&E Dometic Two Step Awning Fabric
- 1.1) What You’ll Need
- 1.2) Lock the Spring With a Cotter Pin
- 1.3) Insert a Phillips Head Screwdriver Into the Left End Cap
- 1.4) Secure the Left & Right Awning Arms
- 1.5) Remove the Fabric Set Screws
- 1.6) Remove Rain Gutters (If Applicable)
- 1.7) Remove the Bolts that Secure the Roller Tube Into the Awning Arms
- 1.8) Unroll the Awning Fabric
- 1.9) Release the Spring on the Right (Front) Awning Arm
- 1.10) Mark the Track
- 1.11) Remove the Spring Assembly
- 1.12) Remove the Awning Fabric
- 1.13) Remove the Metal Wrap (If Applicable)
- 1.14) Install the Metal Wrap (If Applicable)
- 1.15) Prepare the Awning Track on the RV
- 1.16) Install the New Awning Fabric
- 1.17) Install Your New Awning Strap
- 1.18) Reinstall the Spring
- 1.19) Reinstall the Awning Arms Into the Roller Tube
- 1.20) Center Your New Awning Fabric
- 2) Have a Different Type of Awning or Slide Topper?
- 3) Free RVing Tips, Tricks, Reviews & Giveaways
How to Replace A&E Dometic Two Step Awning Fabric
If you’ve never replaced the fabric of an awning or slide topper before, the project may seem intimidating, especially because there are ladders and a fairly large spring involved. But the spring tension is surprisingly light and easy to handle, and this RV DIY project is so easily managed that it’s perfect for the average DIYer. If you’re able to safely climb a ladder and have a friend or two to help, you should be able to handle this with no problem.
What You’ll Need
Here are the tools and items you’ll need to get the job done:
- Cordless Drill
- Wire Cutters
- Phillips Screwdriver
- Flat Blade Screwdriver
- Large Cotter Pin
- Zip Ties
- Utility Knife
- Flat File
- Small Box Wrench or Crescent Wrench
- Locking Oil Filter Wrench
- Pop Rivet Tool
- Pop Rivets
- Tape Measure
- Silicone Spray
- Folding 7' Step Ladder
To make this project easier, it’s also best to have a couple of stepladders and a helper or two. Let’s start with the awning in the fully retracted position.
Lock the Spring With a Cotter Pin
Pull the awning out about a foot, and insert your cotter pin into the hole in the right side end cap to lock the roller tube spring.

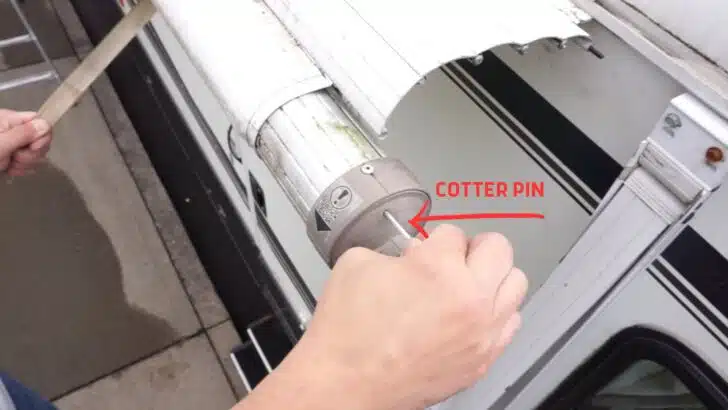
Pulling the awning out about a foot, insert the cotter pin into the hole in the right side end cap to lock the roller tube spring.
You’ll likely need to pull the tube in and out just a bit to line up the holes properly, allowing the pin to go all the way in.
Insert a Phillips Head Screwdriver Into the Left End Cap
Insert a Phillips-head screwdriver into the channel in the left end cap, and push the awning arm closed. Then, push the front (right) awning arm in as well.


Insert a Phillips head screwdriver into the channel in the left end cap.
Secure the Left & Right Awning Arms
Slide a zip tie behind one of the awning arms up near the top of the RV and secure the arm in place. If your zip ties aren’t long enough, you can use two and connect them. Now do the same thing on the other awning arm.
Remove the Fabric Set Screws
Remove the set screws that hold the fabric in place on the side of the roof. Usually, there are two set screws to remove – one at each end.

Remove the set screws that hold the fabric in place on the side of the roof. There’s likely one on each end.
Remove Rain Gutters (If Applicable)
Determine the clearest path for sliding the fabric out toward the front (right) or the rear (left), and remove any rain gutters that are in the way.
Remove the Bolts that Secure the Roller Tube Into the Awning Arms
Remove the bolts that secure the roller tube into the top of the right side awning arm.


Remove the screws/bolts that secure the roller tube into the top of the right side awning arm.
Before removing the bolts on the left side, zip-tie your Phillips-head screwdriver to ensure it stays in place.

Zip-tie your Phillips head screwdriver to make sure it stays in place.
Then remove the two screws at the top of the left awning arm that secure the left end of the roller tube.
Unroll the Awning Fabric
With one person on each ladder, simultaneously lift both ends of the roller tube out of the awning arms. Slowly and carefully unroll the fabric as you descend the ladders together. Take it slow, holding the roller tube away from the RV to avoid scratching it. Unroll it all the way down, until the tube is hanging at the bottom.
Release the Spring on the Right (Front) Awning Arm
Clamp your locking filter wrench onto the fitting at the right end of the roller tube. Holding the wrench firmly, apply enough pressure to allow the cotter pin to slide out, and remove it.

Holding the oil filter wrench (which is basically a large vice grips) firmly, apply enough pressure to allow the cotter pin to slide out, and remove it. You can then begin slowly unwinding the spring to release the spring tension.
Now, slowly unwind the spring being sure to count and record the exact number of rotations as you go. Also, note the direction of rotation — the top of the fitting rotates toward the RV to unwind.
Mark the Track
Using a felt-tip marker, make a mark on the track on top of the roller tube with the letter “A” for “awning.” Then mark the letter “V” on the track where the decorative valance goes. This ensures that we’ll insert the new fabric correctly into the tube.
Next, mark two dots, one on the cap and one on the roller tube, to ensure the cap is lined up correctly during reinstallation.
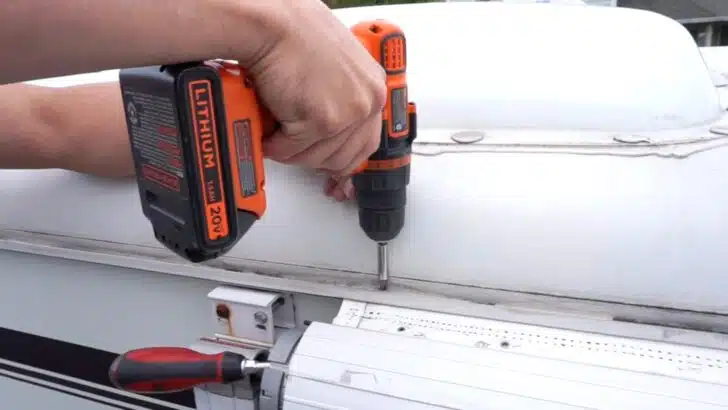
Remove the Spring Assembly
Drill out the rivets on the right end cap using your cordless drill. Once the rivets are removed, simply slide the spring assembly out the right side of the tube.
Remove the Awning Fabric
With a helper holding the fabric at the front of the awning, slide the roller tube out the other side (to the left, which is toward the rear of the RV). Keep sliding the tube until it comes out the end of the fabric. Now slide the old awning off the side of the RV. It’s pretty much the same whether you have a protective metal wrap or not, except it’s less rigid without the wrap.
Note that if you have the space available, lining everything up side by side is a good way to ensure that the fabric, metal wrap, and roller tube are oriented correctly with each other and the RV.
Remove the Metal Wrap (If Applicable)
If you have a metal wrap, use a utility knife to cut away the first foot or two of fabric from the end.

If your awning has a protective metal wrap, use a utility knife to cut away the first foot or two of fabric from the end. You’ll then need to pry apart the crimped edges of the wrap that hold the fabric in place.
The manufacturer secures the awning in place on the wrap by crimping the fabric into the track. Use a large flat-blade screwdriver to carefully un-crimp the metal. It will take a little prying, but you only need to bend it enough to allow the fabric to slide freely again.
Repeat the same process at the other end, cutting the first foot or two of the fabric and then un-crimping the track from the fabric, allowing it to slide freely. With a helper holding one end of the wrap, pull the old awning material out the other side.
Install the Metal Wrap (If Applicable)
On the side of the wrap where you’ll be sliding in the new fabric, file any sharp edges on both corners of both tracks. Using a flat-blade screwdriver, spread the ends of the tracks slightly. Then lubricate the entire length of both tracks with silicone spray. Insert the bead cord into the tracks and slide the metal wrap all the way on.
Measure both ends to center the fabric on the wrap, adjusting as needed. Use your wire cutters to re-crimp the tracks at both ends onto the new material, which will lock it into place in the metal wrap.
Prepare the Awning Track on the RV
On the side from where you’ll be installing the awning, spread the track on the RV slightly with your flat-blade screwdriver. Then file any sharp edges. For extra protection, you can also cover the corners with some masking tape. Then lubricate the entire track with silicone spray.
Install the New Awning Fabric
Bring the new awning over to the RV. Insert the bead into the track and carefully slide it in. Keep going until it’s approximately centered between the awning arms.
Lubricate the tracks on the roller tube that you marked with an “A” and a “V” with silicone spray. Before sliding the tube onto the fabric, trim the ends of the bead cords down to about 3/4 of an inch long.
Line up the bead on the awning with the “A” track and the bead at the valance with the “V” track, and begin sliding the tube onto the fabric.

Line up the bead on the awning with the “A” track and the bead at the valance with the “V” track.
Holding the fabric at the end, continue feeding the tube onto the beads until it comes out the other side.
Install Your New Awning Strap
Now is the time to remove your old awning strap and replace it with the new one. Simply slide it out one end of the tube, and slide a new one in (available when you buy your fabric — see below).
Reinstall the Spring
Insert the spring assembly into the end of the tube, making sure to line up the two dots. Use your pop rivet gun to install new rivets where you drilled out the old ones. Then, slide the tube left or right as needed to get it perfectly centered, using your measuring tape to ensure the same distance on both sides.
Clamp your oil filter wrench back onto the fitting on the right side of the tube and rewind the spring, rotating it in the opposite direction from when you unwound it (top toward you). Be sure to count the same number of rotations. Then, insert the cotter pin back into the hole at the end of the cap to lock the spring and remove the filter wrench.
Reinstall the Awning Arms Into the Roller Tube
Along with a helper, roll the new awning up as smoothly as you can. Don’t worry about it being perfect because any wrinkles will come out when you center the fabric.
Climb the ladders together, rolling the tube as you go. When you get to the top, simultaneously insert both fittings into the tops of the awning arms. Now reinstall the bolts in both ends, securing the roller tube into the tops of the awning arms.
Cut the zip-tie holding the screwdriver into the left end cap and remove it. You can also cut the zip ties on both the front and rear awning arms and discard them. Pull the tube out about a foot or so and remove the cotter pin from the right end cap.
Center Your New Awning Fabric
Extend the awning and then roll it back up again. This allows you to see if the fabric is lined up correctly on the side of the RV. If the awning arms don’t line up perfectly, give a tug forward or backward on the roller until they do. You can now reinstall both set screws that hold the fabric in place on the side of the RV.
Now it’s time to enjoy your beautiful new awning, which will last for years!
Use the code “RVGEEKS“ to get a 5% discount from Tough Top Awnings. Don’t forget to order your new pull strap, too!
The original equipment fabric that comes on RV awnings and slidetoppers is... well, how do we say this?... CRAP!. It's no surprise, since the RV manufacturers are looking to cut their costs...Show More
The original equipment fabric that comes on RV awnings and slidetoppers is... well, how do we say this?... CRAP!. It's no surprise, since the RV manufacturers are looking to cut their costs. Instead of replacing it with the same stuff that failed in the first place, get high-quality replacement fabric from Tough Top Awnings, instead.
Check out our Tough Top Awnings videos here
Plus you can save 5% on your entire order from Tough Top Awnings. The coupon code is valid online or over the phone!
Show LessIf you’d like to follow along with us as we replace the fabric on an A&E/Dometic Two Step RV patio awning, check out our video:
If you’re not ready to replace your awning fabric just yet but want to try cleaning it up a bit, check out our post on how to get stains out of RV awnings.
Have a Different Type of Awning or Slide Topper?
If you have a different make or jodel awning or slide topper that needs replacing, be sure to check out our entire series of posts and videos covering a wide range of models like these:
- How to Replace the Fabric On a Dometic / A&E RV Window Awning
- How to Replace the Fabric On A Dometic/A&E WeatherPro Awning
- Pull-Down Dometic Awning Fabric Replacement
You can also learn how to repair or replace a failed Dometic Oasis Elite door awning motor.
Free RVing Tips, Tricks, Reviews & Giveaways
As 20-year full-timers, we share everything we’ve learned about RVing over the years. Join our online community to receive a wealth of great RVing knowledge delivered daily to your inbox.
Whether you’re a new RVer or a seasoned full-timer, you’ll love the wide range of RVing topics we cover. Don’t miss a single article or any of our famous Giveaways. Subscribe to our newsletter today!