
If you’ve got a 50-amp RV, knowing how to wire a 50-amp RV plug can be important information. In fact, a shore power cord plug in poor condition can be dangerous. And a broken plug that can’t be used at all can ruin your camping trip.
Fortunately, 50 amp plugs aren’t difficult to replace, or very expensive. In this post, we’ll tell you why you could find yourself needing to replace the plug on the end of your RV’s 50-amp power cord and how to do it yourself.
We’ll provide you with a wiring diagram for a 50 amp RV plug, and show you the right way to do the job as a DIY project… right at your campsite if necessary.
Why You Should Know How to Replace Your 50 Amp RV Plug
You might need to replace the plug on the end of your RV power cord for several reasons.
Damage from Use Over Time
The RV plug at the end of your shore power cord gets a lot of use. So do RV park power pedestals. The repeated pushing and pulling of the plug’s prongs into and out of 50-amp outlets can loosen the prongs over time.
It’s also easy to drop the plug onto the ground while handling the heavy 50-amp cord, which can damage it. These wear-and-tear issues can damage your RV’s power plug over time.
Damage from Overheating
First, it’s important to understand the power behind 50-amp RV service. A 50-amp circuit has 2 poles (legs) of 50 amps each. This means that despite the common “50-amp” designation, it can actually provide a total of 100 amps of current.
But you can’t exceed 50 amps on either leg — hence the name. You’ll find more info in our detailed post on the 50-amp RV plug, but suffice it to say that lots of amperage gets pulled through it.
Your 50-amp RV power plug has four prongs. Two of the prongs carry 120V AC power at 50 amps each. The other two prongs of a 50-amp RV plug include one neutral wire and one ground wire.
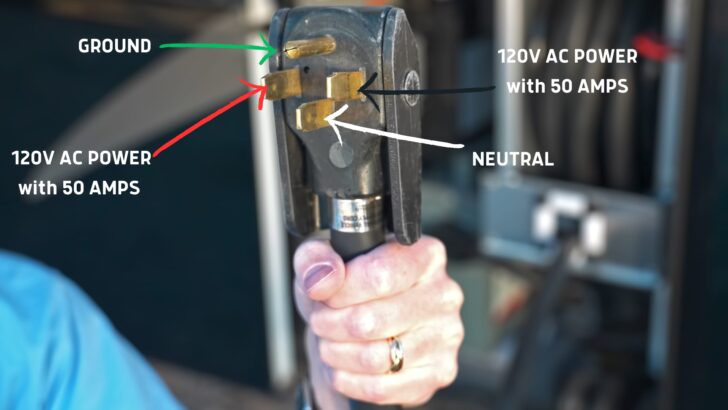

This is what each prong on a 50-amp RV power cord plug does. The wires inside the plug correspond to the arrow colors we’ve used to identify each prong. As long as you can see color, you can wire your 50-amp plug.
Over time, 50-amp RV plugs can start to show signs of burning around one or both prongs that hold the hot wires. And once you have signs of overheating on the plug, that leads to even more heat and more damage.
This is a pretty common situation, especially for RVers who frequently camp plugged into campground power pedestals.
Broken Prong
A prong (most often the round one — the ground — at the top) can break off. Sometimes a weak prong isn’t noticed until you suddenly find it stuck in a 50 amp RV outlet or embedded in your Hughes Power Watchdog or other RV surge protector when you pull it out.
While we’re on the topic, let’s take a moment for a critically important PRO TIP! We never (EVER. SERIOUSLY!) plug our RV into shore power without using a Power Watchdog. The potential damage to our rig simply isn’t worth the risk.
We love the Watchdog so much more than any other surge protector that we even arranged for special RVgeeks discounts so you can save on one when you protect your rig, too.
Prices vary, so be sure to check all three sources (factory-direct, Mobile Must Have, and Amazon). Both 50-amp and 30-amp units are available, and we prefer the top models with EPO (Emergency Power Off).
Make sure your RV is protected from low voltage, bad RV park wiring AND power surges when connecting to shore power with a Power Watchdog and/or Hughes Autoformer. We never hookup without ours (we...Show More
Make sure your RV is protected from low voltage, bad RV park wiring AND power surges when connecting to shore power with a Power Watchdog and/or Hughes Autoformer. We never hookup without ours (we have both), and know our RV's electrical system and all our electronics are being protected.
Watch our Hughes Autoformer video
Watch our Hughes Power Watchdog video
Save 10% on your entire purchase when ordering from Hughes!
Show LessThanks to the latest additions to our RV internet arsenal from MobileMustHave, we're able to stay connected more reliably... and more remotely... than we ever could before. We couldn't be happier...Show More
Thanks to the latest additions to our RV internet arsenal from MobileMustHave, we're able to stay connected more reliably... and more remotely... than we ever could before. We couldn't be happier with the equipment we now have!
Upgrade your RV internet connectivity with great products from Peplink, WeBoost, Parsec, Poynting, Mobile Mark, and more. And while you're there, look at other great products like Viair Compressors!
Watch our video about our RV internet connectivity solutions for 2021
Save 5% on your equipment order at MobileMustHave.com when you click the button on this deal or use discount code "RVGEEKS" at checkout!
Show Less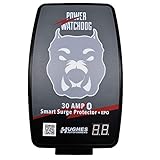
- Replaceable Surge / Spike Module: Should a large spike happen, surge module is completely replacable instead of replacing the entire unit.
- Wirelessly Monitor voltage, amperage, and wattage on your smartphone in real time using our free mobile app! Oldest and most reliable phone app in the...

- Replaceable Surge / Spike Module: Should a large spike happen, surge module is completely replacable instead of replacing the entire unit.
- Wirelessly Monitor voltage, amperage, and wattage on your smartphone in real time using our free mobile app! Oldest and most reliable phone app in the...
Now we’ll get off our soapbox about the critical importance of surge & spike protection and get back to today’s main topic!
Damage from Campground Power Pedestals
It’s possible to park your RV at a campsite and plug your rig into 50 amp service that damages your power plug and even your surge protector, depending on which one you’re using.
Here’s why:
50-amp outlets should have 120/240-volt, 2-pole service with a circuit breaker coming into the pedestal. This should have a double pole breaker.
So on a typical campground pedestal, you’ll see the 15/20- and the 30-amp outlets fed by single pole circuit breakers (one switch), while the 50-amp outlet is fed by a double (2-pole) circuit breaker (two switches).
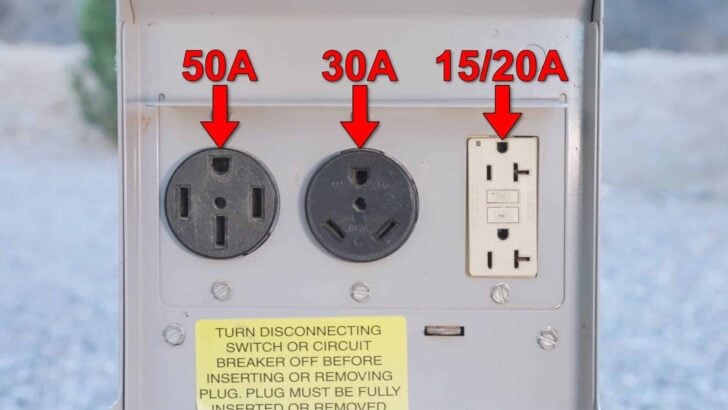
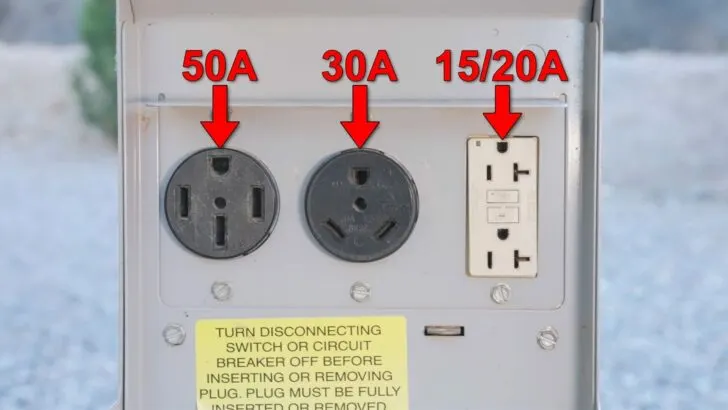
This is a typical campground pedestal, with 15/20- and 30-amp outlets fed by single-pole circuit breakers and a 50-amp outlet fed by a double (2-pole) circuit breaker.
This is because if a campground ran a single leg to both contacts when installing a 50 amp outlet, the shore power contacts and the neutral wires could carry up to 100 amps of current without tripping the 50 amp breaker. That much overcurrent could fry your RV plug, surge protector, and shore power cord. It could even catch on fire.
While the scenario above is unlikely because electricians understand the importance of installing double pole breakers on 50-amp outlets, it’s some states have no regulations requiring that a licensed electrician wire a campground.
So, we mention this information to reinforce how much current you’re dealing with when you have 50-amp service to your RV and what can happen if a power pedestal isn’t properly wired with the appropriately limited current.
The point is that it is possible for a campground to either be improperly wired, have old wiring (that could even be out of code), or have rusty contacts or loose screws. A power pedestal can have internal damage that you’d be unaware of when plugging in.
Some campground power pedestals are really old, and many are poorly maintained. Circuit breaker panels are outside in all kinds of weather, with outlets being plugged into by multiple RVers all season long.
The bottom line is that you could end up with a fried shore power plug. That means that you can’t just move to another site or campground and plug in… until you replace your 50 amp RV plug.
So, keeping an extra plug on hand is a good idea. Now let’s talk about 50 amp RV plug wiring to prepare you in advance, just in case. And did we mention the importance of surge and spike protection?!
How to Wire a 50 Amp RV Plug
Besides the DIY steps for installing your new plug, we’ll also include links to a couple of popular 50-amp male power plugs. But you need to be aware of some things, so first… a couple of notes.
A Note About Plug Measurements
The plugs with handles are great and they’re popular for a reason. But before you buy a plug with a handle, note the dimensions of the plug you’re considering to make sure it will fit through any port or opening in your RV that you feed your cord through when you connect to shore power. The dimensions are listed in the Amazon descriptions.
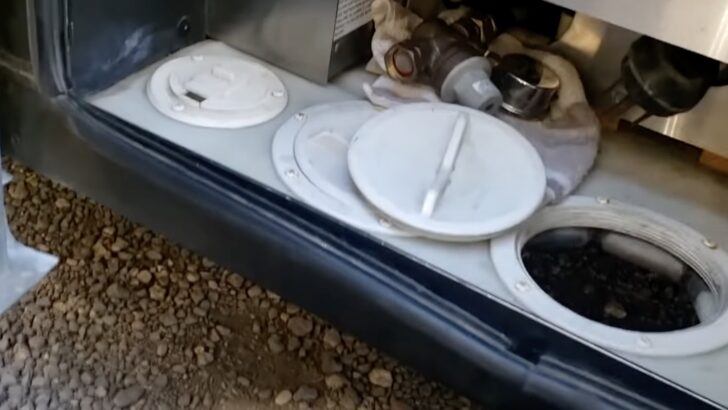
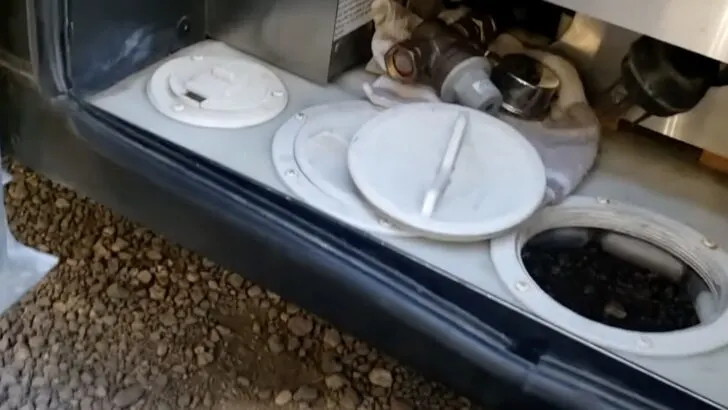
If your rig has an opening through which you feed your power cord (like the one at the upper left of this photo with the lid currently closed), consider the dimensions of your new plug before ordering. A larger plug may not fit through the opening, even with the lid wide open. That would be a deal-breaker for some large plugs.
An Important Note About Wire Routing
Also, we believe the directions for the Camco (and other) plugs should be revised. They suggest routing the ground (green) wire up through the middle of the plug. We disagree.
That doesn’t mean you can’t do it Camco’s way… but we wouldn’t. We’ll tell you why as we take a look at a couple of wiring diagrams for a 50-amp RV plug:
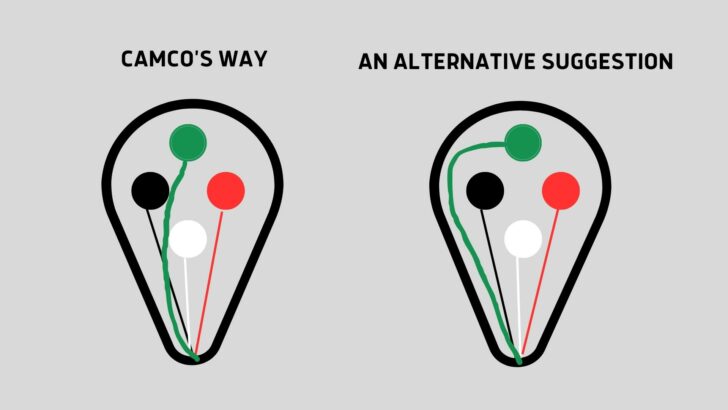
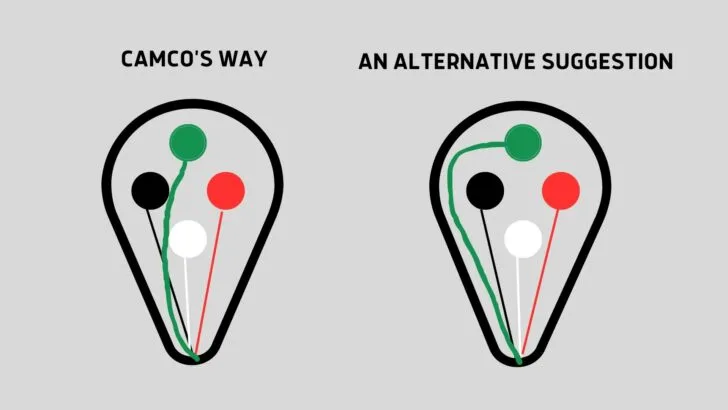
We prefer the wiring option on the right because it makes a short between the green ground wire and the black positive wire less likely. You can route around either side — left/black or right/red — as long as you route the green ground wire around the outside edge of the plug, clear of the other terminals.
On the left, you see the way Camco’s directions suggest wiring your 50-amp RV shore power plug. As you can see, the green (ground) wire is routed up through the middle of the white neutral and the black positive wires. This is a recipe for a short, and it has reportedly happened to some RVers.
The problem is that with use and vibration over time, the insulation around the green wire can wear through where it contacts the black wire’s terminal. If that happens, you can have a short (and potentially fire) if your ground wire contacts the hot/positive wire.
An electrician would most likely tell you to wire your plug using the alternative suggestion above. In fact, we saw reviews from electricians who used and liked this plug, but they wired their Camco plugs the way you see it wired on the right-hand side of the wiring diagram above.
We’re also including a link to a replacement plug from RVGUARD, and you’ll notice that they route the green ground wire around to the outer edge of the casing, as we’ve suggested.
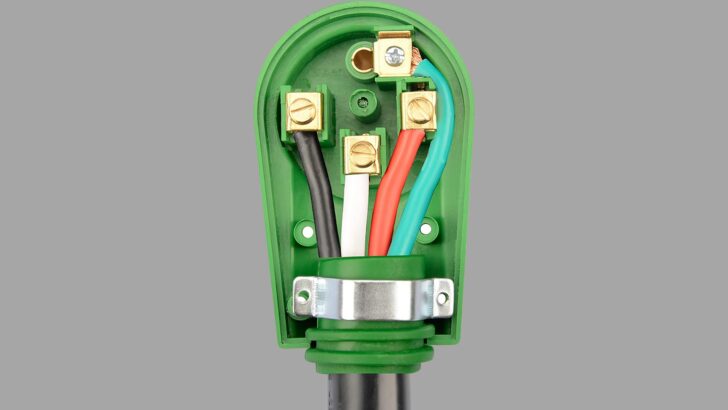

Note the wiring of this 50-amp power plug from RVGUARD. The green wire is routed to the ground prong around the outside edge of the plug, not up the middle. This is what we recommend, regardless of what plug you choose.
We’re not suggesting that the RVGUARD plug is superior to the Camco plug. Camco’s plugs are very popular and highly rated. We’re only suggesting that the Camco plug comes with inferior instructions.
That’s our heads up. Now let’s move on to the instructions for replacing your 50-amp RV shore power plug.
Steps to Wire and Install Your New Plug
- Cut off the old plug as cleanly as possible using a large wire cutter.
- Using a utility knife, cut and remove 3″ of the outer casing, being careful not to nick the insulation on the wires inside.
- Cut away all of the interior insulation, leaving only the green, white, red, and black wires.
- Following the instructions that came with your plug, cut each of the 4 wires to the correct length. This will vary for different plugs, but the green wire will be the longest, the red and black wires shorter, and the white neutral wire will be the shortest. Looking at the photo of the RVGUARD plug above should clarify why the lengths are not all the same.
- Strip back the insulation on all four wires according to the directions that came with your plug.
- Remove the screws holding the head of your new plug together and the screws that secure the cable retention yoke.
- Route and connect the ends of the exposed wires to the appropriate blades, securing them tightly with the Phillips head screws. PRO TIP: You may find it easier to connect the wires if you partially or fully remove the blades from the new plug by pressing them out from the front of the plug toward the back. Also, make sure that the heavy black outer casing of the cable will be well held in place by the retaining yoke.
- If you removed the blades, press them back into place inside the plug head, pushing them all the way out through the blade openings, making sure they’re tightly secured in place.
- Install the back cover of the plug and secure it firmly with the screws.
- Place the retaining yoke/strain relief over the outer casing and firmly secure it with the screws. This takes the pressure off the wiring connections rather than having them be responsible for holding the plug and cable together.
PRO TIP: If you’d like to waterproof your new plug, you can add some of outdoor-rated silicone to the back of each blade opening inside the plug head, to the base of the plug where the cable and wires enter the head, and under the retaining yoke. Finally, use a thick bead of silicone where the cable meets the retaining yoke.
Once you have your 50-amp plug installed, if you need to adapt down to a 30-amp or 15-amp outlet, you can watch our video Dog Bones 101.

- REPLACEMENT PLUG WITH HANDLE: Camco's RV Male Plug Replacement lets you attach a standard 50A head to your existing RV extension cord.
- COMPATIBILITY & DIMENSIONS: This plug is compatible with older-style receptacles, ensuring a secure connection. It measures 4 3/8" x 3" x 4 1/2".

- NEMA 14-50P. Rated at 125/250V 50A, fit's for 6/3+8/1 RV cord, replace the male end of 50A RV cord.
- Adopts well-conductive copper pin and flame retardant ABS plastic housing, Inner strain relief clip and outer bushing firmly secure cable, lasting a...
The video below shows a couple of fellow RVers tacking this job as a DIY project.
Free RVing Tips, Tricks, Reviews, Giveaways & More
Subscribe to our daily newsletter! We’ve been full-time RVers for 20 years (!) and share everything we’ve learned about RVing in our daily blog posts. Join our online community to receive a wealth of great RVing knowledge delivered right to your inbox.
Whether this is your first time on the road or you’re a seasoned full-timer, you’ll love the wide range of RVing topics we cover. Don’t miss a single article or any of our famous RV gear Giveaways — Subscribe today!
Dr. Mike
Wednesday 5th of July 2023
Absolute spot-on instructions!
One additional step I take is to add a thin film of dielectric grease to the prongs.
Pat OConnor
Tuesday 4th of July 2023
We're using Progressive Industries Surge Protector. Is there something we should know about it's safety and efficacy? I thought I did a pretty good job researching in 2020. We went for a while without one, because we couldn't find a 50 amp protector. Unless there's a reason not to, we'll continue to use Progressive.