
If you’ve ever found it a challenge to level a motorhome that isn’t equipped with a jack system, you’ve come to the right place! This post is our step-by-step DIY guide to leveling a motorhome on blocks. We’ll take you through the steps, including a video showing you exactly how to level an RV without jacks.
Class A motorhomes are usually equipped with a leveling system. But even with those, there are locations where you can’t, or shouldn’t, use them (a Walmart parking lot, for example). So you’ll want to know how to get your rig level without using your automatic/power jacks.
Also, if you need to know how to level a Class C RV without jacks, our guide’s steps to manually leveling your motorhome will make the process easier. We’ll also include a video where we share the easiest, quickest way to level a Class C RV.
So, let’s talk about leveling a motorized RV without using built-in leveling jacks so you’ll be ready for your next camping trip, no matter where you land.
Why Do I Need to Know How to Level a Motorhome On Blocks?
There are many reasons to level an RV. That includes the need for an RV refrigerator to be at or close to level to operate properly. It’s also for comfort — Who likes sleeping with their head lower than their feet? And who wants to stand in a puddle of soapy water because the drain is on the high side of the shower? Most manufacturers also recommend leveling the rig before extending or retracting the slides-outs.
Many Class B and Class C RVs don’t have automatic leveling systems or stabilizing jacks, so those owners will need to manually level their motorized RVs using blocks when they arrive at a campsite.
However, even RV owners with motorhomes that DO have a built-in auto-leveling system occasionally find themselves at a location where the jacks can’t be used. So, every motorhome owner should know how to level a motorhome on blocks.
Let’s take ourselves for example. Both of our RVs (our Mountain Aire and our first rig, a Bounder Diesel) have been equipped with computer-controlled leveling systems. You’d think would be an easy way to get perfectly level. However, there are two problems.
First, the tolerances of on-board systems are generally mediocre at best. And while getting absolutely, flawlessly level isn’t the most crucial thing in the world, it can help avoid walking into the bathroom door in the middle of the night after it swings open on its own. And, as mentioned, bathing is generally nicer without a small lake forming in one corner of the shower.


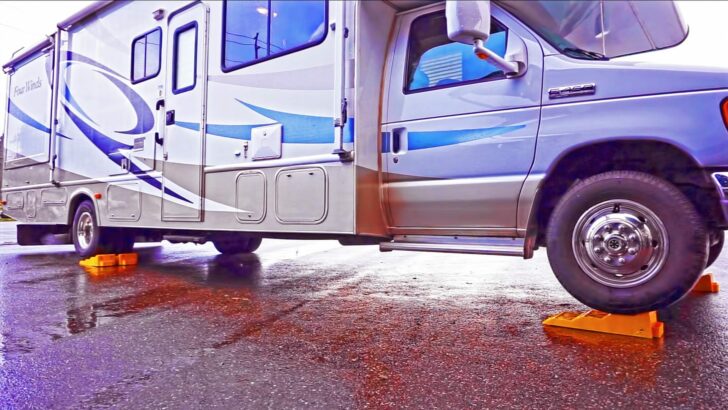
Sure, this is an extreme off-level situation for demonstration purposes. But often, even if your RV is only slightly off-level, you can have issues with your absorption fridge, your shower, and your bed.
The second issue, which no jack system can overcome, is the challenge of finding the most level spot on which to park. We’ve boondocked in many places that are pretty wide open, allowing us to freely select the exact spot where we want to set up camp.
But we can’t even count the number of times we’ve driven around looking for the most level spot, only to have one of our jacks max out before getting the rig level. It’s just too hard to guesstimate which spot is the most level by eyeing it up.
At times, we found ourselves using bubble levels for a rough idea and our Utility Blocks to make up the difference if a jack won’t extend far enough to get us level. (Utility Blocks are, in our opinion, the best RV leveling blocks to make up for very off-level situations — more on those below. We’ve also got a favorite trick up our sleeves for easily getting level anywhere, but more on that in the following sections.
There are also many times we can’t level at all, such as in Walmart parking lots, where it’s not appropriate to use jacks. Our on-board system is useless for those scenarios as well.
The leveling procedure using blocks is usually a trial-and-error proposition. We’ll cover how that’s done, and then we’ll show you a much easier way to level your rig without the trial-and-error part.
How to Level a Motorhome On Blocks
In general, when leveling any RV using blocks, the process amounts to following these basic steps:
- Check your level
- Set your leveling blocks
- Pull your RV onto the blocks
- Re-check your level
- Repeat as necessary
But there are a few additional considerations for motorized RVs, particularly those without built-in jacks.
Start as Level as Possible
Start with your rig as level as reasonably possible. Use your bubble level to check left-to-right and front-to-rear. Bubble levels are widely available and inexpensive. You can even use a carpenter’s level if you’ve got one in your toolbox. But this type is nice because it’s inexpensive and effective and offers two bubble levels in a T-shape for side-to-side and front-to-back leveling in one glance.
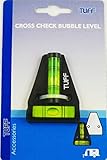
- ► DURABLE ◄ Shatterproof, waterproof, unbreakable design made to withstand harsh environments.
- ► VERSATILE ◄ Great for leveling RVs, campers, trailer tongues or hitches, large tools, tripods, cameras, pictures, rifle rests, furniture,...
If you want to easily and quickly know exactly how off-level your rig is before you even start trying to get level, keep reading for our top leveling tip!
Adjust From Front-to-Back and Left-to-Right Using Leveling Blocks
If the nose of the RV is low, place blocks directly in front of (or behind) both front wheels. Then, drive slowly forward (or backward) onto the blocks, making sure to stop when centered on them. If the rear of the RV is low, the blocks would, of course, be placed at the rear tires instead.
If the driver’s side is low, place blocks under both front and rear driver’s side tires, then drive up onto them. Of course, the same is true if the passenger’s side is low, with the blocks placed under the front and rear tires on the right side of the rig.
As you may have seen in our post Do You Need RV Leveling Blocks?, several different types of blocks/pads are useful for leveling a motorhome (or a travel trailer). You can use any combination of the following types of leveling blocks under your front and/or rear wheels.
DIY Wood “Levelers”
Some RV owners use DIY blocks created from pieces of wood. These can be useful and very inexpensive (or even free) but tend to be heavy and, depending on how they’re made, may not last all that long. When we first hit the road full-time over 20 years ago, we made our own leveling blocks out of very thick, solid wood. They lasted less than a year before they cracked and had to be replaced.
Plastic Stacker Pads
Plastic stacker pads are lightweight and easy to transport and store. They also interlock to avoid slipping. But we don’t think these are the best choice, because the design of the bottom can allow the pads to sink into soft surfaces. When it’s time to break camp, they also tend to hold clumps of dirt in the bottom. And if you have a heavy RV, plastic stacker pads may crack under the weight (we tried these after our homemade wood pads split, and these also cracked after a while).
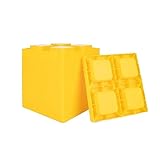
- CUSTOMIZABLE RV LEVELING SYSTEM: These interlocking RV wheel blocks offer a reliable way to achieve safe and secure camper leveling. They are designed...
- COMPATIBILITY: Camco’s leveling blocks work with single wheels, double wheels, hydraulic jacks, tongue jacks, stabilizer jacks, fifth wheel jacks,...
Drive-On Levelers
Drive-on levelers are popular and can be very useful for leveling a motorhome with blocks, though you’ll want to take note of their weight capacity. Also, these tend to be slippery, especially on wet pavement, so they can be frustrating to use if they move when you attempt to drive up on them. To be fair, most blocks tend to slip on wet pavement. So (if possible) arriving at a gravel, grass, dirt campsite on a dry day might be best.

- Raise your RV up to 3-7/8" on any tire for a more level position
- Load capacity of 3500 lbs
Andersen Levelers
The Andersen Camper Leveler Kit is great in lots of ways. They make leveling a fairly simple and quick process. Anderson Levelers are lightweight and compact while also being sturdy, and they come with a lifetime warranty. Their tapered design allows very precise leveling and eliminates the trial-and-error of hoping you put the right number of blocks down for the amount of off-level you’re trying to correct.
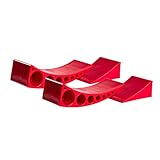
- 🛻[MUST HAVE FOR CAMPERS OR FIFTH WHEEL]: Works great on trailers up to 30,000 lbs and with tires up to 32" diameter. The Andersen Camper Leveler...
- 🛻[EASY TO USE]: Just drive on, decide how high you want it and place the chocks! You'll be ready to go dirt biking or hiking in no time- It's that...
Utility Blocks
These have been our primary leveling pads for years (partly because we love them, and partly because they’re virtually indestructible). They have several benefits and only a few shortcomings.
Utility blocks address some of the drawbacks of many other RV leveling pads. They’re incredibly strong and durable, but still very lightweight. The rope handles allow for easy pick-up and carrying when breaking camp. They’re also designed to interlock together, so they won’t slip off each other when stacked.
Utility Blocks also have slightly sloped sides which act as a ramp onto which you drive your RV. They’re also equipped with a notch that a standard RV awning rod fits into. That makes it easy to place, position, and retrieve them, so you don’t have to crawl under your RV to make adjustments.
They’re flat on the bottom, making them less likely to sink into soft surfaces. And for anyone with a travel trailer, Utility Blocks have a circular recess in the top, designed to support the tongue jack and hold the jockey wheel in place while you’re parked.
One potential drawback is cost, which is higher than the cheaper waffle-style plastic pads. But like anything else you get what you pay for, and these things are built to survive the apocalypse!
Note that if you have a very large and heavy motorhome, you may need jack pads with a larger surface area than Utility Blocks provide. That’s especially true if you’re planning to drive onto them since it’s crucial for the entire tire tread to be fully supported to avoid tire damage. But we were happy using them under the jacks on our 43′ diesel pusher for years.

Drive Onto Leveling Blocks
Slowly drive your RV onto your leveling blocks until you’re centered on them (It’s helpful to have a spotter guide you). They can also check to see how level you are, and let you know if adjustments need to be made. If you’re alone, you’ll need to stop, set your parking brake, and check your level. You may need to check and adjust more than once to get yourself perfectly level.
Adjust as Necessary
Continue to make adjustments as necessary until your motorhome is as level as possible both side-to-side and front-to-back. If you’re driving up onto the pads, as opposed to placing them under your jacks, you may need to drive back off, add or remove blocks to increase or decrease the height, and try again, In the next section, we’ll share how to get it right — first time, every time.
The Easiest Way to Level a Motorhome
Every RVer needs to carry leveling blocks of some kind. But if you’re interested in tech that can tell you how un-level a site is and how many blocks you’ll need to use before you even try to level, you’ll want a LevelMatePRO or LevelMatePRO+. This is one of our favorite pieces of gear, and we wouldn’t RV without one.
For details on this awesome device, see our post on 21st-century RV leveling using LevelMatePro. Here are the reasons why the LevelMatePRO system is the easiest way to level your motorhome on blocks. Or jacks. Or both.
The LevelMatePRO uses Bluetooth and a 3-axis digital accelerometer, wirelessly reporting the height needed to level your RV by sending that info to an app on your phone or tablet.
Note that the LevelMatePRO doesn’t do the leveling for you. Similar to some hydraulic systems, it tells you how much height to add and to which position to add it. But it’s incredibly precise, with a digital level and very exact tolerances. To use the LevelMatePRO, you simply install it in your rig (very easy DIY job) and download the app.
Once you arrive at a campsite, turn the LMP on and open the app. You’ll see side-to-side and front-to-back diagrams of your rig, showing exactly how much to raise each corner to get your RV perfectly level. One of our favorite things is what it does for boondocking. To avoid raising the rig more than needed, you really want to set up camp on the most level spot possible.
When we stop on what looks like a level spot, we fire up our LMP and it shows us how level we really are (or aren’t). It’s amazing how rolling just a few feet forward or backward can make a major difference. And since it tells us exactly how much we have to raise the front, rear, or side of the RV, we know in advance if we’ll be able to get level (after 18 years in our Mountain Aire, we know the maximum available travel on the jacks).
It even makes using leveling blocks easy. Usually, for RVs that don’t have built-in jack systems, it’s hard to estimate how much height is needed under each corner. You need to figure out how many leveling blocks you need and where to place them. The LevelMatePRO tells you exactly how much height is needed at each position, allowing you to precisely level your rig on the first try, every time.
The best way for us to demonstrate the accuracy and ease of use of the LMP is with our video about it, below. Here, we share our enthusiasm for the LevelMatePRO with our friends Brian & Melissa of RV with Tito.
The LevelMatePRO is available on Amazon, or you can SAVE 5% on a LevelMatePRO or LevelMatePRO+ when you order from TechnoRV using the RVGEEKS Promo Code:
TechnoRV.com is a supplier of leading RV technology products that are designed to enhance your RV lifestyle. That includes items like LevelMatePRO, Viair portable air compressors, connectivity...Show More
TechnoRV.com is a supplier of leading RV technology products that are designed to enhance your RV lifestyle. That includes items like LevelMatePRO, Viair portable air compressors, connectivity equipment, and more!
Use the Promo Code "RVGEEKS" to save 5% on your entire order at TechnoRV.
Show LessYou can also check out more than 7,000 reviews of the LevelMatePRO on Amazon:

- FUSS-FREE LEVELING: LevelMatePRO is an essential RV accessory that saves you time for leveling. It provides real-time feedback on how much and which...
- SIMPLE SETUP: Simply mount this device in your vehicle with the included screws. LevelMatePRO app compatible with iOS and Android will guide you...
Now you’ve got the details on leveling a motorhome. Using these tips should help you sleep more comfortably, keep your slide-outs and refrigerator working, and allow your feet to stay out of that soapy pond at the bottom of the shower.
Free RVing Tips, Tricks, Reviews & Giveaways
As 20-year full-timers, we share everything we’ve learned about RVing over the years. Join our online community to receive a wealth of great RVing knowledge delivered daily to your inbox.
Whether you’re a new RVer or a seasoned full-timer, you’ll love the wide range of RVing topics we cover. Don’t miss a single article or any of our famous Giveaways. Subscribe to our newsletter today!
Kathy
Monday 25th of December 2023
Merry Christmas! Thanks for the article! The link for utility blocs says the item is not available. Do you know where we can get these? Would love to see them in action, too, to see if they would work for me. Currently use the lego style levelers, but they tend to break easily.
And also, a question I have, that you didn’t answer in your article is about using levelers with a dually. My new to me RV has dual rear wheels. Would I need to use levelers on both wheels or just the inner (or outer) one?
Thanks for all you do for our community!
Kathy
Tuesday 26th of December 2023
@TheRVgeeks, Thank you so much! Helpful information and I guess I'll wait until the blocks are back in stock.
TheRVgeeks
Monday 25th of December 2023
Thanks, Kathy! Merry Christmas & Happy New Year to you, too!
Thanks for the heads up on the Utility Blocks link. Unfortunately, the manufacturer (Quality Plastics) only sells them through Amazon and eBay (we checked... eBay's out of stock, too), and they often go out of inventory. If you're patient and keep looking, they'll likely come back in stock after the holidays. To see the Utility Blocks in action, check out this article: The Best RV Leveling Blocks for Any RV! It gives our reasons for why we love the Utility Blocks and has a video so you can see them in use (scroll toward the bottom of the post for the vid).
As far as lifting a dually: yes, it's recommended that you put blocks under both tires on whichever side of the RV you're lifting so that you avoid over-stressing a single tire. It makes sense since the manufacturer put the duallies on there in the first place because it was needed to support the weight of the RV properly (if it wasn't, they'd use a single-position axle instead). But, in a pinch (where you can't get a second set of blocks under the inner dually), you can get away with it for short duration (you'll read LOTS of people's posts on the forums saying they've done it, blocking under a single tire instead of both, and never had a problem). But it's not recommended and it's definitely better for the tire if you put blocks under them both.
Neal Davis
Monday 25th of December 2023
Thank you for the hints. I suspected you were headed in that direction, given some of the episodes of "The RVers." Thank you, and merry Christmas, John and Peter, and happy 2024!
TheRVgeeks
Monday 25th of December 2023
LOL! You've clearly been paying attention, Neal! Merry Christmas and Happy New Year to you, too!
Phil Fonteyn
Monday 25th of December 2023
I would really like to see an article on putting holes in your RV to run cables. I am tired of running cables (cell booster, starlink, sat TV, etc through windows or slide out seals. Pointers on putting a hole in the RV that would simplify passing cables through outer walls would be awesome
TheRVgeeks
Monday 25th of December 2023
That's a good topic, Phil... and we wish we had a good solution to offer you. PERMANENTLY installing cables isn't so bad (and there are lots of ways/options for sealing them up), but having a hole that allows you to regularly pass a wire through the wall, while still keeping it weather tight, is much harder. We'll keep looking, but we're all ears if someone else out there has any ideas!