
Recreational vehicles are not immune to wear and tear… or damage. One issue that many RV owners face is fiberglass damage. If you’re considering doing some RV fiberglass repair yourself, we’ve got a step-by-step overview of the process for you in today’s post.
Whether your RV fiberglass exterior damage is a minor scrape, a crack, a small hole, or something more extensive, knowing how to handle a fiberglass repair job can maintain your RV’s structural integrity and aesthetic appeal.
We’ll walk you through the steps to repair your RV’s exterior, helping you to restore the fiberglass surface, and bring your rig back to its former glory. If you’re unsure about working with fiberglass, today’s post should help you decide if it’s a project you’re comfortable tackling.
What Is Fiberglass?
Fiberglass is a common material used in the construction of RVs due to its lightweight, durable, and weather-resistant properties. It consists of thin layers of woven glass fibers embedded in resin.
In our post on the fiberglass RV roof, we talked about how durable fiberglass is. But even though it’s known for being tough and durable, it can still be damaged. Even minor accidents or exposure to the elements can lead to cracks, holes, or other issues.
RV fiberglass repair can also be expensive, which is why some people want to do it themselves. It can certainly be done as a DIY project, especially if the damage isn’t too extensive.
Tools & Materials Required for RV Fiberglass Repair
Before beginning your RV fiberglass repair project, you’ll want to gather all the necessary tools and repair materials.
Safety Gear
Wear safety goggles, gloves, and a mask to protect yourself from fiberglass dust and fumes.
No products found.

- Use For Non-Harmful Dusts From Sanding, Grinding, Sawing And Insulating Particles
- Proprietary Filter Technology For Easier Breathing

- All of our products will have an updated look in coming months. You may continue to see previous packaging, or a mix of new and old, as we sell...
- Nitrile industrial gloves are textured for enhanced grip. They offer excellent comfort and tactile sensitivity as well as strong barrier protection.
Fiberglass Repair Kit
An RV fiberglass repair kit usually includes fiberglass mat/cloth, fiberglass resin, hardener, and a mixing container. Note that you may not find a fiberglass repair kit for an RV specifically, but the process is the same as working on a fiberglass boat.
![U. S. Chemical & Plastics USC-58005 Fiberglass Repair Kit, Quart Repair Kit [mat]](https://m.media-amazon.com/images/I/31Vn9wb17XL._SL160_.jpg)
- Fiberglass Repair Kit, Quart Repair Kit (Mat) USC-58005

- EASY DO-IT-YOURSELF KIT to repair holes and scratches on automobiles, boats and more
- 100% WATERPROOF seal for long-lasting, durable repairs
Sandpaper
You’ll need different grades of sandpaper, including coarse (60-80 grit), medium (120-180 grit), and fine (220-320 grit).
- 🔶 PRODUCT SIZE AND CONTENTS: The package includes 25 pieces with a choice of 3 grits: 80 (5 sheets), 120 (10 sheets), 220 (10 sheets). Size: 9'' x...
- 🔧 POSSIBLE USES: Versatile use as it can be used for a variety of purposes such as carpentry, painting and plastering, as well as old weathering,...

- MORE DURABLE & REUSABLE – Our sanding discs are made with polyester film construction which makes them nearly impossible to tear. No more frayed or...
- LESS CLOGGING – Our proprietary heat-treated zinc stearate anti-clog coating sheds dust before it has a chance to clog up your disc, making these...
Sticks, Brushes, Rollers, Etc.
Depending on the size and extent of your repair, you’ll need some mixing sticks as well as disposable brushes and/or rollers. A putty knife will also be helpful.

- Perfect for Mixing small batches from 1 ounce to 4 ounces
- Small Batch Mix Sticks 1/2" x 5"

- Ram-Pro Pack of 36 Disposable Brushes.
- Specs: 5-¼” Tubular Metal Handle - 7/8” long by 3/8” wide Horsehair Tight Bristles - with 3/8” Ferrule - Overall Brush Length 6”.

- Paint Brush Set Includes 1 Ea of 1" Flat, 1-1/2" Angle, 2" Stubby Angle, 2" Flat & 2-1/2" Angle
- Paint Brushes For Interior Or Exterior Projects. Use Angle Sash Paint Brush For Cutting Crisp Lines.

- The fiberglass roller tools set is a proper balance of glass and resin with no air pockets
- These aluminum rollers set the industry standard for durability and ease of cleaning. Plastic handles are solvent-resistant for easy cleaning
Heavy-Duty Scissors
You’ll need a pair of scissors for cutting the fiberglass cloth. We keep a pair of heavy-duty scissors in our tool kit for this type of project.

- Westcott CarboTitanium scissors won the 2016 Good design award
- Carbo-titanium coating is 8x stronger than steel
Cleaning Supplies
Your cleaning supplies should include acetone or a fiberglass cleaner to prepare the damaged area.
- Product type :CLEANING AGENT
- Package dimensions :25.4 cm L x6.35 cm W x6.35 cm H
Protective Coverings
You can use painter’s tape and plastic sheeting to protect the areas surrounding the repair.

- Premium grade painter’s tape, medium adhesion for most common paint applications
- Treated with PaintBlock Technology that seals tape edges for very sharp paint lines
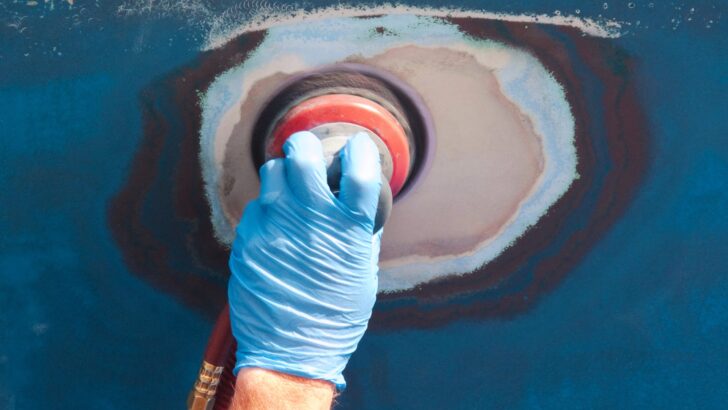
Sander
Depending on the extent of the repair you’re tackling, you’ll likely need some type of sander for smoothing the repaired area.

- 3.0-amp motor of the orbital sander spins the pad at 12,000 OPM
- Shorter height of the hand sander allows the user to get closer to work piece
Step-by-Step RV Fiberglass Repair
Safety First
The first step to any RV fiberglass repair project should be assembling and using the proper safety gear. Also, make sure that you’re working in a well-ventilated area. Fiberglass dust created by sanding isn’t something you want to breathe in.
Sand the Area
Sand the affected area being repaired. You’ll want to sand all around the damaged area, extending out a couple of inches surrounding the damage. This cleans and roughens the surface for the best adhesion of the fiberglass repair. You can do this sanding by hand or with an electric sander.


You can hand sand the area or carefully use an electric sander to smooth the area prior to repair and again after the repair has cured.
Clean the Area
Use acetone or a fiberglass cleaner to thoroughly clean the damaged area and the surrounding surface. This removes loose fiberglass, dust, dirt, grease, or contaminants that might reduce adhesion.
Prepare the Fiberglass Cloth
Using your scissors, cut the fiberglass cloth into pieces that overlap the damaged area by at least two inches on all sides. The amount of cloth you’ll need will vary based on how large and/or deep the damaged area is.
Mix the Resin
Follow the instructions provided with your fiberglass repair kit to mix the resin and hardener. Usually, this involves combining the two components in a specific ratio and stirring thoroughly.
NOTE: The clock begins ticking as soon as the hardener is mixed into the resin. You’ll only have so much time before it begins to harden, so be sure you’re ready to start working immediately. Check the instructions to see how much time you have before the resin begins to harden and cure.
Apply the Resin
Use a disposable brush (or a roller for larger jobs) to apply a layer of resin to the damaged area, coating it evenly. If you’re not sure why a disposable brush is needed, you’ll see why after the resin cures, and the brush is as hard as a rock. Any brush used for fiberglass work is single-use only!
Apply the Fiberglass Cloth
Place the cut fiberglass cloth over the wet resin and press it down gently. Apply more resin on top of the cloth and work it in to remove any air bubbles. Be sure ALL of the fabric is completely soaked with resin. You want to use enough resin to saturate the fabric completely, but not so much that it runs down the side of your rig.
Repeat this process if necessary, adding layers of fabric and resin until the repair is at least level with the surrounding surface. The deeper the damaged area, the more layers of cloth will be needed.
Let it Cure
Allow the repair to cure according to the manufacturer’s instructions. This typically takes several hours or overnight. When fiberglass resin cures, it will be as hard as the surrounding fiberglass.
Sand and Smooth
After the repair has cured, use sandpaper to smooth the surface. Begin with coarse sandpaper to level any bumps or excess resin, then progress to medium and fine grits for a smooth finish. Your rig’s surface is smooth, so you’ll want your RV fiberglass repair to match!
The goal is to make it flat and level with the original fiberglass surface surrounding the repair. This is why we added layers of fiberglass cloth and resin until it’s at least at the same level as the original/surrounding surface. If, after sanding, any part of the repair is below the original level, it may require a second coating of resin (and possibly more fabric), depending on how you plan to finish the surface (either paint or gel coat, in the next step).
After the final sanding, clean the area thoroughly to prepare the surface for the final step — gel coating or priming & painting.
Finish and Paint
Once the RV fiberglass repair is smooth, you can finish the job by applying a matching gel coat or paint to blend it with the rest of your RV’s exterior. If painting, follow the instructions on the paint can, including priming and multiple coats as needed.
The decision of whether to use gel coat or paint is usually based on your rig’s original finish. If the fiberglass on your RV is unpainted, its color is impregnated in the gel coat. So you’ll likely want to use gel coat to match it. If your rig has paint over fiberglass, you’ll likely want to match that when completing your repair.
Either way (paint or gel coat), you’ll want to match the original color of your rig as closely as possible to make your fiberglass repair as invisible as possible.
NOTE: For minor repairs, like very small cracks or holes, you may be able to skip the resin-and-fabric entirely, and fill the damaged area with color-matched gelcoat only.
RV Fiberglass Repair Final Touches
Remove any tape or plastic sheeting, and inspect the repair. Clean as needed with fiberglass cleaner. Keep in mind that repairs vary depending on the type of damage, how bad it is, and whether the surface is painted or not, and there are several ways to tackle the job. That said, check out the following video for a general idea of what might be involved in your RV fiberglass repair project.
Repairing fiberglass damage on your RV may seem daunting, but with the right tools, materials, and some patience, many RVers can do the job themselves. If you’re uncomfortable repairing RV fiberglass exterior damage, or your rig has more serious damage (or fiberglass delamination), you may want to contact a repair service or body shop to handle your fiberglass RV repair.
Googling “RV fiberglass repair near me” should give you a good start toward identifying a shop capable of doing fiberglass repair.
Free RVing Tips, Tricks, Reviews & Giveaways
As 20-year full-timers, we share everything we’ve learned about RVing over the years. Join our online community to receive a wealth of great RVing knowledge delivered daily to your inbox.
Whether you’re a new RVer or a seasoned full-timer, you’ll love the wide range of RVing topics we cover. Don’t miss a single article or any of our famous Giveaways. Subscribe to our newsletter today!
Lydia
Sunday 24th of September 2023
Is there a glue you recommend to glue marine grade vinyl onto fibreglass?
TheRVgeeks
Monday 25th of September 2023
Oh boy, Lydia. We've never encountered that situation, so we're not sure what to recommend. You may want to check with the vinyl supplier... or at a marine supply shop. They may have some suggestions.