Window awnings keep your RV cooler and all RVers know how important that is. They can also allow a window to be kept open when it’s raining. But many RV windows come without awnings protecting them.
Awnings can also degrade over time and fail for various reasons, requiring replacement. Fortunately, installing RV window awnings isn’t rocket science even if there’s never been an awning over that window before.
We installed a window awning over the large curb-side living room window on our Newmar Mountain Aire. Even though it was beneath our large patio awning, there were times when having the main awning extended didn’t make sense (in windy conditions, or when we were away from the RV, for example), but we still wanted to have the window shaded to help keep the rig cooler.
In this post, we’re providing a step-by-step guide (video included) to help you tackle this project yourself with confidence.
- 1) How to Measure for New RV Window Awnings
-
2)
How to Install Window Awnings on an RV
- 2.1) Gather the Items You’ll Need for a New RV Window Awning Installation
- 2.2) Lay Out All New Awning Parts
- 2.3) Measure the Awning Rail and Mark the Center
- 2.4) Measure and Mark for Awning Placement
- 2.5) Mark the Center of the Window
- 2.6) Prepare and Place the Awning Rail on the RV
- 2.7) Mark Your Drill Bit with Electrical Tape
- 2.8) Attach the Awning Rail to the RV
- 2.9) Slice Away Excess Putty/Butyl Tape
- 2.10) Prep the Rail, and Attach the Awning Arms to the Roller Tube Assembly
- 2.11) Slide the Entire Awning Assembly into the Rail on the RV
- 2.12) Center the Roller in the Rail
- 2.13) Position the Foot Brackets
- 2.14) Mark the Foot Bracket Holes on the RV
- 2.15) Drill the Foot Bracket Holes
- 2.16) Install the Foot Brackets
- 2.17) Install Foot Covers
- 2.18) Attach the Strap Hanger Bracket
- 2.19) Secure the Top of the Awning into Place In the Rail
- 3) Where to Buy an RV Window Awning for DIY Installation
- 4) Free RVing Tips, Tricks, Reviews & Giveaways
How to Measure for New RV Window Awnings
Before we get to the steps required for RV window awning installation, there are a few things you need to know about inspecting the area and measuring for an awning.
Inspect the Area for Potential Obstructions
First, you should inspect where you plan to place the window awning to be sure there aren’t any obstructions above or alongside the window you plan to cover, such as patio awning arms, vents, etc.
Measure the Area Where You’ll Be Installing the RV Window Awning
Measure the width you plan the window awning to be and make sure the area is clear for the mounting rail, roller, and support arms.
Identify the Awning Brand, Make, and Model and Check Installation Recommendations
Identify the brand, make, and model of the window awning you intend to buy, and find the installation instructions from the manufacturer, which are often available online. Carefully go over the steps they recommend, including measuring/sizing.
For example, you may need to measure how far beyond the width of the window they recommend the awning extends and how high above the window the mounting rail gets installed, etc. Make sure all of the specifications will work for your installation.
Allow for Extra Width
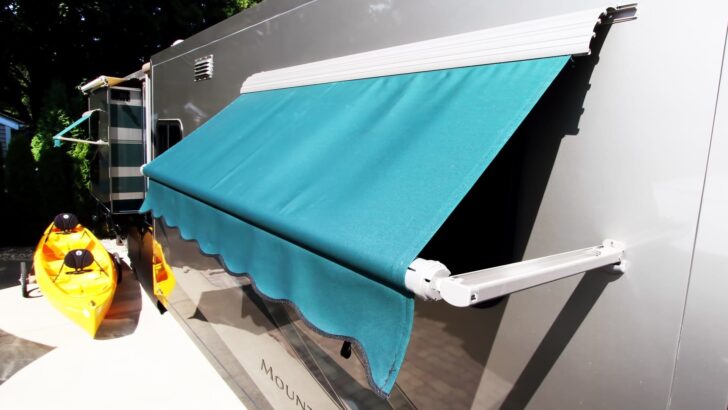
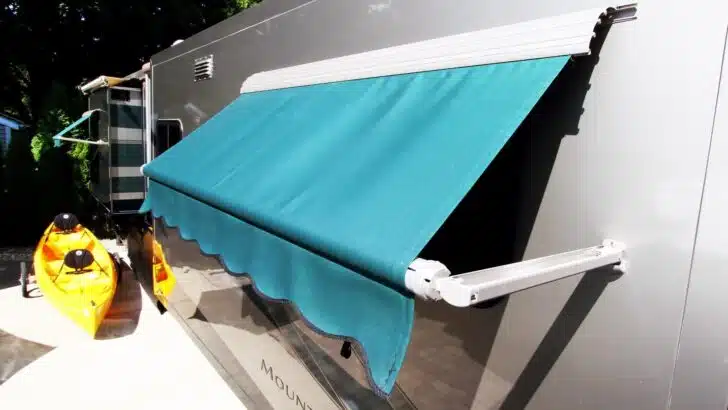
One thing we hate about most RV window awnings that come from the factory is their width. They tend to be hardly any wider than the window itself. If, like us, your rig has windows that slide to the side (vs flip-up/flip-out style windows), it can rain in.
Extending the window awning can, of course, block rain from coming in. But if it’s even a little bit windy, that can easily blow rain in from the side. That’s why, as you’ll see in the photos and video below, we opted to buy an awning that was wider than almost anything we’ve ever seen in a factory installation. Ours extends out nicely on each side of the window.

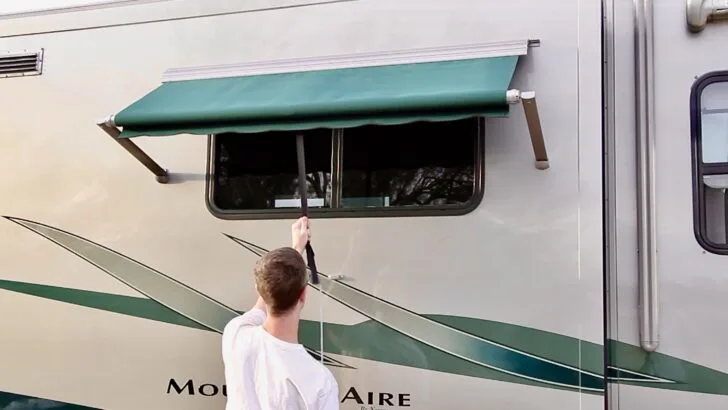
As John extends our new window awning, you can see that we ordered one that’s MUCH wider than any factory-installed awning we’ve seen. We had the space for it, and now we’re better protected from both rain and sun.
If you have the room, we recommend installing a window awning that’s at least several inches wider than even what the manual recommends to help keep both rain and sun out. We often see minimally-sized window awnings that don’t protect as well as they could have if they extended out just a few inches more on each side.
So, if you have room for it, consider going for a wider window awning, like we did. Once you’ve done all of the above, you can order the correct size awning(s) for your RV’s window(s).
How to Install Window Awnings on an RV
Here are the tools and supplies you’ll need, as well as the steps to follow for installing a new RV window awning. Keep in mind that we did this in a location on our rig where no awning was ever installed before, not as a replacement project. But many of the steps are the same as completely replacing a broken or defective awning.
Note that we completed our window awning installation in 2014 using a Dometic Elite Series awning. Depending on the brand of awning you’re installing (we like the idea of matching other awnings on the rig), and what year it is, details will vary. Even today’s Dometic awnings have had some updates to their design. But most of the details we’re sharing will apply to most window awnings.
Gather the Items You’ll Need for a New RV Window Awning Installation
- New awning roller, fabric, arms, and installation hardware
- A roll of butyl/putty tape
- Scissors
- Tape measure
- Slot head screwdriver
- Phillip’s head screwdriver
- Pliers
- Felt-tip marker
- Drill & drill bits
- Square-head (Robertson) driver bit
- An old pair of athletic socks (long socks are best)
- Plastic knife or plastic putty knife
- Electrical tape
- Pop riveter (for aluminum RVs)
- Step ladder
- A mat to lay out all the parts and work on
Lay Out All New Awning Parts
It’s helpful to lay out all of your new awning parts and identify them so you’ll be sure everything is there and you’ll be prepared when each part is needed.
Here you see all of the parts of a brand new awning we installed on our Newmar Mountain Aire. Note that because our awnings are Dometic Elite series, our parts include a metal wrap that prevents billowing on the highway. Your awning may not include this part.
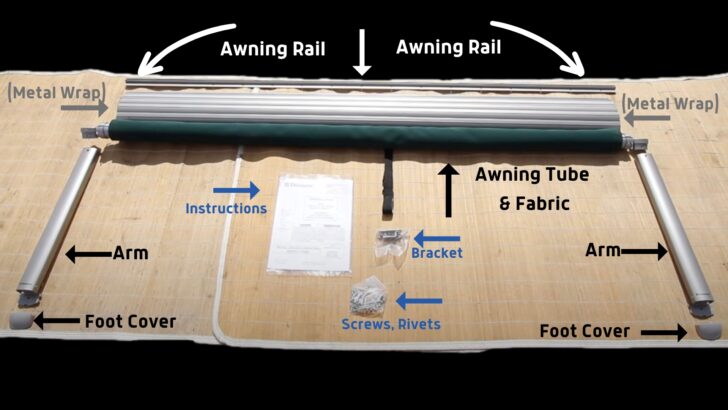

Here you see the parts that were included with our new window awning which was part of Dometic’s Elite series.
We installed our awning rail using Robertson (square head) screws which require a square driver bit.
On fiberglass RVs (like our Newmar), Phillip’s head screws are used to install the awning arms. On aluminum RVs, the arms are attached with Oscar rivets which have splits along the shaft to ensure a wide grip.
Measure the Awning Rail and Mark the Center
Measure the new awning rail to confirm that it’s the exact length you ordered. Then, use a felt-tip pen to mark the exact center point of the rail.
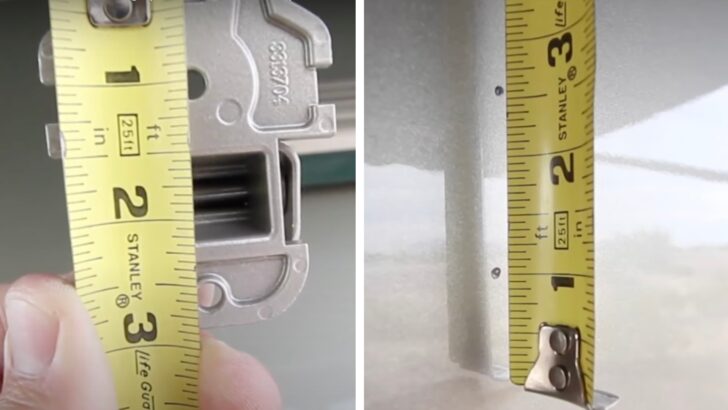
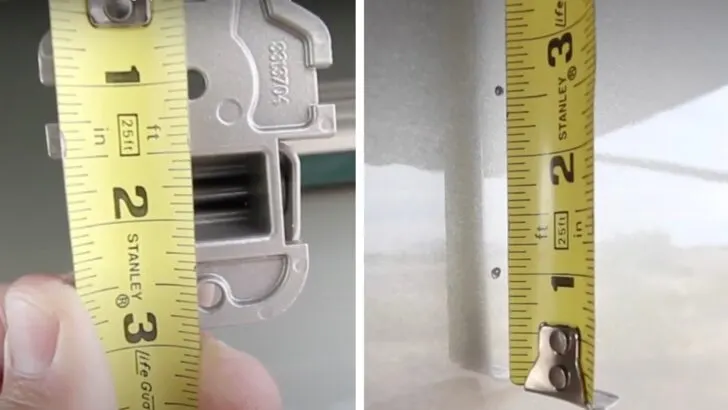
Measure and Mark for Awning Placement
To determine the correct position of the awning rail above the window frame, measure the diameter of the end of the fabric roller tube assembly. In the photo below, you can see that ours measures almost exactly 3 inches.
Then, using the roller tube’s diameter measurement, use your Sharpie to mark that distance onto the side of the RV above the window frame in 3-4 places along the window. In our case, we make several small dots with our felt-tip pen, exactly 3″ above the window frame.
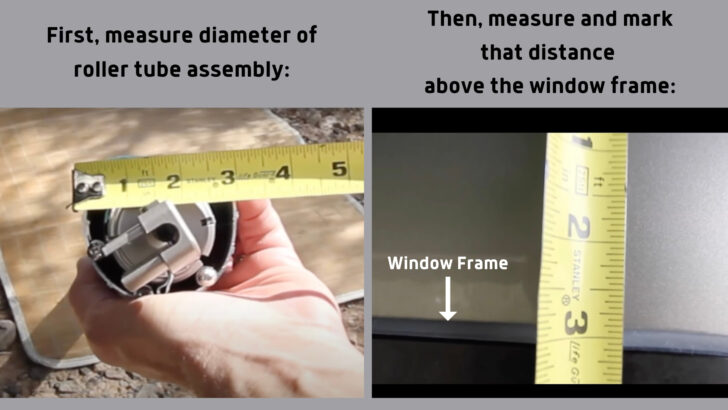
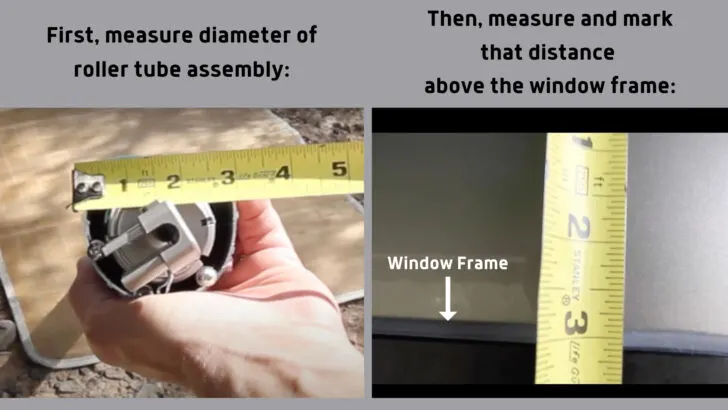
Measure the diameter of the roller tube assembly (left) and then use that measurement to mark the distance above the window frame where the awning will be installed (right). Our 3″ diameter roller assembly means we placed several small marks 3″ above the window frame, all along the top of the window.
Mark the Center of the Window
Re-confirm the width of your window and mark the exact center point above the window frame. Make your marks the same distance above the window frame that you determined in Step 4.
In our installation, we marked the outer wall of the RV in the exact center of the window, exactly 3″ above the window frame. You’ll be lining this mark up with the mark you made in the center of the awning rail which will then center it above the window.
Prepare and Place the Awning Rail on the RV
Unroll some of the butyl/putty tape and apply it to the back of the awning rail, pressing it lightly into place along its entire length. Cut the tape even with the end of the rail and then peel the backing paper off.
Carefully place the lower edge of the awning rail along the marks you made above the window, making sure to line up the center mark on the rail with the center mark on the side of the RV above the window.
Once the rail is lined up, perfectly centered, and straight along the marks, press it snugly against the wall of the RV. The putty tape will hold the rail in place for now until you install the screws.
Mark Your Drill Bit with Electrical Tape
To avoid cracking the fiberglass or finish as you screw the awning rail in place, you’ll want to pre-drill the holes for the awning rail screws.
The following tip is one you can use going forward in all sorts of drilling applications. It will help you avoid drilling too deep any time that’s a concern.
PRO TIP: Wrap the correct size drill bit (we used a 1/16″ bit for this purpose) with several turns of electrical tape, leaving about 1/2″ of the drill bit exposed. The tape will act as a guide to prevent you from drilling deeper than necessary into the wall of the RV.

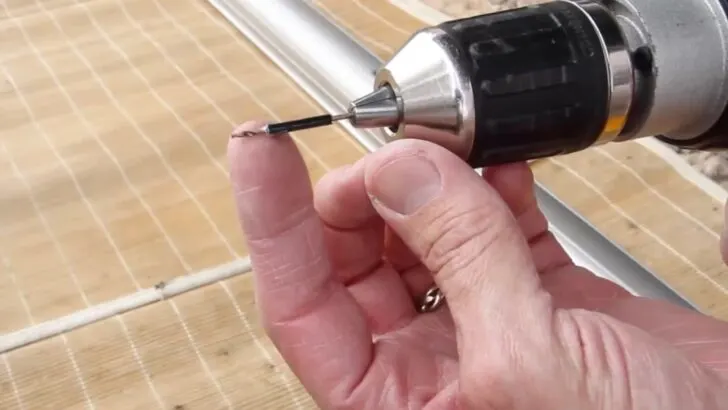
Wrapping the drill bit with several turns of electrical tape will prevent you from drilling deeper than necessary into the wall of the RV.
Attach the Awning Rail to the RV
After re-confirming (measure twice, cut once!) that the center Sharpie marks are perfectly aligned and the rail is straight along the other marks, drill the center pilot hole first. Only drill until the bit goes through or until the electrical tape guide touches the side of the RV.
Install the center screw and then check one last time to be sure that the bottom of the rail runs perfectly straight along the marks you made above the window frame. Now you can pre-drill the remaining holes and install the rest of the screws, securely attaching the awning rail to the side wall of the RV above the window.
NOTE: Be sure to avoid over-tightening the screws. The potential for stripping out the holes isn’t worth the risk. We use a cordless drill to make the job go much faster. But we set the torque all the way down to 1 to start, increasing it as needed based on how hard the fiberglass is.
We also suggest doing the final tightening/torquing of each screw by hand, especially if you’re not 100% confident you won’t strip the holes with your cordless drill.
Slice Away Excess Putty/Butyl Tape
Once the awning rail is fully installed, you’ll notice that the pressure of tightening the screws will press/squeeze some of the putty tape out along the edge of the rail. This is completely normal, as it ensures that the installation is watertight.
Use your disposable plastic knife or plastic putty knife to gently cut away the excess putty.
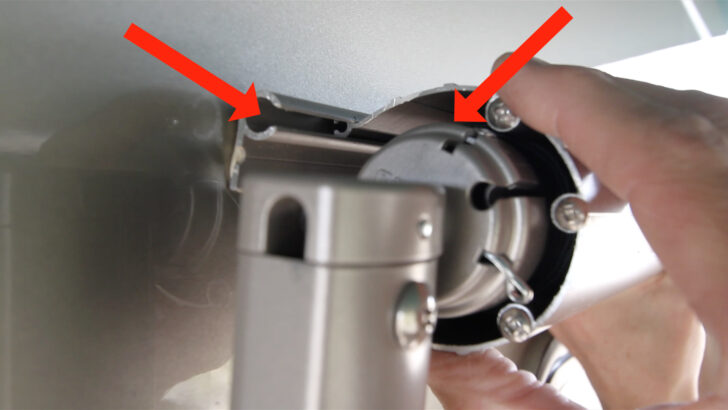
Prep the Rail, and Attach the Awning Arms to the Roller Tube Assembly
Using a flat-blade screwdriver, gently spread the opening in one end of the awning rail slightly to make it easy to slide the awning into the rail.
Using the supplied Phillip’s head screws, use your Phillip’s head screwdriver to attach one of the arms to one side of the roller tube assembly, and then do the same on the other side.
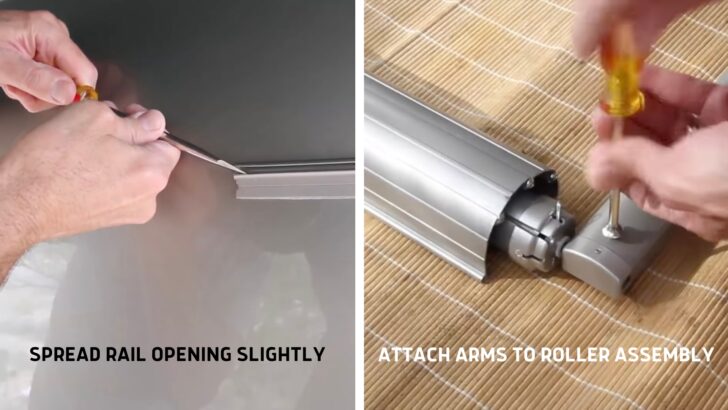

Spread the rail opening just slightly to allow easy attachment of the assembly (left). Then, attach the two awning arms to the ends of the roller assembly (right), using the included Phillip’s head screws.
Slide the Entire Awning Assembly into the Rail on the RV
If you were wondering what the long athletic socks were for, this is where they’ll protect the finish on the side of your RV. Slide a sock over each of the two arms of the awning assembly to prevent them from scratching the RV during this step.
Our instructions suggested unwrapping the awning (or the wrap on Elite models) one full turn. However, unwrapping it too far will leave the spring without enough tension to hold the awning tightly closed. For this reason, we prefer to keep the awning wrapped as much as possible, only unwrapping it as much as necessary, if at all.
Slide the entire assembly into the awning rail from the side where you spread the opening with your screwdriver. With the arms swung out slightly, the awning should slide easily into the track without unrolling it an additional turn. We left ours completely rolled up, and think this is a better choice than unrolling any fabric at all. Once installed this way, the spring tension was excellent.
Center the Roller in the Rail
Using your tape measure at each end, slide the assembly side to side as needed to perfectly center the roller on the rail.
Position the Foot Brackets
With your felt-tip marker handy, slide one of the athletic socks off, being careful not to scratch the side of the RV. To get the brackets/feet at the end of each arm (it’s funny that a foot is found at the end of an arm 😂) positioned correctly, push each arm upward. You want the top of the roller tube to line up with the center of the awning rail’s track.
It’s a good idea to have this visual in mind since it’s so important for getting the screw holes for the feet positioned correctly.

To get each awning arm’s foot positioned correctly before drilling, push the arms straight upward until the top of the roller tube lines up with the center of the awning rail track.
Mark the Foot Bracket Holes on the RV
Hold each arm square to the window by measuring the distance from the window to the arm at both the top and bottom of the window frame. Again, be sure to push upward on the arm and the end of the roller assembly so that the top of the roller tube is even with the center of the awning rail track.
Once you’ve confirmed that you’re holding the arm square to the window and at the correct height, use your Sharpie to mark a small dot on the side of the RV through the lower hole of the foot bracket. Following the “measure twice, cut once” mantra, we always double-check the placement of the mark to be sure it’s correct before drilling.
Next, measure the distance between the two mounting holes in the foot bracket. Then make a second mark exactly that distance directly above the lower mark.
Now you can complete the exact same measuring and marking process on the other side of the window. Hold the arm up to align the top of the roller with the center of the rail’s track, making sure the arm is square to the window; mark the lower hole; mark the upper hole the same distance directly above the first mark.
You should now have four little dots marked on the side of your RV, two on each side of the window, all set for drilling the four pilot holes for the feet.
On the left you see us measuring the distance between the mounting holes in the foot bracket. We then made a second mark exactly that distance directly above the lower mark on each side of the window.
Drill the Foot Bracket Holes
For our RV’s fiberglass walls and the included mounting screws, we used a 1/8″ drill bit and the same electrical tape trick we shared earlier. Carefully drill all four pilot holes that will be used to mount the feet with Phillips head screws, two on each side of the window. Be sure to drill slowly, only going as deep as needed to get through the wall.
For aluminum-sided RVs, you’ll be using Oscar rivets and a pop rivet gun instead, drilling the appropriate-sized hole for those first. Again, be sure to drill slowly and carefully so that you can stop without going any deeper than needed into the outer wall of the RV.
Install the Foot Brackets
Press four small pieces of putty/butyl tape onto the back of the two foot brackets, one over each of the four holes, and remove the backing paper.
One at a time, hold each arm up into position and install a Phillips head screw through the lower mounting hole on each bracket.
Use a pair of pliers, straighten, remove, and discard the two cotter pins, one at each end of the roller tube assembly. Those were in place for shipping only and are no longer needed.
Now pull down on the awning strap to fully extend the awning. This will pivot both arms down and straight out to about 90° which will expose the upper mounting holes on both feet. You can now install the two remaining Phillips head screws, one into each of the upper foot bracket holes.
NOTE: Because the hanger/bracket for the strap hasn’t been installed yet, you’ll need to hold the strap down while installing the two upper foot bracket screws. This is a great time to have the assistance of a helper.
Use your disposable plastic knife to slice away any excess butyl tape that may have squeezed out from the sides of the foot brackets. Again, this is totally normal and assures a waterproof installation. If none squeezes out, that’s okay, too. As long as you covered all of the holes with tape before screwing the foot into place, you should be good to go.
Install Foot Covers
Press both included foot covers onto the brackets and snap them into place.
Attach the Strap Hanger Bracket
Pull the strap down to fully extend the awning. Then insert the strap hanger bracket through the top loop of the strap (if your strap has more than one look) and position the bracket against the side of the RV. Make sure the strap is centered in the roller tube and is aiming straight down.
Mark one of the holes with your Sharpie, then retract the awning. Then mark the second hole using the first mark and the bracket as a guide.
Again, drill pilot holes for the two screws that will secure the strap hanger bracket to the side of the RV. You’ll be using Phillips head screws for fiberglass RVs and Oscar rivets for aluminum RVs, so again be sure to use the correct drill bit.
Apply putty tape to the back of the bracket and screw or rivet it into the side of the RV. Again, use your plastic knife to clean away any excess putty after you’ve attached the bracket to the side of the RV.
Secure the Top of the Awning into Place In the Rail
Confirm that the awning is centered on the track by rolling it in and out a couple of times. If it’s positioned properly, the fabric will roll in and out smoothly and flat. Adjust slightly left or right if needed.
Once you’ve confirmed that the roller and awning assembly is centered, install the included self-drilling screws to hold it in place, one at each end of the track. Come straight in from the top as you install the screws tightly against each end of the awning.
Congratulations! You’ve now completed the installation of your new RV window awning.
If you’d like to see a visual step-by-step tutorial for installing an RV window awning, use our video below as a guide:
Where to Buy an RV Window Awning for DIY Installation
The biggest names in RV awnings are:
- Dometic/A&E
- Carefree of Colorado
- Lippert (Solera model)
- Girard
- RecPro
We got our window awning by calling the nearest RV dealer and having them order what we wanted. Most online retailers sell replacement parts, but not entire window awnings, so contacting an RV dealer near you might be your best bet, too.
If you already have a window awning and the hardware is still in good shape, you can replace just the old worn-out fabric. We’ve highly recommended Tough Top Awnings for years as the best awning and slide-topper replacement fabric we’ve ever seen. Over time, we replaced every single awning and topper on our rig with TTA fabric, and it’s way better than the original.
Be sure to use our RVGEEKS coupon code to save $$, and tell Tyler we said “Hi!”
The original equipment fabric that comes on RV awnings and slidetoppers is... well, how do we say this?... CRAP!. It's no surprise, since the RV manufacturers are looking to cut their costs...Show More
The original equipment fabric that comes on RV awnings and slidetoppers is... well, how do we say this?... CRAP!. It's no surprise, since the RV manufacturers are looking to cut their costs. Instead of replacing it with the same stuff that failed in the first place, get high-quality replacement fabric from Tough Top Awnings, instead.
Check out our Tough Top Awnings videos here
Plus you can save 5% on your entire order from Tough Top Awnings. The coupon code is valid online or over the phone!
Show LessFree RVing Tips, Tricks, Reviews & Giveaways
As 20-year full-timers, we share everything we’ve learned about RVing over the years. Join our online community to receive a wealth of great RVing knowledge delivered daily to your inbox.
Whether you’re a new RVer or a seasoned full-timer, you’ll love the wide range of RVing topics we cover. Don’t miss a single article or any of our famous Giveaways. Subscribe to our newsletter today!