

In this post, we’ll discuss how to wire a 50-amp RV outlet so that anyone with a 50-amp RV can plug in right at home. (A 30-amp RV can also use it by using a dogbone adapter.)
Is this a DIY job? If you’re comfortable and have experience working with electrical systems, installing a 50 amp outlet can be a DIY job. But if you lack expertise in this area, we suggest calling on a professional to wire your 50 amp breaker and outlet. Electricity is one of those areas that can be dangerous if you don’t know what you’re doing.
If you are doing the job yourself, it’s important to take your time and be sure to wire the outlet correctly and safely.
So, let’s talk about how to wire a 50-amp outlet for an RV the right way – and the safe way.
- 1) What Is a 50 Amp RV Outlet?
- 2) What Are the Benefits of Knowing How to Wire a 50-Amp RV Outlet?
- 3) What Are the Safety Precautions to Take When Wiring a 50 Amp RV Outlet?
- 4) Do I Need a Grounding Rod When Adding a 50-Amp RV Outlet At My Home?
- 5) How Do I Mount a 50-Amp RV Outlet?
- 6) Tools and Materials Needed for Wiring a 50 Amp RV Outlet
-
7)
Step-by-step Guide to Wiring a 50 Amp RV Outlet
- 7.1) IMPORTANT NOTES:
- 7.2) Turn Off Power to Main Breaker
- 7.3) Locate or Install a Double-Pole Circuit Breaker
- 7.4) Run 4- Conductor Wire Through Conduit
- 7.5) Strip Wire Insulation
- 7.6) Connect Wires to the Home Electrical Panel
- 7.7) Mount the Box for Your 50-Amp RV Outlet
- 7.8) Connect Wires to the 50-Amp RV Outlet
- 7.9) Turn On the Power and Test the Outlet
- 8) Final Note
- 9) Free RVing Tips, Tricks, Reviews, Giveaways & More
What Is a 50 Amp RV Outlet?
Technically referred to as a NEMA 14-50R receptacle, a 50-amp RV outlet is an electrical outlet designed specifically for the delivery of 50-amp power. If you’ve seen our post on how to wire a 50-amp RV plug, you already know that a 50-amp outlet provides powerful electrical service.
A 50-amp circuit actually has two legs of 50 amps each. That means that it can provide a total of 100 amps of current at 120 volts (as long as you don’t go over 50 amps on either leg). The 50-amp RV power plug has four prongs, two of which carry 120V AC power, each with 50 amps of power, plus one neutral wire and one ground wire.
When you plug your RV power cord into this receptacle, you should be able to power all of your RV’s appliances and devices (though perhaps not all at once) in the same way you could if you were connected to shore power at an RV park power pedestal. A 50-amp RV outlet like the one we’re talking about basically provides shore power right at your home.
What Are the Benefits of Knowing How to Wire a 50-Amp RV Outlet?
The main benefits of having access to 50-amp shore power at home are to keep your rig’s battery bank charged and to give you a place to relax or work right on your home property with access to shore power that’ll power your RV’s appliances and devices. It also makes your RV a fantastic place for guests to stay while they’re visiting.
What Are the Safety Precautions to Take When Wiring a 50 Amp RV Outlet?
There are several safety precautions to take when wiring a 50-amp RV outlet:
- This one’s worth reiterating: Don’t attempt a DIY 50-amp RV outlet installation unless you have some knowledge and experience working with electricity.
- Always turn off the main breaker, shutting down all power prior to beginning any work on the installation of a 50-amp RV outlet.
- Use the appropriate wire: 6-gauge, 4-conductor UF-rated (for outdoor use) copper wire for 50-amp service. This will have two hot wires (black & red), one neutral (white), and a ground (green). You’ll need enough to run from your breaker box to your pedestal/outlet location. If you’re running a longer distance (50-100 feet), you’ll need even heavier 4-gauge wire.
The first option listed below is an industrial-strength NEMA 14-50R receptacle that’s more reasonably priced than the popular Hubbell receptacle. We’ll link to both.
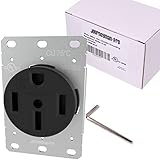
- NEMA 14-50R Flush Mount, Straight Blade, 3 Pole 4 Wire,120/250 VOLT, High Amperage Draw Use
- Heavy Duty Allen Head Screws, Constructed with High-Impact Resistant Thermoplastic Materials

Do I Need a Grounding Rod When Adding a 50-Amp RV Outlet At My Home?
A grounding rod is a long metal rod made of copper or galvanized steel. Its job is to shunt current from lightning strikes into the earth. If you’re adding a 50-amp RV outlet at your home, you don’t need an additional grounding rod for your new outlet. A location only requires one, and the service panel that feeds your house should already have one.
If you’re installing a pedestal away from the house, you live in a high-lightning area like Florida, and/or you want to install another grounding rod, there’s no code against doing so. It’s just not necessary. Also, regardless of your setup, there can only be ONE neutral-ground bond on your local power distribution panel (usually found at the incoming service panel). You can’t have a secondary neutral-ground bond.
How Do I Mount a 50-Amp RV Outlet?
You can mount your new 50-amp RV outlet onto a wall in a garage, or to the side of your house. You can also add a pedestal and mount your outlet on that if you prefer. To do that, you’d need to secure a 4×4 into the ground by digging a hole that you’ll fill with concrete.
For the purposes of this post, though, we’re assuming the outlet is being mounted to a wall or the side of the house. The outside wall of the garage is a popular choice. Remember that 50 amp plugs are heavy, so your electrical box must be mounted securely.
Tools and Materials Needed for Wiring a 50 Amp RV Outlet
Following are the tools & materials you’ll need to install a 50-amp RV outlet at your home:
- A 50-Amp 120/240-volt circuit breaker (double-pole)
- A NEMA 14-50R receptacle
- A weatherproof mounting box and face plate (or a weatherproof RV pedestal box if you’re mounting to a pedestal)
- UF-rated 4-conductor wire (6 gauge minimum) of appropriate length
- 1″ diameter conduit (protective sheathing/covering) for the wire. (If you’re running this out to a pedestal, note that you’ll need to bury it at least 24 inches deep to be code-compliant.)
- Screwdriver
- Allen wrenches
- Wire cutters
- Wire strippers
- Metal straps/clamps to secure the cables at the wall mount or pedestal and the breaker box. If you’re running wires a long distance, you’ll need additional metal straps to secure the conduit containing your wires along its route between the electrical panel and the RV outlet.
You’ll also need an available spot in your home’s electrical breaker box. (Please see notes below.) This is where you’ll install your new 50-amp 120/240-volt double-pole circuit breaker (2 handles / 2 terminals) to which you’ll connect the two hot wires (red & black).
Step-by-step Guide to Wiring a 50 Amp RV Outlet
Wiring a 50-amp RV outlet isn’t difficult, but it’s important to do it correctly.
IMPORTANT NOTES:
We’ll share the steps to safely wiring a NEMA 14-50R receptacle below, but first… your new 50-amp RV outlet needs to be connected to a 50-Amp 120/240-volt double pole circuit breaker.
You need a double pole circuit breaker because each of the two hot leads (red & black) requires its own breaker. Your new 50-amp outlet will have two hot wires because 240-volt wiring requires two, whereas 120-volt circuits require only one (and a single-pole breaker).
Perhaps most importantly, working inside your home’s breaker panel is dangerous because the panel is always energized, even after you turn off the main breaker. This means that a mistake could potentially result in a serious or even fatal shock. Unless you have electrical expertise, you may want to consider referring work inside the panel to a licensed electrician.
Turn Off Power to Main Breaker
Shut off power to the circuit at the main breaker. Place a piece of masking tape marked with a warning over the main breaker if there’s anyone else in the house who might flip it back on as you work. Again, turning off the main breaker does not disconnect power to the lines that feed the main breaker. These lines will be hot as you work, so use extreme caution.
Use a non-contact voltage tester to ensure that there’s no power going to any of the other breakers in the box.

- Be aware of voltage easily - the tip glows red and a beeper sounds when voltage is detected
- Continuous self-test so you always know it’s working
Locate or Install a Double-Pole Circuit Breaker
Either locate an empty double pole 50-amp 120/240-volt circuit breaker in your main breaker panel or install one. (Or have one installed by a qualified electrician.) Check out that procedure here.
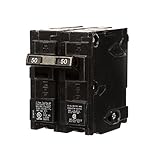
- Double pole, 50 Amp, 240V type QP Circuit Breaker
- 10,000 AIC interrupting rating
Run 4- Conductor Wire Through Conduit
Run your UF-rated 4-conductor wire (6-gauge minimum) through the conduit/protective sheathing prior to connecting the wire to your home’s electrical panel and the new 50-amp RV outlet. You can use a soft conduit or a hard PVC conduit, depending on your particular application.
Strip Wire Insulation
Strip ¼ inch of insulation from both ends of each of the 4 wires/conductors using your wire strippers.
Connect Wires to the Home Electrical Panel
At the breaker box/electrical panel, first, connect the green ground wire to the ground bus in the panel and then attach the white neutral wire to the neutral bus. Then connect the red and black hot wires to the terminals on the 50-amp breaker. It doesn’t matter which hot wire connects to which terminal. Secure your conduit using one of the clamps.
Mount the Box for Your 50-Amp RV Outlet
Pull your wires through the hole at your mounting point and mount the box for your new 50-amp outlet. Make sure it’s firmly attached to the wall or pedestal, using the appropriate mounting hardware. Again, a 50 amp RV plug is heavy, so you’ll need to make absolutely sure that your box is mounted solidly.
You can use weatherproof boxes like the ones below, or you can use an appropriately-sized electrical wall box, likely a 4″ box that’s a minimum of 2 1/8″ deep with 3/4″-1″ knockouts for your 6-gauge wire.
If you’re using a wall box, you may need a box extension as well, depending on your application, along with the appropriately sized face plate. If you buy a weatherproof box, be aware that some may come with inferior NEMA 14-50R receptacles.

- 【ETL LISTED】50 A 125V/250V RV ELECTRICAL OUTLET, NEMA 14-50R receptacle with type 3R enclosure rainproof which compatible with the normal 50A NEMA...
- 【LARGE SPACE】There is enough room to close and lock up the door while plugging in the 50A RV cord even with a big handle or heavy duty very stiff...
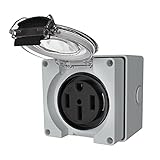
- Specifications: NEMA 14-50 Receptacle, one power outlet with protective box.ETL Listed, 125/250V, 50A, 3 Pole 4 Wire Grounding Type.Protection class:...
- Reminder: Due to the compact and lightweight design of this product, there is limited space inside. So it is not recommended to use 6AWG wire, it is...


- Single receptacle wall plate with 2 gang
- Provide solutions for a variety of industrial and commercial applications
Connect Wires to the 50-Amp RV Outlet
Connect the wires to the 50-amp outlet (NEMA 14-50R receptacle). The terminals on the back of the outlet should be labeled to make it simple.
The green (ground) wire connects to the terminal that should be labeled “green.” The white (neutral) wire connects to the terminal labeled white.
The hot leads (red & black) connect to the terminals that are likely labeled X and Y, or they may be labeled red and black. Note that it really doesn’t matter which wire (red or black) is connected to the X and Y terminals. In a 50-amp installation, they’re interchangeable.
Tighten all screws securely with your Allen wrench.
Turn On the Power and Test the Outlet
Turn on the power at the main breaker, and use a voltmeter to check for power at your new 50-amp RV outlet.
- The voltage between the hot (red & black) wires should be 240 volts.
- The voltage between each hot wire and the neutral wire should be 120 volts.
- The voltage between each hot wire and the ground should be 120 volts.
- The voltage between the neutral and ground wires should be 0 volts.
Final Note
Despite knowing how to wire a 50 amp outlet for an RV, this may not be a project you want to consider doing yourself. We’ll say it again: if you’re not comfortable working with an electrical system, it’s best to consider calling a professional to do the installation.
Learning how to wire a 50 amp RV outlet box isn’t difficult, but working in your home’s electrical panel subjects you to dangerous current even when the main breaker is off. Again, the wires coming into your house from the service at your meter are hot at all times.
We’re big DIYers ourselves, but safety is always paramount.
Free RVing Tips, Tricks, Reviews, Giveaways & More
Subscribe to our daily newsletter! We’ve been full-time RVers for 20 years (!) and share everything we’ve learned about RVing in our daily blog posts. Join our online community to receive a wealth of great RVing knowledge delivered right to your inbox.
Whether this is your first time on the road or you’re a seasoned full-timer, you’ll love the wide range of RVing topics we cover. Don’t miss a single article or any of our famous RV gear Giveaways — Subscribe today!
Dan Guyor
Monday 17th of July 2023
Hello again Peter and John - Again you are right on the money and just in time for me as my bride and I are looking to put a 50-amp pedestal in the back yard for our Class A. The location where I live requires that a permit be pulled and I plan to hire a licensed electrician to ensure everything in the panel and everything outside is just the way it should be before the inspection. I have no problem digging the trench, running the wires, and installing the outside box. I want to make sure everything is done to code the first time. I aslo want to leverage his insight as to the best way to position everything before I start digging. I had a CO in the Marine Corps who always said, "I don't need to know everything, I just need to know who does and keep them close." Thanks for another great article.
Ray Davis
Tuesday 11th of July 2023
Good article as always. I would add, however, that for several decades, NEC has required 2 ground rods 6 feet apart, with each connected to the other with a copper grounding conductor, and then to the main panel. Generally over 50 feet or more, depending on the Electric Inspector, they strongly advise adding a rod at the new outlet to reestablish ground due to the length from the main panel. Also, it is required that a metal box holding an electrical device or acting as a junction box is grounded, whether it is mounted on interior or exterior of a structure. Frequently, depending on local law, there may be a requirement to also have a shutoff at the new device box or immediately adjacent there to.
Joe Curbelo
Tuesday 11th of July 2023
This is a fantastic and very timely post for me. I will say though as comfortable as I am working with electricity, I've never worked inside a breaker panel and will hire an electrician for that. Should I consider installing another breaker outside with the outlet like they have in campgrounds? You didn't cover the recommendation of plugging/unplugging the RV with the breaker turned off. Thanks again!
TheRVgeeks
Tuesday 11th of July 2023
Hi Joe... having a secondary breaker at the outlet (assuming you have a box/pedestal that has the room for it) would be a good idea as you're right: it's best to plug/unplug the RV with the breaker turned off. If the supply breaker box isn't far away... you could always use that breaker instead. But if it's inconvenient, adding one right at the outlet/pedestal would be good.
And don't blame you for not wanting to tackle the electrical work at the breaker panel! Discretion is the better part of valor! ????