
Each spring, we service our genset as part of routine spring cleaning. And the Onan diesel generator oil change is so easy that it makes a great DIY project for almost anyone.
So, in this post, we’ll show you the step-by-step process of our Onan 7.5kw diesel generator oil change so that you can follow along and make it part of your DIY generator maintenance schedule.
One of the greatest freedoms we get from RVing is the ability to go anywhere, any time, completely self-contained. Our Onan 7.5 kW QuietDiesel RV generator is a key part of that freedom.
Proper care and maintenance of the “genny” will lead to a long life of trouble-free operation.
- 1) How Often Should You Change the Oil In an RV Generator?
-
2)
How to Change the Oil & Filter In an Onan Diesel Generator
- 2.1) What You’ll Need
- 2.2) Identify the Location of Generator Items
- 2.3) Loosen the Oil Filter
- 2.4) Turn on the Engine
- 2.5) Loosen the Oil Fill Cap
- 2.6) Loosen & Remove the Oil Drain Plug
- 2.7) Replace the Oil Drain Plug
- 2.8) Remove the Oil Filter
- 2.9) Clean the Seat of the Filter Housing
- 2.10) Lightly Coat the Gasket of the New Oil Filter
- 2.11) Install the New Oil Filter
- 2.12) Add Fresh Oil
- 2.13) Start the Generator
- 2.14) Check the Oil Level
- 2.15) Check for Any Leaks
- 2.16) Check the Oil Level One Last Time
- 2.17) PROPERLY Dispose of Your Used Oil
- 3) Remember to Exercise Your RV Generator
- 4) Free RVing Tips, Tricks, Reviews, Giveaways & More
How Often Should You Change the Oil In an RV Generator?
Changing the oil in your rig’s generator is part of regular Onan RV generator maintenance.
In our rig, the oil and oil filter are changed every year, along with cleaning the spark arrestor. Some years also call for air & fuel filter replacement and coolant system service as well.
Usually, generator service intervals are based on time or on the number of hours the generator has run. We generally don’t use our generator enough to need service more than once a year.
If you use your generator frequently and you’re putting a lot of hours on it, then you may need to change the oil & filter more often, especially if you use your RV year-round. But in general, an RV generator’s oil should be changed at least once a year, but be sure to check your owner’s manual for recommended maintenance intervals.
How to Change the Oil & Filter In an Onan Diesel Generator
To change the oil and filter in an Onan RV generator, you’ll take the steps we’ve laid out below. Note that our generator is an Onan 7.5kW Quiet Diesel RV Generator, but this process applies to many makes & models of Onan RV generators as well.
What You’ll Need
- Oil Drain Pan
- Replacement Air Filter
- Replacement Oil
- Replacement Oil Filter
- Oil Filter Wrench
- Rubber Gloves
- Socket Wrench
- 3/8″ Socket
- Rag(s)
You may also want something to lie on when you’re under the RV.
Note that you can buy Onan Generator Maintenance Kits that include all the supplies needed for various genset models. Choose the one you need for your particular generator.
Identify the Location of Generator Items
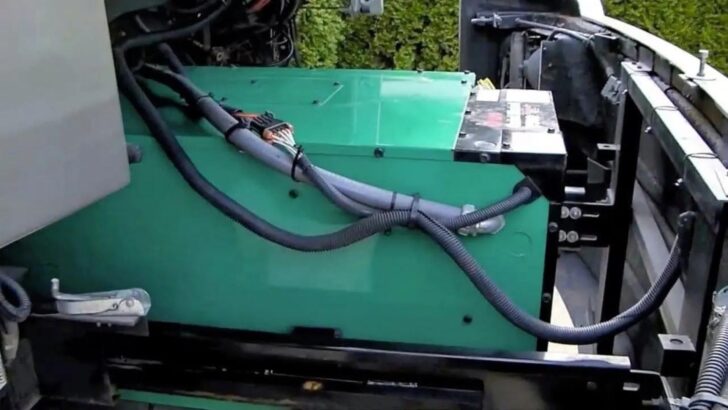
First, let’s identify the areas of the generator we’ll need to access for this job. You can refer to the descriptive photo below as a visual guide.
Oil Fill and Dipstick
You’ll find the oil fill and dipstick right on top of the generator, where they’re easily accessed.
Oil Drain Plug
Heading under the RV, you’ll find the oil drain plug right in the center. On our generator, the plug requires a 3/8″ socket to remove and replace.
Oil Filter
The oil filter is located behind a small metal access door. On our generator, the door is gold in color. You’ll need to pinch together the two releases to swing the door open, where you’ll find the oil filter.
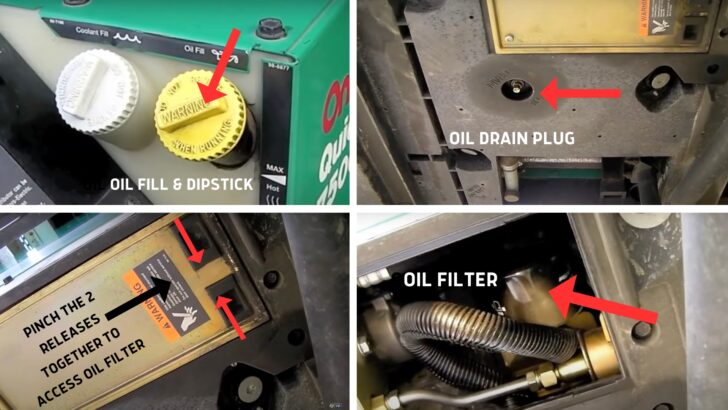
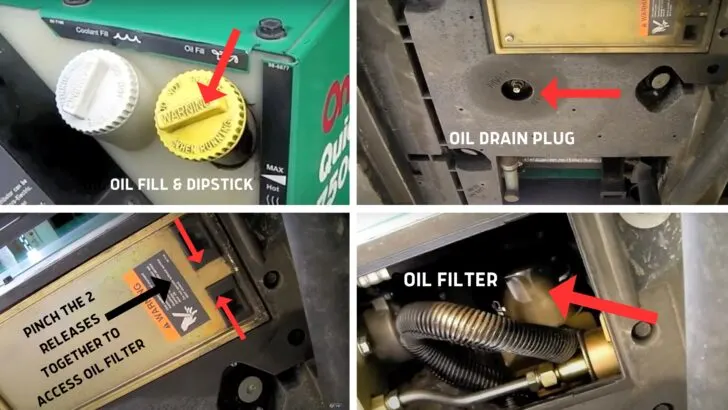
These are the areas on the generator where you’ll drain the oil, refill and check the oil, and change the oil filter. The placement of items may vary somewhat on different generators.
Loosen the Oil Filter
Before draining the oil, you’ll want to warm it up to help it run smoothly and completely out of the generator. But before you do that, we recommend using your oil filter wrench to loosen the oil filter slightly (just enough to be sure it’s loose). That way, if the oil filter is installed very tight, you won’t be fighting with it in a hot engine, possibly burning yourself.
Once you’ve slightly loosened the oil filter, hand tighten it back down prior to turning on the engine to be sure no oil comes out while it’s warming up.
Turn on the Engine
Start the generator to warm up the engine. In most cases, you should be able to start the engine using the start button on the genny itself rather than going inside the RV to use any dash-mounted start switch.
Hold the control button until it starts. NOTE: It’s perfectly normal for a cold diesel genset to take several seconds to start while the glow plugs pre-heat. Allow the generator to warm up for a few minutes until it comes down off of fast idle.
Since the goal is to warm the oil in the genset, we put a load on it for about five minutes. To do this, you can turn on the electric side of your water heater, for example.
Once the genset has warmed up, turn off all loads, let the generator go back to idle, allowing the engine to cool down for about two minutes, and turn off the generator. The oil has now been warmed up and will run out of the engine more quickly and completely, taking contaminants with it.
Loosen the Oil Fill Cap
Loosening the cap will allow the oil to run out faster in the next step. This faster rush of oil will help drain contaminants more thoroughly.
Loosen & Remove the Oil Drain Plug
Of course you’ll want to be sure to have your oil drain pan in place before removing the oil drain plug. When you remove it, use caution so you don’t get burned by hot oil. This is where wearing protective nitrile work gloves is particularly handy.
Let the oil drain as thoroughly as possible, which will likely take several minutes. It’s not possible to remove every drop of oil, but once the stream of oil has slowed to a drip, you should be good to go.
Replace the Oil Drain Plug
Once the oil flow has slowed to a drip, you can replace the drain plug, being careful to start it by hand and confirm it’s not cross-threaded. Note that, unlike a car, the generator’s plug has no crush washer.
Hand-tighten the oil drain plug, then snug it down with your socket wrench. Be careful not to tighten it too much. The most common mistake people make here is stripping the drain plug by overtightening it and stripping the threads.
Wipe off any excess oil on and around the drain plug.
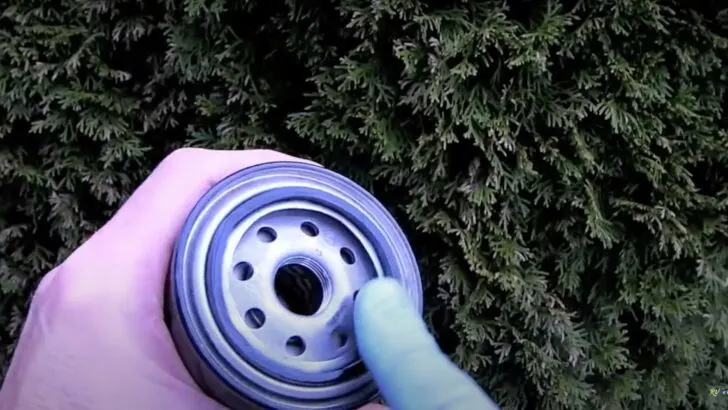
Remove the Oil Filter
Since you pre-loosened the oil filter before warming up the genset, you should be able to easily remove the filter by hand. Of course, be sure to have your oil drain pan underneath because the filter is full of oil.
NOTE: You can reverse steps 5 & 6 if you want to. Having the oil drain plug and the oil filter removed at the same time will allow the oil to run out of the drain pan and the filter at the same time. We don’t do that though, because trying to position the oil drain pan under the drain bolt and the filter mount simultaneously makes it more likely that we’ll spill oil on the ground.
Clean the Seat of the Filter Housing
Using a clean rag, carefully clean the seat where the oil filter screws onto the filter housing.
Lightly Coat the Gasket of the New Oil Filter
Use your finger to put a light coating of fresh oil on the gasket of your new oil filter. This ensures that it will install smoothly onto the filter mount without damaging the gasket.
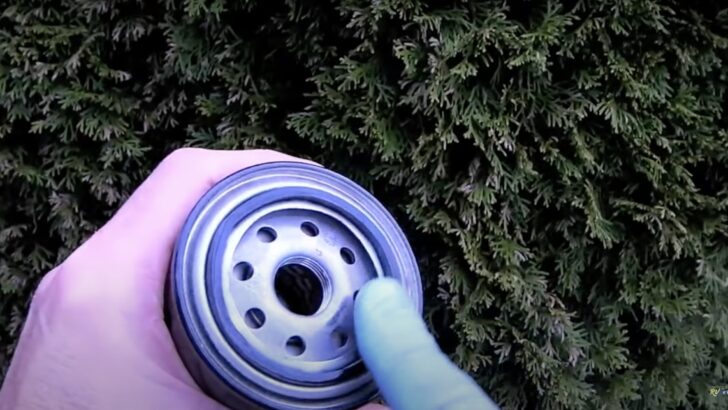
Be sure to put a light coating of fresh oil on the gasket of your new oil filter before installing it.
Install the New Oil Filter
Install the new filter. Turn it until it just touches the block, and then turn it only another 1/2 or 3/4 of a turn. Important: Never use an oil filter wrench to tighten an oil filter. The wrench is for filter removal only.
Use a rag to wipe up any excess oil around the filter. Leave the access panel open for now, so you can check for leaks after adding the fresh oil.
Add Fresh Oil
Using a clean funnel, add fresh oil through the oil fill cap. Note that the oil fill and the dipstick opening are one and the same.
PRO TIP: Add about 1/2 quart less oil than the generator’s stated oil capacity. That’s because adding more oil as needed is much easier than removing some if you overfill. And running the generator 1/2 quart low for a few minutes while you check and adjust the level won’t harm it.
Start the Generator
Run the generator for about 5 minutes to warm the engine and new oil. Warm oil will run down into the bottom of the block more completely, ensuring a more accurate reading as you do your final check & adjusting of the level.
Check the Oil Level
Shut the generator down and wait at least a minute for the oil to run down into the bottom of the engine block. Then use the dipstick to check the oil level, and add more as needed. Be sure to fill only enough to get to the “full” line and no more (see our earlier tip about not overfilling).
Add oil and re-check the dipstick as needed until the level is correct at the “full” line on the stick.
Check for Any Leaks
Check for leaks near the oil filter and oil drain fill plug. If you don’t find a leak anywhere, close the filter access door (gold metal plate), and make sure it locks securely into place.
Check the Oil Level One Last Time
We like to check the oil one final time to confirm that the level is correct as we conclude the job. Oil is the lifeblood of any engine, and double- (or triple-) checking is well worth the small effort.
PROPERLY Dispose of Your Used Oil
Be sure to dispose of the old oil properly, which can often be done where you purchased it, or at a recycling center. Never, ever under any circumstances should used oil be thrown in the trash or allowed to run onto the ground.
And that’s all there is to an Onan diesel generator oil change!
For a complete visual tutorial of this job, you can check out our video below, in which we change our generator’s oil & oil filter, air filter, and spark arrestor.
Remember to Exercise Your RV Generator
The single biggest cause of generator trouble is lack of regular use. This is why exercising a generator is so important. Sometimes we’re hooked up for fairly extended periods and don’t need the genset (or boondocking in very sunny locations where our solar panels and lithium batteries provide all the power we need).
Either way, we make sure to exercise our genny regularly. All genset owners should run their generator at least once a month for about 1-2 hours under load. For us, this means firing it up even if it’s not needed for power or battery charging and turning on both air conditioners (or heat pumps). We may also heat a tank of hot water or plug in our portable space heater.
Exercising a generator is an important part of RV maintenance. We’ve had more than one technician tell us that the generators they see with the most problems are the ones with the fewest hours on them.
If you’re having trouble with your RV generator, be sure to check out our post on motorhome generator troubleshooting.
Free RVing Tips, Tricks, Reviews, Giveaways & More
Subscribe to our daily newsletter! We’ve been full-time RVers for 20 years (!) and share everything we’ve learned about RVing in our daily blog posts. Join our online community to receive a wealth of great RVing knowledge delivered right to your inbox.
Whether this is your first time on the road or you’re a seasoned full-timer, you’ll love the wide range of RVing topics we cover. Don’t miss a single article or any of our famous RV gear Giveaways — Subscribe today!
dave lattin
Monday 3rd of July 2023
Video says to use an 11/16" socket for the spark arrestor but shows using a 16MM socket. Theyn are not the same.
TheRVgeeks
Monday 3rd of July 2023
The “16” you’re seeing on the socket is preceded by a slash, and the “11” is not visible on the side. If you freeze frame at 5:59, there you can see the 11 and the slash are visible. This is an 11/16 inch socket, not a 16 mm socket, which we mentioned correctly at least twice in the video, and never showed using a 16mm one.