
An RV is part house and part vehicle, and sometimes, after the “house” has been driven for miles and miles over bumpy roads, maintenance issues can arise. Among the potential repairs that an RV owner may face is an RV window replacement.
We faced this issue several years ago and met it head-on with our desire to DIO (Do It Ourselves) as many of our own RV maintenance and repair projects as possible. Because RV windows can crack, break, come loose or, as in our case, lose proper seal and fog over, today we’re bringing you our step-by-step guide to window replacement for recreational vehicles, showing you how to measure and install a new, high-quality RV window.
For those of you who are more visual, you’ll appreciate our step-by-step tutorial video, embedded below. If you’re partial to the written word, the steps are laid further down the page. Or enjoy both!
- 1) Tools for RV Window Replacement
- 2) How to Measure RV Windows for Replacement
- 3) Measuring the RV Window Opening
- 4) Measuring RV Sidewall Thickness
- 5) How to Measure RV Window Corner Radius
- 6) RV Window Measurement Mistakes to Avoid
- 7) Measure Twice, Buy Once
- 8) How to Order Your New RV Window
- 9) How to Install Your Replacement RV Window
- 10) Conclusion
Tools for RV Window Replacement
These are the tools we needed for our camper window replacement. Depending on your RV, you may or may not need all of these tools for your project. Or you might need a few more.
- Cordless drill
- Tape measure
- Spray bottle containing plain water
- Ruler (with measurements that run all the way to the ruler’s end)
- Scissors
- Plastic putty knife
- Painter’s tape
- Clean rag (an old towel or t-shirt will work, or pick up a pack of these)
- Rubbing alcohol
- Mineral spirits
- Caulk gun
- Pro-Flex Clear RV Sealant
- Nitrile gloves
- Folding step ladder
How to Measure RV Windows for Replacement
We had our new window custom-made by Peninsula Glass in Vancouver, Washington. They regularly ship custom RV windows, but we were on-site and had a chance to observe how meticulously their technicians work to create their products. The replacement window they made for our rig is far higher quality than the original.
Peninsula Glass can custom make almost any size or shape RV window to your specifications. No matter where you buy your new RV window, you’ll need to provide accurate measurements. Let’s break down our process for measuring an RV window for replacement.
Note that we’re measuring from INSIDE the RV.
Begin by removing any window valance, blinds, or shades.
Next, remove all screws around the perimeter of the window, and remove the inside frame.
NOTE: Once you’ve removed the inner window frame, be very careful… the outer portion of the window may not be held in by much if anything. Don’t put any outward pressure on the window while taking your measurements or it could come loose and fall. For extra safety, you may want to have a helper on a ladder outside, holding the window in place while you measure.

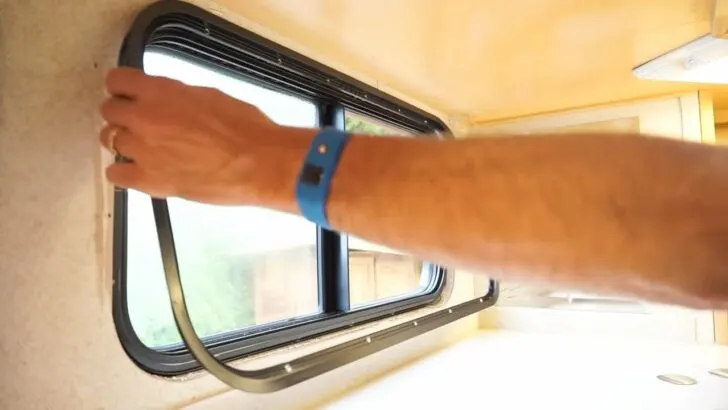
Carefully remove the frame of your old window so that you can measure the opening (NOT the window itself).
Measuring the RV Window Opening
If you’re replacing an oddly shaped window, it’s best to check with the maker of your new RV window for the exact measurements they need. For our rectangular window, we needed to take only four measurements.
Please note that we’re measuring the opening itself – not the old window. Using a measuring tape, take careful note of the width and height of the opening. It’s a good idea to take measurements at several points so you have an idea of how cleanly the window opening was cut. If the measurements vary, be sure that the ones you provide the replacement RV window manufacturer will allow the new window to fit.
Measuring RV Sidewall Thickness
Next, measure the thickness of the wall (depth of the window), from the exterior wall surface to the interior wall surface.
For this measurement, use your ruler (with measurements that run all the way to the end). Insert the ruler into the wall until it touches the outside of the window frame.
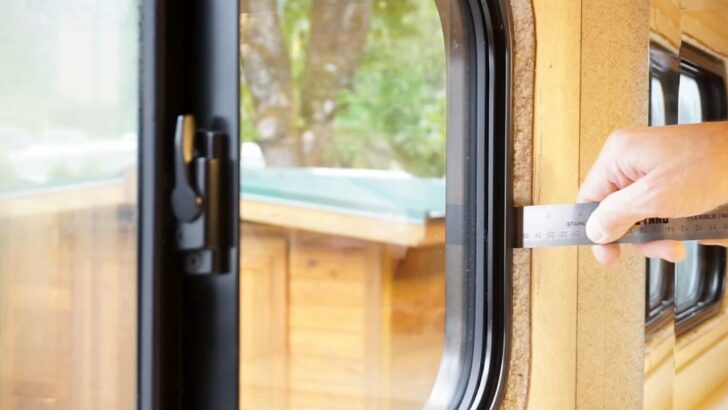

The thickness of the window is equivalent to the depth of the wall, which you’ll measure with a stiff ruler that has measurements all the way to the end.
How to Measure RV Window Corner Radius
Some RV windows have rounded corners like ours. Most have either a 2.5-inch or 3-inch radius, but it’s important to accurately measure this. Here are the steps we took to confirm this important measurement:
First, we printed out this Radius Measurement Template from the Motion Windows (Peninsula Glass) website. We used our ruler to confirm that the radius of the printed template was exactly 5 ½ inches, assuring us that the template had printed correctly (if yours doesn’t match, be sure to adjust your print settings and print a new copy until it measures exactly).
We then used our scissors to carefully cut around the edge of the printed shape, giving us our final template. Next, we placed the template against the curved window opening to confirm that our radius is 3 inches.

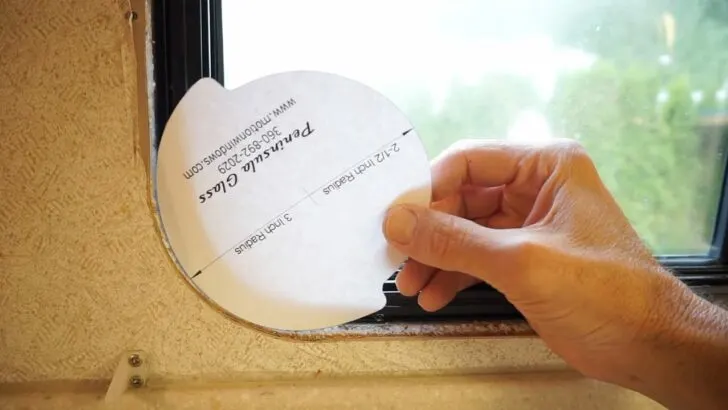
Measuring the radius of the curve of the window opening is accomplished using a template.
Now you may replace your window frame, window, valance, and shade or blinds. Yes… doing this job right does require removing some things twice. But it’s worth it, and good practice!
RV Window Measurement Mistakes to Avoid
Because accurate measurements are so important to this project, before we move on to the step of ordering the new window, let’s run through a few common measurement mistakes so that you’re sure to avoid these when measuring your RV windows.
Measuring the Window Instead of the Opening
Measurements of the old window and the window opening are often different. In fact, they can vary as much as half an inch on the sides, top, and bottom. Window manufacturers use filler strips to keep the window level and snug. This is why it’s so important to measure the opening and not the original window itself. Failing to do that could result in a replacement window that doesn’t fit correctly.
Not Double Checking Your Measurements
Measure twice, cut once, right?
Take your time to get an accurate measurement, and double-check it by measuring a second time.
Rounding Up or Down
Exact measurements are important to RV window replacement. We don’t want to loosely measure and round up or down. Always measure to the nearest 1/16th of an inch. Take a close look at your tape measure and be sure you know which are the 1/16th-inch measurements.

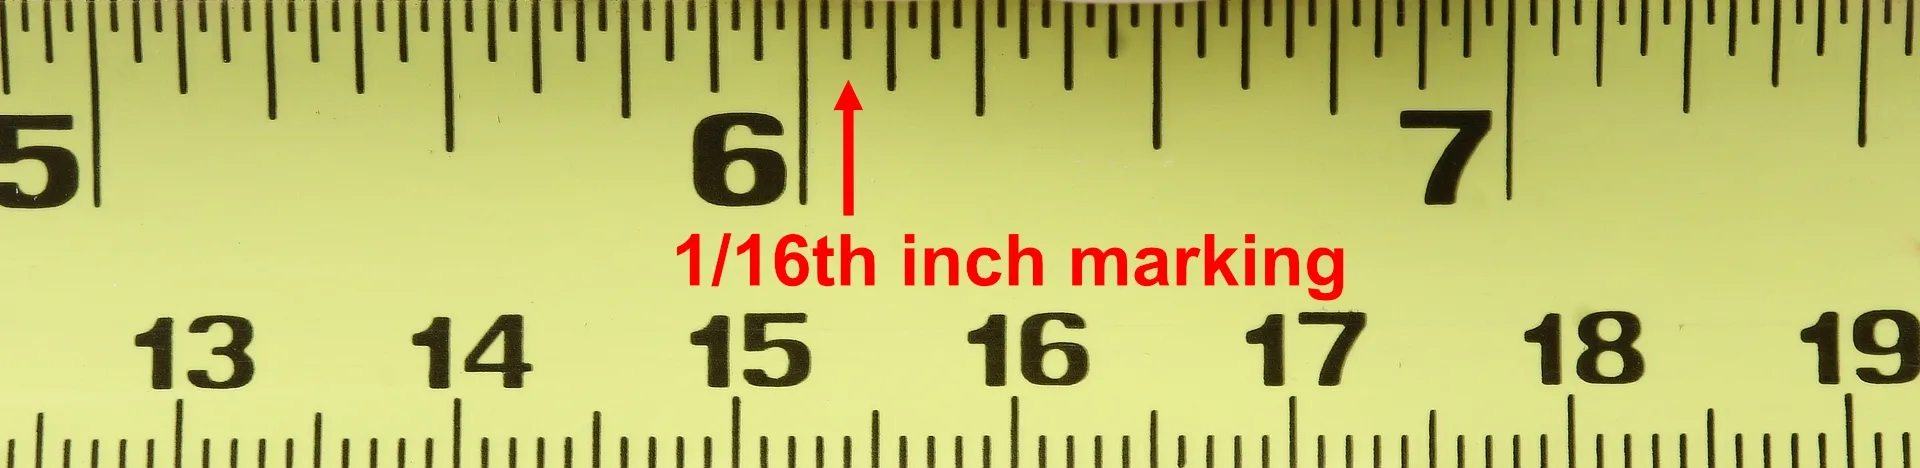
This tape measure goes down to 1/32″ markings, so be sure you know which are the 1/16th inch marks.
Not Checking Manufacturer’s Website for Guides and Tips
The window manufacturers are the best authorities on installing their products. The manufacturer of your new RV window has likely included helpful guidelines or tips to make the installation easier. These types of instructions are often included on manufacturers’ websites as well.
If your new window came with instructions in the package, be sure to keep those handy as they may have detailed step-by-step directions in an included booklet.
Measure Twice, Buy Once
We know we’ve said this already, but it’s worth repeating that when taking measurements for RV window replacement, ALWAYS measure twice, confirming accurate measurements before ordering your replacement window.
Measuring accurately for the right fit will not only make installation a breeze but will also help to prevent the bane of every RVers existence – leaks!
Now let’s move on to ordering a new RV window.
How to Order Your New RV Window
The process may differ if you’re not ordering from Peninsula Glass, but we printed out this order form, entered our information and window measurements, and placed our order.
When your new RV window arrives, follow the steps below to install it:
How to Install Your Replacement RV Window
Remove the Old Window and Prepare the Area for the New Window
First, remove the inside frame of the window just as you did when you took your measurements, again being careful not to accidentally knock the outer part of the window loose from the opening.
There may be a bead of sealant around the top of your old window or between the outer window frame and the RV’s sidewall. If so, you’ll need to remove this prior to removing the old window.
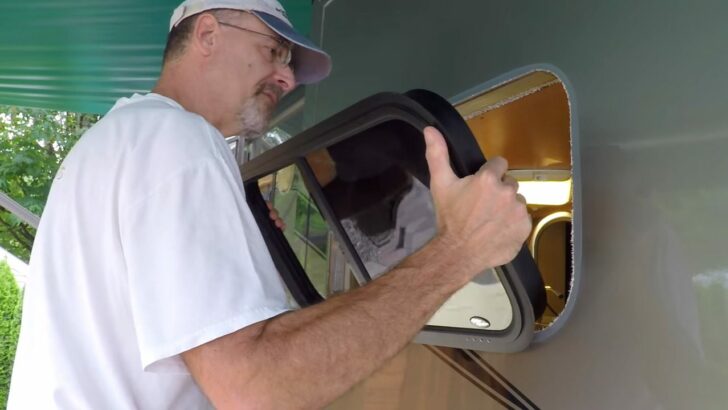
Moving to the outside of the RV, use your plastic putty knife (yes PLASTIC, to avoid scratching your RV’s finish) to carefully break the seal around the old window and remove it. Pro Tip: Be sure to have your old window OPEN, so that you can hold onto it tightly until it comes loose from the seal.
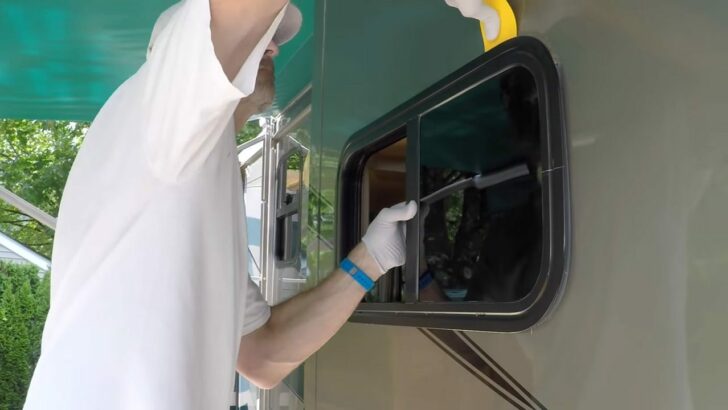

Be sure the window is OPEN so that you can firmly grasp the window as it falls out of the opening, once the seal is broken.
Scrape off any remaining sealant using your plastic putty knife, and clean off any remaining debris using mineral spirits. Give the area a final cleaning using rubbing alcohol to ensure that the area around the window opening is free of any oily residue.
On the new window, pry off the small adhesive strips that hold the ends of the inside frame together at the seams, and set the new frame aside for now. Take your new window outside and prepare to install it!
Dry Fit the New Window
With the new window open to ensure that you have a tight grip on it, set it into the opening, dry fitting it to check the alignment. If possible, have someone inside the RV take a close look, ensuring that there’s no extra space at the top of the frame.
Note: the window doesn’t have to fill the opening completely, and it’s perfectly normal for there to be some play in the window setting at this point.
If you do find that you’ve got a little extra space at the top of the window (which is totally normal), use a couple of small shims (rubber or wooden) set inside the bottom of the window sill to shore up the window and hold it as centered as possible in the opening. Dry fit the window again, to make sure that the spacing is now the same at the top and bottom of the window.
Install Your New RV Window
Begin by setting your new window on a flat surface covered with a soft cloth, with the outside of the window facing down. Clean all the way around the edge with rubbing alcohol and a clean cloth. This will ensure that the surface is clear of all residue.
Using the included roll of double-sided, closed-cell foam tape, apply the tape. Begin at the center of the bottom of the window, pressing it into place and removing the paper backing as you go. Pro Tip: Remove the paper backing of the tape just prior to rounding each corner for a perfect, flat, unbroken seal. When you reach the end, cut the tape to allow about ½ inch of the end of the tape to overlap the point where you started.
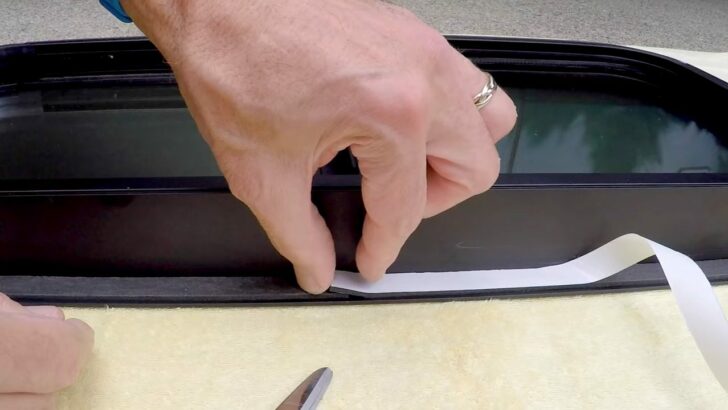

Once you’ve brought the foam tape around to meet the beginning, overlap the end of the tape about 1/2 inch, ensuring a good seal.
Use your spray bottle to spray water all around the tape. It may seem strange to wet something you want to stick, but it will help you to place the window WITHOUT it sticking to the RV sidewall. Once the water evaporates, it will allow the frame of the window to adhere to the outer wall of the RV, providing a water-tight seal.
Spray water around the perimeter of the window opening on the outside of the RV as well.
Set the new window into the opening gently – don’t press the tape into place just yet. First, ensure that you have the same amount of space on all sides of the window. Having someone inside the RV can be very helpful with this.
Once the window is positioned correctly, push against the window frame from the outside, firmly adhering the foam tape to the RV.
Put the inside frame in place and install the screws, making sure to only use the screws that came with the new window, beginning at one of the seams where you removed the adhesive tape earlier in the installation process. See our video at the top of this post for explicit instructions on the best process for screwing in the new window frame correctly.
Wipe off any excess water, press the two drain covers into place at the bottom of the frame, and pop the screen into its track. If your RV’s manufacturer used sealant at the top of your windows as Newmar did with ours, we suggest replacing that sealant at this time using the Pro-Flex RV Sealant.
Finally, congratulate yourself on a job well done, and enjoy your brand new RV window along with a wonderful sense of accomplishment.
Conclusion
RV window replacement may seem daunting, but if you take your time and follow the steps outlined in this guide, this task becomes a doable DIY project.
If you’re interested in #vanlife and are considering converting a cargo/passenger van into a custom van conversion, you can even do your own van conversion window installation using our step-by-step guide!
Geek Out with Us Every Week
Join our newsletter to learn about all things RV-related. Every week we offer free tips, tricks, product reviews, and more to our online community of RVers. Whether this is your first time on the road or you’re a seasoned expert, we’d love for you to geek out with us!
Rose
Thursday 11th of May 2023
Hi. I live in Las Vegas. I recently purchased a Jayco camper trailer. I have learned the shoddy single pane windows do not hold heat in nor keep it out. I am looking into replacing my windows this fall with double one windows. I am very curious about the caulking and tape used. I do understand to use as directed, but would it be any different, worse or better to try to “double up” or use weather stripping of a bit thicker? I appreciate any thoughts, opinions, or advice. Rose
Richard Hawley
Sunday 12th of March 2023
After watching your video, we were convinced on ordering windows from Peninsula Glass after doing a lot of research. We just received our first order and are in the process of installing them. The windows look fantastic. Our second order will consist of replacing our exit window in our class A. So my question is- Jeff suggested ordering a lift slide for the exit window instead of a push out model due to cost. Would this affect any safety issues and or resale issues if we don't replace it as a OEM replacement?
TheRVgeeks
Sunday 19th of March 2023
Good question, Richard. We can't imagine it being an issue for resale... and as long as the replacement window offers a large enough opening for use as an emergency exit, it shouldn't affect safety, either. We're in a similar boat... our bedroom emergency window is a flip-out style (the bottom portion of the window cranks out a small amount) that we love... it enables us to leave that window open in virtually any weather so we can get fresh air. It's fogged up quite a bit... and we've delayed doing anything about it because we didn't want to switch to a slide-style window. Our options are: (1) leave it as is and put up with the fogging, (2) have it removed and repaired (or repair it ourselves), (3) replace it with a simpler slide-style window (like Jeff suggested), or (4) buy a new replacement of the same style.
So far... we're sticking with option #1, the path of least resistance. ????
K Massengill
Sunday 15th of August 2021
Does this company just do 'framed' type windows with slider type glass? How about the 'frameless' one piece type that crank open from the bottom?
TheRVgeeks
Sunday 15th of August 2021
Hi K. As far as we know, Motion Windows only makes framed RV windows and doesn't currently offer frameless models. But it couldn't hurt to call them in case they haven't updated their website and/or so they know the demand is out there! ????
Ted Norin
Monday 9th of August 2021
Was just wondering why you didn’t have the foggy glass repaired. I have to say that the window you had made was way better than the OEM window. Thanks for all the great videos!
TheRVgeeks
Monday 9th of August 2021
Good question, Ted. There were a couple of reasons, really. The first was that it had been fogged up for a long time... so it was possible (likely?) that the inside of the glass had been etched and would be harder to repair. We could've used a DIY kit, removed and dismantled the window, and tried to clear the glass up before re-sealing and re-installing. But if, after all that work, we ended up with a window that still looked foggy because of etching, we'd be really upset. Plus, the DIY kits aren't all that cheap (although they admittedly come with enough supplies to do more than one window).
The other option was to remove the window and just have it professionally repaired... where, if the glass WAS etched, they could clear it up OR replace it. But the cost for that wasn't significantly less than having a whole new window made. And instead of having 100% new... we'd have the same old mechanicals, just newly-sealed (and/or new) glass.
So... we opted to get betterment and go with a totally new window. And we're 100% glad we did. The Motion Windows replacement is noticeably better than our old Hehr brand OEM windows. We literally comment about how nice it is every time we open/close it. It's just that smooth.
tommyO
Sunday 8th of August 2021
A PERFECT video for a Sunday AM. I am about to replace my entire driver's side DSDP with a factory replacement from Newmar. Luckily I am in forced "COVID" parking in my driveway in Mass to work on it.
Love your videos!!! I match them up with the IRV2 posts I read and re-read religiously and people actually believe I am fairly bright. Little do they know.
Just finished replacing fresh water tank drain valve in the wet bay. What a pain in the rump. Took the whole panel off...frightening but completely doable.
Best wishes to all....STAY HEALTHY !!
tommyO' CW5(R)
TheRVgeeks
Sunday 8th of August 2021
Hi Tommy! Thanks so much for the kind words. Nice to hear you're all done with a pain of a project and headed to glory on what will hopefully be a much easier one! Safe travels.