
Are you avoiding drinking the water you have available in your motorhome or trailer? If purchasing bottled water has become a chore, it may be time to rethink the idea that you can’t drink straight from your rig’s RV water system. It’s safe, as long as you sanitize your RV water system periodically.
We’re here today with your step-by-step guide for providing safe drinking water by sanitizing your fresh water tank!
Why it’s Important to Sanitize
If you notice that your fresh water has an unusual odor, tastes funny, or if you suspect it’s been contaminated, your first response should be to sanitize the RV water system.
Leaving any water in the tank can create a perfect environment for bacteria, especially in hot climates. So flushing out the current water, cleaning the tank and lines, then filling the tank with fresh, potable H2O will give you confidence in knowing that drinking, showering and washing dishes are totally safe again.
How to Sanitize your RV Water System (Step by Step)
This step-by-step guide has many parts, but don’t get overwhelmed. We broke it down into the most simple terms possible, and many of the steps are as easy as turning on a faucet.
Here’s what you’ll need in the way of equipment:
- Clean gallon pitcher
- A gallon of plain liquid bleach (without added fragrance, and preferably new, as bleach does age and degrade if stored for long periods of time, making it ineffective for sanitizing)
- Measuring cup
Step 1: Start with your fresh water somewhere between about ¼ and ¾ full, leaving room to fill the tank after adding the bleach.
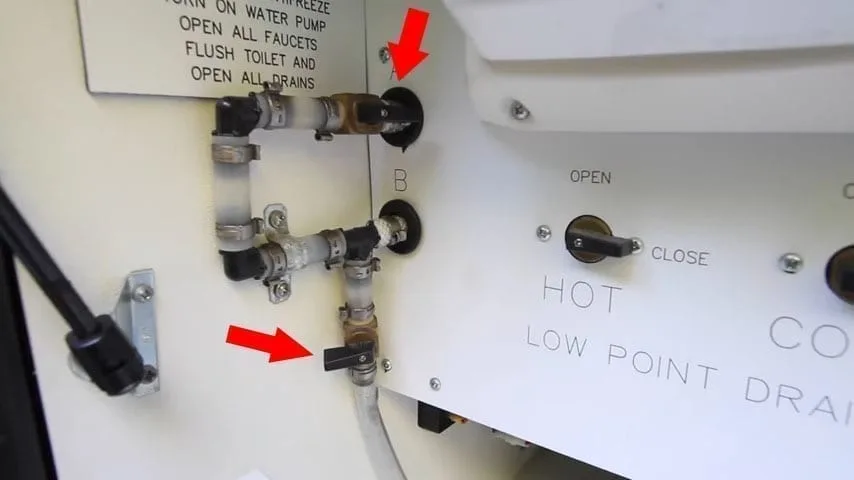
Step 2: Turn off the ice maker if you have one, and bypass any in-house water filters. In our case, that means closing the two valves that lead into and out of the filter and then opening the valve on the bypass line. In your RV, you may have a different system, so check your owner’s manual. If you don’t have a bypass, you may need to remove the filter, in which case some RVs come with a short length of tubing (the same length as a filter) designed to replace the filter when sanitizing or winterizing.

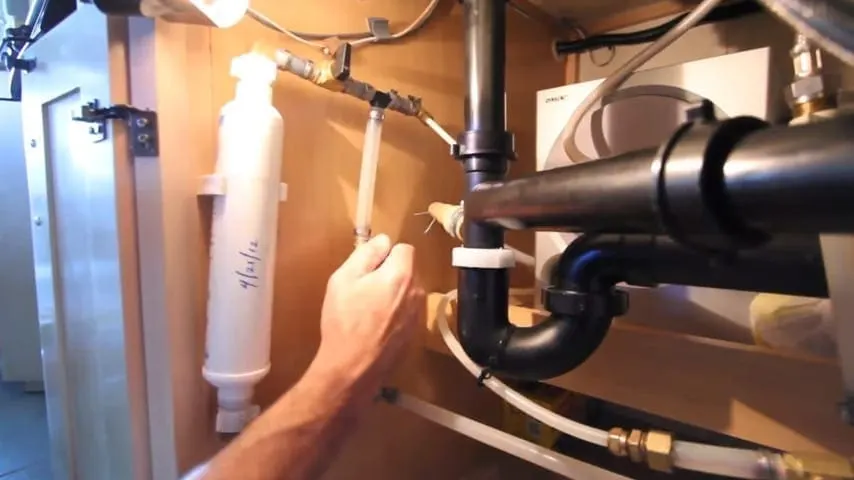
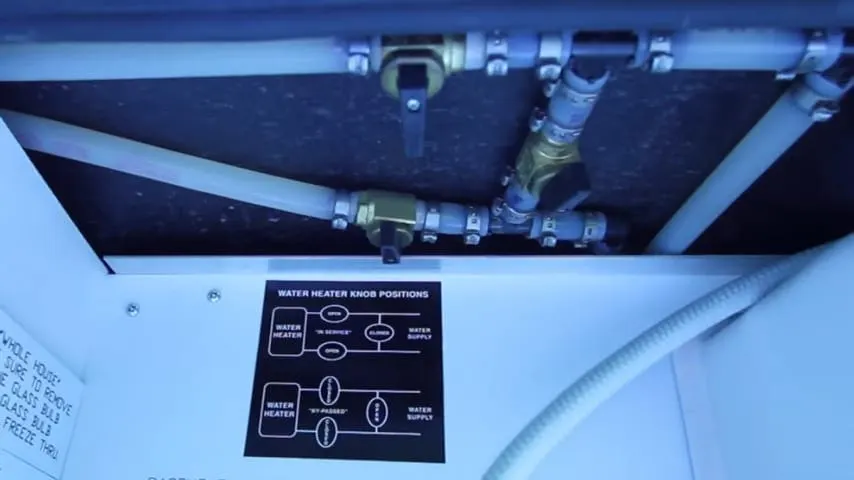
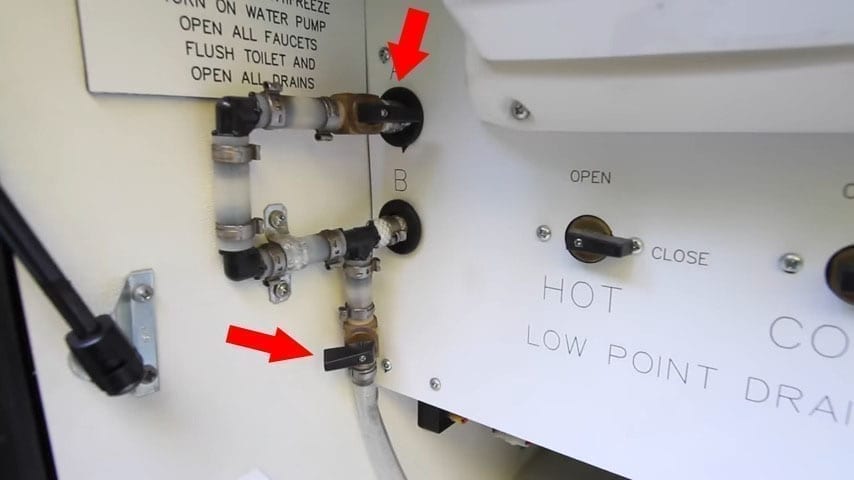
Step 3: Bypass the water heater using the factory-installed valves (they’re sometimes located behind the water heater itself, so you may have to hunt for them in the back of a cabinet or storage area). This will prevent bleached water from entering the water heater during the sanitizing process. If you need/want to sanitize your water heater as well, skip this step and be sure to remember to flush the bleach water out of the water heater at the end of the process. We suggest that sanitizing the water heater is unnecessary, and just makes extra work trying to flush out the bleach.

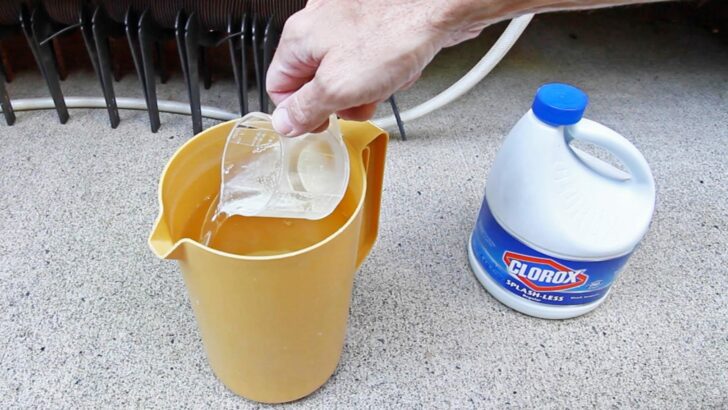
Step 4: Fill your pitcher about ¾ full of water.
Step 5: Add ¼ cup of bleach for every 15 gallons of fresh water tank capacity. For example, if you have a 45-gallon fresh water tank, you’ll add ¾ cup of bleach to your pitcher (45 gallons ÷ 15 = 3 and then 3 x ¼ cup of bleach = ¾ cup of bleach). We have a 105-gallon tank, so we use 1 ¾ cups of bleach.
Step 6: Turn off your city water hookup or disconnect from the water supply completely.

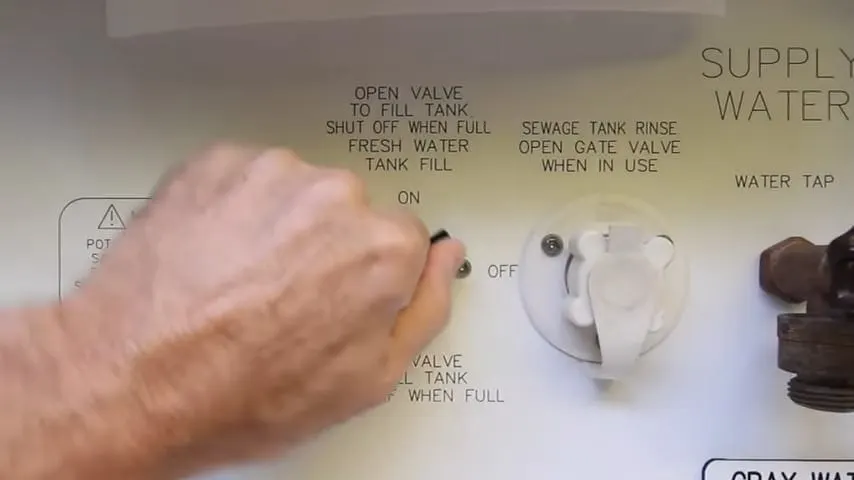
Step 7: If your RV is equipped with a fresh water tank fill valve, switch it to the “On” position

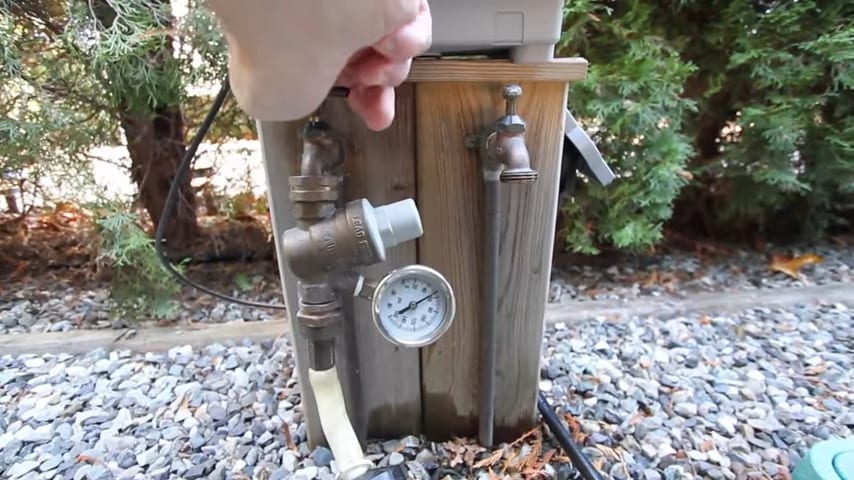
Step 8: Use the winterizing kit (usually factory-installed, again check your owner’s manual) to draw the bleach solution into your fresh water tank to begin the sanitizing process. If you don’t have a winterizing kit, add the bleach solution to your fresh tank through the gravity fill port on your rig using a funnel and skip to Step #14.
Step 9: Flip both valves on the winterizing kit, opening the plastic intake tube.
Step 10: Place the end of the tube in the pitcher and turn on your RV water pump. This will pump the water/bleach mixture into your RV water system.
Step 11: When the pitcher is empty, turn off the water pump.
Step 12: Clean out the winterizing tube by re-filling the pitcher with fresh water and pumping it into the tank.
Step 13: Switch the valves on the winterizing kit back to the normal (or closed) position.
Step 14: Fill the water tank the rest of the way up
Step 15: When water comes out of the overflow valve below the RV, your tank is full, so switch the tank fill to the “Off” position and/or turn off the faucet at the hose connection.
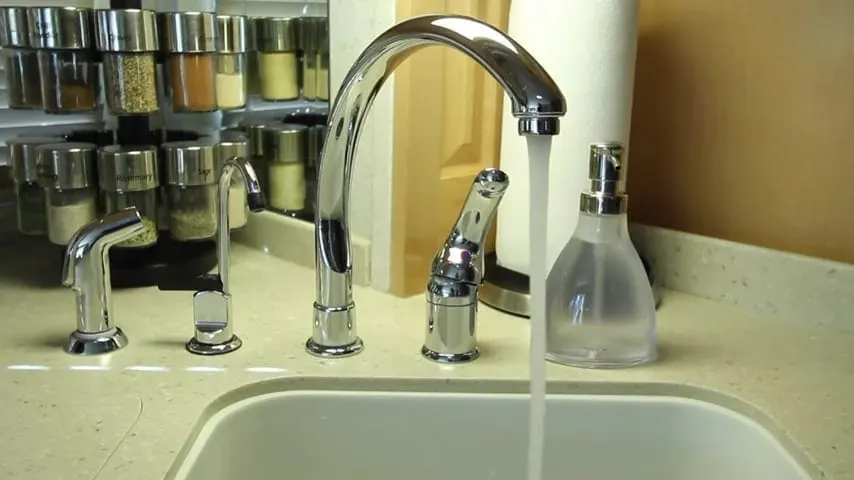
Step 16: Now that the fresh tank is full of bleached water, turn on the water pump (not the city water, as you need to draw the bleached water from the fresh tank), then turn on each faucet in the RV, one at a time, to sanitize their lines. Run cold water until you smell bleach, then run the hot water as well. Be sure to do this at every faucet, including the indoor and outdoor showers and any water dispensers and sink sprayers. This will ensure that you’re drawing the bleach water from the fresh water tank through every water line and faucet in the RV.

Step 17: Leave the bleach water in the tank for about 4-8 hours to ensure it has enough time to thoroughly sanitize the tank and lines. If possible, take a long twisty drive in your RV to get all tank surfaces exposed to the bleach water solution, doing a thorough job of sanitizing it.
Step 18: After the 4 to 8 hours are up (or when you arrive at your RV park with full hookups), you can drain the fresh water tank and the entire RV water system.
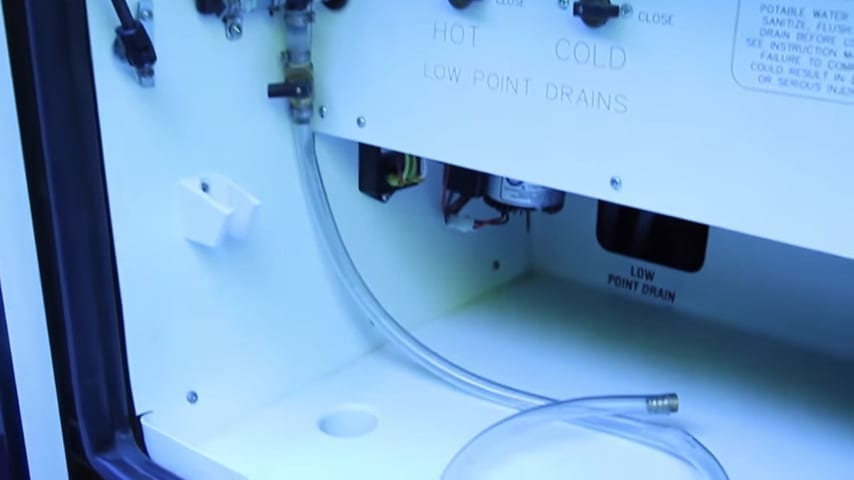
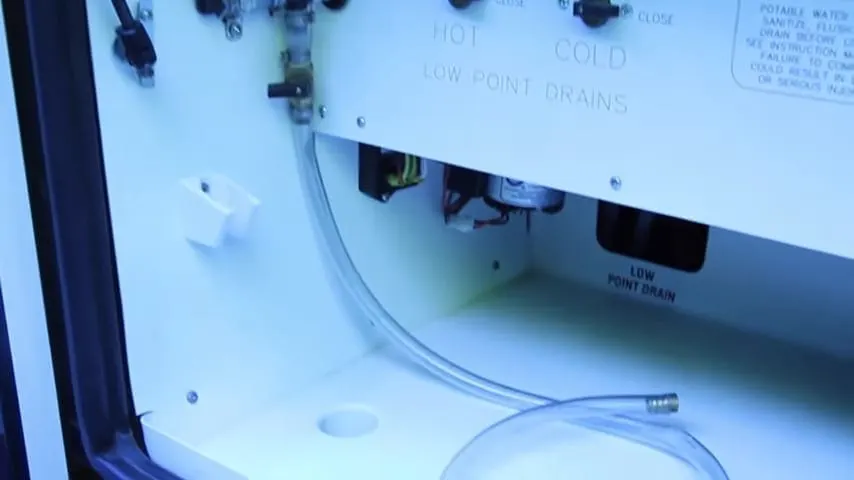
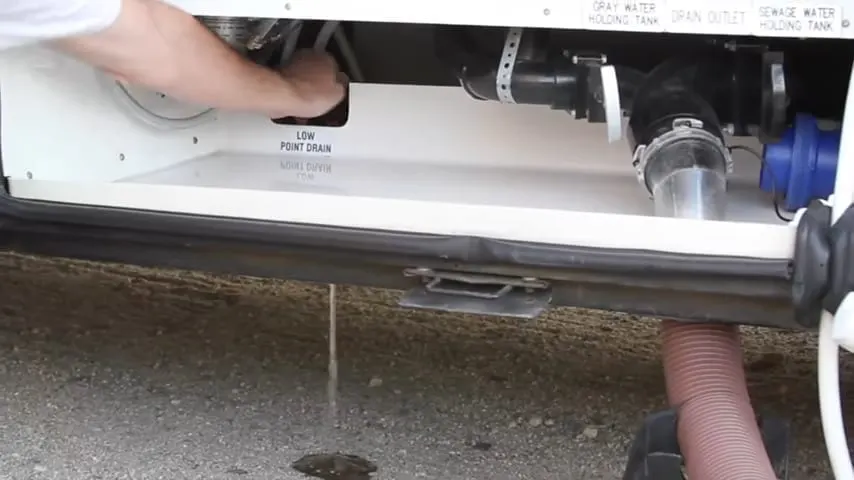
Step 19: Open your low point drain (often located near one end of the fresh tank) and let the water drain out of the tank and onto the ground. The low concentration of bleach is harmless, but if you’d rather drain it into the sewer hookup, you’ll need to turn on your water pump and open one interior faucet, effectively pumping the contents of your fresh water tank into your gray tank… but be careful not to overflow your gray tank! Be sure to leave the gray valve open during this process! Also, be sure to turn off the water pump as soon as the water stops running through the faucet, to avoid burning out your pump by running it dry. We’d suggest that opening the low point drain is a better choice!

Step 20: When the fresh water tank is empty, refill the tank with fresh water again.
Step 21: Turn the RV water pump on and then run water up to each faucet again (hot and cold) to be sure you’ve run all the bleach water out of the lines. Run each faucet until you can no longer smell bleach. You may have to drain and refill the fresh tank one more time if you still smell bleach.
Step 22: Turn off the water pump.
Step 23: Switch the water heater and inline water filter bypass valves back to their normal positions.
Watch The Step-By-Step Video
If all of the above was too much for you to read, you can view the video of our step-by-step process as we sanitize our RV’s water system!
What If Your RV Doesn’t Have a Winterizing Kit?
If your rig isn’t equipped with a winterizing kit, you can either install an aftermarket one or try out the tip in this video:
How Often Should I Sanitize?
It’s usually suggested that you use this technique twice a year to keep your water system fresh and safe. But if you notice the water tasting odd or smelling at all, you should repeat the process as needed.
It’s not difficult to provide fresh, safe drinking water straight from your RV, bypassing the need for (and effort, cost, and waste of) bottled water.
By sanitizing your RV water system a couple of times a year, you assure healthy water for not only drinking, but showering, brushing your teeth, cooking, and even watering your pets!
Lastly, if you’d like to reduce the need to sanitize, but still want to be able to safely drink the water from your RV’s fresh tank, you might consider a high-tech option that’s used to sanitize municipal water systems in major cities around the world: UV light. Check out the system we installed here.
Ditch the bottled water! Major cities sanitize their drinking water using ultraviolet light, and now you can, too. Acuva’s UV-LED system makes water safe to drink, using a fraction of the space...Show More
Ditch the bottled water! Major cities sanitize their drinking water using ultraviolet light, and now you can, too. Acuva’s UV-LED system makes water safe to drink, using a fraction of the space and power… perfect for RVs.
Check out our Acuva installation video here
Get 10% off any Acuva system when shopping online at Acuva's website and using the discount code listed here.
Show LessGeek Out with Us Every Week
Join our newsletter to learn about all things RV-related. Every week we offer free tips, tricks, product reviews, and more to our online community of RVers. Whether this is your first time on the road or you’re a seasoned expert, we’d love for you to geek out with us!
Dave B
Friday 29th of March 2024
After decades of tent camping we purchased a travel trailer. I find your postings and many others I subscribe to extremely helpful. Thanks so much!
Mark G
Friday 8th of April 2022
How about sanitizing the hose that you use to connect to the city water? Seems like that is also at risk for bacteria and mold…
TheRVgeeks
Friday 8th of April 2022
Hi Mark. Good point, and yes it can be done on occasion. You can either carefully use a funnel to pour a bleach solution in and then seal it up and let it sit... or you can use an inline water filter housing (like this one on Amazon: https://amzn.to/3xf4Lgz ... just be sure to use it with the filter cartridge removed) and put the bleach solution in there and run it through the hose.
John Schretlen
Thursday 26th of August 2021
Next week I'll be doing the fresh tank sanitizing and I'm really glad that you posted this.
What I really needed to remind myself of was everything you said in step 5.
Pat Parker
Saturday 30th of January 2021
You make everything easy to do. Thanks for going over this for us.
TheRVgeeks
Saturday 30th of January 2021
Aw, thanks Pat! Glad you liked it!
MICHEL MIGNAC
Saturday 30th of January 2021
There are kits to test bacteria in water like the one sold at Canadian tire. Safe Home DIY Bacteria in Water Test Kit Canadian Tire
there are also kits for other contaminants Safe Home Well Water Test Kit Canadian Tire
these would help troubleshooting water quality in RVs.
TheRVgeeks
Saturday 30th of January 2021
Good point, Michel. These would definitely help.