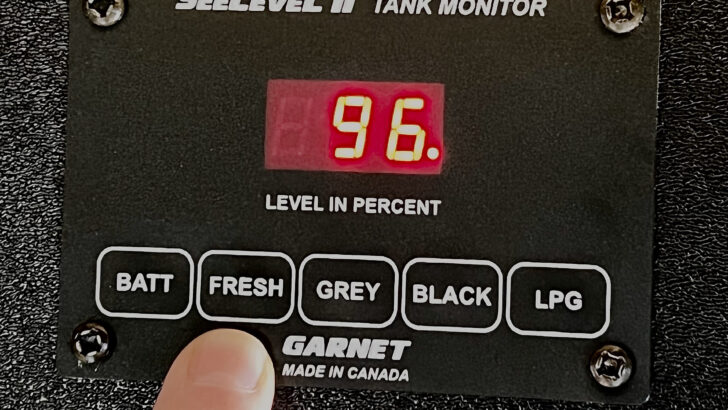

RV holding tank monitors are the bane of many an RVer’s travel experiences, but a SeeLevel tank monitor can be a game-changer!
Why do we say that existing RV holding tank monitors are so bad? Well, they’re notoriously inaccurate. Their readings might indicate you’ve got plenty of room left in a holding tank, and suddenly, you’re standing in a mess of gray water overflowing from your shower drain. Or you suddenly find your black tank completely (and unexpectedly) full.
Many RVers have shared their experiences, and we’ve had plenty of our own. A couple of years ago we installed a SeeLevel tank monitor and know first-hand what a huge improvement it is. If you’re frustrated with your RV’s tank monitoring system like we were, we wanted to share details about the SeeLevel system and how to install it.
- 1) What is the SeeLevel II Tank Monitor System?
- 2) How Does the SeeLevel Tank Monitor Work?
-
3)
SeeLevel Tank Monitor Installation: A Step-By-Step Guide
- 3.1) Before You Order Your SeeLevel System
- 3.2) Parts,Tools, and Supplies Needed for the Job
- 3.3) Read the SeeLevel Tank Monitor Manual
- 3.4) Prepare For Installation (Remove Your Old Tank Sensors?)
- 3.5) Program and Install the SeeLevel Tank Monitor Sensors
- 3.6) Install the Display
- 3.7) Connect the Wiring
- 3.8) Confirm/Program The Number Of Sensors Per Tank
- 3.9) Calibrate The Propane Tank Reading
- 4) Enjoy More Accurate Tank Readings!
What is the SeeLevel II Tank Monitor System?
Most RVs have three holding tanks – one for fresh water, one for gray water, and one for black/wastewater. Any clean water from your fresh water tank that you use for washing dishes, showering, etc., goes into your gray water tank. Toilet waste goes into your black tank. Some RVs have more than one gray tank, and some have a combined black/gray tank.
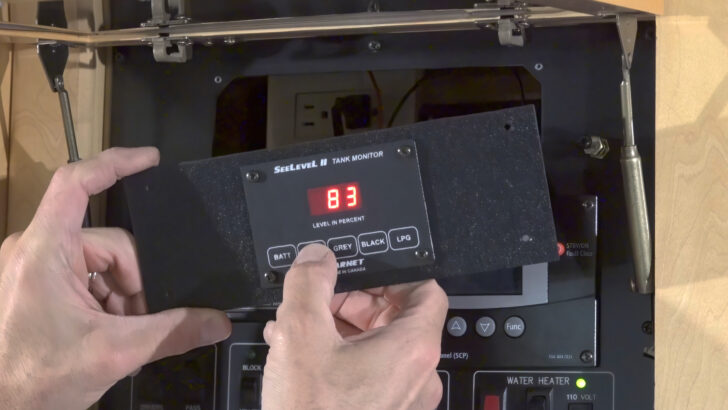
RVs come equipped with tank-monitoring systems (ever wonder how RV holding tank sensors work?), usually sensors or probes mounted on or through the tank walls. This allows you to know the current level in each tank. Each time the fluid in a tank drops or rises by about a quarter, lights on the monitor’s panel will display accordingly (0, ¼, ½, ¾ or full).
In theory, these monitoring systems should work fine. But they are notoriously inaccurate and unreliable. Not only are they imprecise, but they can be affected by whatever is inside the tank (think toilet paper or other “matter”). Individual sensors are also known to fail. A lot. And it gets worse over time, particularly with a buildup of struvite in the waste tanks. We’re sure we’re not the only RVers with a litany of complaints about our old tank monitors.
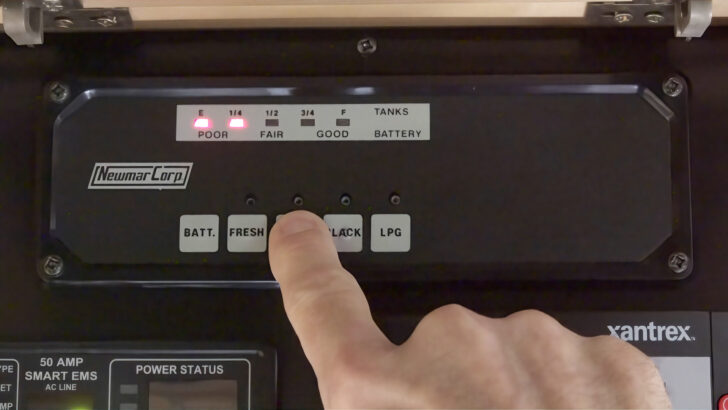

Our original RV tank monitor system that Newmar installed only showed tank capacity in 25% increments.
The SeeLevel tank monitor by Garnet Technologies works differently. Their experience building tank-monitoring systems for the petroleum industry provides improvements to the typical RV tank monitoring system that comes on most RVs.
First, you mount the sensors on the tank’s exterior, solving several problems like corrosion or the build-up of crud interfering with readings on internal probes. Once installed, the sensors are essentially maintenance-free. And the fact that there’s only a single sensor for each tank consolidates the source of information being provided to the system into one reliable location on each tank.
The SeeLevel tank monitor sensors each have multiple “segments” that report tank levels in 2-5% increments (it varies, based on how tall your tank is and how much you have to trim the sensor down during installation… more on that later). You get far more accurate and detailed readings as a result.
NOTE: The vast majority of RV holding tanks are made of roto-cast plastics. In the unlikely event that yours are made of metal, be aware that SeeLevel sensors won’t work with metal tanks.
How Does the SeeLevel Tank Monitor Work?
The system uses sensor strips with embedded circuits to read the interior tank levels and send reports to one or more dedicated display units.
The sender strips can be trimmed to fit various tank heights. The standard 710-ES sensors are 12 inches tall and monitor tanks from 5” to 13” using a single sensor. They can be trimmed in 1.5” increments to fit tanks less than 12” in height. For taller tanks, you can stack two 710-ES sensors together to work with tanks up to 25” tall.
For most tanks, the standard 710-ES sensors are fine, but there are options:
- For taller tanks, the 710-SS model sensor strips are a good choice. At 16” long, they can measure tanks from 7” to 17“ tall. Like the ES sensors, they can be used in pairs to monitor tanks as tall as 34 inches.
- For shorter holding tanks, you can instead purchase the 710-JS model sensor strips. At only 6” in height, these are made for use on very short or curved tanks from 4.5” to 7” tall. They can be shortened/trimmed in 1” segments down to a minimum of 4 inches. Unlike the ES and SS model sensors, the JS sensors cannot be paired together. (But if your tanks are taller, you’d use one of the longer sensors anyway.)
SeeLevel Tank Monitor Installation: A Step-By-Step Guide
This system requires that you install new tank sensors and a new monitoring display panel. But you should be able to re-use the existing wiring your RV manufacturer already put in place between your current sensors and display panel. Access to your holding tanks is required, even if it involves removing a trim panel or two (which is what we did on our rig). We’ll give you a general idea of what upgrading your system to a SeeLevel entails.
Before You Order Your SeeLevel System
You’ll need to determine the model of display panel you need (based on the makeup of tanks you want to monitor and whether or not you want to incorporate switches for your water pump and/or water heater) and the model of sensors you require (based on the height(s) of your tank(s) you’ll be monitoring). Use SeeLevel’s Model Selection Tool to help you determine which monitor will fit your needs before you order.
- Package Dimensions: 46.228 H x 9.906 L x 10.16 W (centimeters)
- Package Weight: 1.0 pounds
Parts,Tools, and Supplies Needed for the Job
You’ll probably need most or all of the following tools and supplies:
- SeeLevel 709 Tank Monitor System (this is the one we installed, you may require a different model)
- Wire cutters
- A tape measure
- Rubbing alcohol or acetone
- Paper towels or a rag
- A pair of scissors
- Butt/splice connectors (or soldering iron and shrink tubing)
- Crimping tool (if using butt/splice connectors)
- Painter’s tape or masking tape
Some additional items/supplies you may need for the installation of the monitor panel:
- ABS plastic panel (if the new SeeLevel monitor panel is smaller than your RV’s current system)
- Mounting screws (to secure the ABS panel in place)
- Utility knife (to cut out a new, properly-sized opening in the ABS panel)
Read the SeeLevel Tank Monitor Manual
You can access the SeeLevel Tank Monitor manual for many SeeLevel monitors here. It’s imperative to consult your manual because styles and directions differ according to monitor type and your RV application. You’ll also want to have the appropriate manual on hand in the event that troubleshooting the SeeLevel Tank Monitor system becomes necessary in the future.
When purchasing your system, you’ll choose from a large number of available models. Carefully consider your display panel, how many (and which) tanks you need to monitor, and whether you’ll want on/off switches for your pump and/or your water heater.
Prepare For Installation (Remove Your Old Tank Sensors?)
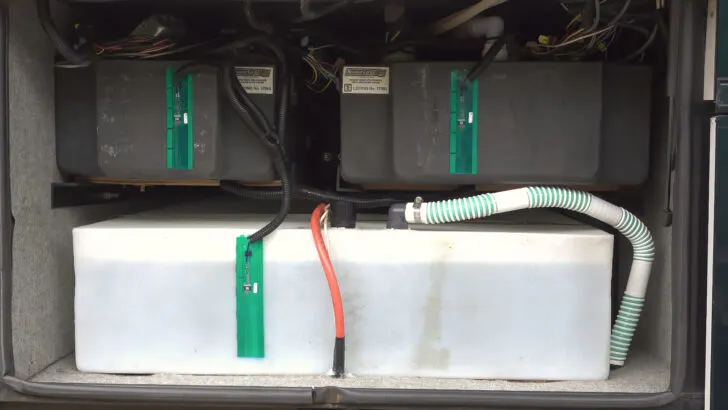
As mentioned earlier, access to the holding tanks is required. All three (fresh, gray, and black) of our tanks are located inside a single compartment. Access to the side of the tanks is relatively easy, as it simply required removing a pegboard that keeps the tanks hidden from view.
Depending on your current system, you may need to remove the original tank sensors. Ours were the type that adheres to the outside of the tank. We removed them to clean up unnecessary clutter that would no longer be in use. But as long as you have enough space to adhere the SeeLevel sensor strips, removing the original sensors isn’t required.
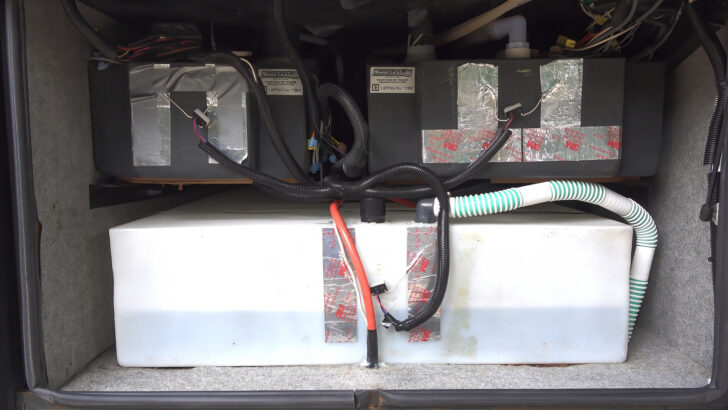
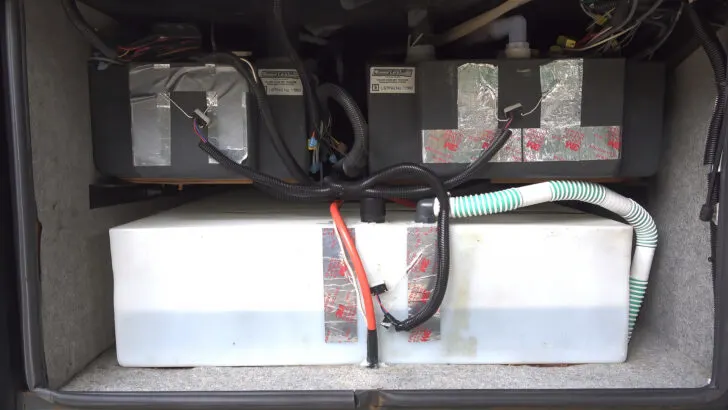
You can see the original factory sensors (long silver strips) adhered to the sides of our three holding tanks.
Program and Install the SeeLevel Tank Monitor Sensors
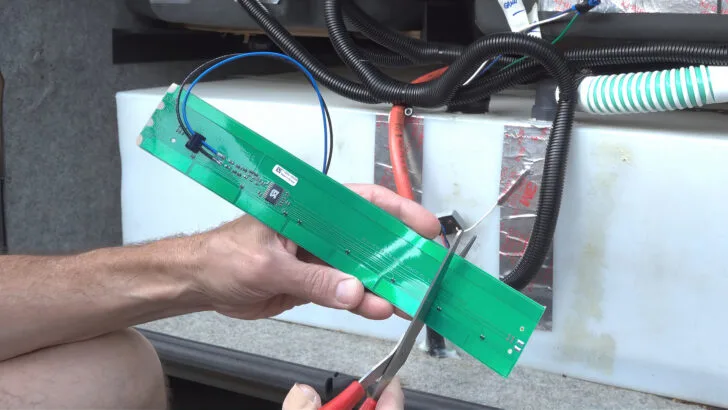
Regardless of which tank (fresh/gray/black) a sensor will be attached to, all sensors are identical. Each sensor strip has several tabs at the top to indicate where it goes: fresh, gray, or black tank. Programming the sensors consists of snipping off the tab that identifies the particular tank it monitors. By default, if NO tabs are removed, the sensor is “Fresh” (for the fresh water tank).


Carefully use scissors to cut off the tab for the appropriate tank. In this case, we’re snipping the “GRY” tab to program this sensor to be used for the gray holding tank.
If your installation requires more than one sender (tall tank), there’s an additional tab to be “snipped” in order to indicate which of the two senders is the “top” one. The instruction manual is quite thorough about this, so just take your time and read it carefully.
Before installing the sensors, measure your tank to see if you need to cut the sensor strip. The strips are clearly marked in 1- to 1.5-inch increments, so you know where to cut safely.
Use caution handling the sensor strips to avoid bending them and damaging the sensors.

Carefully use scissors to cut the SeeLevel sensor strip to the correct length. Each strip has markings showing you where it’s safe to cut, so you don’t damage the circuitry.
SeeLevel includes instructions for determining the mounting location of the sensors, but we’ve found that for the most accurate readings, the gray and black tank sensors will be mounted near the top of their respective tanks (so you’ll have an accurate reading of when those tanks are nearing full) while the freshwater sensor should be mounted closer to the bottom (to improve accuracy as the tank is reaching empty). Follow their guidance for the minimum distance from top or bottom of the tank to ensure you’re not mounting it too high/low.
Before installing them permanently, use tape (painter’s tape or masking tape, which remove easily) to mount the sensors to the tank temporarily until you’ve wired everything and verified that the system works correctly. This can give you the opportunity to test placement on the side of the tank before adhering them permanently. We actually ran our system through a complete filling & dumping of each tank, so we could 100% confirm that the sensors were reading correctly AND were placed properly on the tank.

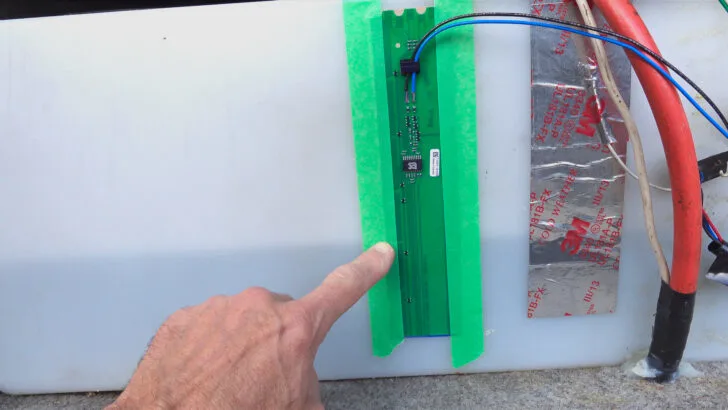
It’s a good idea to test the system by temporarily installing the tank sensor strips using painter’s/masking tape. That way, you can ensure the spot you’ve chosen provides good readings before using the permanent adhesive.
Note: the sensors rely on being in close contact with the surface of the tank to get their readings. When using painters/masking tape to hold them in place, be sure that they are laying as flat as possible and that there aren’t any air gaps between the sensor and the outer wall of the tank. Otherwise, you may get errors in the readings during your testing.
Also, be extremely careful with the application and removal of the tape, to ensure you don’t damage the electronics built onto the sensor strips themselves. It’s not difficult to avoid harming the sensors, but you do want to be careful with them.
Each sensor strip comes with a strong self-adhesive backing. Before installing them, first, clean the tank’s outside surface (where you intend to mount the sensor) with rubbing alcohol or acetone and let it dry so that the adhesive can make a strong bond. Then, peel off the backing and apply the strip to the tank, placing it carefully in just the right spot.

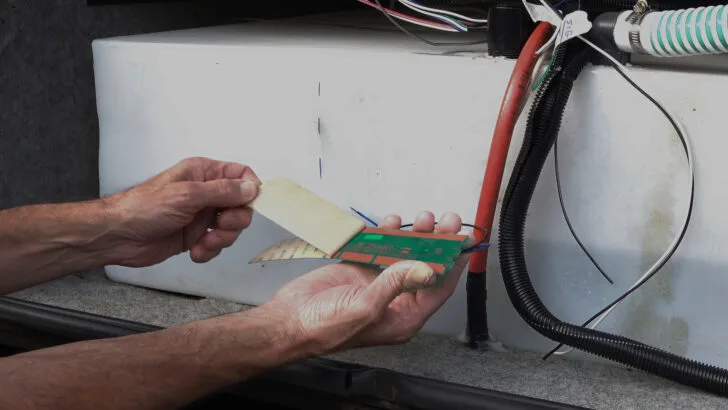
After cleaning & preparing the tank surface, carefully remove the backing from the adhesive.
Install the Display
This process might be different depending on the model you’re installing, and what type of monitor panel you’re replacing. If your old monitor panel is the same size as the new SeeLevel unit, it may be a simple process of removing the old and installing the new. But, more than likely, you’ll need to do some modifications to account for differences in size.
In our RV, our original tank monitor panel was larger than the new SeeLevel system. So, we used a small piece of ABS plastic that we picked up on Amazon (you may also find it at a big box hardware store or auto parts supply). We cut it so that it covered the hole left by the old panel, secured it in place with four screws, and pre-drilled the holes to ensure the screws didn’t crack the plastic. Then we cut out the smaller opening that was required for the new monitor.

Installing the monitor panel for your SeeLevel system may require modifying the size of the opening – in our case, the new monitor was smaller than the original, so we used a piece of black plastic to cover the old hole.
Or, you may need to enlarge the opening from your existing panel so the new one will fit. How that’s done will differ, based on where your existing panel is mounted. If your original monitor panel is smaller than the SeeLevel panel, you’ll of course need to make sure there’s room to enlarge the opening.
Connect the Wiring
In most installations, you won’t need to run any new/additional wires and should be able to reuse those that were part of the original sensor system.
Once the display is installed and the strips are firmly adhered (even if temporarily) to the tanks, you can connect the wires. All of the blue wires from the sensors need to connect to the blue wire on the display panel. You should be able to use one of the existing wires from the original internal tank sensors to run this connection.
The black wires for all of the sensors and the display must go to a common ground. This isn’t usually difficult, as most RVs have their ground wires all connected together and grounded to the chassis, frame or battery. If you can’t find a good common ground, connect all of the black wires together and then connect them to the monitor panel’s black wire using another of the original system’s wires. Then run a new wire from that black bundle to ground on the RV’s electrical system.
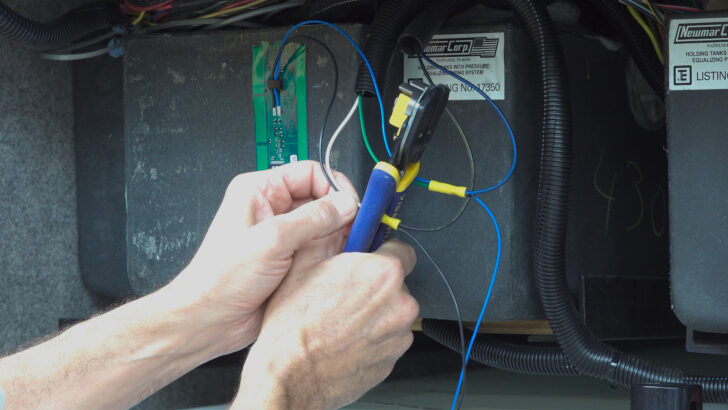
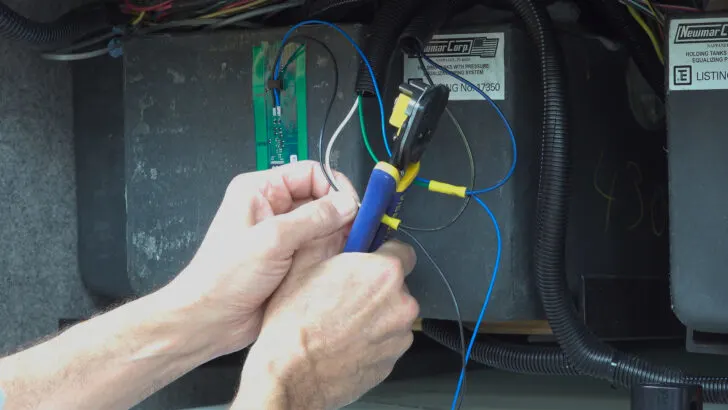
Use butt/splice connectors to connect the wires together. A good crimping tool makes the job easier (and the connection more secure).
If your system also monitors propane tank level(s), connect the green wire on the SeeLevel Display Panel to the propane tank sender’s positive wire.
If your new SeeLevel monitor panel also includes a water pump switch and/or water heater switch, you’ll need to remove the wires from your existing switches and connect them to their appropriate partner on the new panel.
For all connections, use butt/splice connectors (not spade connectors) to ensure a solid and reliable connection that won’t vibrate loose over time. This is all 12-volt DC wiring, so not as intimidating as 120-volt AC!
Confirm/Program The Number Of Sensors Per Tank
Once the display panel and sensors are installed and wired together, you’ll need to properly configure the system for the sensors on each tank. If one or more of your holding tanks were tall enough that you had to use two sensors (positioned one above the other and trimmed appropriately), you’ll need to configure the monitor for each of those tanks to let it know that fact.
-
- Press and hold down the button for the tank to be programmed (Black, Gray, or Fresh)
- While continuing to hold down the tank button, simultaneously press and hold down the “BATT” button. The display will immediately show “dIA” (diagnostics), but continue to hold down both buttons for about 5 seconds until the monitor enters “Programming Mode”
- When the monitor has entered Programming Mode, you’ll know because the display will change to one of three things, depending on the tank being programmed: “FrS” for the fresh tank, “GrS” for the gray tank, or “bLS” for the black tank. Once the appropriate code appears on the display, release both buttons.
- You should now see either “1SE” (one sender) or “2SE” (two senders), depending on how the monitor was currently programmed. Press the correct tank button (Black, Gray, or Fresh) once to toggle the setting.
- When the display shows the correct number of senders for that tank, press the “BATT” button once to exit programming mode.
- Repeat the process above for each tank (Black, Gray, and Fresh) to ensure the system is properly configured for the number of sensors you installed
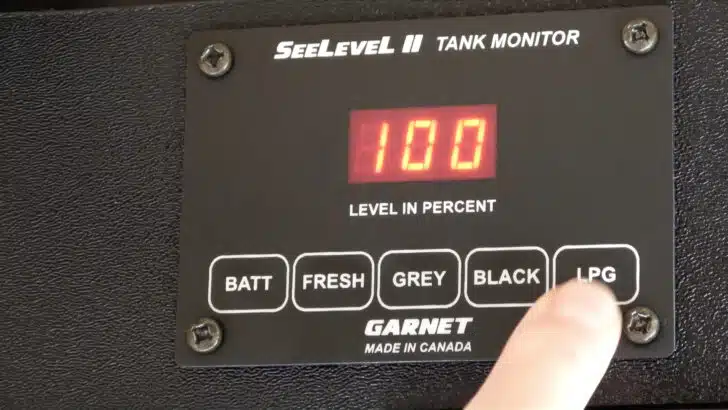
Calibrate The Propane Tank Reading
If your installation includes monitoring your RV’s onboard propane tank, the SeeLevel monitor panel will need to be calibrated to your tank’s sensor. To do that:
-
- Your onboard propane tank will need to be full before initiating the calibration procedure
- Press and hold the “LPG” button on the SeeLevel display panel.
- While holding “LPG”, simultaneously depress the “BATT” button. Continue holding both buttons down (about 5 seconds) until the display shows “LPG”.
- Once “LPG” is displayed, release both buttons. The display will show “CAL” for a second or two, and then shut off.
- The calibration is complete and should now show “100%” for the propane reading when the “LPG” button is pressed.

Once you’ve completed the calibration procedure for your propane tank, you’ll be all set!
Enjoy More Accurate Tank Readings!
And that’s it! For accurate tank readings, the SeeLevel tank monitor is the best system we’ve ever seen. We used to wonder if those little lights indicating “¾” on our black tank meant that it had juuust exceeded half a tank (enough to light that light), or if it was about to hit 100%! We want to know exactly what our tank levels are (especially when we’re dry camping), and absolutely love how precisely and accurately our SeeLevel system lets us monitor our resources.

Here’s the completed installation, with all three (fresh, gray, and black tank) SeeLevel sensor strips permanently installed and wired together.
NOTE: If after installing and testing your new SeeLevel II Tank Monitor System your tank readings are still off, you may need to clean your RV’s holding tanks. If THAT doesn’t work, it’s quite likely that you have a buildup of struvite on the inside of your tank walls. You may need to have your black and/or gray holding tanks power washed to remove that buildup.
Geek Out with Us Every Week
Join our newsletter to learn about all things RV-related. Every week we offer free tips, tricks, product reviews, and more to our online community of RVers. Whether this is your first time on the road or you’re a seasoned expert, we’d love for you to geek out with us!
Mark
Monday 26th of June 2023
Guys - Bad URL for the comparison tool. I believe you want this: https://www.garnetinstruments.com/selection-tool/
TheRVgeeks
Monday 26th of June 2023
Thanks, Mark... SeeLevel must've updated their website. We've fixed the link.
Steve Hasselberg
Thursday 26th of January 2023
What can you tell me about false readings with the SeeLevel sensors? Here is my situation which is very common among owners.
My RV uses capacitive sensors such as these, except that the sensors are connected to a Spyder G6 board and do not use the KIB display. https://www.recpro.com/rv-tank-sensor-monitor-panel-kit-with-probeless-adhesive-sensors/
They are very prone to false readings and no amount of cleaning helps the situation. I have considered SeeLevel sensors, but since they are also capacitive wondered if they would likewise suffer from the same problem.
The odd shape of the tanks is also a concern, but that can be handled with an offline calibration.
Are the SeeLevel sensors prone to the same false readings as other capacitive sensors?
Jim Poland
Sunday 3rd of July 2022
I am constantly fighting our black tank for accurate readings. After I dump and rinse with clean water, the reading always jumps to 95-100%. Usually after sitting for a few hours it will drop to 65%, and by morning it will be 30-40%. But for those several hours when it's at 100%, despite the tank be virtually empty, we get the red light of death that inactivates our toilets. We had the SeeLevel system in our last coach and it worked very well, so I'm anxious to add to our current 2019 DS4369. Two questions: how does the SeeLevel system communicate with the toilet lock-out system, i.e. is there an additional wire to connect at installation? Second, with our first RV (2014 Allegro Bus) we had a SeeLevel display panel in the wet bay, in addition to the one inside the electronics cabinet. Is there an option for a second panel, and if so, can it be wireless or must it be hardwired? Thanks for great info, as always.
TheRVgeeks
Monday 4th of July 2022
Uggh, sorry to hear about your tank troubles, Jim. And that's a good question... we're not sure how the existing tank sensor system in your Dutch Star communicates with the (we assume macerator) toilets. So we're not sure how/if the SeeLevel would be able to supply that same signal. We'd suggest contacting both Newmar and Garnet Instruments (the makers of the SeeLevel System) to see if you can find that out. Surely you're not the first person who has this same issue.
On the display panel... you can either tap in a second set of wires and feed them over to the water bay so you can install a second display panel. OR... you could get a single SeeLevel monitor, but opt for the Bluetooth version. With that, you can use your smartphone to monitor the tank levels instead.
Tom
Monday 27th of June 2022
"NOTE: The vast majority of RV holding tanks are made of roto-cast plastics. In the unlikely event that yours are made of metal, be aware that SeeLevel sensors won’t work with metal tanks." Regarding propane tanks (step 9 above) this is confusing. Does this work work for propane tanks??
Tom
Wednesday 6th of July 2022
@TheRVgeeks, Yes and thanks for your reply! Actually I am in the long process of ordering a camper van from a conversion company and they do not offer any tank level monitors. Can you suggest suggest a sending unit (propane tank level sensor) that perhaps I can have them install on the propane tank? It will be a 5-gallon "skinny" tank mounted horizontally underneath the van (Class B). Thanks! Tom
TheRVgeeks
Monday 27th of June 2022
Hi Tom! Sorry for any confusion. It does indeed work on built-in propane tanks, but because they are of course always metal, the system doesn't use the same adhesive-backed sensors that get applied to the fresh, black and gray tanks. The propane readings come from the same sending unit that's already supplying the signal from the tank to the monitor panel. Those same two wires that send a signal to the old panel are able to supply the info to the new panel. It just reads out a lot more accurately & specifically, with a digital % displayed as opposed to the typical lights for 1/4, 1/2, 3/4, etc. It's easy to program by filling up the propane tank, and then "telling" the system that the tank is now full. It's amazingly accurate. But it does require the sending unit on the tank, which must be there already in any RV with a remote propane reading on the monitor panel. It won't work on portable tanks unless they've been wired to send level info to a remote monitor panel. Hope this all makes sense.
John S.
Sunday 26th of June 2022
I really want to install this system in our coach.
But I think that getting to my three tanks will be a lot harder than yours: "Access to the side of the tanks is relatively easy, as it simply required removing a pegboard that keeps the tanks hidden from view."
I think that my tanks are between steel bulkheads and access to the driver's side is blocked by plumbing and floor supports.
I'm be going to the Newmar International Rally in Rock Springs next month. My plan is to talk to some very knowledgeable individuals that may be able to show me how to access the tanks.
TheRVgeeks
Sunday 26th of June 2022
If you’re able to determine that your tanks are indeed accessible, we can’t recommend the SeeLevel system enough. It really is a game changer and we absolutely love it.