
Are your RV window awnings cracked or torn and need to be replaced? If so, this is the post for you because we’ll share exactly how to replace RV window awning fabric yourself with our easy-to-follow step-by-step guide.
Since they’re smaller than main awnings (and even most slide toppers), window awnings are particularly easy to replace at a very reasonable cost, and the labor is free when you do it yourself.
Let’s get right to the details, photos, and video so you can see just how easy it is.
-
1)
How to Replace the Fabric On a Dometic/A&E RV Window Awning
- 1.1) What You’ll Need to Replace RV Window Awning Fabric
- 1.2) Retract the Awning and Remove the Set Screws
- 1.3) Insert a Straight Pick to Secure the Spring
- 1.4) Disconnect the Arm from the Roller Tube
- 1.5) Disconnect the Other Arm
- 1.6) Slide the Awning Roller Out of the Track
- 1.7) Unwind One Spring
- 1.8) Mark the Cap and Tube
- 1.9) Remove the Spring Assembly From One End of the Tube
- 1.10) Remove the Old Fabric
- 1.11) Install the New Fabric
- 1.12) Reinstall the Spring Assembly and End Cap
- 1.13) Re-tension the Spring
- 1.14) Center the New Fabric
- 1.15) Roll the Fabric Onto the Tube
- 1.16) Prepare the Awning Rail
- 1.17) Install the New Awning
- 1.18) Extend the Awning
- 1.19) Reinstall the Set Screws
- 2) Free RVing Tips, Tricks, Reviews & Giveaways
How to Replace the Fabric On a Dometic/A&E RV Window Awning
As we mentioned in our post 5 signs your RV awning needs replacement, awnings and slide toppers take a beating in the sun. Over the years, we’ve shown how to replace the fabric on many different models. It’s easy to do, saves lots of $$, and provides better-than-new results (after all, it’s the cheap OEM stuff that failed you in the first place).
The following steps show how to complete one of our favorite DIY projects — replacing the fabric on a tattered RV window awning.
What You’ll Need to Replace RV Window Awning Fabric
Here are the tools and items most commonly needed to complete the job:
- Cordless drill
- Torx Bit Set
- Two small straight picks or long nails
- Silicone Spray
- Flat File
- Felt-tip marker
- Pop Rivet Tool
- Pop Rivets
- Tape Measure
- Diagonal Wire Cutters
- Step Ladder
- Replacement Fabric (Tough Top Awnings is the best… details and discount below)
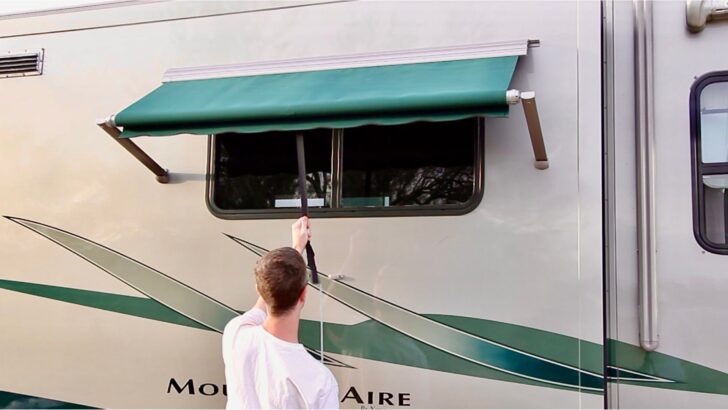
Retract the Awning and Remove the Set Screws
Fully retract the awning so that it’s up against the side of the RV. Then remove the set screws on the side of the RV at each end of the awning. Those screws hold the awning in place to prevent it from sliding side to side.
Insert a Straight Pick to Secure the Spring
Pull one awning arm slightly away from the side of the RV and insert a straight pick or small screwdriver into the end. This prevents the spring from unwinding.
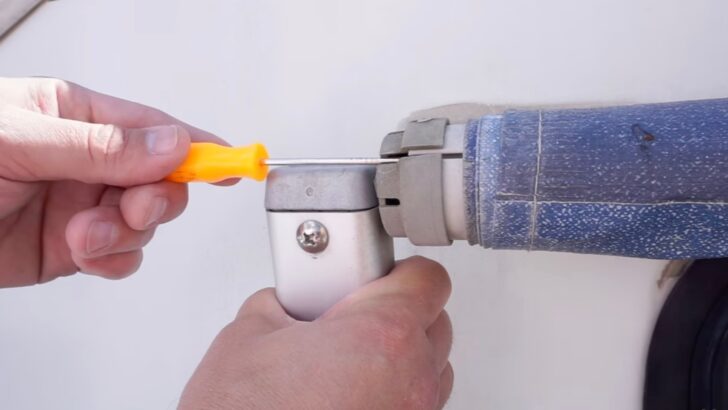

Inserting a straight pick into the end of the awning cap will keep the spring from unwinding as you work.
Disconnect the Arm from the Roller Tube
Remove the single bolt (seen in the photo above) that holds the end of the awning arm to the bracket at the end of the roller tube. Then lift the bracket and tube out and lower the arm down. This will leave the arm sticking straight off the side of the RV, with nothing attached to the end of it.
Disconnect the Other Arm
Repeat steps 2 and 3 on the other side of the awning, inserting the pick, removing the bolt, lifting the bracket and roller tube out of the arm, and lowering the arm down. Be sure to hold the fabric and roller tube in place so the awning won’t unroll down the side of the RV.
Slide the Awning Roller Out of the Track
Carefully maintaining your balance on one of the ladders, slide the entire roller tube, with the fabric wrapped around it, to one side. Remove the entire assembly from the horizontal mounting track on the side of the RV. Then carefully descend the ladder with it or hand it down to a helper.
Unwind One Spring
Keep a firm grip on the bracket at one end of the tube since it’s attached to a spring that is still under tension. Slide the pick out and unwind the spring, counting the exact number of rotations while noting the direction in which the spring unwinds. The spring isn’t all that strong, so it shouldn’t take much grip strength to control it.

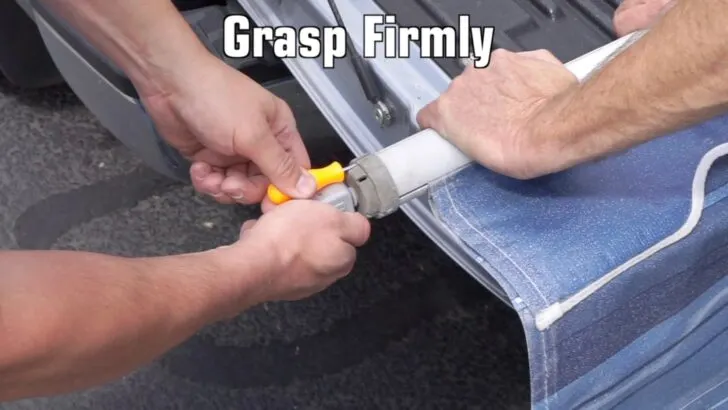
Here we’re keeping a firm grasp on the end fitting while we remove the straight pick. Once the pick is out, we’ll unwind the spring, keeping count of the exact number of turns required, and the direction to fully unwind it.
Mark the Cap and Tube
Use your felt-tip marker to make two small dots near each other — one on the cap and one on the tube. This will allow you to match them up properly during reassembly.
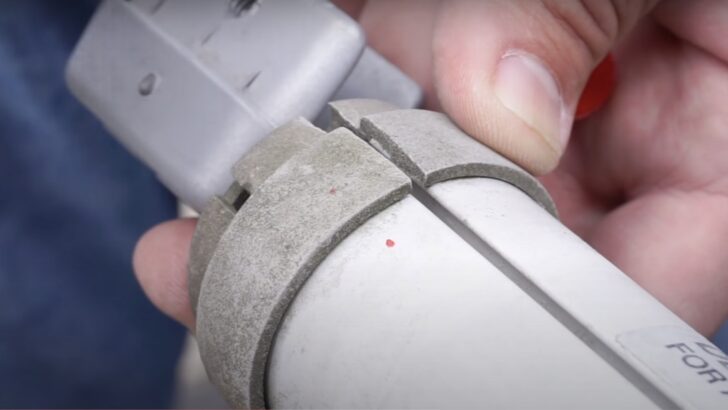
Mark the cap and tube to help with accurate reassembly. The two small red dots we added here are visible here.
Remove the Spring Assembly From One End of the Tube
Drill out one of the pop rivets in the end cap, then rotate the roller 180° and drill out the second rivet on the opposite side of the same cap. Now you can remove the spring assembly from the tube by simply sliding it out.
Remove the Old Fabric
Now you can pull the old fabric out from the end of the tube. If your awning has a decorative valance, be sure to note whether it’s on top of or underneath the awning material. In our video below, it was on top, which makes it clear which way to orient the new fabric when it’s time for re-assembly.
Install the New Fabric
Slide the new fabric into the same track from which you removed the old awning. Be sure to place the decorative valance in the same position as the old one (on top in our video, below).
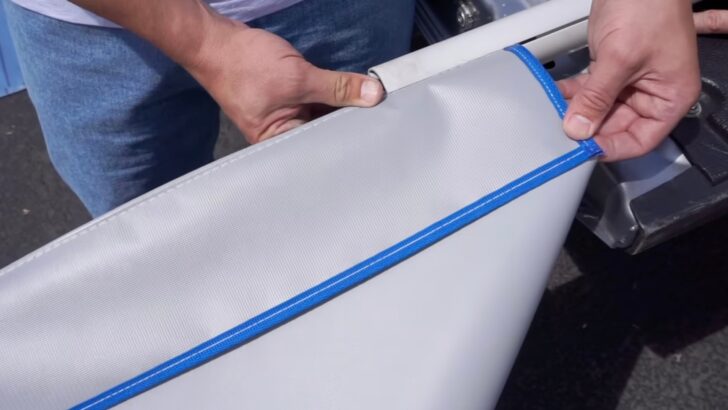
Sliding the new fabric and decorative valance into the track.
Slide the fabric all the way onto the tube, leaving the bead cord extending slightly from the end. Before reinstalling the end cap, trim the bead cord down to about an inch and then slide the fabric fully onto the tube.
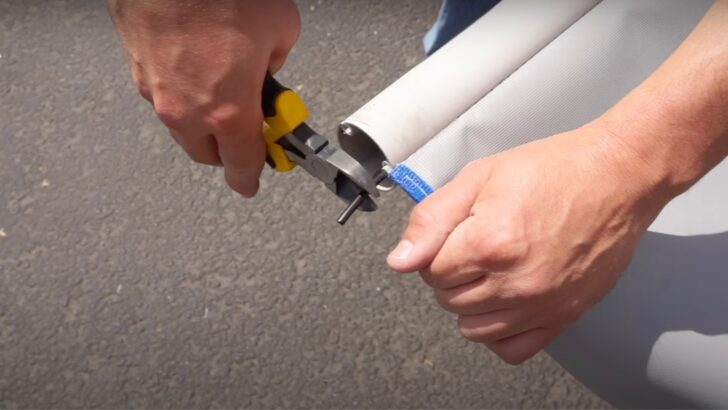
Before sliding the new fabric all the way into the track on the roller tube and reinstalling the end cap, trim the bead cord down to about an inch.
If you purchased a new pull-down strap (available from Tough Top Awnings), now’s the time to install it, too. Simply slide the old strap out and slide the new one into the same track.
Reinstall the Spring Assembly and End Cap
Insert the end cap and spring assembly back into the roller tube, lining up the two small marks you made earlier with your felt-tip pen. Make sure the holes in the cap and the tube are lined up. Insert a new pop rivet and squeeze the tool until it pops. Then, roll the tube over and install the second new pop rivet.
Re-tension the Spring
Re-tension the spring by winding the fitting in the opposite direction from when you removed it. Be sure to rotate it the exact number of times you counted earlier. Reinsert the straight pick to hold the fitting in place.
PRO TIP: If your old window awning wasn’t staying tight up against the side of the RV when stowed, this would probably be a perfect time to add a couple of extra turns to the spring to increase tension.
Center the New Fabric
Measure the distance between each edge of the new fabric and each end cap. If the fabric isn’t centered, slide it left or right in the track until both sides of the material are the same distance from the end caps.
Roll the Fabric Onto the Tube
Keeping in mind that the top of the material is smooth and the underside is more textured, roll the fabric onto the tube with the smooth top surface on the outside of the roll.
Prepare the Awning Rail
If the awning rail has sharp edges or corners, you can file them a bit to prevent snagging the new fabric. You can also cover those edges with two small pieces of masking tape to ensure the new awning won’t get cut as you slide it into the track. Then spray the awning rail with silicone lubricant along its entire length to ease installation of the bead cord and new awning.
Install the New Awning
Insert the bead cord at the end of the new fabric into the track and slide it all the way into and along the track. Once the new awning is in, swing one of the arms back into position, insert the fitting at the end of the roller into the end of the arm, and reinstall the bolt.

Once you’ve slid the new fabric all the way into the track, swing one of the arms back up into position. Then insert the fitting at the end of the tube into the end of the arm and reinstall the retaining bolt.
Now do the same thing at the other end of the roller tube. Then you can safely remove both straight picks.
Extend the Awning
Extend the awning and check for wrinkles. If the awning doesn’t lay perfectly flat, slide it left or right in the upper track until it does. Then retract/stow the awning to confirm the correct position. If it rolls smoothly in and out without wrinkling, it’s square, with the position of the upper bead cord correct.
Reinstall the Set Screws
Reinstall the two set screws into the upper awning rail, one at each end of the track. That will prevent the assembly from sliding side to side. Now, enjoy your beautiful new window awning!
The best replacement awning and slide topper fabric is also available with a special discount:
The original equipment fabric that comes on RV awnings and slidetoppers is... well, how do we say this?... CRAP!. It's no surprise, since the RV manufacturers are looking to cut their costs...Show More
The original equipment fabric that comes on RV awnings and slidetoppers is... well, how do we say this?... CRAP!. It's no surprise, since the RV manufacturers are looking to cut their costs. Instead of replacing it with the same stuff that failed in the first place, get high-quality replacement fabric from Tough Top Awnings, instead.
Check out our Tough Top Awnings videos here
Plus you can save 5% on your entire order from Tough Top Awnings. The coupon code is valid online or over the phone!
Show LessIf you’d like a visual guide to replacing the fabric on a Dometic/A&E window awning, check out our video:
You may also be interested in our posts on how to replace Dometic WeatherPro awning fabric, how to repair or replace a failed Dometic Oasis Elite door awning motor, and an easy DIY guide for a pull-down Dometic awning fabric replacement.
Free RVing Tips, Tricks, Reviews & Giveaways
As 20-year full-timers, we share everything we’ve learned about RVing over the years. Join our online community to receive a wealth of great RVing knowledge delivered daily to your inbox.
Whether you’re a new RVer or a seasoned full-timer, you’ll love the wide range of RVing topics we cover. Don’t miss a single article or any of our famous Giveaways. Subscribe to our newsletter today!
Jimmy Kidd
Wednesday 4th of July 2018
At the end of June, we decided to replace all the outdoor material at Tough Top Awnings. I had first considered doing the work myself and even ordered the vicegrip wrench to hold the rollers. In end, I acknowledge that I wouldn't be able to do it myself and was extremely pleased that Tyler's quote included installation. The price of $1,800 out the door (4 slide toppers, 2 window shades, 1 door shade and 1 huge 24' patio shade) for 18 oz. material and it included my RVGeek discount and taxes. Their parking lot was gravel so the coach leaned to one side but Tyler is having the whole parking area paved this month. The estimates for the same work from several Florida shops was 3-5 times as much. Thanks for you video and if you need vicegrip wrench, let me know.
TheRVgeeks
Wednesday 4th of July 2018
That is so awesome Jimmy! How great to hear! We LOVE the entire Tough Top Awnings crew, and man-on-man does Tyler ever take great care of people. Besides the great fabric and super prices, he knows how to treat a customer as well as anyone could ever ask for. Can't tell you how much we appreciate your sharing your experience. Makes us prouder than ever to be associated with such a fine company. And thanks for the offer of the wrench, but we're good to go already!
Glenn Please enter your last name.
Wednesday 4th of April 2018
The springs in our Colorado Care Free awning have given up the ghost! We need new springs as it won't roll up anymore. The awning is only about a 7 ft long awning. Do you know where we might be able to get new springs for it? We had to dismantle it completely to remove it from the rig. Does Tough Top sell springs for awings?
TheRVgeeks
Wednesday 4th of April 2018
PS - If you have trouble finding the right ones at that link, it might be easier to start here: https://www.e-carefree.com/ecarefree30/ReplacementPartsServletController
TheRVgeeks
Wednesday 4th of April 2018
Hi Glenn! Tough Top Doesn't sell awning parts (except for fabric of course) but if you have your model number, you should be able to find parts here, direct from Carfree: https://www.e-carefree.com/ecarefree30/ExplodedPartsViewController?productId=126
Watkins Rita
Wednesday 4th of April 2018
All you guys looked great
TheRVgeeks
Wednesday 4th of April 2018
Thanks Rita! Can't wait to see you and Pat. ?
Vito mazzaro
Wednesday 4th of April 2018
Is it possible to show how to replace an awning that is open and closed by a power motor? All I’ve seen is the replacement of non motorized kind. Thanks love your videos especially the one in Panama
TheRVgeeks
Wednesday 4th of April 2018
Thanks Vito! Glad you liked the Panama video! We had a blast down there with Nikki & Jason. The only power patio awning fabric we've ever replaced is our own, and A&E WeatherPro. If you have the same type, you can see the video here: https://www.thervgeeks.com/repair/ae-weatherpro-awning-fabric/ Hope this helps.
Rich
Wednesday 4th of April 2018
Would like information how to upgrade Rv's floor with flexable laminate floating flooring.That has both rug and ceramic tiles in this 04 Monico Diplomat. Rug sits slightly lower than the tiles. Thanks. Rich Holiday FL.
TheRVgeeks
Wednesday 4th of April 2018
We've never done any flooring projects in our RV, but you might get some ideas from Mortons On The Move, who just re-did the flooring in their 5th wheel: https://www.mortonsonthemove.com/travelblog/diy-rv-reflooring-with-a-flush-slide
RICHARD YELICH
Wednesday 4th of April 2018
Make sure youiput a moisture barrier down before the flooring .I have a wood laminate floor in mine and with water being a issue .I would go to a inlay one piece or if you want to put a plank looking floor use a vinyl plank floor.. You may have to put a sub floor thickness to meet the rug level. Good Luck.