

When our motorhome was about 11 years old, we found ourselves with a patio awning ready for replacement fabric. Being avid DIYers meant we wanted to learn how to replace Dometic WeatherPro awning fabric ourselves.
We’d already replaced several awnings and slide toppers with super-robust Tough Top Awnings material, so we knew we’d be using their quality fabric, which would hold up and look great for years. However, this was the first time we’d ever worked on a WeatherPro, so we were happy to be in Vancouver, WA at the time, where Tyler and Ray of Tough Top Awnings took the lead to show us how to do it right.
In this post, we’ll give you a step-by-step account of that process (and a video to boot) so that you can undertake this project if you ever want to do the same.
- 1) What You’ll Need to Replace Dometic WeatherPro Awning Fabric
-
2)
Steps for How to Replace Dometic WeatherPro Awning Fabric
- 2.1) Pin the Spring
- 2.2) Unplug the Motor Wires
- 2.3) Remove the Bracket
- 2.4) Disconnect the Roller Tube from the Awning Arm
- 2.5) Remove the Screw that Holds the Fabric in Place
- 2.6) Replicate Steps 4 Through 6 on the Right Arm
- 2.7) Remove the Roller Tube and Unroll the Fabric
- 2.8) Remove the Motor
- 2.9) Mark the End of the Tube
- 2.10) Remove the Roller Tube & Awning Fabric From the RV
- 2.11) Remove the Awning Fabric from the Metal Wrap
- 2.12) Install the New Awning Fabric Onto the Metal Wrap
- 2.13) Install the Wrap with the New Awning Fabric Onto the RV
- 2.14) Install the Roller Tube
- 2.15) Reinstall the Motor
- 2.16) Center and Roll Up the New Awning
- 2.17) Install Your New Awning
- 3) Free RVing Tips, Tricks, Reviews & Giveaways
What You’ll Need to Replace Dometic WeatherPro Awning Fabric
Here are the tools you’ll likely need to replace your Dometic/A&E WeatherPro awning fabric:
- Locking Oil Filter Wrench
- Cordless Drill
- 25’ Locking Tape Measure
- Silicone Spray
- Utility Knife
- Pop Rivet Tool
- Pop Rivets
- 11-Inch Cable Ties
- 8-Inch Wire Cutters
- 10-Inch Flat File
- Torx Bit Set
- Straight Pick Tool (These are also available on the Tough Top Awnings website.)
- A couple of sturdy step ladders
Note that the stepladder we carry on our rig is currently unavailable, so we’ve linked to a similar one above. But we do want to mention that it may take up more space on board your rig than our collapsible step ladder does.
We also highly recommend Tough Top Awnings fabric. If you decide to order this high-quality awning fabric, be sure to use our RVGEEKS coupon to save yourself some $:
The original equipment fabric that comes on RV awnings and slidetoppers is... well, how do we say this?... CRAP!. It's no surprise, since the RV manufacturers are looking to cut their costs...Show More
The original equipment fabric that comes on RV awnings and slidetoppers is... well, how do we say this?... CRAP!. It's no surprise, since the RV manufacturers are looking to cut their costs. Instead of replacing it with the same stuff that failed in the first place, get high-quality replacement fabric from Tough Top Awnings, instead.
Check out our Tough Top Awnings videos here
Plus you can save 5% on your entire order from Tough Top Awnings. The coupon code is valid online or over the phone!
Show LessSteps for How to Replace Dometic WeatherPro Awning Fabric
To replace your Dometic/A&E WeatherPro awning fabric, take the following steps:
Pin the Spring
Start by extending the awning several inches so the hole at the left end of the roller tube faces outward away from the RV. If needed, roll the awning in or out a small amount until you can see daylight straight through the hole.
Insert a straight pick into the hole of the roller tube, which will pin the spring.
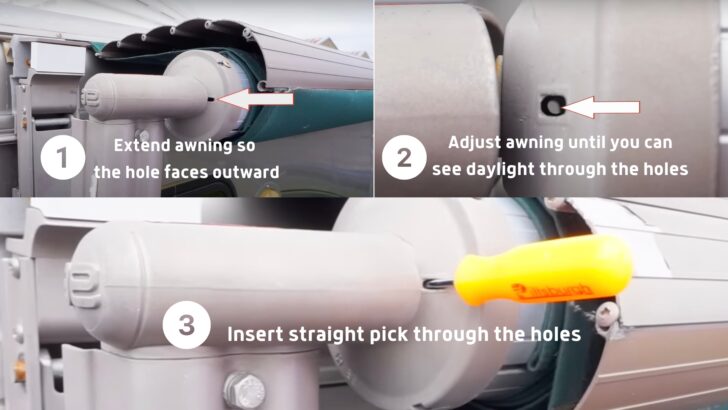

In step 1, you’ll need to extend the awning several inches so the hole at the left end of the roller tube faces outward, away from the RV. Then you’ll insert your straight pick through the hole to pin the spring.
Unplug the Motor Wires
At the other end of the awning, pop off the metal cover at the top of the arm and unplug the wires that power the motor.

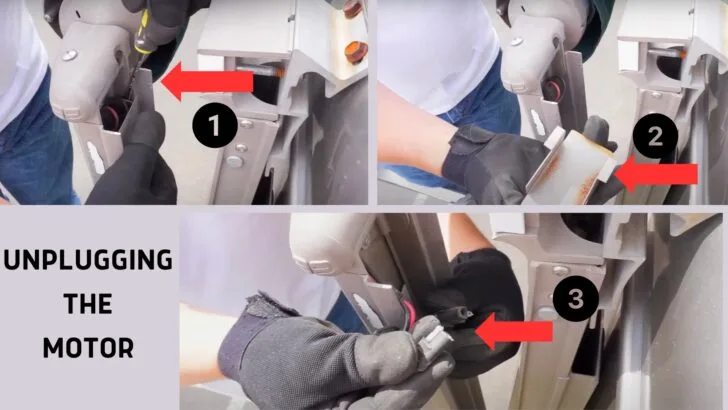
At the other end of the awning, you’ll need to pop off the metal cover at the top of the front arm, and then unplug the wires that power the motor.
Remove the Bracket
Back on the rear ladder, remove the cover at the top of the left arm, exposing the bolts that hold the arm in place. Be aware that there are nuts on the back of each bolt but they don’t require a wrench to remove because they’re locked in place in the narrow channel. So you can just remove the bolts and retrieve the two nuts from behind the bracket.
Remove the four screws that hold the bracket in place. There are two screws on each side. This is where you’ll need your torx bit. Lift the bracket out and set it aside.
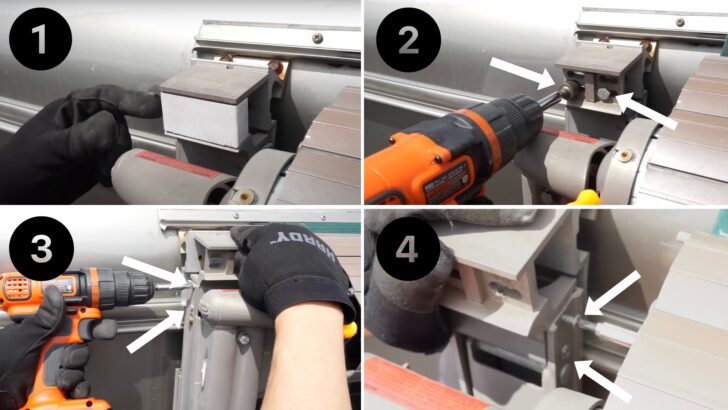

Once you remove the two bolts and four screws, you can lift the bracket out and set it aside.
Disconnect the Roller Tube from the Awning Arm
Push the left arm against the RV and secure it with a zip tie. Add a second zip tie just below the first. Now, remove the bolt that holds the roller tube to the awning arm.
Remove the Screw that Holds the Fabric in Place
While still on the rear ladder, remove the screw that holds the fabric in place on the side of the RV.
Steps 4 and 5: Secure the arm to the RV with two zip ties and then remove the arm bolt and fabric screw.
Replicate Steps 4 Through 6 on the Right Arm
Move to the front ladder. Remove the bolt cover and replicate the same steps you’ve just completed on the left arm.
- Remove the two bolts
- Retrieve the nuts
- Remove the four screws (two from each side)
- Lift out the bracket
- Secure the arm to the side of the RV with two zip ties
- Remove the bolt that secures the roller tube to the awning arm
- Remove the screw that secures the fabric in place on the side of the RV
Remove the Roller Tube and Unroll the Fabric
With one person on each ladder, lift both ends of the roller tube out of the arms and begin unrolling the fabric down the side of the RV. Make sure to hold the roller away from the body of the RV, and use a soft cloth to protect the paint job as needed. Be sure that both you and your helper are very careful descending the ladders as you unroll the fabric from the tube on the way down.
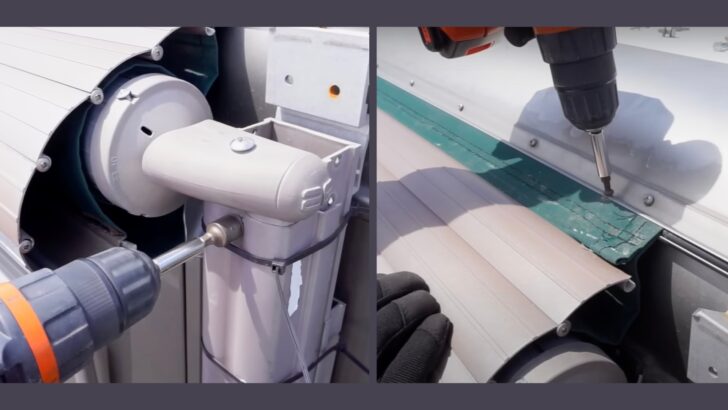
Remove the Motor
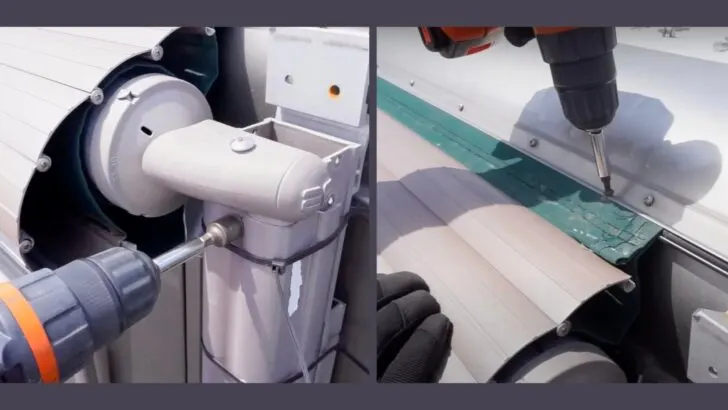
Drill out the rivet on the right side of the roller tube at the front of the RV. Before removing the motor, use a felt-tip marker to make two small dots on the cap and roller so you can reassemble them the same way they were.
Now slide the motor out the end of the tube and set it aside.
Mark the End of the Tube
Make two marks at the end of the tube: “A” for awning and “V” for valance next to their respective tracks. This is how you’ll know which track is for the awning and which is for the decorative valance. When you’re done, the marks will be covered by the end caps, so they won’t be visible.
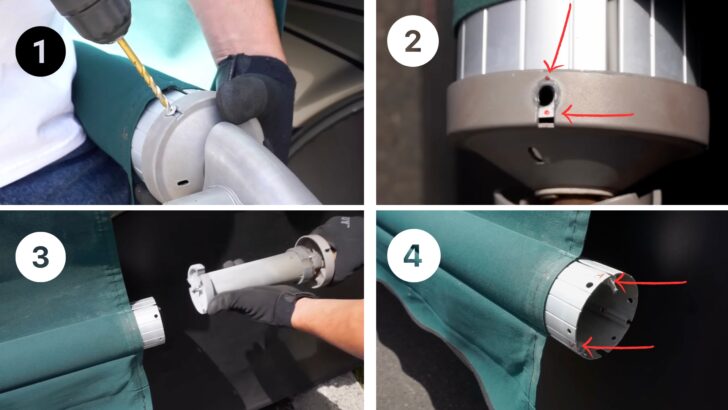

Here are Steps 8 and 9, which result in removing the motor and marking the awning track with an “A” and the track for the decorative valance with a “V.”
Remove the Roller Tube & Awning Fabric From the RV
With a helper holding the fabric at the front of the RV, pull the roller tube out toward the rear. Now you can slide the entire awning and protective metal wrap off the side of the RV. Place the metal wrap upward to protect it from scratching.
Remove the Awning Fabric from the Metal Wrap
Flip the wrap over and use a razor knife to cut the first foot or so of fabric. Use a flat-blade screwdriver to spread the metal where the manufacturer crimped the fabric into place. You’ll need to do this on both sides and at both ends of the wrap.
With a helper holding the far end of the fabric, pull the metal wrap completely off the fabric.


Flip the wrap over and use a razor knife to cut the first foot or so of fabric. Then use a large screwdriver to spread the metal where the fabric is crimped into place. Do this on both sides and then you’ll be able to remove the wrap from the awning.
Install the New Awning Fabric Onto the Metal Wrap
Use your old awning fabric as a tarp to lay out your new awning fabric. Lay the wrap upside down and use a screwdriver to gently spread the openings in the tracks. Use a file to remove any sharp edges.
Lubricate both tracks with silicone spray. Start the beads onto the end of the wrap and carefully slide the fabric all the way onto it. Once it’s on completely, check to be sure it’s perfectly centered.
Flip the wrap upside down again and use your wire cutters to re-crimp both ends of both tracks.
Install the Wrap with the New Awning Fabric Onto the RV
Lubricate the track on the RV with your silicone spray. Start the bead of the awning wrap into the track and slide it all the way in. Center it between the two awning arms. In preparation for installing the roller tube, clip all four ends of the black bead cord to about 3/4 of an inch.
Install the Roller Tube
Grab your roller tube and start feeding the bead cords into the end of the awning at the rear of the RV. Remember to put the bead in the awning side into the track marked “A” and the bead on the valance side into the track marked “V.” Slide the tube all the way in until it comes out the other end of the fabric.
Reinstall the Motor
Insert the motor into the front end, making sure to align the two dots you made earlier. Use your pop rivet gun to install new rivets in all three holes, securing the motor to the end of the roller tube.
Center and Roll Up the New Awning
Center the fabric between the end caps by checking on both sides to make sure you have the same amount of distance from the cap to the awning material. With one person at each end, begin rolling the awning up onto the roller tube, carefully climbing the ladders as you go.
Install Your New Awning
Place both ends of the tubes back into the top of the arms. Install the screw that holds the roller tube to the front arm and remove the two zip ties. Plug the motor back in and clip the protective cover back in place over the plug and wires. Drop the bracket back into the top of the front awning arm and replace the four screws, two on each side of the arm.
Holding the nuts in place behind the bracket, reinstall the main bolts. Again, you can see the channel on the back that holds the nuts in place allowing you to tighten the bolts without a wrench. Now snap the bolt cover back in place.
On the other ladder, repeat the same process.
- Install the bolt that holds the roller to the awning arm.
- Remove the zip ties.
- Drop the bracket back into the top of the rear awning arm.
- Install the four screws.
- Install the main bolts.
- Install the bolt cover.
You can now remove the straight pick and extend the awning.
If the fabric is centered correctly between the awning arms, it should lay pretty flat and smooth, although it might take a little time for it to settle into place so that any wrinkles smooth out.
When you close the awning, the arms should fall directly into place. If they don’t, slide the fabric a little forward or backward on the side of the RV until they do.
Once you’ve run the awning in and out a few times to confirm that everything is lined up, you can replace the two screws at each end that keep the fabric from sliding out of place.
If you’d like to follow along with us as we replace the fabric on our Dometic WeatherPro awning, check out our video:
You may also be interested in our posts on RV slide topper replacement, installing an RV window awning, Dometic awning fabric replacement, window awning replacement, and A&E/TwoStep awning replacement. You may also be interested in our post on how to repair or replace a failed Dometic Oasis Elite door awning motor.
Have a Carefree of Colorado patio awning? Read our dedicated article: Carefree Awning Fabric Replacement: Manual/Powered + Soft Connect
Or you can read all about replacing Carefree of Colorado Slide Topper fabric.
Free RVing Tips, Tricks, Reviews & Giveaways
As 20-year full-timers, we share everything we’ve learned about RVing over the years. Join our online community to receive a wealth of great RVing knowledge delivered daily to your inbox.
Whether you’re a new RVer or a seasoned full-timer, you’ll love the wide range of RVing topics we cover. Don’t miss a single article or any of our famous Giveaways. Subscribe to our newsletter today.
Darrin
Monday 8th of July 2019
Dave, I have the a&e dometic power patio and the top mounting bracket is different than the one shown in the video of the weatherpro. Do you have any tips to help deal with this different mounting bracket in trying to replace the awning material? Thanks,
TheRVgeeks
Monday 8th of July 2019
Hi Darrin. We'd recommend you contact Tyler at Tough Top Awnings. He's got experience working with virtually every make & model of awning, and can surely help guide you to make sure everything turns out OK. Plus, their replacement fabric is top notch! You can check out their website here (https://toughtopawnings.com) or you can call: 360-953-3299 (and if you order fabric, be sure to use the "RVGEEKSROCK" code to save 5%!)
- Peter & John
Martin
Friday 16th of June 2017
I just love your videos. Saw the one where you installed your "Elite Series" window awning with the metal shroud on the passenger side but for the life of me after hours on the web looking for that unit I can't find it anywhere. So where can I order these units? I need 4 of them.
TheRVgeeks
Friday 16th of June 2017
Hi Martin. Thanks for your comment and question! If you're looking for replacement fabric, you can of course contact Tyler as he mentioned in his reply to you (thanks, Tyler!). But if you're looking for the complete window awning, not just for replacement fabric, that's a different story. There are a couple of places online that list whole awnings... but we found it easier to deal with a local dealer, who was able to help us decipher Dometic's somewhat confusing array of options (size, fabric style, fabric color, mounting hardware, etc). Plus, we needed a fabric color to match our factory-installed awnings (we think it's called "Spruce"), and it wasn't offered as part of most online dealers' systems
We used Dometic's Dealer Locator to find a dealer near where we were at the time and ordered from them. Our window awning is the A&E Elite (acrylic/woven fabric) which comes with the metal wrap (ours is "Champagne" color)... but if you'd prefer, the A&E Deluxe Plus has vinyl fabric and the option to include/exclude the metal weathershield. Either way, you'll also need to order the accompanying "hardware" (arms) package in the correct color (again, ours is "Champagne") and length. If your window is 36" or taller, you need the "tall" version of the arms AND the window awning itself... so that it extends far enough to shade the window.
If you already have a Dometic/A&E window awning installed on another window, extend the awning and look inside the arms AND on the roller tube for labels. These have information that will tell you what style & color your existing arms & awning/roller tube are. Or, at least, that info will help a dealer help you determine a match! ;)
Hope this helps!
Tyler Hammack
Friday 16th of June 2017
Hello, Follow this link for info and a link to get pricing. http://www.toughtopawnings.com/windowawnings.html We just need to know if you have the flexible metal guard or if the fabric attaches direct to the side of the coach? Then we will need to know the total depth of the fabric you need from bead to bead. That is the bead that attaches it to the coach or guard to the bead that attaches to the roller tube and how wide you will need your new fabrics. Call me if you have any questions at 360-980-0537 Best Regards, Tyler
Richard Hawley
Saturday 17th of September 2016
I have watched and bought a lot of products you have recommended, but Tough Top Awnings was not one of them sorry to say. I called two different numbers and emailed them and never got a response to either. I do enjoy videos.
Tyler Hammack
Saturday 17th of September 2016
Hi Richard,
I'm sorry about the difficulty in getting in touch with us! I spend 10 hours a day trying my best to help everyone and I know I am human and never 100% perfect. We are expanding our facilities and staff to keep up with all our customers!!! Call me on Monday Richard and I will personally make it my mission to help you with a discount for me dropping the ball and get you whatever you need ASAP!
All my Best! Tyler Tough Top Awnings
TheRVgeeks
Saturday 17th of September 2016
Hi Richard. We can't imagine why you wouldn't hear back if you're using the correct e-mail and phone number. We constantly kid Tyler about the fact that we almost never see him without his bluetooth ear piece in, and he's constantly on the phone helping customers and replies to e-mails faster than anyone we know (except maybe us LOL). ToughTopAwnings.com has this message posted on every page: "For questions call Tyler at: 360.980.0537 email: tyler@toughtopawnings.com" because he's eager to help, and very accessible. Maybe if you haven't already purchased somewhere else and still need an awning or toppers, give him another try. This is literally the first time we've ever heard of anyone saying that they couldn't get hold of him. Maybe a phone number or e-mail issue? In case you had the wrong info, the ones we just provided are correct. Sorry you had trouble. The quality of Tough Top's fabric alone is worth making another call! Please let us know how you make out.
Pat and Rita
Friday 16th of September 2016
You two made it look easy. Great video. Thanks
TheRVgeeks
Friday 16th of September 2016
Thanks, Ladies! Glad you liked it!
Ronald Poulin
Friday 16th of September 2016
Great video! My awning is 3 years old and already shows wear. Noticed your new awning is one piece, mine, from A&E has a seem in the middle that has stretched and now shows fabric of a different color in the seem. I will get a new awning the next time I drive through Vancouver WA.
Question: at 5:10/11 I see a sequence where your tire covers are in view. I have been looking everywhere for covers like these. Can you run a piece about them or publish the name of the vendor/distributor for these?
Thanks again for the great videos!
TheRVgeeks
Friday 16th of September 2016
Hi Ron,
It's not uncommon for the OEM fabric to be assembled from multiple pieces... and for that to be the failure point over time. Tough Top only manufactures their slideout and awning fabric from a single piece, so it doesn't suffer from that problem.
As for our tire covers... we get LOTS of questions about them, but we're sorry to report that they are no longer manufactured (we're especially sorry since ours are now getting old enough that we may need to replace them in the near future). MCD Innovations used to make them, but long ago stopped since their roller shade business took off. We're still looking to find something comparable to what we have, but haven't found anything we like as much as what we've got. If we find anything, we'll be sure to let you know here.