
Over the years, we’ve demonstrated how to replace the fabric on many different awning & slide topper models. That includes a Dometic awning fabric replacement on one of their most popular models — the Dometic/A&E manual pull-down patio awning.
We’ve actually created two videos for the same model. After learning a new way to do the job more easily, we made an updated new video. It shows us helping our friends Tom & Cait of Mortons on the Move replace the awning fabric on their 5th wheel.
We know some people prefer to read rather than watch a video. So we’ve created the following post detailing the new easier process for anyone looking to do a DIY Dometic awning fabric replacement. The newer video is included at the end, too.
- 1) How to Replace an RV Awning the Easy Way
-
2)
Dometic Awning Fabric Replacement Step-by-step Instructions
- 2.1) Measure For Your New RV Awning Fabric
- 2.2) Retract the Awning
- 2.3) Set The Awning Control to The “Roll-Down” Position
- 2.4) Pull the Awning Out Slightly
- 2.5) Insert a Straight Pick into the Roller to Lock the Spring
- 2.6) Remove the Bolts on the Awning Arms
- 2.7) Lift the Roller Tube Out of the Arms
- 2.8) Unroll the Fabric From the Roller Tube
- 2.9) Unwind the Spring on the Right
- 2.10) Drill Out the Rivet Heads
- 2.11) Remove the Spring Mechanism
- 2.12) Mark Awning and Valance Slots
- 2.13) Separate the Awning and Valance (If Needed)
- 2.14) Slide Out the Roller Tube
- 2.15) Remove the Fabric From the RV Track
- 2.16) Disconnect One Awning Arm
- 2.17) Slide the Awning Fabric Out of the Track
- 2.18) Prepare the RV Awning Track for the New Fabric
- 2.19) Lubricate the Awning Track
- 2.20) Install the New Fabric
- 2.21) Reinstall the Awning Arm
- 2.22) Trim Bead Cord as Necessary
- 2.23) Lubricate Both the Awning and Valance Tracks
- 2.24) Reinstall Right Spring and End Cap
- 2.25) Install New Pop Rivets
- 2.26) Return the Spring to Proper Tension
- 2.27) Center the Fabric
- 2.28) Center the Roller
- 2.29) Roll the Fabric Onto the Tube
- 2.30) Insert the Brackets Into the Awning Arms
- 2.31) Reinstall the Bolts
- 2.32) Release the Left Spring
- 2.33) Extend the Awning
- 2.34) Reinstall the Set Screw(s) and Enjoy Your Dometic Awning Fabric Replacement!
- 3) Free RVing Tips, Tricks, Reviews, Giveaways & More
How to Replace an RV Awning the Easy Way
The “old way” of replacing awning fabric (Dometic manual pull-down model) might be considered by some to be the “official” way to do it. But it’s considerably more difficult, and we promise you the new way is much better.
This method may seem like there are a lot of steps. But that’s partly because we wanted to include every detail to ensure you have all the steps. It’s actually surprisingly easy for any reasonably competent DIY RVer, with the help of a friend or two.
As always, use extreme caution on ladders, and prepare for the job ahead of time by laying out everything you’ll need to complete the project.
What You’ll Need For Dometic Awning Fabric Replacement
Following is a list of all the items needed to complete the job. We’ll provide an Amazon link for most items needed for the project in case there’s something you don’t already have in your tool kit.
In addition to this list of tools and supplies, you’ll need a marking pen (like a Sharpie) and two tall (8′) step ladders. If you don’t have access to ladders, they can be rented from a local home improvement center.
- Cordless Drill
- Tape Measure
- Vice Grips
- Silicone Spray
- Utility Knife
- Pop Rivet Tool
- 3/16″ Pop Rivets
- 8″ Wire Cutters
- 10″ Flat File
- Masking Tape
- ProFlex Clear RV Sealant
- Caulk Gun
- Diagonal Cutting Pliers
- Straight Pick
- Slot Head Screwdriver
- Hammer
- #2 Phillips Head Screwdriver
- Replacement Fabric for Dometic Awning
We highly recommend ordering your Dometic patio awning replacement fabric directly from Tough Top Awnings. That’s what we’ve had on our rig for years, and it’s better than any other material we’ve ever seen. They also carry a few replacement parts & supplies (anti-billowing devices, pull-straps, straight picks, etc) for manual awnings, electric awnings, and slide toppers.
Be sure to use the coupon code RVGEEKS to save yourself some cash!
The original equipment fabric that comes on RV awnings and slidetoppers is... well, how do we say this?... CRAP!. It's no surprise, since the RV manufacturers are looking to cut their costs...Show More
The original equipment fabric that comes on RV awnings and slidetoppers is... well, how do we say this?... CRAP!. It's no surprise, since the RV manufacturers are looking to cut their costs. Instead of replacing it with the same stuff that failed in the first place, get high-quality replacement fabric from Tough Top Awnings, instead.
Check out our Tough Top Awnings videos here
Plus you can save 5% on your entire order from Tough Top Awnings. The coupon code is valid online or over the phone!
Show LessDometic Awning Fabric Replacement Step-by-step Instructions
Measure For Your New RV Awning Fabric
This first step will need to be completed at least a couple of weeks before you actually plan to do the job because it involves determining what size replacement awning material you’ll need. Measure your roller tube from the inside of one end cap to the inside of the other end cap.
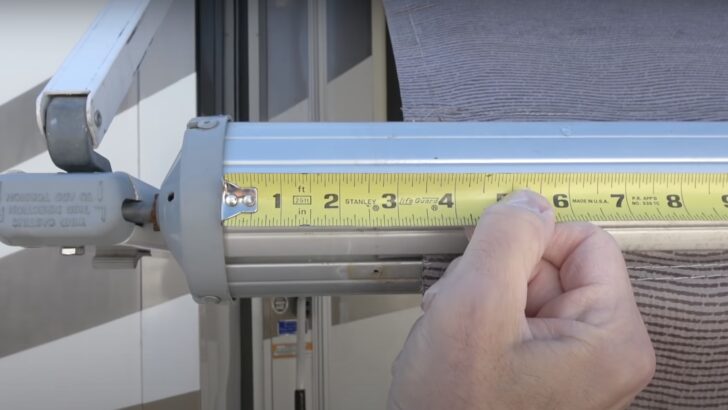

Use a tape measure to measure the distance between the inside edge of each end cap of your awning’s roller tube.
Once you have your measurements, go to the Tough Top Awnings website and place your order. Once you’ve received your beautiful replacement material, you’ll be ready to replace Dometic awning fabric like a pro.
For the record, we didn’t invent this technique. We learned it from Tyler Hammack at Tough Top Awnings. Tyler not only makes the best awning & slide topper replacement material, but he knows more about awnings than anyone we’ve ever met. And he’s a great person and a good friend.
Retract the Awning
Start by stowing the awning to check the spring tension. If the awning retracts on its own without “helping” it, then the tension should be fine the way it is. But if it requires some help to close completely, we’ll explain how to tighten the springs when we get to that point in the process.
Set The Awning Control to The “Roll-Down” Position
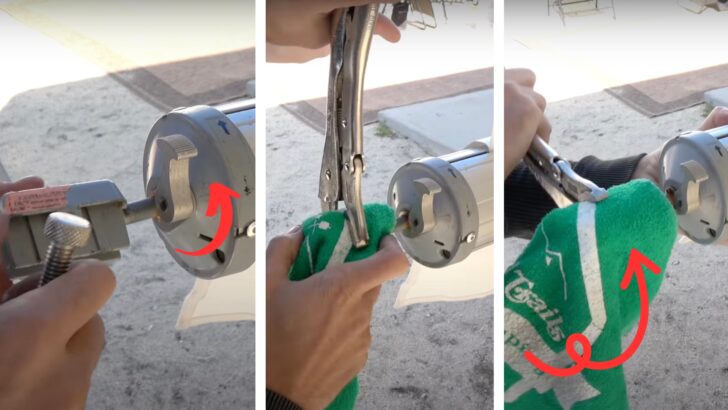
Use your awning rod to flip the latch down to set the awning control into the roll-down position.

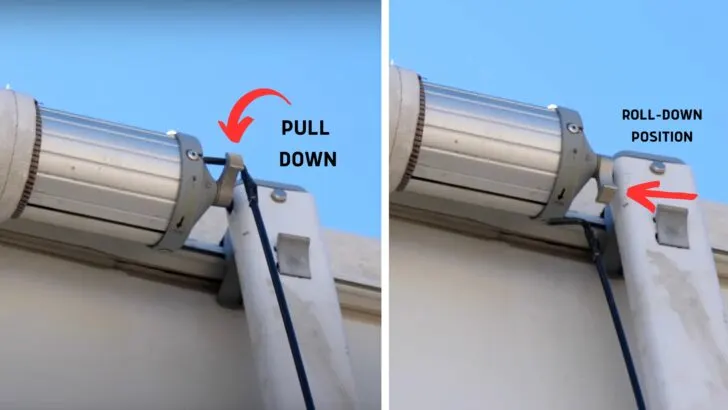
Flip the latch down to put the awning in the roll-down position.
Pull the Awning Out Slightly
Pull the awning roller out away from the side of the RV about a foot or so.
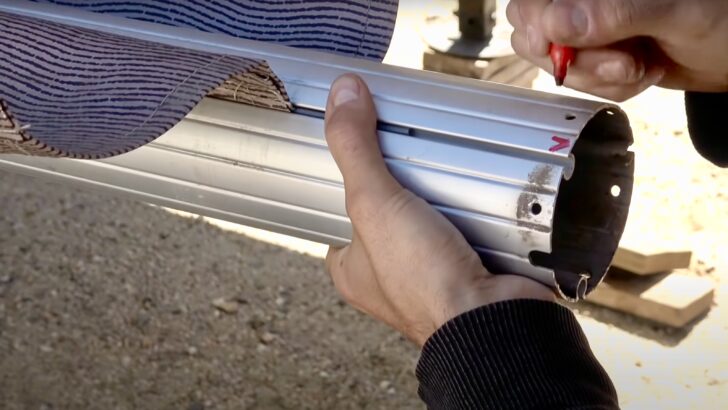
Insert a Straight Pick into the Roller to Lock the Spring
When the hole in the awning cap faces straight out, insert a straight pick through the opening and through the center rod behind it. It might take a little wiggling to line up the holes. Be sure to get the pick completely inserted through the center rod. Doing this locks the spring inside the left end of the roller tube.
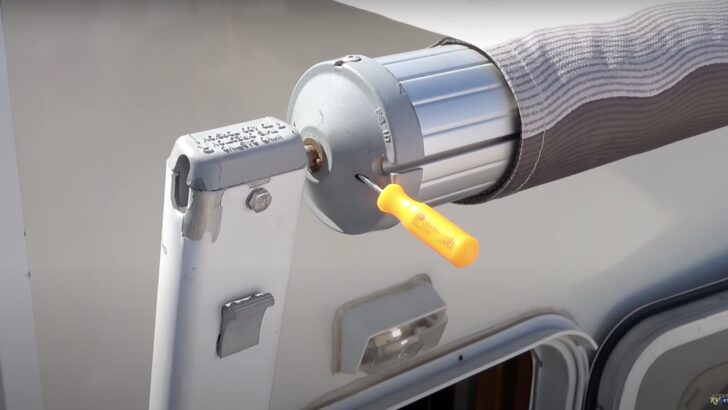
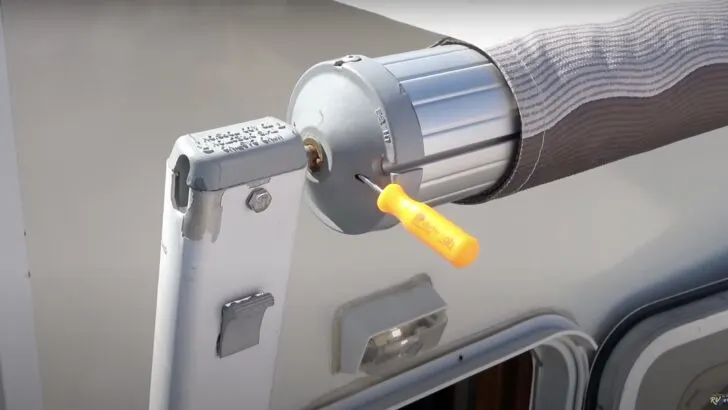
Insert the straight pick through the opening of the end cap and the metal rod behind it.
Remove the Bolts on the Awning Arms
With the pick inserted and the spring locked, you can now remove the bolts on both the left and right awning arms. We suggest removing the bolts from the left arm first, since you’re already on the ladder there (after inserting the pick).
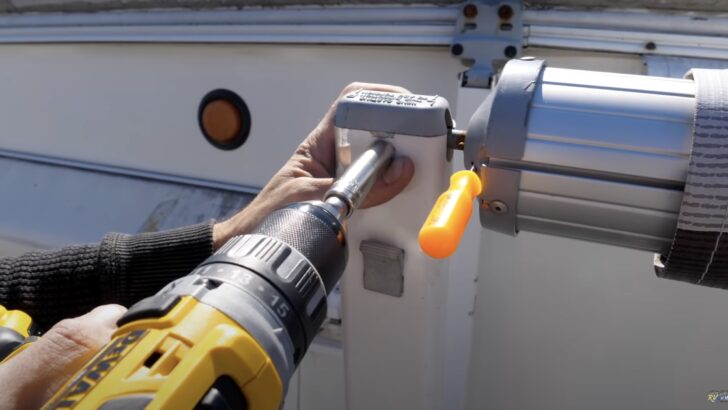

Removing the bolt on the left awning arm. Then remove the same bolt from the top of the right awning arm.
Lift the Roller Tube Out of the Arms
With one person on a ladder at each end of the awning, lift both ends of the roller tube out of the arms.

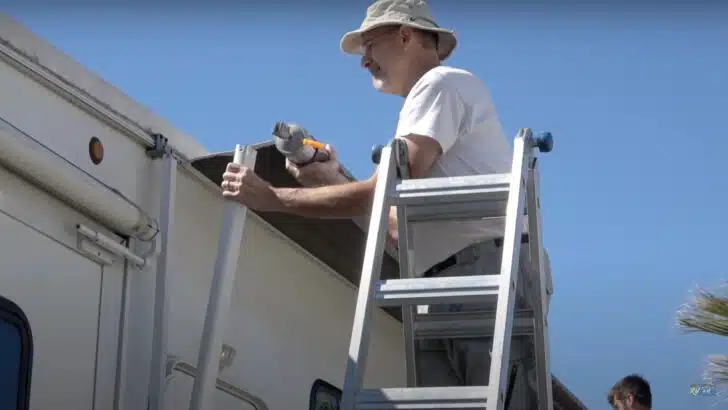
Lift the roller tubes out of the arms, then secure the arms against the RV using the latches on each arm.
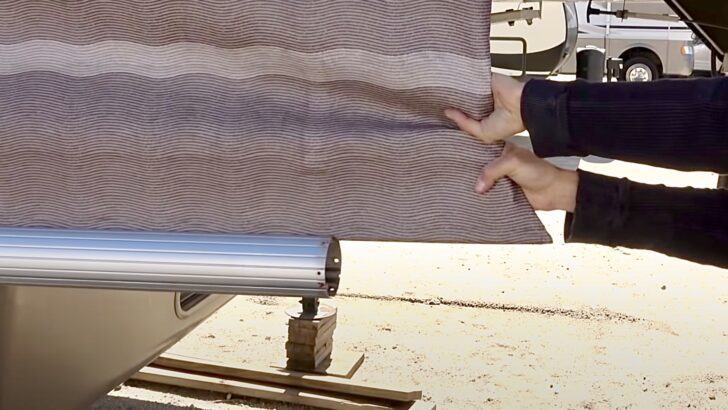
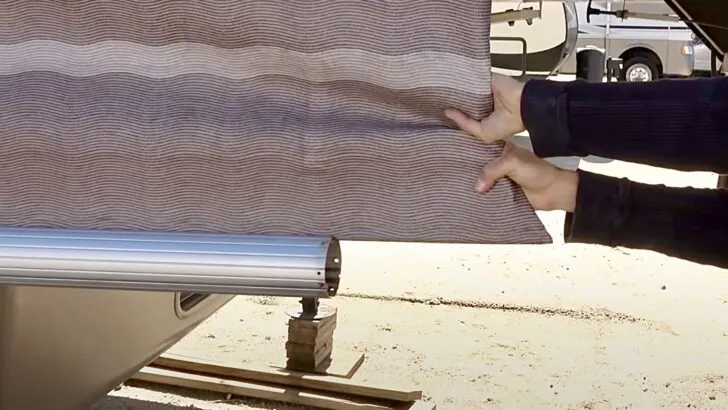
Unroll the Fabric From the Roller Tube
Slowly and carefully unroll the fabric as you and your helper descend the ladders together. Pause on the way down to flip the arm latches closed so they’ll stay in place on the side of the RV.
Continue unrolling the fabric from the tube until it’s all the way down. When the roller tube is hanging down, you may want to protect the side of the RV by wrapping a soft cloth around each end of the roller tube.
Unwind the Spring on the Right
The spring on the left is pinned with the straight pick, but the spring on the right still needs to be unwound and removed. Place a cloth on the bracket to protect the finish, then clamp vice-grip pliers securely onto the bracket.
Hold the vice grips securely and flip the latch to the roll-up position. Begin rotating the bracket (top toward the RV), keeping a firm grip on the vice grips, and carefully counting the number of rotations as you go. (You’ll need to know how many turns are required when it’s time to re-tension the spring.)
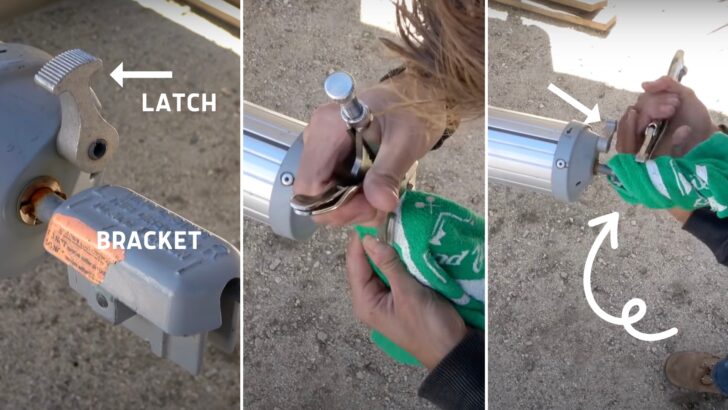

Release the spring tension by turning the bracket clockwise (the top of the bracket toward the RV). Be sure to count and remember the total number of rotations as you go. Again, pay attention to the direction of rotation. (You’ll thank us later)
When the spring is completely unwound, you can remove the vice grips and the cloth.
Drill Out the Rivet Heads
Drill out the three rivet heads that secure the right cap into the end of the roller tube.
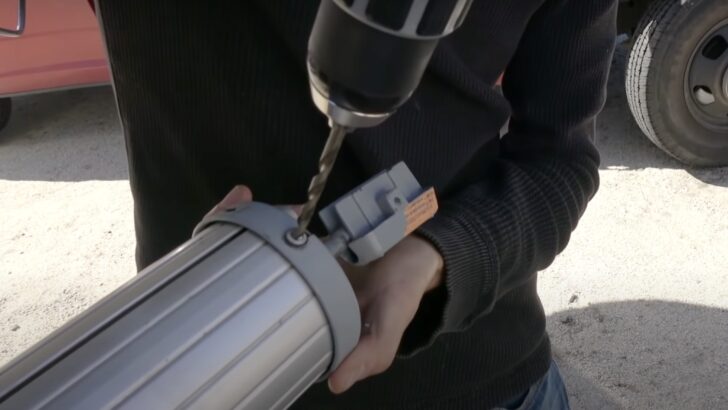

Drill out the heads of the three rivets that hold the end cap and spring into the roller tube.
After you drill out the first rivet, use a Sharpie to mark the cap and the roller to be sure you can line them up during reassembly.
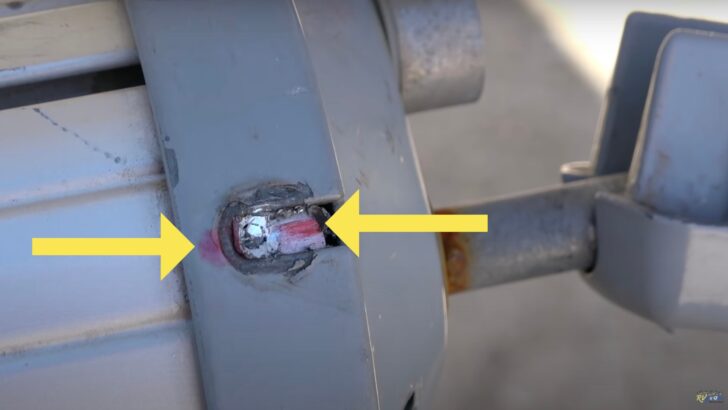
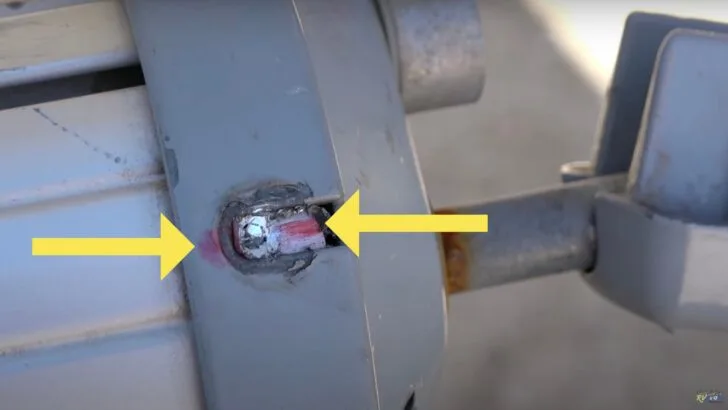
Use a Sharpie to make visible marks on the roller cap and tube. This will help ensure the cap goes back on in the same position it was before.
After you’ve marked the cap and tube, drill out the other two rivets. Once you’ve drilled the heads off the rivets, you may need a Phillips head screwdriver and a hammer to knock out the back of the rivets. Place the tip of the screwdriver in the hole and tap the handle of the screwdriver with your hammer to punch out the backs of the rivets as needed.
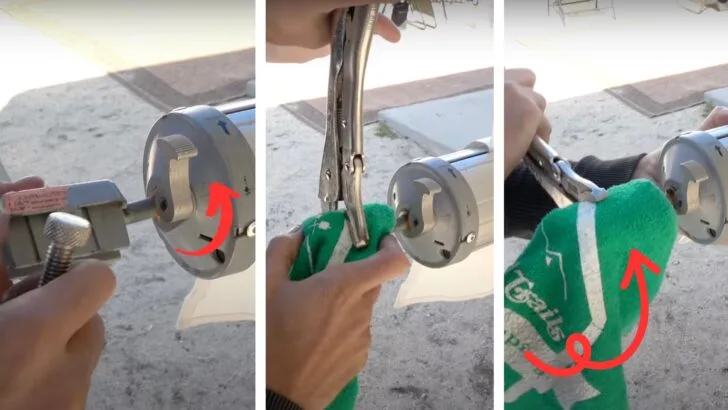
Remove the Spring Mechanism
Once the three rivets have been removed, you can pull the spring mechanism out of the roller tube. The springs is connected to the end cap so the entire assembly will pull right out as a single unit.

Slide the end cap and spring assembly out of the roller tube.
Mark Awning and Valance Slots
Using your Sharpie, mark the track that the awning is in with the letter “A” (for awning) and the track that the decorative valance is in with the letter “V” (for valance). Marking the tracks will let you know which track to slide each bead cord into during reassembly. The end caps will cover the markings, so no worries about them being visible when you’re done.

Use your marker to write the letter “V” on the track where the decorative valence goes and the letter “A” on the track where the main awning fabric is. You’ll appreciate it during re-assembly!
Separate the Awning and Valance (If Needed)
With time and age, your original fabric may have shrunk, making it difficult to slide the awning off the roller because the bead cords in the two tracks are being pulled together.
If that’s the case in your situation, you can use a utility knife to cut the fabric so it can be slid out in two pieces. Simply run your utility knife down the entire length of the fabric on the roller tube, separating it into two sections.
NOTE: It’s common for original awnings to have the bead cord clamped into the end caps. Since one of the caps (the one you pinned with the straight pick) is still in place, you may have to cut that cord there to slide the fabric off the roller. You can use a utility knife or a small drill bit to do that. There’s no harm in cutting the cord, so don’t worry!
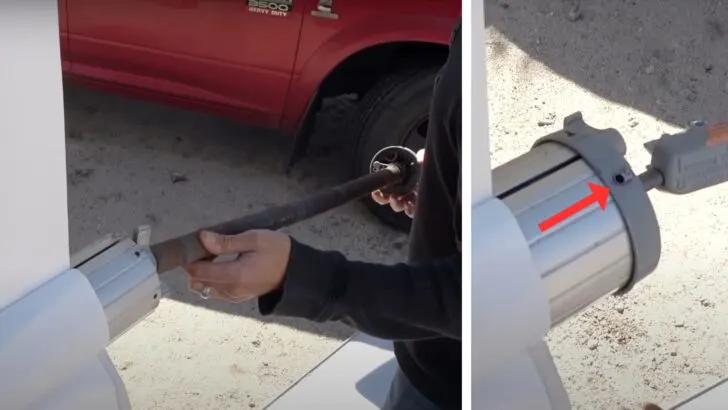
Slide Out the Roller Tube
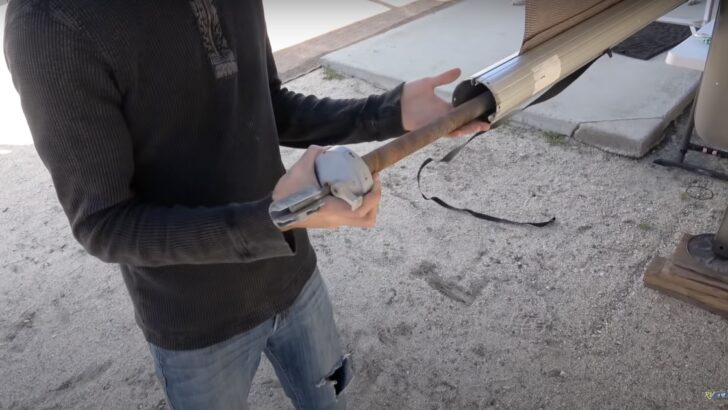
With a helper firmly holding the awning fabric at the right side of the roller tube, you can now slide the tube out to the left and completely off of the fabric, which will be left hanging along the side of the RV.
Firmly grasp the old fabric while a helper pulls/slides the roller tube out toward the back of the RV (to the left).
Remove the Fabric From the RV Track
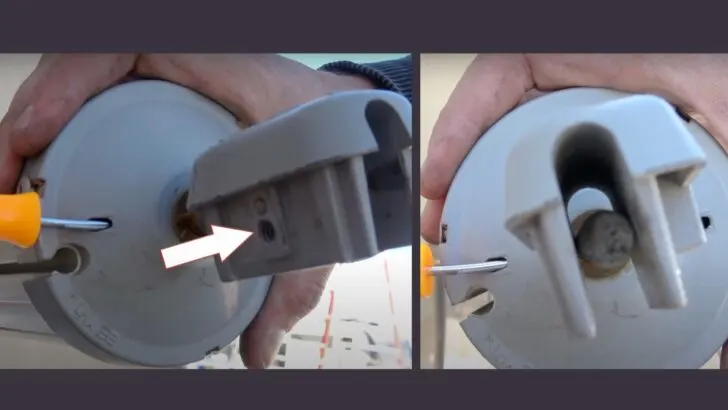
To slide the fabric out of the track on the RV, you’ll need to remove the set screw(s) at the end(s) of the awning track on the side of the RV. Some rigs have one set screw, and some have two — one at each end.
NOTE: If you have gutter extensions, you’ll likely need to remove the one on the side from which you’ll remove the fabric (usually toward the front of the RV).
Disconnect One Awning Arm
Remove the two screws that secure the top of the awning arm to the RV. Most commonly, you’ll slide the awning out to the right (toward the front) of the RV, so you’ll need to remove the awning arm on the right.
But if your setup makes it preferable to slide the awning fabric out to the left side of the RV, you’ll want to remove the left awning arm instead. Once you’ve removed the screws from the top of the awning arm, release the spring clip at the bottom. Carefully lower it down and set it aside.
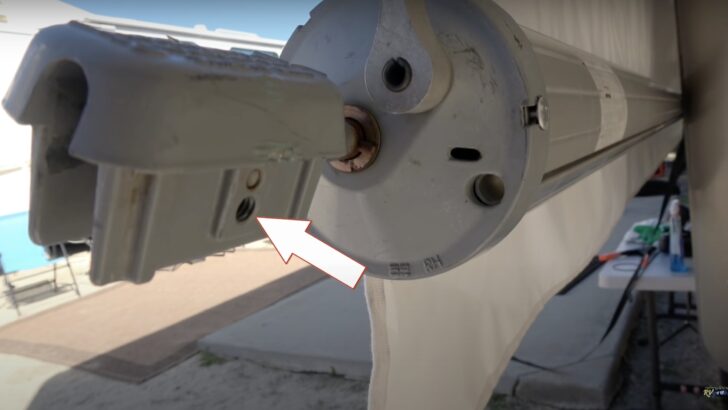
Slide the Awning Fabric Out of the Track
Now you can remove the awning fabric from the track at the top of the RV. It may take a firm pull to get it to start sliding. Continuing pulling until the awning fabric has been completely removed from the awning rail.

Slide the old fabric out of the track. It may take a pretty serious pull to get it started.
Prepare the RV Awning Track for the New Fabric
Using a flathead screwdriver, carefully widen the opening in the track on the RV. Then file off any sharp edges. Finally, use your masking tape to tape any sharp edges that could snag your new awning fabric as you slide it into place.

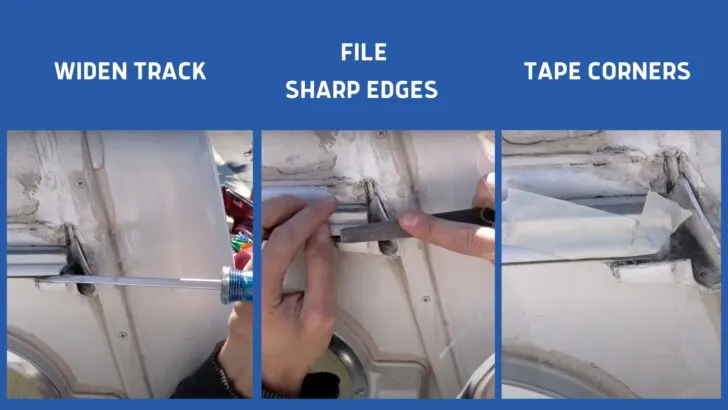
Widen the track with a flat-blade screwdriver, file any sharp edges, and protect the new fabric from potential tears during installation by putting masking tape over the corners.
Lubricate the Awning Track
Spray the entire length of the track with silicone spray to make it easier to slide the new material into the track.
Install the New Fabric
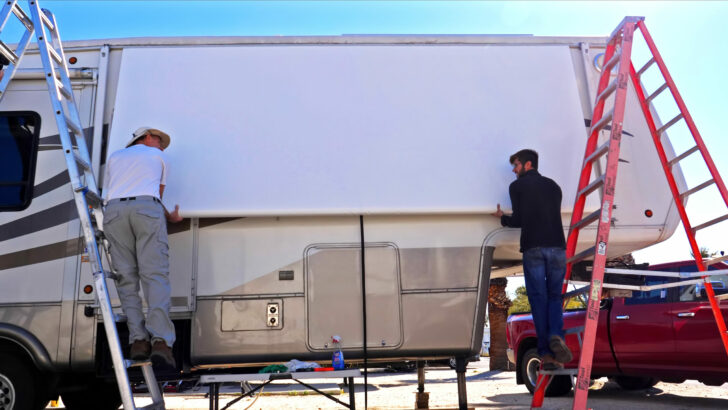
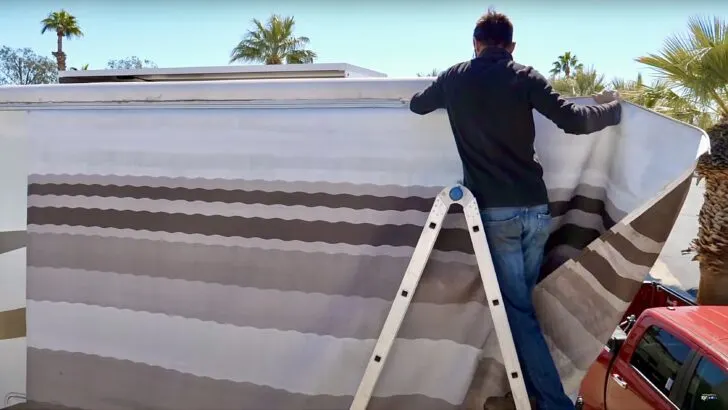
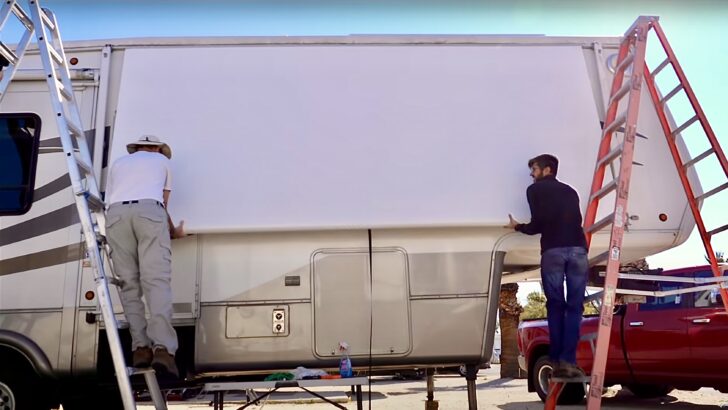
This is most easily done with three people — One on the ground handing the awning fabric upward, one on a ladder feeding the bead into the track, and one on the second ladder pulling the leading edge of the fabric through the track.
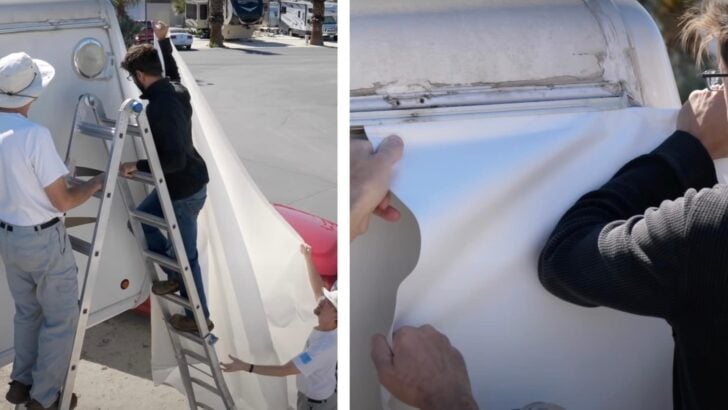
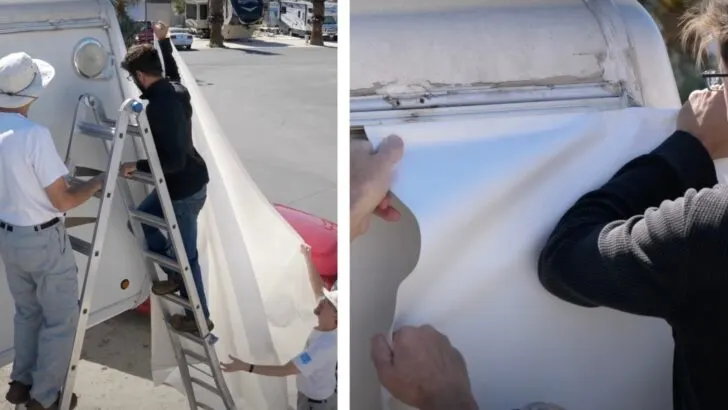
It’s easiest to have three people to feed the new awning fabric into the RV track… one on the ground holding the fabric up and two on ladders feeding the fabric through the track.
It’s possible for two people to manage this process, but it’s definitely easier with three. Move the second ladder as needed as you continue to feed the fabric along the length of the track.
Reinstall the Awning Arm
Once your fabric is approximately centered, you can reinstall the awning arm.
First, click it into place at the bottom. Then reinstall the two screws at the top. Be sure to coat the threads with the appropriate caulk (like the ProFlex in our list at the top of the post) to prevent leaks.
Once the screws have been fully reinstalled, wipe away any excess caulk.
Trim Bead Cord as Necessary
The bead cord that goes into the roller should stick out on the ends by about one inch or so. If it’s much longer than that, you can trim off the excess bead cord using a wire cutter.
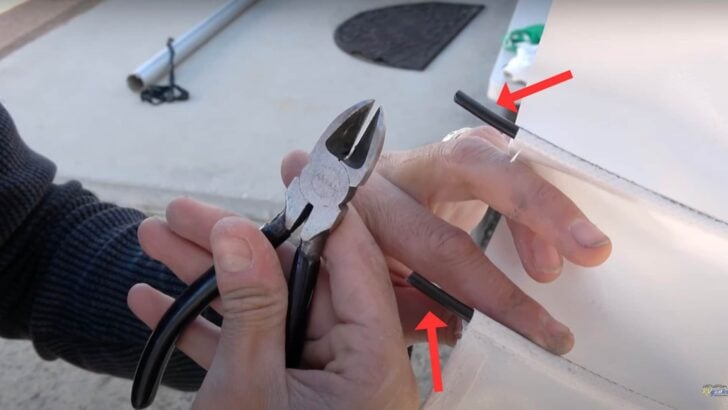
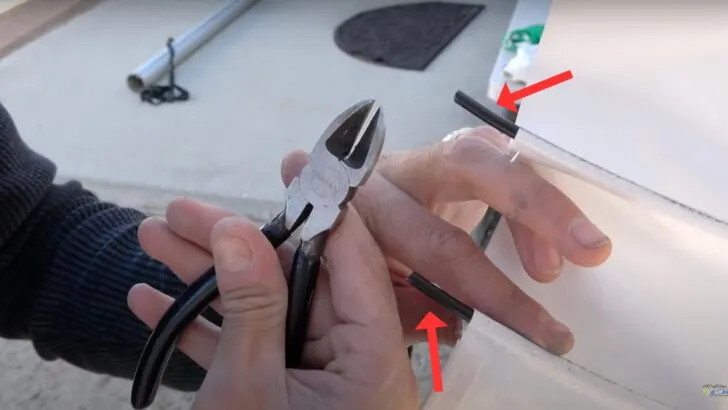
The ends of the bead cord should be about an inch long. You can trim any excess cord with a pair of wire cutters.
Lubricate Both the Awning and Valance Tracks
Spray silicone all the way along the roller tube’s “A” and “V” tracks. Hold the tube in place and start the bead cord into the appropriate tracks – “A” for the awning and “V” for the valance.
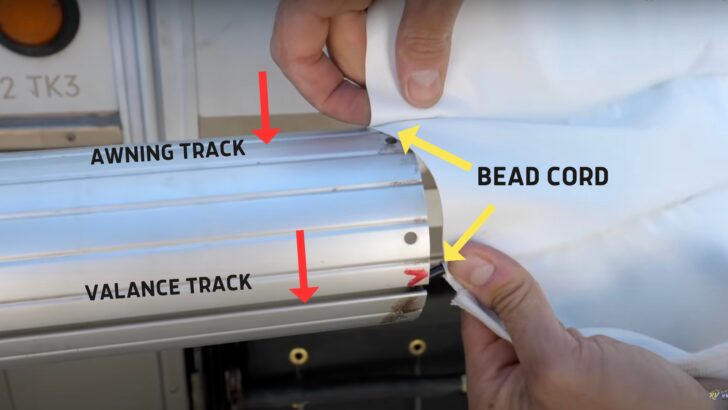
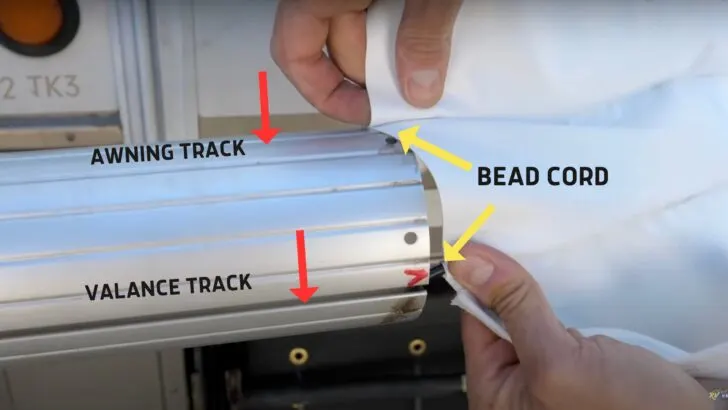
Feed the bead cord into the A (awning) and V (valance) tracks.
Line up the two ends of bead cords and begin sliding the entire length of the tube onto the fabric. If your pull strap is worn out, this would be a great time to replace it!
Reinstall Right Spring and End Cap
Reinstall the right spring and end cap, making sure to line up the two marks you made on the cap and roller tube.

When reinstalling the spring, make sure to line up the marks you made on the roller tube and end cap.
Install New Pop Rivets
Install three new pop rivets to secure the cap and spring into place.


Install three new pop rivets to secure the cap and spring into place.
Return the Spring to Proper Tension
Flip the awning control to the roll-down position and cover the bracket with your cloth again to protect it.
Return the spring to its original tension by doing the opposite of what you did when you removed the tension. Count the number of turns to match the number you unwound it. And be sure to wind in the correct direction!
Place your vice grips firmly on the bracket and begin to turn in the opposite direction from the way you turned before, which should be away from the RV. Be sure to keep a firm hold on the vice grips, and count the revolutions to wind the spring back to its proper tension.
If your awning needed help in retracting, now is the time to tighten the spring by adding a couple of extra turns. If you do add turns, be sure to do the same thing on the opposite end of the roller by clamping your vice grips onto the bracket, pulling the pin, tightening the spring, and repinning it.
PRO TIP: This will make the next step super easy. Note the position of the left bracket (the side you pinned). On ours, the hole for the bolt is on the back, facing the RV, and the angle is at about the 11 o’clock position.

Aligning the front bracket with the rear bracket will make it much easier to re-install them both into the tops of the awning arms.
When you’re re-tensioning the front spring, make sure the bracket on the right side of the tube matches the pinned bracket. Note in our photo below that the hole for the bolt on ours is in the back facing the RV, just like the pinned bracket.
During spring re-tensioning, we rotated the front bracket until it was parallel to the one on the other end, which is the 1 o’clock position.

Placing the bracket in the 1 o’clock position with the bolt hole facing the RV made it parallel to the other bracket.
Center the Fabric
Use your measuring tape to get the fabric as perfectly centered as possible between the awning arms. Pull the awning fabric left or right in the track as needed to center it.
Center the Roller
Do the same thing with the roller, sliding it left or right to get the same distance between the caps and the new fabric on both sides.
Roll the Fabric Onto the Tube
With two people climbing the two ladders together, roll the fabric up onto the tube as you go. Be sure to unlatch the awning arms on your way up.

Roll up the new awning fabric by carefully climbing the ladders together. Don’t forget to flip the awning arm releases on the way up.
Insert the Brackets Into the Awning Arms
Insert the brackets back into the tops of the awning arms. Because we previously ensured the two brackets were parallel, reinserting them into the arms should be a breeze.
Reinstall the Bolts
Reinstall the two bolts at the top of the awning arms (one on each arm), securing the roller tube brackets back into place.
Release the Left Spring
With both people holding the roller tube, remove the straight pick, which will release the left spring. Then gently allow the roller tube to retract against the side of the RV. It’s normal for the arms not to line up just perfectly yet. Fine-tuning the alignment is usually needed.
Slide the entire roller assembly left or right until the arms line up and close properly.
Extend the Awning
Extend the awning normally, and it should lay flat. Then retract it. If needed, pull the top of the fabric (the part that’s attached to the side of the RV) left or right until the fabric is square and lays flat. Retract and extend the awning to confirm it’s straight and the arms close normally.
Reinstall the Set Screw(s) and Enjoy Your Dometic Awning Fabric Replacement!
Now you can reinstall the set screw(s) into the side of the RV’s awning rail to prevent the material from sliding left or right.
Congratulations! You’ve got yourself a beautiful new awning!
If you have a different model awning or want to replace your slide topper fabric, view our entire list of awning & slide topper replacement tutorials.
If you’d like to view this tutorial in video format, check out our YouTube video below. You can pause as needed as you move along with your DIY project by following us as we did the job.
We hope this post and the accompanying photos and video will be helpful as you take on this DIY project. Doing this job yourself will save you a LOT of money (labor is the most expensive part).
You’ll also end up with a better result (Tough Top Awnings are FAR better than the junk from the factory since OEMs are only interested in the cheapest components). We’ve also seen a lot of other aftermarket awning fabric, and most of it is, frankly, awful.
Maybe the best part about doing this as a DIY job is the satisfaction of doing a great installation yourself — something you might not have been sure you could do. After all, nobody cares more about your RV than you do, so who will be more meticulous than you?
Free RVing Tips, Tricks, Reviews, Giveaways & More
Subscribe to our daily newsletter! We’ve been full-time RVers for 20 years (!) and share everything we’ve learned about RVing in our daily blog posts. Join our online community to receive a wealth of great RVing knowledge delivered right to your inbox.
Whether this is your first time on the road or you’re a seasoned full-timer, you’ll love the wide range of RVing topics we cover. Don’t miss a single article or any of our famous RV gear Giveaways — Subscribe today!
Randy
Tuesday 13th of June 2023
One thing I might add is to clean the awning and valance channels in the tube. Mine were full of mold, bugs, debris even after pulling out old one.