
The RV water heater anode rod is an unsung hero that sits quietly in the background, protecting your expensive RV water heater tank from damage and eventual destruction.
Today’s post is all about the RV anode rod, what it does, how it works, and which RV water heaters require them. We’ll tell you (and show you) exactly how to replace your camper’s water heater anode when it’s no longer able to protect your water heater tank.
What Is an RV Water Heater Anode Rod?
An anode rod for an RV water heater is a protective device whose sole purpose is to prolong the tank’s life. But not all RV water heaters have an anode rod.
Generally, only Suburban brand water heaters require an anode rod to protect the steel tank from corrosion. Atwood brand water heaters generally don’t use anodes because their tanks are made of aluminum. And RV tankless water heaters don’t have tanks at all, so they don’t need anode rods either.
The standard anode rod is made of magnesium, which is a soft reactive metal that “sacrifices” itself to preserve the steel tank and other components. It reacts with minerals in the water and neutralizes them so they don’t attack the other metal components of your water heater, such as the electric heating element, temperature probe(s), and even the tank itself (if it’s not aluminum).
The job of an anode for a camper water heater is to attract the corrosive minerals in the water so they’ll corrode the rod rather than the water heater itself. Anodes are also found in some boating applications for the same reason. They sacrifice themselves to preserve valuable metal parts.
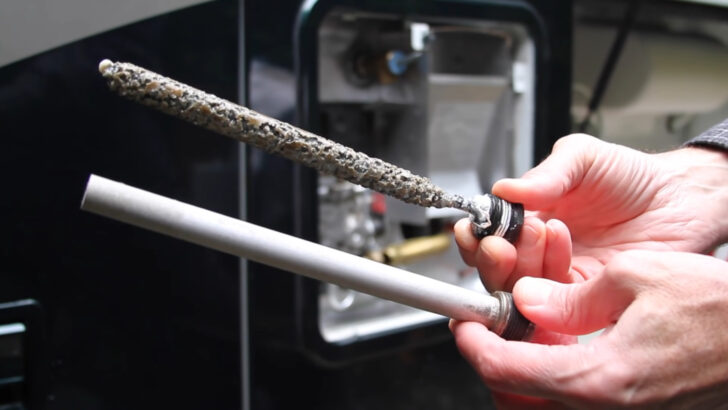
Once a brand-new anode (like the one at the top of the following photo) has spent some time sacrificing itself to save the Suburban water heater’s steel tank, it should look something like the rod on the bottom of the photo. The used rod shown here actually has quite a bit of life left in it, but replacing anodes once each year is the way to make sure they never break down all the way and stop working as a result.
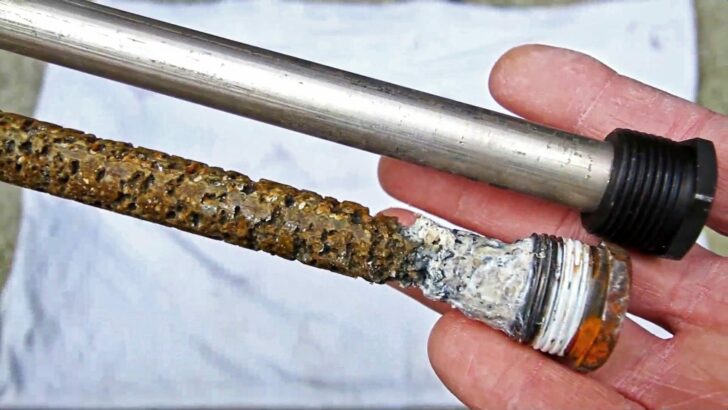

The anode rod on top is brand new. The one on the bottom has done its job, attracting corrosive minerals and sacrificing itself to protect the RV water heater. While it’s not completely worn out, we’ll replace it once per year anyway, since it’s such cheap insurance to protect our valuable water heater.
Anode rods should be checked and usually replaced about once a year when you’re draining and flushing the water heater to winterize it or whenever you’re giving it a good annual flush & clean.
Here’s what Suburban has to say about anodes:
“All Suburban water heaters are protected by a magnesium or aluminum anode to prolong the life of the tank. Under normal use, the anode rod will deteriorate. Because of this, we recommend it be replaced annually or when consumption or weight loss of the rod is greater than 75%. Note: Water with high levels of iron and/or sulfate will increase the rate of deterioration. To extend anode life, drain water from the tank whenever the RV is not being used. Avoid any extended time of non-use with water in the tank.”
Why Don’t All Camper Water Heaters Have an Anode Rod?
First, anode rods are only required for tanked water heaters. Tankless water heaters have no tank, so they have nothing to protect. Also, Dometic/Atwood tank-based water heaters use an aluminum tank that doesn’t need anodic protection.
Suburban brand water heaters use an enamel-coated steel tank that needs protection and comes factory-equipped with an anode rod that needs to be replaced about once a year.
If you don’t replace the anode rod inside your Suburban water heater, you’ll eventually end up needing to replace the tank as well as the electric heating element and temperature probe(s), a far more expensive proposition. If you travel in areas with a high mineral content in the water, it will happen even sooner.
In addition to the steps for draining the water heater, flushing it out, and replacing the anode rod, our video below shows how water quality affects an RV water heater. You’ll see the difference between the condition of our tank and heating element the year we spent most of our time in the desert southwest (with a high mineral content in the water) vs. the year we spent most of our time in the Pacific Northwest where the water quality is excellent.
Can I Use an Aftermarket Anode for My Suburban RV Water Heater?
Can you? Sure. Should you? We don’t think so. We tried that ourselves with results that proved to us that the OEM Suburban anode rod did a far better job of attracting corrosive minerals and sacrificing itself for the benefit of our hot water tank.
As a result, we highly recommend using only an OEM Suburban anode rod as a replacement. These aren’t terribly expensive and are far better at serving the intended protective role than aftermarket rods are. We’re all for using less expensive aftermarket products as long as they meet the manufacturer’s requirements and do a good job.
Here’s our video showing the results of trying an aftermarket anode and an OEM Suburban anode, followed by links to the appropriate anode rods to use with Suburban RV water heaters.
Suburban Water Heater Anode Rod (Magnesium)
This is the standard magnesium anode rod that Suburban water heaters come with. It’s the most protective for the tank & other metal components inside the water heater.

- Easily installs
- Extends tank life
Suburban Water Heater Anode Rod (Aluminum)
This is an alternative anode rod made of aluminum that Suburban says is for locations where the water has a high pH or is particularly soft. These water conditions tend to react more aggressively with the magnesium rod, causing it to require replacement more frequently.
Most of the time, however, it’s used when the standard magnesium rod causes an odor (usually a rotten egg smell) because of the specific chemistry of the local water. Switching from the magnesium rod to aluminum should stop the odor, but will still protect the water heater’s tank and metal components.

- USE: Aluminum anode with commercial grade stainless steel core helps extend the working life of the anode rod and your hot water tank
- DIMENSIONS: Best suited for high pH and soft water; 12"W x 5"H
In addition to a new anode rod, you’ll need a wand to rinse the tank out.

- EXTENDS THE LIFE OF YOUR WATER HEATER: The tank rinser lifts sediment that collects at the bottom of water heaters and flushes it out. This Camco RV...
- IMPROVES WATER HEATER FUNCTION: This camper accessory helps prevent tank corrosion and also restores your hot water tank’s heating efficiency by...
It’s a good idea to use Teflon plumber’s tape on the threads of the anode rod in order to ensure that it doesn’t leak and is easy to remove when the time comes. We’ve heard people disagree with this because they think the tape will prevent the metal of the anode rod from making an electrical connection with the metal of the water heater’s tank. Anode rods aren’t electrically powered but need to be “grounded” to the rest of the water heater to work.
But the plumber’s tape is so thin that the threads of the anode rod will cut through the tape enough to make contact as it should. We got great use out of our water heater, even using plumber’s tape on the anode threads. And for what it’s worth, the Suburban anode rods we’ve purchased came with Teflon tape already wrapped around the threads.
- VCELINK Teflon Tapes can be used to connect threaded pipes. A good solution for enhancing the tightness of pipes.
- WIDELY APPLICABLE: Plumbing tape is designed for home and threaded pipe applications. Suitable for the most threaded-installing piping devices,...
For more helpful information on all things related to RV water heaters, be sure to have a look at our guide to the RV water heater as well as our post on the water heater flush and inspection. We’ve also got a full post on informative RV water heater tips you need to know. If you’re thinking of ditching the tank, check out our post on Tankless vs Traditional RV Water Heaters.
Free RVing Tips, Tricks, Reviews & Giveaways
As 20-year full-timers, we share everything we’ve learned about RVing over the years. Join our online community to receive a wealth of great RVing knowledge delivered daily to your inbox.
Whether you’re a new RVer or a seasoned full-timer, you’ll love the wide range of RVing topics we cover. Don’t miss a single article or any of our famous Giveaways. Subscribe to our newsletter today!
Jere
Sunday 14th of January 2024
I just watched your video about draining and flushing the Hot Water Tank. I knew about the Flushing and using the probe wand along with the amazing results, however I have never heard or seen the use of Vinegar. DUH, that's a great way to REALLY clean the residue from the Tank. However I did not find the info about the Borescope. Additionally, what is the amount of Vinegar to use? Love RVGEEKS Thank You Jere
TheRVgeeks
Monday 15th of January 2024
Hi Jere! Glad to give you a new idea for flushing your water heater! We usually used about half a tank of vinegar (6 gallons in the case of our 12 gallon water heater) and filled it the rest of the way with water. It's not all that sensitive, so a little more or a little less won't hurt.
Here's a link to Amazon for the equivalent borescope we used: https://amzn.to/3vw2mz0
Brigitte
Sunday 14th of January 2024
Thank you so much for the very thorough but concise explanation! Do you have a link for the Suburban water heater plastic plug?
TheRVgeeks
Monday 15th of January 2024
Here you go, Brigitte: https://amzn.to/3HkUkM7 This should do the trick for ya!
Tim
Thursday 20th of July 2023
I have a suburban hot water tank. But there is a strong rotten egg smell (h2s). How do you eliminate and prevent this smell? Others have recommended an aluminium zinc anode rod to prevent the odour. Others have said a magnesium anode rod creates the strongest odour
Jim Allen
Tuesday 15th of March 2022
I've used sacrificial Zinc anode's in other application's for years. As always one must be careful buying aftermarket part's. Having owned, and operated a class 8 heavy duty truck, half my career, and worked in every aspect of the business, mostly as a driver, and mechanic, one's bound to learn something in close to 45 year's. Longer actually as I started working on trucks in high school. Weekends, and summer's. As a kid I had some hot rod car's. Fast cars, and the fastest was a 1935 Ford pickup with an insane 350 Chevy in it. Thing about this 350 was every single part in it, had a GM part number on it. Chevy didn't sponsor racing, but they provided the part's. Called "GM Service Package," the engine was based on a 1970 Corvette 370 horsepower 350. (LT-1) the camshaft was a trans-am racing cam, the cylinder head's also. "Service Package," for off highway use only, it said. Well, 1935 Ford pickups weren't emissions tested. That was lesson number one in OEM. Next lesson, 1965 Peterbilt model 281. Updated Cummins power, 855 inch with a factory CPL 101 290 horsepower. A 1975 block. When I was done hot rodding it, it's about 700 horsepower, and not really breathing hard. Again, every part in it, OEM Cummins. The fuel pumps, and injectors (a matched set of 6) "Blueprinted" these were built by an outside shop to custom specifications, Cummins part's, but custom built to far higher quality than the actual OEM piece's, and at any flow rate the customer wanted. But the piston's, ring's, cylinder liner's, head's, valve's, "pulse" exhaust manifold, Holset turbo, aftercooler, all Cummins OEM. We used all Sodium filled exhaust valves. Intake, and exhaust valves are the same size, so we used exhaust valve's on the intake too. (a little trick) There wasn't another truck around that could get around me on a hill. The drivetrain was also updated, and the truck hand built. Lowered, chrome, and red. With low-profile tire's, (275/85X24.5) 3.70 rear end's, and a 12513 speed trans. 8th over at 2400 rpm was 90 mph. Stick with OEM parts, unless you really know what you're doing. Clessie Cummins would've fainted, if he'd seen how much power his engine actually made. It stayed together too. 12 year's, electrolysis ate pinholes in the cylinder liners. The rest of the engine inside was flawless. The same thing that eat's your hot water tank.
David
Saturday 27th of June 2020
I find reinstalling a rv water heater anode rod very trying! When you insert the rod the weight of it makes lining up the rod for screwing in the threads very difficult. Any pointers? Thanks!
TheRVgeeks
Saturday 27th of June 2020
Hi David. As with any threading, it’s super important to start the threads by hand, to avoid cross-threading (and damaging the threads). It is indeed a bit of a balancing act when screwing the anode in. Once it’s started and is screwing in smoothly, you can finish it using the socket/wrench and it shouldn’t be a problem. Hope that makes sense.