
Today’s post is a complete step-by-step tutorial on performing an Onan Quiet Diesel 7500 generator coolant change yourself as a DIY maintenance project.
So, if you’ve ever wondered, “Can I change the coolant on my RV’s Onan generator myself?” the answer is yes, you can! We’ve got a list of what you’ll need and the steps to take to complete the job, laid out with photos and a video.
Before we get into the tutorial, we want to note that these steps follow step by step as we flush the cooling system in our 2005 Onan 7500 Quiet Diesel generator. But it is a very popular model, and similar models will have the same or similar process.
Check your owner’s manual for any particular instructions related to your Onan generator coolant change in case other models or model years have a different recommended schedule and/or procedure.
Without further ado, here are the general steps covering how to change the coolant on 7500 Onan generators.
- 1) How Often Should You Service the Coolant On an Onan 7.5 kilowatt QuietDiesel Generator?
- 2) What Items Do I Need to Change the Coolant In an Onan 7500 Quiet Diesel Generator?
-
3)
How to Do a Coolant Change In an Onan Quiet Diesel 7500 Generator
- 3.1) Access the Radiator Cap
- 3.2) Remove the Radiator Cap
- 3.3) Remove the Coolant Drain Plug
- 3.4) If Needed, Siphon Coolant From the Overflow Tank
- 3.5) Flush the Radiator
- 3.6) Fill the Expansion Tank with Clean Water
- 3.7) Start the Generator and Bring It Up to Operating Temperature
- 3.8) Turn Off the Generator After Ramping Down the Load
- 3.9) Allow the Generator to Cool Down
- 3.10) Drain the Flush
- 3.11) Refill the Entire Cooling System With Fresh Water
- 3.12) Start the Generator Again
- 3.13) Turn Off the Generator After Ramping Down the Load
- 3.14) Remove the Pressure Cap After the Generator Has Cooled
- 3.15) Drain the System Again
- 3.16) Replace Your Thermostat
- 3.17) Remove the Old Thermostat and Gasket
- 3.18) Install the New Thermostat and New Gasket
- 3.19) Replace the Generator Cover
- 3.20) Replace the Coolant Drain Cap
- 3.21) Pour Fresh Antifreeze into the Coolant Fill Tube
- 3.22) Turn Your Chassis Batteries Back On
- 3.23) Start the Generator and Release the Air From the System
- 3.24) Turn Off the Generator After Ramping Down the Load
- 3.25) Top Off the Coolant
- 3.26) Install Your New Pressure Cap
- 3.27) Reinstall the Plate
- 3.28) Check the Coolant Level In the Expansion Tank
- 3.29) Start the Generator and Check for Leaks
- 3.30) Run the Generator on High Load
- 3.31) Check the Coolant Level In 24 Hours
- 4) Free RVing Tips, Tricks, Reviews, Giveaways & More
How Often Should You Service the Coolant On an Onan 7.5 kilowatt QuietDiesel Generator?
You can check the service intervals for your generator’s cooling system in your owner’s manual. We do our Onan Quiet Diesel 7500 coolant change every two years, flushing the system and replacing the anti-freeze and radiator pressure cap.
Every other time (every four years), we also replace the thermostat. Unfortunately, the thermostat can only be replaced if you can access the top of the generator’s engine. So if the generator isn’t on a slide-out, you may be unable to do that yourself.
The rest of the job can be done without a generator slide.
So, the schedule for our 2005 Onan QD7500 HDKAJ generator is:
- Coolant Flush & Change + Cap Replacement: Every 2 years (or every 1,000 hours, whichever comes first)
- Thermostat Replacement: Every 5 years (or 1,000 hours, whichever comes first). We just do this every 4 years with the coolant since the parts aren’t all that expensive, and it’s easier to do it all at once (and track it for our records).
This is what our 2005 generator requires, but again, be sure to check the owner’s manual for your generator in case other models or model years have different recommended schedules and/or procedures.
What Items Do I Need to Change the Coolant In an Onan 7500 Quiet Diesel Generator?
We’ll provide a list below. But first, we want to note that we use regular automotive radiator flush, anti-freeze, and a replacement pressure cap. All of these items can be purchased at most auto parts stores (but we’ll provide links to all). We purchase the new thermostat and gasket directly from Onan (we’ll also provide links to these).
We also use pure antifreeze and mix it 50/50 with de-ionized or distilled water, as opposed to buying the 50/50 pre-mixed coolant. It doesn’t matter which you choose.
Regular tap water can be used if it is low in minerals, but for such an important application, we don’t mind spending an extra dollar or two on distilled/bottled water (although we do the flushing and rinsing of the system with regular tap water).
PRO TIP & UPDATE: Since we first bought our rig and made the video below, Fleetguard Compleat “OAT” extended-life coolant has become available. This red-colored pre-mixed coolant can halve the frequency with which you need to flush and replace your genny’s coolant. We now use it in both our genset and engine. Check your owner’s manual to be sure, but you should be able to take advantage of this awesome updated product.
No products found.
Note that we’ll be including a replacement thermostat and thermostat gasket, but again, you can only do this part of the job if your generator is on a slide.
Following is a list (with links) of all of the items you’ll need to complete the tasks:
- Coolant (choose the right one based on your current coolant):
- Ethylene Glycol (Green):
- Fleetguard Compleat OAT
- Distilled Water
- Radiator Flush
- 13psi Replacement Radiator Cap
- Metric Socket Set (includes 10mm needed)
- Funnel
- Transmission fluid funnel
- Disposable Gloves
- Replacement Thermostat
- Replacement Thermostat Gasket
- Oil Drain Pan
- A mat for lying on the ground and catching any coolant drips
- A rag
- Empty containers for used coolant
- Pliers
- A length of clear plastic tubing may be needed if your coolant overflow tank remains full of fluid and needs to be siphoned

- PVC Material - Tubing is made of high quality PVC material, lightweight and flexible, can withstand rough handling and multiple usage. Smooth interior...
- Tubing Details - PVC vinyl tubing, ID: 1/2", OD: 5/8", 5 feet, Wall thickness: 1.6mm; Hardness: 73A (firm); Temperature Range : 23°F to 149°F (-5°C...
How to Do a Coolant Change In an Onan Quiet Diesel 7500 Generator
Before we start, we want to note that the two most common challenges with this task are getting all of the coolant drained out of the system… and then getting all the air back out of it.
Onan published a service bulletin ( Onan Coolant Service Bulletin 981-1049 ) to address this, in which they recommend using care when filling the system by avoiding pouring water, flush, or coolant into the vent or overflow tubes.
While the whole process can be a bit time-consuming, the method we’re about to demonstrate has been very successful for us, and we’ve never had a single problem getting our genset back up and running afterward.
Be sure to catch and contain all coolant and flush liquid and dispose of them properly.
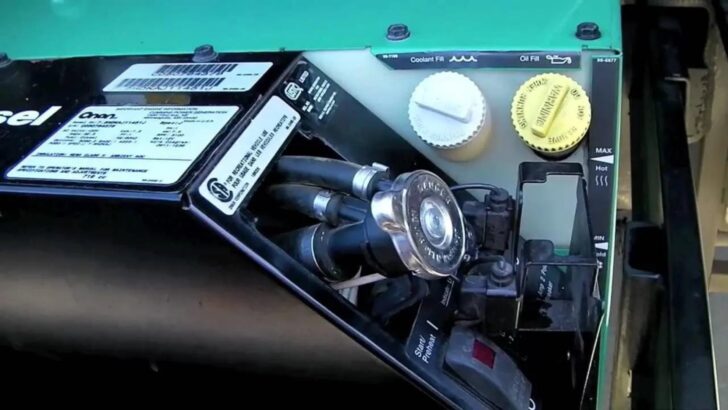
Access the Radiator Cap
The radiator cap is located under a small plate beside the coolant and oil fills.

Remove the bolt on the small plate to access the radiator cap.
The radiator cap beneath the plate should slide right out, and you can remove the plate.
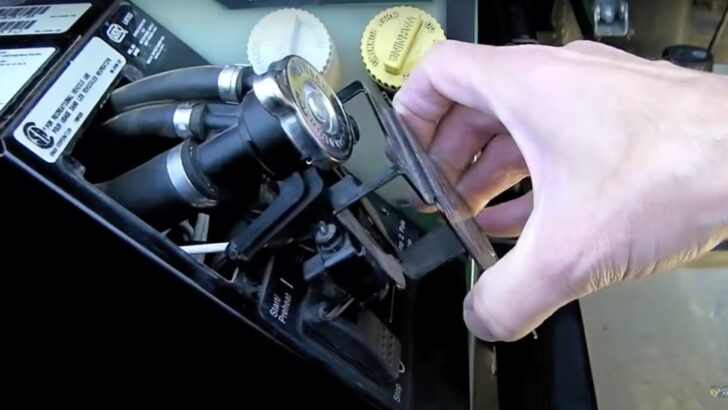

Once you’ve revealed the radiator cap, slide the plate away from it. We’ll be replacing this radiator cap with a new one later as part of our Onan Quiet Diesel 7500 coolant change.
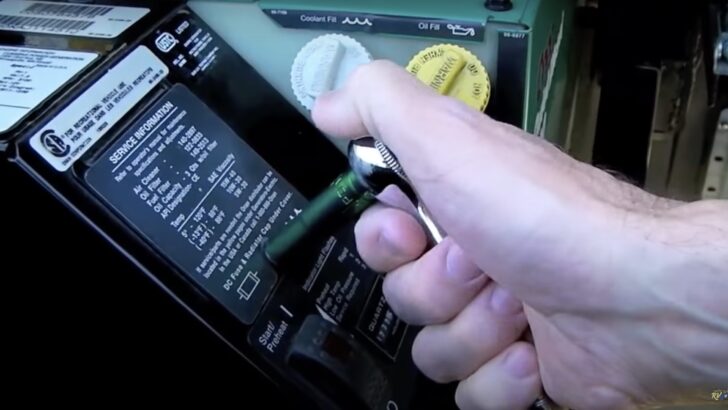
Remove the Radiator Cap
With the generator cold and your hands protected with nitrile gloves, pull up the cap and filler tube and hold it straight up as high as possible.
Push down on the cap and turn it counterclockwise to remove it like any standard radiator cap. You may need to push down on the cap again to twist it off. Have your rag handy to catch any coolant dripping from the cap.
Remove the Coolant Drain Plug
With your pliers handy, identify the coolant drain plug under the generator. It should be clearly marked.
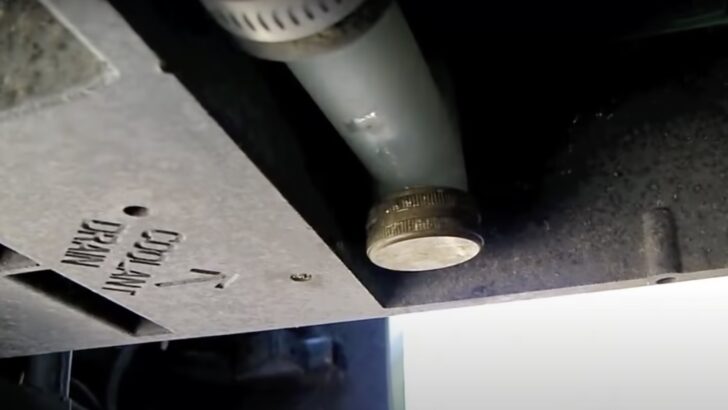
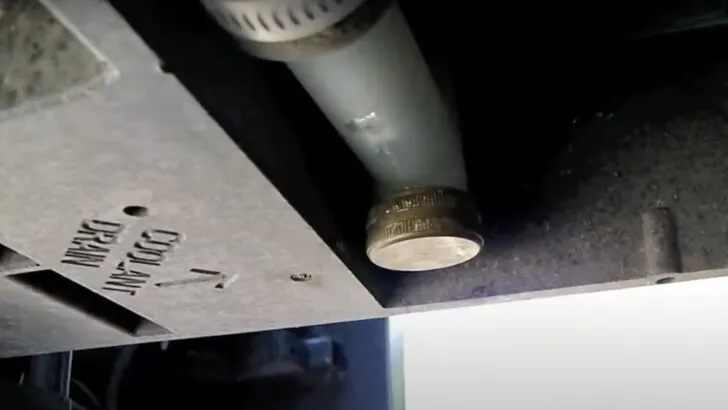
The coolant drain plug is accessed from under the generator and should be clearly marked.
Place your catch/drain pan under the cap and use your pliers to loosen it. Once loose, it’s easy to finish opening the drain plug by hand, allowing the coolant to drain into your catch pan.
Once all the coolant has drained out, replace the cap and tighten it back down.
If Needed, Siphon Coolant From the Overflow Tank
This step may not be necessary, but it’s common for the overflow tank to remain full of coolant even after the generator drains. If this is the case for you, you’ll want to use your clear plastic tubing to siphon out the fluid from the overflow tank now. (We’ve had to siphon the overflow tank every time we’ve changed our generator coolant.)
Flush the Radiator
Before beginning the radiator flush process, we want to note that it’s important to avoid getting fluid into the vent and overflow tubes as much as possible. The middle tube shown here is the vent tube, and it’s particularly important to avoid getting any fluids into that tube.
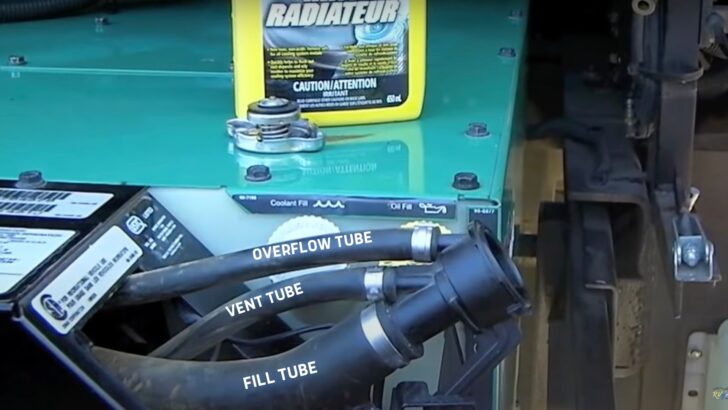
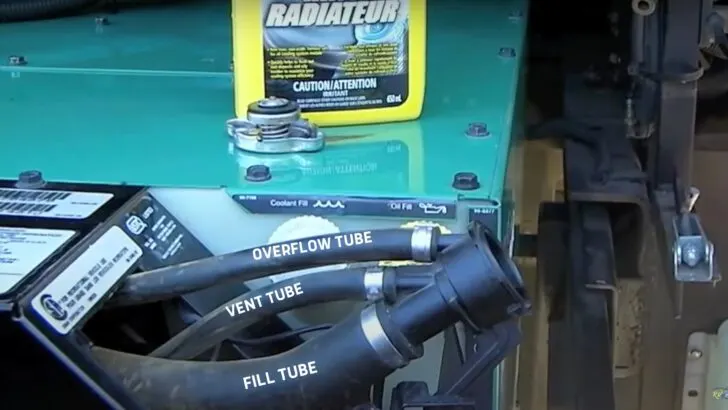
Here you see the overflow, vent, and fill tubes (clearly marked by us for this photo – they don’t have lettering on them). Avoid getting fluids into the overflow tube, and especially the vent tube, as much as you can.
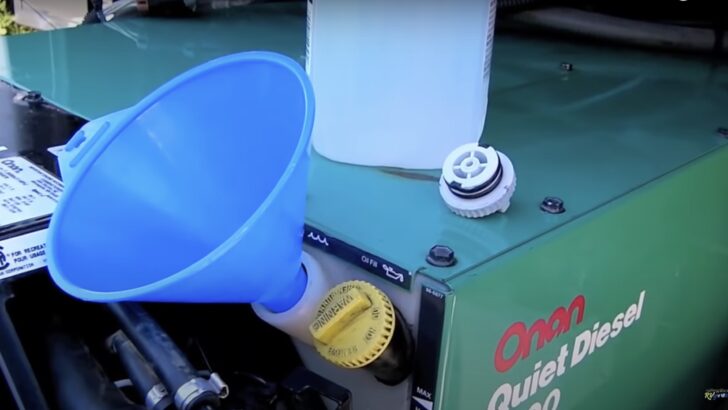
You can use a long-neck funnel with a flexible tube at the end to avoid getting fluid where it shouldn’t go. Slip the tube/neck of the funnel down into the fill tube to isolate any fluids to that tube only. We use a clean transmission fluid funnel for this purpose, which works great.

- 2 Piece - Funnel Plus Tubing
- Color May Vary
Pour the entire contents of the bottle of radiator flush into the fill tube, and fill the radiator the rest of the way with clean water through the same tube. Pour slowly to give air time to escape through the vent tube. When the water is right to the top of the fill tube, replace your pressure cap and secure it firmly.
Fill the Expansion Tank with Clean Water
After emptying the expansion tank, again by siphoning if necessary, refill it with fresh water using a clean funnel. Add water until the level is between the low and full levels on the side of the translucent tank. Then put the cap back onto the overflow tank.

After emptying the expansion tank, refill it with fresh water using a funnel.
Start the Generator and Bring It Up to Operating Temperature
With the cap back on the overflow tank, start the generator. (You can use the start switch right there on the genset.) Once the generator has run for a couple of minutes and has come down off fast idle, put a load on it and let it run for a bit to bring it up to full operating temperature.
We like to do this by turning on our electric water heater element and one of our air conditioners. We leave them running for about 10 minutes to get the generator up to full operating temperature.
Turn Off the Generator After Ramping Down the Load
Turn off the generator by first ramping down the load by turning off any appliances. Allow the generator to cool down at idle for at least a couple of minutes prior to shutting it down.
Allow the Generator to Cool Down
After shutting down the generator, wait a while to allow it to cool down prior to taking the next step. If you don’t let it cool first, you’ll have to be EXTREMELY careful draining the flush to avoid being scalded.
Drain the Flush
Pour the fluid from your catch pan into a spare plastic container, and place the empty catch pan under the coolant drain. Remove the drain cap again, allowing all of the flush to drain out from the radiator. Carefully removing the radiator pressure cap can help the flush drain (again, AFTER the genny has cooled). Once it’s completely drained, replace the drain cap.
If the expansion tank didn’t empty when you removed the drain cap (again likely), siphon it again using your clear plastic tubing.
Refill the Entire Cooling System With Fresh Water
Now that you’ve used radiator flush to flush out the coolant, you’ll want to use clean water to flush out the flush! Refill the radiator and the expansion tank with fresh water. Replace the pressure cap and the expansion tank cap.
Start the Generator Again
Once the generator has warmed up enough to come off fast idle, put a load on it again, just as you did before. Then allow the generator to run under load (again, by turning on the water heater, air conditioner(s), etc) for about ten minutes.
Turn Off the Generator After Ramping Down the Load
After the generator has run for about ten minutes, ramp down the load by turning all loads, and let it cool down at idle for about two minutes before turning it off. Now you’ll need to let the generator cool down again for safety.
Remove the Pressure Cap After the Generator Has Cooled
Once the generator has cooled down completely, remove the pressure cap again.
Drain the System Again
Again, pour the fluid from your catch pan into a spare plastic container and place the empty catch pan under the coolant drain. Remove the drain cap again and allow the fluid to drain into the catch pan. Siphon the expansion tank again, as needed.
Replace Your Thermostat
If your generator is on a slide and your thermostat is due to be replaced, now’s the time to remove the top of the generator to access the thermostat. Before opening the top of the generator, turn off the chassis batteries to ensure there’s no power going to the generator.
Take this opportunity to look over the hoses inside the generator, checking them for cracks or other signs of aging. If they look like they’re aging, now would be a great time to replace them.
The thermostat is located toward the back of the generator. You’ll need to remove two bolts (one on each side of the thermostat housing) to access it.
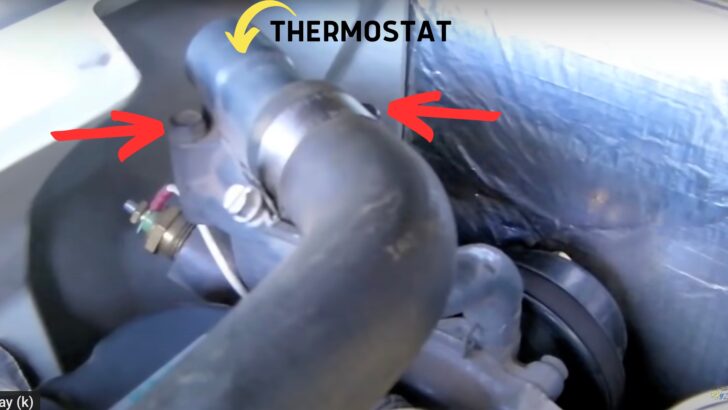

The yellow arrow indicates the location of the thermostat underneath the housing. The red arrows point to the bolts needing removal to access the thermostat.
Remove the Old Thermostat and Gasket
Loosen the two bolts and lift the housing off of the thermostat. Remove the old thermostat’s gasket, and then remove the thermostat itself. (It will simply lift out without tools).

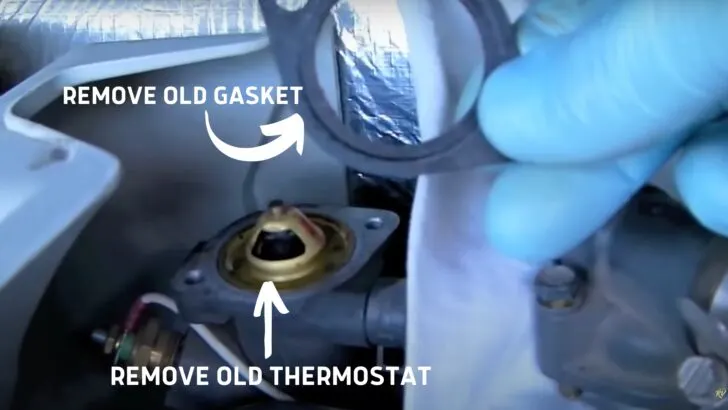
Remove both the old gasket and the old thermostat.
Install the New Thermostat and New Gasket
After using a clean cloth to wipe away any excess liquid around the seat of the old gasket, drop your new thermostat into place. Then place your new gasket on the seat and reinstall the gasket housing, tightening down the two bolts.
Replace the Generator Cover
Replace the generator cover and tighten down the screws to secure it.
Replace the Coolant Drain Cap
Replace your coolant drain cap (for the final time!), and tighten it firmly using your pliers.
Pour Fresh Antifreeze into the Coolant Fill Tube
Slowly and carefully pour the new antifreeze (pre-mixed or mixed 50/50 by you) into the coolant fill, being very careful not to get any fluid into the vent tube or overflow tube.
Hold the filler tube as high in the air as you can safely stretch it to make it easier to fill as completely as possible. Fill your expansion tank with coolant to at least the cold/minimum line.
Turn Your Chassis Batteries Back On
Prior to restarting the generator, be sure to turn your chassis battery back on. If you forget this step, you may have a quick heart flutter as you wonder why your genny won’t start!
Start the Generator and Release the Air From the System
While holding the filler tube as high as possible, with the pressure cap still off, start the generator. Don’t worry about the cap being off — the coolant won’t splash out (and even if a little bit drips, it’s not hot yet, so no worries).

Hold the filler tube stretched up as high as possible while you start the generator.
While continuing to hold up the fill tube, run the generator for a few minutes until it warms up and comes down off fast idle. Have a helper turn on a load inside the RV (again, the electric water heater element or an A/C unit or two). Run the generator under a load for a few minutes. This process is what releases the air from the system.
Turn Off the Generator After Ramping Down the Load
Have your helper turn off the loads inside the RV, wait a minute or two, and then shut down the generator.
Top Off the Coolant
After you’ve released the air from the system, you’ll likely see (by looking in the filler tube) that the fluid level has gone down. This is a completely normal part of the process of purging air from the system. Top off the coolant at this time by adding fluid slowly until it’s back at the top of the filler tube.
Install Your New Pressure Cap
Install your new pressure cap and then slide the fitting on the plate back over the top of the cap.
Reinstall the Plate
Slide the pressure cap and the plate back into place and tighten down the bolt that secures the plate.
Check the Coolant Level In the Expansion Tank
Check the coolant level in the expansion tank to ensure it’s above the minimum cold line. We generally add coolant to the expansion tank until it’s halfway between the cold/minimum and hot/maximum lines.
Start the Generator and Check for Leaks
Start the generator again and look under the generator to check for any leaking from the drain plug.
Run the Generator on High Load
Run the generator on high load for about 45 minutes to an hour. This helps any remaining air work its way out of the system. However, occasionally the generator will overheat and shut down during this process if there’s still air in the system. (In our 20 years of full-time RVing, we’ve never had this happen).
If it does happen to your genny, continue topping off the coolant through the filler tube and the expansion tank as needed, always being sure to take care to never open the filler cap while the generator is hot.
It’s possible that it could take a couple of days of starting and running the generator and checking the coolant level, topping it off as necessary, so that you ultimately get all of the air out and the coolant as full as possible.
Check the Coolant Level In 24 Hours
Even if the generator doesn’t shut down during the above process, you’ll want to go back in and inspect the coolant level in the filler tube 24 hours later. If the coolant isn’t all the way to the top of the filler tube, you’ll know that more air has worked its way to the top of the system.
Top off the coolant level bringing it back to the top of the filler tube’s neck. Check the coolant level in the expansion tank at this time as well, making sure it’s between the minimum and maximum lines.
Check again to ensure no leaks are under the thermostat or near the drain cap.
After you’ve run the generator a few more times over the next several days, continue the process of checking the coolant levels until you find the coolant all the way up to the filler neck and the expansion tank full to at least the minimum cold level.
Now your Onan RV generator is all set with this maintenance task for another two years (or longer if you’re using extended-life OAT coolant).
For a visual guide to this entire job from start to finish, follow along with us as we do the job on our rig in the following video:
If you’re having issues with your Onan generator, check out our post on motorhome generator troubleshooting. And if it’s time for a generator oil change, follow along with our guide to your Onan diesel generator oil change.
Free RVing Tips, Tricks, Reviews, Giveaways & More
Subscribe to our daily newsletter! We’ve been full-time RVers for 20 years (!) and share everything we’ve learned about RVing in our daily blog posts. Join our online community to receive a wealth of great RVing knowledge delivered right to your inbox.
Whether this is your first time on the road or you’re a seasoned full-timer, you’ll love the wide range of RVing topics we cover. Don’t miss a single article or any of our famous RV gear Giveaways — Subscribe today!
Mike
Friday 30th of June 2023
Thanks once again for a great, well detailed process for servicing the cooling system on an Onan diesel generator! As always, very helpful for all us DIY'ers who want to venture into new territory with confidence.
TheRVgeeks
Friday 30th of June 2023
Thanks so much, Mike!
Mark Robbins
Friday 30th of June 2023
Be careful! Not all coolant is the same and Manufactures will tell you that using the wrong fluid will void your warranty. The above may be fine for Onan generators but for gas engines coolant can and does change based on manufactures.
I have a gas Ford V10 that I recently changed out my coolant. While visiting my Ford dealership I was told not using the correct coolant would damage my water pump…..$750 for the pump plus shop costs to install!
TheRVgeeks
Friday 30th of June 2023
Thanks, Mark, for re-enforcing our admonition to read the owner's manual! You are so right. No sense causing a self-inflicted wound, for sure.
Steven Guthrie
Thursday 15th of October 2020
You mention the vent tube needing to be clear but I have noticed when I run the geny with the cap off coolant flows through the vent tube as it is running, is it supposed to do that?
TheRVgeeks
Thursday 15th of October 2020
That's okay once the system is filled. I believe the only reason to avoid getting too much coolant down the overflow line during filling is so that as coolant is being added, the majority of it goes into the generator itself rather than the expansion thank.
MarkV
Monday 3rd of September 2018
Just completed the service. Thanks for the video, sure made it easy. One question, how do you keep your genset SOOOO clean? Seriously, it looks like it just came out of the delivery crate. :)
TheRVgeeks
Monday 3rd of September 2018
That’s great Mark! It’s always good to hear we’ve been helpful. Our generator has gotten a little older since this video was made several years ago, so it doesn’t look QUITE as new now. But it still does look pretty good for over 13 years old. Whenever we do a thorough wash of the RV, I pull out the generator slide, and give it a good cleaning and power washing along with everything else. We even touched up and painted a couple of small rusty spots last year. Being anal retentive does have its advantages. LOL
Steve Odom
Sunday 25th of June 2017
I will do that tomorrow and let you know how it turns out!