
If your RV’s hot water isn’t as hot as it should be, the problem could well be your RV water heater thermostat. Fortunately, most RV water heaters aren’t all that complicated. So when this happened to us, we had an easy DIY repair on our hands. In this post, we’ll show you exactly how we did it.
Not all water heaters are the same, so your mileage may vary slightly. But read on to learn how to replace a Suburban RV water heater thermostat and an Atwood RV water heater thermostat.
- 1) How to Know If Your RV Water Heater’s Thermostat Needs to Be Replaced
-
2)
How to Replace an RV Water Heater Thermostat
- 2.1) Turn Off the Water Heater
- 2.2) Remove the Thermostat Cover
- 2.3) Remove the Nut Holding the Thermostat in Place
- 2.4) Remove the Spade Connectors
- 2.5) Attach the Reset Button
- 2.6) Attach the Spade Connectors
- 2.7) Set the Thermostat Into Position & Tighten into Place
- 2.8) Replace the Cover
- 2.9) Replace the Water Heater Cover
- 3) Atwood Water Heater Thermostat Replacement
- 4) Free RVing Tips, Tricks, Reviews & Giveaways
How to Know If Your RV Water Heater’s Thermostat Needs to Be Replaced
In our case, when we were heating our water in electric mode, the water clearly wasn’t getting as hot as it should normally be. Typically, it would heat up to the proper temperature (about 130°F), and then the heater would shut off. But instead of completing the heating cycle, our energy management system (EMS) showed that it was repeatedly turning on and off. It seemed as though the electric thermostat that controlled our heating element thought the water was hot, turned the heater off, and then changed its mind.
We turned off the heater, and the EMS readout immediately stopped jumping up and down. That confirmed that it was indeed the water heater causing the power readout to cycle up and down. We also checked the temperature of the water when heated using the electric side of the water heater (vs propane), and it was not getting anywhere near the level it should be, showing only about 110°F.
We then turned on the propane side of the heater to see if that would bring the water up to temperature. As soon as it finished its heating cycle, we confirmed that the water was right in the range that it should be, at 130.5°F.
Since the thermostat that controls the temperature on the electric side of our water heater was the most likely problem, and is so easy to swap out (and so inexpensive), we decided to go ahead and replace it to see if that would solve the problem.
The symptoms of a failing thermostat may be similar across most RV water heaters, with the water not getting as hot as it should when heating on one mode or the other. With that in mind, let’s get to replacing that thermostat.
How to Replace an RV Water Heater Thermostat
Before we start, note that we had a 12-gallon bi-fuel (propane/electric) Suburban brand water heater in our motorhome. Some of the smaller Suburban units have a different set-up, with the exact same electric-side thermostat as ours had, but with a different thermostat design for the propane side. And Atwood heaters are completely different from Suburbans. We’ll cover both Suburban and Atwood below.
Even if yours is a slightly different design, our experience should give you a good idea of how it’s done and how easy it is.
Turn Off the Water Heater
Obviously, you don’t want any power coming into any appliance while you’re working on it. That goes double when you’re working on any electrical component. In this case, with a bi-fuel propane/electric RV water heater, we’ll turn off both the electric and propane sides.
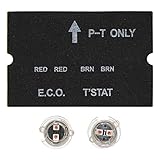
Remove the Thermostat Cover
On our water heater, this required removing two flat-head screws, one on either side of the cover. Removing the cover reveals two thermostats — one for the electric side and one for the propane side. On our model, they look almost identical, with the blue connectors attached to the electric-side thermostat on the left and the red connectors attached to the propane-side thermostat on the right.
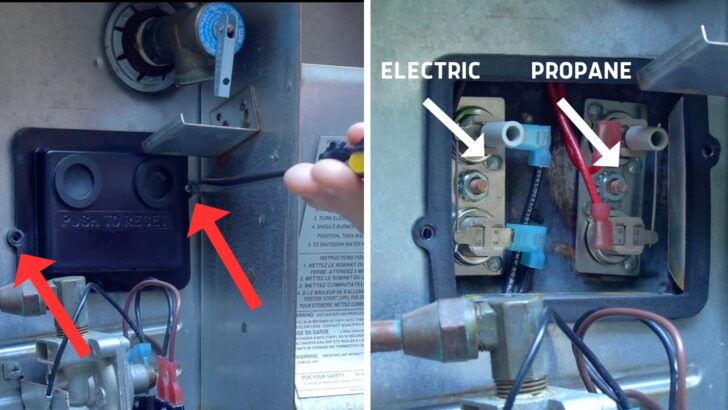
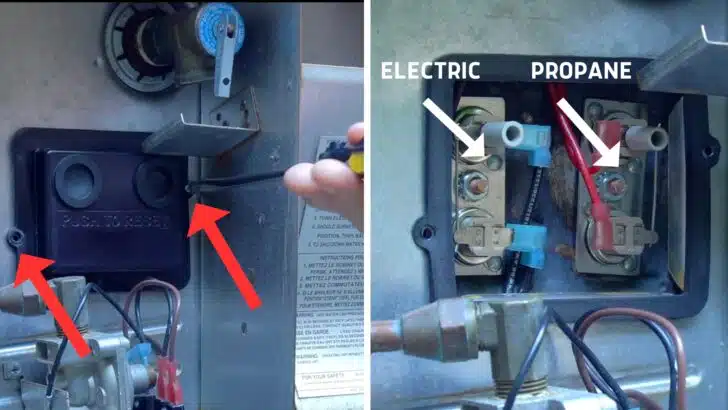
Removing the cover reveals two thermostats – one for the 12V AC electric side and one for the 12V DC propane side.
Remove the Nut Holding the Thermostat in Place
Each thermostat is held in place by a single nut. We removed the nut holding the electric thermostat in place, using a 3/8″ socket wrench. Since the propane thermostat was working fine, we didn’t need to replace it. If we’d needed to, the process would have been identical. Again, some RV water heater models may have a different type of propane thermostat, possibly in a different location.
Remove the Spade Connectors
Pull the spade connectors off of the terminals. This should be easily done by hand, wiggling each connector off its terminal. If they’re really tight, needlenose or other small pliers may be needed. Once you’ve disconnected the two wires from the old thermostat, you’re ready to install the new one.
Be sure to leave the loose wires in such a way that the upper and lower wires stay in place. Keeping track of which is which will make sure you attach the upper wire and lower wire correctly onto the new thermostat.
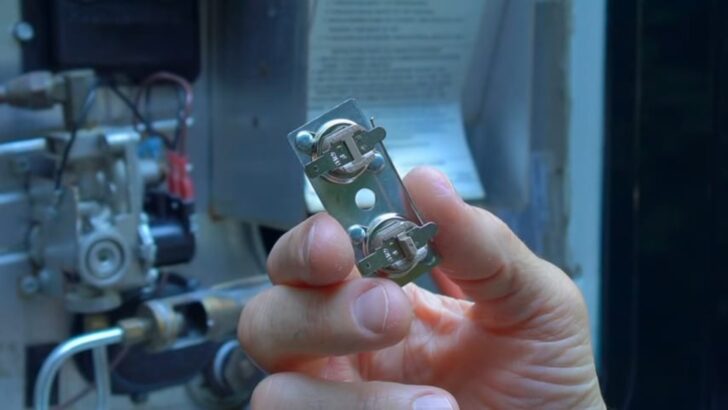
The upper section of the new thermostat should have a small plastic tab sticking straight off the back of it. Press the included nylon spacer tube onto that tab. This is the reset button that can be pressed if the system ever stops working due to overheating.
In the photo on the left, below, you can see the red arrow pointing to the small tab sticking out of the upper-rear portion of the new thermostat. That’s where the round nylon spacer goes. On the right, the nylon spacer has been pressed into place. This is the reset button, which will be hidden behind the flexible black cover when it’s reinstalled.
One spade and connecter may be slightly wider/larger than the other, guaranteeing that you can’t reinstall them backward. But we like keeping track of which is which anyway, just in case. We’re not sure what would happen if we mixed them up (might work, might not), but we weren’t interested in finding out. We often say “We learn the hard way so you don’t have to,” but we never do that on purpose! 😂


On the left, you can see the tab where the round nylon spacer goes. On the right, the spacer has been pressed into place on that tab. This is the reset button.
Attach the Spade Connectors
Attach the two spade connectors to the terminals of the new thermostat, again keeping track of which is which (upper wire vs lower wire). No tools should be needed here, as the terminals are designed to push on by hand.
Set the Thermostat Into Position & Tighten into Place
Set the thermostat into place over the threaded post, then install and tighten the nut at the center using your 3/8″ socket. As always, be sure to go easy when torquing the nut. The small, lightweight thermostat won’t take much to secure it into place, and a stripped post is the last thing you need. We always try hard to avoid self-inflicted wounds that can turn a simple job into a headache!
Replace the Cover
If the gasket has come loose from around the cover, put it back into place. Then place the cover over the thermostats and tighten down the two screws that hold it into place using your flat-blade screwdriver.
Replace the Water Heater Cover
Once you place the water heater’s cover back into place and turn the latches to secure it, you’re all done. You’ve just completed one of the easiest repairs that a DIY RV can do. Again, if you have a different model of Suburban water heater, the process may be slightly different. But at least you’ve got a good idea of what’s involved in the repair.
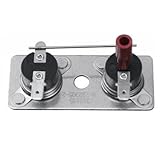
Following is the replacement part for the Suburban SW12DE, SW10DE, and SW6DE water heater models. Be sure to confirm the correct part for your model of Suburban water heater before ordering:
Suburban 232282 12V DC Thermostat

- Product Type: Auto Accessory
- Package Quantity: 1
Suburban 232306 12oV AC Thermostat
For a visual step-by-step guide, check out our short step-by-step video showing us replacing our own water heater thermostat.
Atwood Water Heater Thermostat Replacement
Again, if you have an Atwood brand water heater, the procedure will be a bit different. The following thermostat for RV water heaters by Atwood should work for most Dometic/Atwood water heaters, but be sure to confirm it’s the right part for your specific water heater model before ordering.
Dometic/Atwood 91447 Replacement Thermostat
- 1.Water heater repair parts for RV, Motor, Home,etc.
- 2.Fits Models:GCH6-4E, GCH6-6E, GCH6-7E, GC6A-7E, GH6-6E, GH6-7E, GH6-8E, G6A-6E, G6A-7E, G6A-8E, GCH6A-7E, GCH6A-8E, GCG6A-9E, GC6AA-7E, GC6AA-8E,...
If you need to replace a thermostat on an Atwood RV water heater, we suggest the following video to guide you through the process.
If your hot water heater’s thermostat isn’t the cause of your problem, we suggest having a look at our post about potential causes of no hot water in your RV, and our post on RV water heater troubleshooting.
Free RVing Tips, Tricks, Reviews & Giveaways
As 20-year full-timers, we share everything we’ve learned about RVing over the years. Join our online community to receive a wealth of great RVing knowledge delivered daily to your inbox.
Whether you’re a new RVer or a seasoned full-timer, you’ll love the wide range of RVing topics we cover. Don’t miss a single article or any of our famous Giveaways. Subscribe to our newsletter today!
Adam McLaughlin
Sunday 30th of August 2020
3.5
JOHN SCHRETLEN
Thursday 12th of October 2017
Troubleshooting and ordering took longer than the repair - those are the way snags ought to be.
I see that you tested your fix and it worked. Did you consider cleaning the tank a bit so the new thermostat would have an excellent contact?
TheRVgeeks
Thursday 12th of October 2017
Hi John! That hadn't occurred to us, as we think it's physical contact vs electrical contact that makes the thermostat work. Of course we might now have to remove, clean and re-install it to find out for sure!
Speaking of cleaning the water heater, we just reached the 1-year anniversary of our borescope inspection & cleaning video. So we loaded up on vinegar and a new anode rod, and went out a couple of days ago to video the 1-year follow-up. We wanted to see what the condition of the tank was in back-to-back annual borescope inspections for the very first time. What we found surprised us, and might surprise you, too. But you'll have to wait for the video to find out! How's that for a teaser? LOL We've got it penciled in for next month, so you won't have to wait too long. :)
Mike Fisher
Thursday 12th of October 2017
From a plumbers son...what a fine job you did with your tutorial for everyone to get a little better on the DIY side of this keep them " running and working ". The bride and I as empty nesters have just purchased our first MH and we should be taking possession of it in the next week or so as it has also flew the coup and is being driven to the dealership as of this reply. It's a small Class A RUV a Thor Axis. It just might be a fine MH to learn on and maybe one day a bit of full timing or at least 6 months. So the adventure will start shortly fro the Bride and I and our Certified Therapy Dog Han who is a 118 lb Bernese Mountain Dog who thinks he is attached to the brides heels and her shadow! So as a resource to us we will be standing by for another RVGeeks CLIP and who knows maybe one day we will meet and you can say..why did you that ? Here is a better way >>>Newbie Geez they need all the help we can give them..were we like that years ago? Ha! Also congrats of 15 years and let's hope you guys will give each other and we subscribers at least another 15 years of help and do it in a happy and healthy way! You guys rock the trimester scale by me! < FISH < the K9Piper
TheRVgeeks
Thursday 12th of October 2017
Hi Mike! Thanks for the comment. Congratulations on your first RV! You much be so excited. Best of luck with it, and lots of safe and fun travels.
Allan Kirch
Thursday 12th of October 2017
Great video! Thanks especially for including the diagnosis steps which is usually the most difficult part.
TheRVgeeks
Thursday 12th of October 2017
Thanks, Allan. Glad you liked it. We thought that adding in the steps we took to diagnose the problem would be helpful... glad you agree! ;) Plus, the repair was so easy that the video would have flashed by in a blink if we hadn't! LOL! This is the first time we've ever had a thermostat fail, so we're not sure if the symptoms might be different for other people (like not heating at all), but this was our experience. So we hope it helps!
Frank McCulloch
Thursday 12th of October 2017
Another great "how to". Keep up the awesome postings.
TheRVgeeks
Thursday 12th of October 2017
Thanks, Frank! Glad you liked it!