
What is an RV low point drain valve and where is it located? Does every RV have one? What does it do?
A low point drain is an important part of an RV, and in this post, we tell you why. We cover what a low-point drain valve is, what it does (and what it doesn’t do!), why you need it, and where to find it!
- 1) What Is an RV Low Point Drain Valve?
- 2) Where Is the Low Point Drain On an RV?
- 3) Does the Low Point Drain Empty the Water Heater?
- 4) How to Drain an RV Plumbing System Using the Low Point Drain
- 5) What If My Low Point Drains Don’t Have Valves?
- 6) When to Use Your RV Low-Point Drain Valves
- 7) Free RVing Tips, Tricks, Reviews & Giveaways
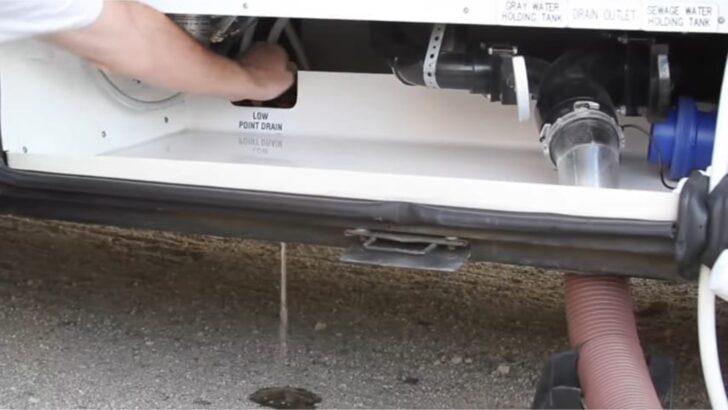
What Is an RV Low Point Drain Valve?
Low point drains are designed to allow the water to drain completely from an RV’s water system. The primary reason you’d want to drain the water from your RV’s plumbing is to help avoid the risk of the lines freezing. As you might expect, low-point drains are situated at a low point in the plumbing.
There are typically two or three low-point drain valves in an RV (but not always). There’s generally one for the cold water side (often blue), one for the hot side (often red), and one for the fresh water tank (white).
Some small RVs have only a single low-point drain. In a Class B Roadtrek, for example, you drain the fresh water tank and the hot & cold fresh water system by opening the exterior fresh water drain valve at the single low point drain under the RV. Other small RVs may operate similarly.
Where Is the Low Point Drain On an RV?
Usually, you can find them by looking under the RV for short tubes or pipes sticking down toward the ground. Sometimes the drain valves are right there on the drain tubes/pipes and simply need to be twisted open.
In other cases, the valves are located somewhere inside the heated underbelly of the RV, to help protect them from freezing when you’re camping in sub-freezing temps. So, in some cases, to open the low point drain valve you may need to follow the tube or pipe upstream to where the valves are located.
Does the Low Point Drain Empty the Water Heater?
No. The water in an RV’s hot water tank is NOT released by opening the low point drain. If an RV is equipped with a tanked water heater (Suburban or Atwood), the tank will need to be drained separately. Low-point drains only drain the plumbing lines, faucets, valves, etc.
To drain your RV’s hot water tank, you would open the pressure relief valve on the water heater, and then remove the anode rod (Suburban) or the drain plug (Atwood) and allow the tank to drain.
For much more information on this process, see our post on how to flush your RV water heater or check out our YouTube channel to follow along with us step-by-step as we drain and flush a tanked hot water heater and show you how to clean out the limescale from the bottom of the tank and from the heating element to keep your:
How to Drain an RV Plumbing System Using the Low Point Drain
To drain your RV’s water system thoroughly, take the following steps:
- Turn off the city water or your RV water pump (depending on whether you’re connected or not).
- Open all faucets inside the RV, and turn the water to warm to allow air from both the hot and cold sides into the plumbing as it drains.
- Open the low-point drain valve(s).
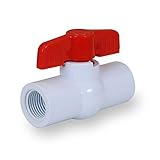
What If My Low Point Drains Don’t Have Valves?
Not all RVs come with actual “valves” that need to be turned to open/close them. Instead, some use a screw-on cap. If your RV has caps, leave your faucets closed until you remove the cap(s). This will help keep all of the water from draining right away when you remove the cap. Once you’ve removed the cap, then go inside and open your faucet(s) to allow the plumbing to drain.
You can also consider adding actual valves to your setup, making it easier to use the low-point drains in the future. The following valves should work, but confirm the size of your existing drain plumbing to be sure they’ll fit.
½” FIP (Female Inner Pipe thread) PVC Ball Valve – Red
- ✔LEAK-FREE: Female Threaded Ball Valve Includes EPDM O-Rings and TPE Seats for a Secure, Leak-Free Seal
- ✔RED T-HANDLE: Enables Rapid and Safe Flow Control in Your Water Pipes; Not Recommended for Potable Water
½” FIP (Female Inner Pipe thread) PVC Ball Valve – Blue

- ✔LEAK-FREE: Female Threaded Ball Valve Includes EPDM O-Rings and TPE Seats for a Secure, Leak-Free Seal
- ✔BLUE T-HANDLE: Enables Rapid and Safe Flow Control in Cold Water Pipes; NSF Certified for Potable Water
The valves are also available at most major big box hardware stores or good plumbing supply stores. Again, be sure to check the size of the pipe/tubing you need to connect to and take note of how it connects (most are likely threaded in place, but some may be clamped or glued in place instead).
When to Use Your RV Low-Point Drain Valves
You use your low-point drains when you winterize your RV. This removes the water from the plumbing system before pumping in the antifreeze. If you don’t do this, the antifreeze will be diluted by the water in the system, reducing its effectiveness/protection.
If you use compressed air to blow out your water lines during the winterizing process, you would still use your low point drain to first drain the water from the system.
For more information, see our posts on how to winterize an RV with antifreeze and how to winterize an RV with an air compressor.
Free RVing Tips, Tricks, Reviews & Giveaways
As 20-year full-timers, we share everything we’ve learned about RVing over the years. Join our online community to receive a wealth of great RVing knowledge delivered daily to your inbox.
Whether you’re a new RVer or a seasoned full-timer, you’ll love the wide range of RVing topics we cover. Don’t miss a single article or any of our famous Giveaways. Subscribe to our newsletter today!
John Wilkerson
Sunday 4th of February 2024
This is more of a question. I have three drain tubes. The usual Red and Blue. They are together at point near the water intake. The third one is (was) clear, it’s closer to the front (not near water source). It’s been dripping excessively. We’ve never filled our freshwater tank. Tank gauge shows empty. Our thoughts were possibly fridge condensation but it’s some 30ft away. It wouldn’t be on the same model but different floor plan. 2021 Crossroads Hampton 380RKS
John Wilkerson
Wednesday 7th of February 2024
@TheRVgeeks, thank you for your response. I shared this with Keystone and they think it’s condensation from the refrigerator. But it’s a lot of water. Only thing making that possible is the other floor plan the fridge is in that location. We haven’t been running then A/C’s but they do run off the roof into gutters. Our next step is to use a Endoscopic camera and see if we can go to the source. Our underbelly is solid so we don’t want to damage it. The strange thing is, we moved in this spot Oct 2021, used it as a weekender until Sept 2023 then became full time. This only started when we began full time. Sorry for the rant but I do appreciate your input.
TheRVgeeks
Sunday 4th of February 2024
Hmmm... that's a strange one, John. We'd assume, since it was clear/white, that it was a fresh tank overflow. But since you said you've never filled that tank, that would eliminate that as an option. Looking at the floorplan, there's nothing near the front that would be an obvious source. Is it possible that it's a drain tube for condensation from the roof air conditioner(s)? Our Mountain Aire had two of those inside the rear cap, allowing the water from A/C to drain out the back, instead of onto the roof and then down the sidewalls. So that's a possibility (if you've been running your A/C a lot recently).
If not we'd suggest trying to trace that line as far as you can to locate the source, in case it's an indicator that something's leaking somewhere. And if that doesn't work, we'd post your question in the forums over at iRV2.com... you may be able to find someone with the same floorplan who could shed some light.