

Deep cycle batteries are a key part of an RV’s electrical system, providing the power required to run the water pump, lights, vent fans, and other appliances when you’re boondocking (not connected to shore power). Routine deep cycle battery tests on the rig’s house batteries are an important part of RV maintenance.
- 1) What Is a Deep Cycle Battery?
- 2) Why Is It Important to Test RV Deep Cycle Batteries?
- 3) Tools for Deep Cycle Battery Testing
- 4) How to Test a Deep Cycle Battery
- 5) A Final Note on Deep Cycle Battery Test Results
- 6) How to Prolong the Life of RV Deep Cycle Batteries
- 7) Free RVing Tips, Tricks, Reviews & Giveaways
What Is a Deep Cycle Battery?
A “cycle” is the charging and discharging of a battery. Each time a battery is discharged and then re-charged fully is one cycle. A typical 12 volt battery (such as the average car battery), is not designed to deep cycle. Their health is best maintained by keeping them virtually fully charged at all times, which is done via the vehicle’s alternator.
They’re commonly referred to as “starting” batteries, or “chassis” batteries on a motorhome. They’re great for short, sudden, large bursts of power, but deeply discharging them will shorten their lifespan.
On the other hand, deep cycle batteries are designed to provide a long, steady supply of power rather than short power surges. They’re engineered to be drawn down (or deeply discharged) without harm. Hence, the term “deep-cycle” since the repeated discharging and recharging is exactly what they’re meant to do.
Deep cycle batteries are used as RV house batteries (for powering all the things in the “house”). Just how far down they can safely be discharged depends on the type of battery. More on that in a minute. But first, in the world of deep-cycle batteries, three main types are most commonly used in RVs.
If you saw our appearance at the 2019 Xscapers BASH, you may recall that three of the most common types of RV house batteries are flooded lead-acid, AGM, and LiFePO4, which is short for Lithium Iron Phosphate. AGM batteries as well as gel batteries are VRLA or valve-regulated lead-acid. If you missed us at BASH, you can watch our entire presentation in the video below. (Grab a drink and some popcorn – it’s an hour-long deep dive!)
NOTE: Because VRLA/AGM/Gel and LiFePO4 batteries are sealed, and (mostly) maintenance-free, our primary focus today is on that old standby that’s been around since Hector was a pup: flooded lead-acid deep-cycle house batteries. That’s because they’re the ones that require the most care, monitoring, and maintenance. But some things we’ll cover apply to all batteries, so if you have AGM or lithium, stay with us! (But, obviously, you won’t be using a hydrometer on a sealed battery, for example).
Deep cycle batteries are built using a smaller number of thicker lead plates than their starting battery cousins. That gives them greater resistance to damage from many cycles of being discharged and recharged repeatedly. But…. as we mentioned above, how far down you can safely discharge a deep-cycle battery depends on the type.
Ideally, flooded lead-acid (FLA) and AGM/gel batteries should never be discharged below a 50% state of charge. For example, if you have a deep cycle FLA or AGM/gel battery rated to provide 100 amp-hours of energy, you don’t want to use more than 50% of that energy, or 50 amp-hours, before recharging it… back up to 100% full whenever possible.
Lithium batteries are far superior in many ways. One of the biggest benefits is the ability to safely discharge virtually 100%. That means a 100Ah LiFePO4 battery will actually provide 100Ah of power without causing major harm to the battery. And they last many more cycles than other battery types.
Why Is It Important to Test RV Deep Cycle Batteries?
Regularly testing your RV’s deep-cycle batteries is important for several reasons.
General Battery Health Assessment
Not only do you want to know if your battery bank is capable of providing the power you need while traveling and camping, but you also need to know how to tell if a deep-cycle battery is bad and needs to be replaced.
Testing helps you assess the overall health of your RV house batteries and whether they can still hold a charge and deliver the power you need.


It’s important to maintain your RV’s deep cycle house batteries and routinely test them to make sure you’ll have the power you need to run your RV’s lights, appliances, etc.
Prevention of Unexpected Failures
Regular 12V battery testing can identify potential issues and weaknesses BEFORE they become critical, reducing the risk of unexpected battery failure while you’re traveling.
Optimize Battery Performance & Lifespan
Knowing the condition of the deep cycle batteries in your house battery bank allows you to take any action needed to improve their performance and, ultimately, their lifespan. We think it’s always a shame to allow neglect to limit performance and shorten the useful life of any RV gear. That’s especially true for things that are expensive and/or take considerable effort to replace.
Deep Cycle Battery Tests Save Money!
Avoiding prematurely replacing your RV’s deep cycle batteries can result in considerable cost savings. Batteries aren’t cheap, and regularly maintaining their optimal health goes a long way toward preserving them. Testing can identify battery issues early, alerting you to the need to take steps to save your batteries, which means saving money.
Tools for Deep Cycle Battery Testing
To test the deep cycle batteries in your RV, the following tools can be helpful:
Digital Multimeter
A digital multimeter allows you to measure voltage, current, and resistance. When testing your RV’s deep cycle house batteries, you’ll use it to check a battery’s voltage. A multimeter should be part of every RVer’s tool kit, no matter what type of house batteries you have.
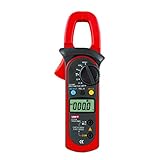
- Measures both ac & dc current up to 400 amps, ideal for vehicles, rvs, marine boats & etc
- Ac/dc voltage, current, resistance, frequency, continuity, duty cycle & diode check
Note that checking the voltage can give you a basic idea of how well the battery is taking and holding a charge, but it doesn’t give you any insight into how well it will perform under load. The next two tools can give a better picture of that.
Battery Hydrometer
A hydrometer measures the specific gravity of the battery’s electrolyte, which provides information about its overall health and state of charge. Remember that this tool is only useful for FLA batteries. So if you have sealed batteries of any type (AGM, gel, lithium), don’t bother buying a hydrometer, since you’ll have no use for it (other than possibly wanting one for occasional chassis battery inspection).

- Hydrometers test the state of charge of a battery cell by measuring the specific gravity (density) of the electrolyte - the greater the concentration...
- OTC's Professional Battery Hydrometer displays a batteries specific gravity (density) on an easy-to-read float with a scale ranging from 1.100 to...
Battery Load Tester
A load tester measures a battery’s drop in voltage under load by applying a controlled load to the battery. This helps to determine the battery’s capacity and health.
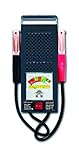
- TRUSTED TESTING: Test load, battery condition, and starter motor draw; 50 Amp load test for 6V batteries and 100 Amp for 12V batteries; tests up to...
- COMPLETE DIAGNOSIS: Delivers a complete charging system diagnosis for batteries in cars, small trucks, RVs, motorcycles, ATVs, boats, and lawn...
Safety Gear
It’s important always to wear safety glasses and gloves when working with batteries that contain corrosive acid. FLA batteries contain an electrolyte that will ruin clothing and burn skin. And nothing would be more dangerous than getting it in your eyes. Be safe!

- STRONG, DURABLE DESIGN — Thanks to the tough, polycarbonate wraparound construction, these anti fog safety glasses for men and women offer superior...
- LIGHT, COMFORTABLE AND ADJUSTABLE — These clear eye protection glasses have extendable arms and an adjustable soft nose pad so you always get the...
![Comfy Package, Black Nitrile Disposable Gloves 6 Mil. Extra Strength Latex & Powder Free, Chemical Resistance, Textured Fingertips Gloves - Small [100 Count]](https://m.media-amazon.com/images/I/41pQ7nIU8aL._SL160_.jpg)
- Multipurpose disposable gloves- pack of 100 6 Mil. small black nitrile plastic chemical resistance disposable gloves. Popular in janitorial...
- Textured, Touch Friendly Surface- for a tougher grip on items, these ambidextrous black disposable gloves are slightly textured, allowing for detailed...
How to Test a Deep Cycle Battery
You can take the following steps to test your RV deep-cycle batteries. Again, be sure to wear safety glasses and gloves to protect yourself, especially with flooded lead-acid batteries.
Visually Inspect Your Batteries (and Keep Them Clean!)
Look carefully at your batteries checking for any corrosion, loose connections, or physical damage. Make sure all terminals and cables are clean and tightly connected. If the batteries are dirty, corroded, and/or covered with “fuzz” (which builds up from outgassing on FLA batteries in particular), clean them thoroughly.

- Fleet and Vehicle Maintenance
- Manufacturer: Crc

- Specially designed to protect battery terminals from corrosion, a leading cause of hard starting and battery failure.
- Provides a lead-free soft protective coating
PRO TIP: A paste made from baking soda and water neutralizes battery electrolyte in much the same way as commercial battery cleaners do.

For even more detail and information about corrosion on RV battery terminals, check out this article: What Causes RV Battery Corrosion + 7 Tips to Prevent It
Conduct a Voltage Test Using a Multimeter
Using your multimeter, measure the battery’s DC voltage at the battery terminals. Note that you want to measure a battery with a full charge, at rest. “At rest” means that the battery has no loads on it, and no charge being applied to it.
Here’s how to test a deep cycle battery with a multimeter:
- Disconnect the RV from any external power sources.
- Turn off all appliances and disconnect all loads from the batteries. You can use your battery disconnect switch to cut off house loads.
- Disable your battery’s charger.
- Let the battery sit (rest) for at least 30 minutes (but no longer than about an hour or two) with no loads on it and no charge coming in. This allows time for it to settle into a steady state of charge, without being affected by loads or charging current.
Turn on your multimeter. You’ll want to set it to measure DC voltage, which (depending on your multi-meter) may be indicated with a solid line and a dashed line above the letter V. If your meter is so equipped, set the dial to 20, which measures between 0-20 volts.
Touch the red probe to the positive battery post (red cable) and the black probe to the negative post (black battery cable). The terminals should also be marked + and – on the battery case and/or posts.
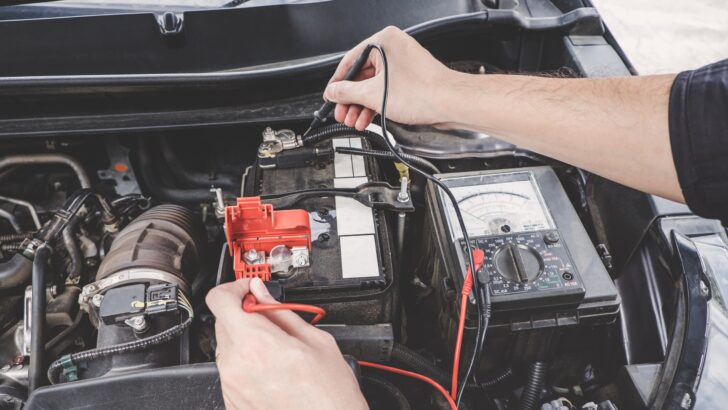

To test a battery using a multimeter, you’ll touch the red multimeter probe to the battery’s positive terminal and the black probe to the negative terminal.
Note: If, while testing the battery with a multimeter, you get a reading with a minus in front of it, for example, -12.6 rather than 12.6, you’ve got the probes on the wrong terminals. (But don’t worry… that won’t harm the battery or the meter.) Simply reverse them.
The resting voltage should be no lower than about 12.6 volts. 12-volt batteries that read 12.1-12.2V at rest are only 50% charged. And below 12V they’re considered discharged.
Ideally, a fully charged 12V lead-acid battery (flooded/gel/AGM) in optimal health should read between 12.7 and 12.8 volts at rest. A 6-volt battery should read around 6.35 to 6.4V.
If any of the batteries in your RV house battery bank read below these levels while fully charged and at rest, that battery is either on its way to requiring replacement or needs some special maintenance called “equalizing.” More on that below.
Just remember that testing a battery’s voltage really only tells you about its current state of charge, not anything about its ability to provide power under load, etc. That’s what the following two tests help you determine.
Conduct a Hydrometer Test
Again, note that this step only applies to flooded lead-acid batteries, not sealed or maintenance-free batteries.
Wearing your gloves and eye protection, remove the cell caps to access the battery electrolyte. Use the hydrometer to measure the specific gravity of the electrolyte in each cell. Each cell should have a similar reading. (A specific gravity reading of 1.278 is pretty much ideal!)

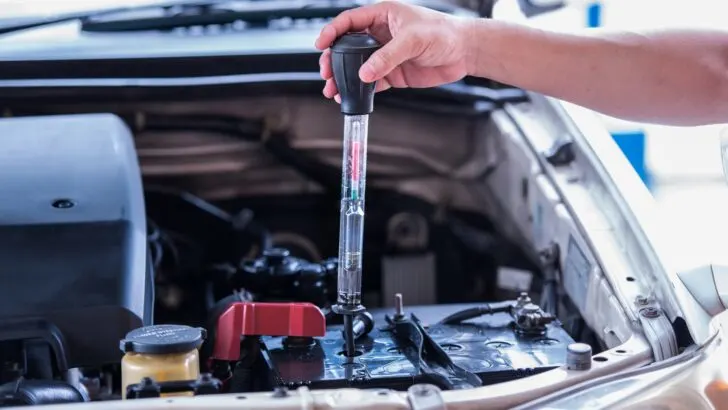
Using a bulb-style hydrometer to test the specific gravity of a flooded lead acid 12V battery (don’t do like you see here… always wear protective gloves!)
A common reason for low readings is something called “sulfation” — a buildup of lead sulfate on the lead plates. The sulfate is supposed to be in solution in the electrolyte fluid. Although repeated cycling of the batteries is part of normal house battery use, over time it can cause the sulfates to bond more firmly to the plates, which reduces the battery’s ability to function properly (without the sulfur as sulfuric acid in the battery electrolyte, there’s less available for the chemical reaction needed to generate electricity).
Luckily, equalizing can solve or improve the situation, and rejuvenate batteries that seem ready to bite the dust. See our article (and our video at the bottom of this post) on equalizing RV batteries for instructions on how to revive an old/dying battery to get more life out of it. You don’t want to replace the battery before you have to.
Perform a Load Test
Knowing how to load test a deep cycle battery can be helpful in determining your RV battery’s health and capacity. You’ll need a load tester for this (see the link above).
To measure the voltage, connect the load tester to the battery following the manufacturer’s instructions, and then apply a load that’s roughly half the battery’s rated capacity for 15 seconds. If the voltage drops below 9.6 volts for a 12V battery (or below 4.8V for a 6V battery), it indicates a weak or failing battery.
Important notes and caveats about load testing deep cycle batteries: Most 12V load testers are geared toward starting batteries, not deep-cycle RV batteries. So, they indicate how much load to apply based on the battery’s Cold Cranking Amps (CCA) rating, which is likely unknown for a deep cycle RV house battery. Also, most testers max out at about 100 amps for load, so they may not work for a large RV deep-cycle battery.
Likewise, if you take a deep cycle battery to an automotive shop or auto parts store to have a load test performed, the test is unlikely to show a problem, because they may not apply a large enough load to it. This is, again, because they’re mostly focused on starting batteries and are likely to have a system designed to choose the CCA of the battery being tested, similar to a tester you might purchase.


If you want to have an RV house battery load tested at a shop, you might want to take it to an RV shop rather than an auto parts store. This is because auto parts stores, due to their focus on vehicle starting batteries, generally have a testing system that’s designed to choose the CCA of the battery being tested.
Deep cycle batteries don’t generally list their CCA rating since it’s irrelevant (they don’t start/crank an engine). So, if you choose to go to a shop for deep-cycle battery testing, an RV dealer may be a better choice.
With all of that said, for deep cycle batteries you can use an equation of applying an amp load equal to about 3-3.5 times the battery’s amp-hour rating.
So, for a 100 Ah battery, you’d want to apply a load of about 300-350 Amps for 15 seconds to see if the voltage (when it levels off while under the load) stays above 9.6V for a 12V battery (or 4.8V for a 6V battery). If it does, then the battery is likely fine. If it doesn’t, it’s probably nearing, or has reached, the end of its useful life.
Important: Note that the load is in DC amps. We want to clarify this so that no one gets confused thinking they should apply a load of 300-350A AC to each battery. Don’t! (Not that you could easily do that.)
A Final Note on Deep Cycle Battery Test Results
If the specific gravity (for lead-acid) and voltage readings of your RV deep cycle batteries are within the recommended ranges, and the battery passes the load test as noted above, your battery is likely to be in good condition and ready to power your adventures on the road.
If readings fall below the recommended values, or if the battery fails the load test, you may need to investigate further, but it’s likely time for battery replacement.
How to Prolong the Life of RV Deep Cycle Batteries
Regular battery maintenance is important to the process of prolonging the life of your RV deep cycle batteries, particularly FLA, and to some extent AGM and gel. (Lithiums are practically indestructible! But monitoring their condition is still worthwhile, especially due to their higher cost.)
Keep these maintenance tips in mind:
Keep Your RV Batteries Charged
Regularly charge your batteries and keep them fully charged when they’re not in use. This helps to prevent sulfation, which is a common cause of battery degradation as mentioned earlier.
Keep Your Batteries Clean and Corrosion-Free
Corrosion will prevent your batteries from performing optimally. For a full guide to dealing with battery corrosion and what causes it, see our post on RV battery corrosion.
Store Your RV Batteries Properly
Very high or low temperatures aren’t optimal for battery storage. Instead, they should be stored in a cool, dry place with good ventilation. Ideally, there should be power available to maintain a very low trickle/maintenance charge during storage. A low-amperage automatic battery charger is perfect for this.
- Meet the GENIUS1 - Similar to our G750, just better. It's 35% smaller and delivers over 35% more power. It's the all-in-one universal charging...
- Do more with Genius - Designed for 6-volt and 12-volt sealed lead-acid automotive, marine, RV, powersport, and deep-cycle batteries, including...
Check the Fluid of Lead-Acid Batteries
If you have flooded lead-acid batteries, use distilled water only top up the electrolyte levels as needed. NOTE: When we say “top up” we don’t mean you should fill them to the top! Fill them only to a level where the fluid touches the bottom of the neck of each filler tube.

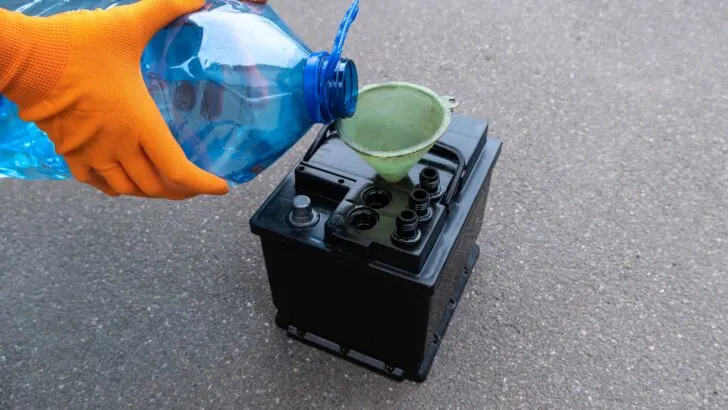
Always use distilled water when filling the cells of an FLA battery. We prefer not to use a funnel if possible, because it makes it easier to see the bottom of the neck of each filler tube. And spilling a little distilled water is harmless. Just don’t overfill the cells!
Equalize Lead-Acid Batteries
You can perform an equalization charge periodically to balance the cells and desulfate the battery. We refer you again to our post on equalizing RV batteries for more about this.
Don’t Allow Batteries to Over-Discharge
Be careful not to discharge your batteries below 50% of their capacity (typically about 12.1 – 12.2 volts at rest). This is true for all battery types except lithium, which in most brands can be taken down as far as you like without harm (though, as with lead acid batteries, their lifespan is increased by fewer deep discharges).
Consider Using a Battery Maintainer
Using a battery maintainer or trickle charger to keep your batteries topped up during storage can be very helpful in maintaining the overall health of a battery. See our post on RV battery chargers for much more information.
Regular testing and maintenance of your RV batteries will do more than save you from running out of power when you need it most. It will also save a considerable amount of money in the long run because your batteries will have a longer life before needing to be replaced.
The following video was one of the very first we ever made, way back in 2011. We’ve learned a LOT since then about making videos, so please excuse the low production quality! But there’s still some helpful info here about deep-cycle RV battery maintenance, specifically about sulfation and equalizing.
Free RVing Tips, Tricks, Reviews & Giveaways
As 20-year full-timers, we share everything we’ve learned about RVing over the years. Join our online community to receive a wealth of great RVing knowledge delivered daily to your inbox.
Whether you’re a new RVer or a seasoned full-timer, you’ll love the wide range of RVing topics we cover. Don’t miss a single article or any of our famous Giveaways. Subscribe to our newsletter today!
Norman
Monday 23rd of October 2023
What should hydrometer test read for a 6 volt battery?
TheRVgeeks
Monday 23rd of October 2023
The same as for 12V batteries… the specific gravity is the same (12V batteries just have twice as many cells) at 1.278.
Robert Garbe
Tuesday 17th of October 2023
plenty of digital 20 hour rate deep cycle load testers for under 100$ bucks available nowadays. Using one is the ONLY way to determine battery health accurately. Even using a 5 amp load (light bulb or whatever) on a 100 amp battery is a cheap way to do the same thing. Once a battery reaches 80% of that number at 10.8 volts, it is on the way out. deep dive, I know.