
RV house batteries are important because they allow us to power so much equipment on our RVs, even when we’re not connected to shore power. The flooded lead-acid battery has long been a popular choice as an RV house battery, thanks to its affordability, dependability, and ability to provide consistent power. However, knowing how to maintain flooded lead-acid batteries is critical for ensuring they can do their job.
This post provides a guide for maintaining flooded lead-acid batteries so that your RV’s house batteries will offer optimal performance and long life.
What is a Flooded Lead-Acid Battery?
A flooded lead-acid battery is a “deep cycle” battery with lead plates submerged in a liquid electrolyte solution of sulfuric acid and water. The term “flooded” refers to that solution, which covers the lead plates. “Deep Cycle” means they’re designed to be (partially) discharged and recharged over and over again. A “cycle” is one discharge + recharge.
Flooded lead-acid batteries have been around for a long time, and are known for their durability, affordability, and ability to deliver reliable power. Unlike some other RV house batteries (see our post on RV battery types), keeping this type of battery healthy and performing well over time requires routine battery maintenance.
We, of course, know that lithium (specifically LiFePO4 batteries) are all the rage. And we installed them ourselves on our Mountain Aire. But lithium isn’t for everyone for a couple of reasons. First, the initial purchase price is much higher than flooded lead-acid and other types of house batteries. Second, many RVers have no real need for lithium. If you’re only vaguely familiar with the term boondocking then lithium is likely overkill for your RVing needs.
Flooded lead-acid batteries can be a great choice for powering your RV, but if you want those batteries to perform well and last a long time, there are several routine maintenance items you’ll need to tend to.
How to Maintain Flooded Lead-Acid Batteries
Proper maintenance of flooded lead-acid batteries consists of inspecting and cleaning them to prevent corrosion, monitoring electrolyte levels and condition, periodic equalizing as needed, as well as a few other general maintenance tasks that can apply to most types of batteries.
Before we start, it’s very important to remember that battery electrolyte is highly corrosive. Be sure to wear clothing that you’re willing to part with while working on batteries. A single drop of battery acid will eat through fabric pretty quickly if not thoroughly washed/rinsed off right away.
Of course, your skin and (most importantly of all!) your eyes need to be protected. Wear safety glasses and nitrile gloves (or old cloth ones, as we did in the video below). If you accidentally get battery acid on your skin, rinse it off immediately (an old work shirt with long sleeves is a good idea, too).
If you splash even a single drop of electrolyte into your eye, immediately flush it with lots of water and be prepared to seek urgent medical attention if needed. As with so many things related to RVing, safety is the number one priority.

- STRONG, DURABLE DESIGN — Thanks to the tough, polycarbonate wraparound construction, these anti fog safety glasses for men and women offer superior...
- LIGHT, COMFORTABLE AND ADJUSTABLE — These clear eye protection glasses have extendable arms and an adjustable soft nose pad so you always get the...

Now that the precautions are out of the way, let’s take a look at the steps for maintaining flooded lead-acid batteries.
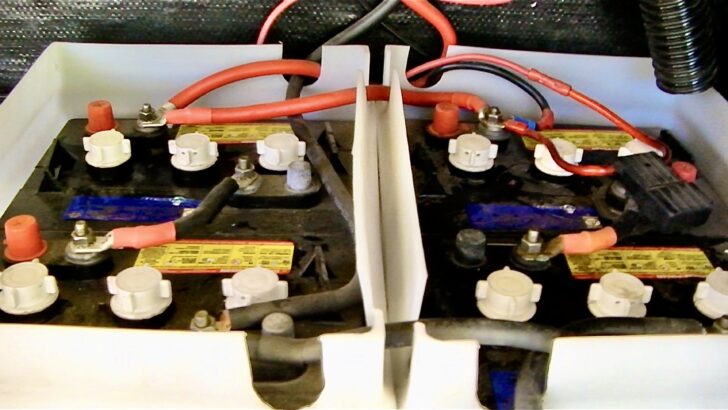
Regular Visual Inspection
Conduct routine visual inspections of the terminals on top of the batteries and the cables attached to them. We inspected our flooded lead-acid batteries once a month and recommend that you do as well.
Also be sure to inspect the entire battery and the surrounding area for signs of corrosion, leaks, or damage. It’s important to keep everything clean. You’re not only looking for dirt and grime but also that blue-green “fuzz” which is corrosion caused by a reaction between the copper terminals/cables and gases from the electrolyte.
Pro Tip: In addition to that telltale blue-green color, also keep an eye out for any signs of metal in the area showing rust/holes. That can be an indication that battery acid is corroding it, which could lead to the battery straps and/or support tray collapsing. If necessary, you may need to remove the batteries to completely clean the area. Once dry, coat any exposed metal with a layer of protective paint, like Rust-Oleum .
We’ll cover how to clean corrosion off the battery in a minute. But that cleaning should be done after step #3 below.
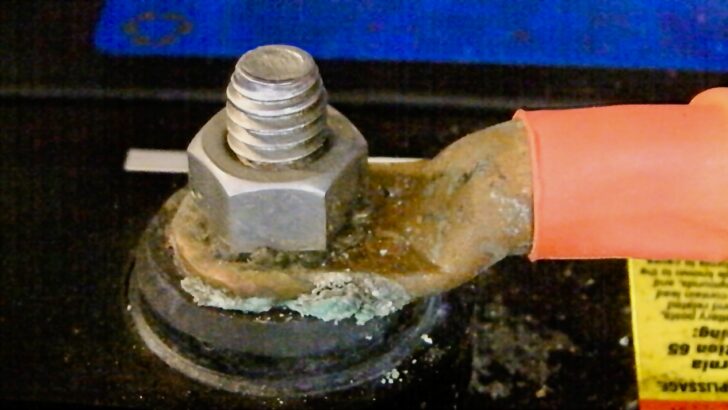

The blue-green substance on this battery terminal is an early sign of corrosion getting started. Keeping the posts, cables, and connections free of corrosion is important for maintaining healthy flooded lead-acid RV house batteries.
Electrolyte Condition / Specific Gravity
The liquid electrolyte needs to be kept in proper condition in two ways, in the following order: 1) The specific gravity of the electrolyte needs to be tested, using a good-quality battery hydrometer, and 2) The fluid level must be maintained in each cell so that the tops of the lead plates are never exposed to air.
The reason it’s important to test specific gravity before adding water is because you want to know the… ahem… current condition of the electrolyte. Adding water immediately before taking hydrometer readings in each cell will artificially lower the readings, and could lead you to think your batteries are failing, when they aren’t.
Start by getting yourself a high-quality battery hydrometer. We prefer using one of the tall ones with a single float (as opposed to the little ones with several tiny colored balls inside). This is the type we’ve used and loved for years:

- Professional Battery Tester
- Compact hand held tester reads specific gravity of battery acid
To properly take accurate hydrometer readings, the batteries should be fully charged and “at rest” which means there should be no power coming in or power draw coming out.
That means:
- Fully charging the house batteries (yes, this is best done in a place where you’re connected to shore power, and after your RV’s charger has finished a complete charginc cycle)
- Turning off all loads, which is best accomplished by using the battery disconnect switch to turn the batteries off (if your RV isn’t equipped with a battery disconnect switch, you may need to remove the cables connecting the battery bank to the RV to stop any power drain)
- Turning off the battery charger (or unplugging from shore power) and disconnecting or disabling any solar chargers
- Waiting at least an hour for the batteries to settle down to their “resting” state
Once the batteries are fully charged and at rest, you can now take accurate hydrometer readings. Start by placing the tip of your hydrometer into the first battery cell. Squeeze the bulb and then release it. This will draw the electrolyte solution up into the hydrometer.
PRO TIP: Don’t take your reading on the first draw of fluid into the hydrometer. Squeeze and release the bulb 3 or 4 times. This will repeatedly draw the solution up into the hydrometer, and then eject it back into the battery cell, mixing the electrolyte thoroughly for a more accurate reading.
After mixing the electrolyte solution by drawing it into the hydrometer several times, you’re ready to take that cell’s reading. Slowly draw just enough fluid to raise the float off the bottom of the hydrometer. Don’t draw too much fluid in, as that will raise the float too far. If it’s touching the top of the hydrometer near the bulb, it won’t float freely, resulting in an incorrect reading.

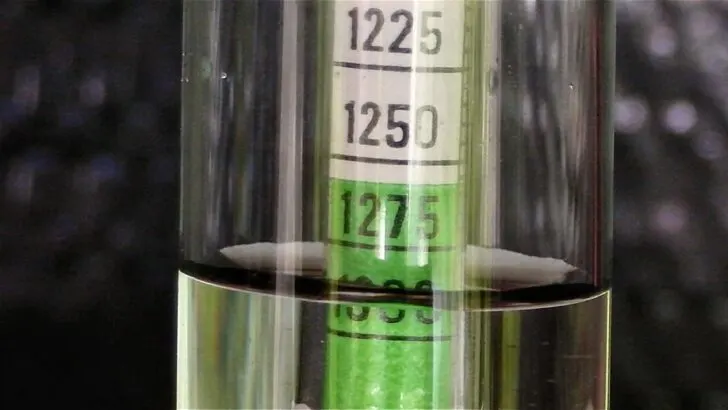
This is a perfect battery hydrometer reading. Specific gravity in a healthy, fully-charged flooded lead-acid RV house battery at rest should read somewhere around 1.275. This “ideal” reading can vary a little by temperature and by manufacturer. Check your brand for specifics, but if you’re close to this number, you’re in good shape.
Once your float is suspended freely inside the glass hydrometer tube, take a look at it. The level of the top of the fluid shows the specific gravity of that one cell. The photo above shows a reading of about 1.278, which means this particular battery cell is in excellent condition.
PRO TIP: It’s important that the float is able to move freely inside the glass tube. If it’s floating above the bottom while also not touching the top, it may still be being held from floating freely if it’s sticking to the side of the glass tube. A very light tap or two on the side of the tube can help unstick it from the glass. If there’s residue from previous uses, you can clean the inside of the glass using distilled water on a rolled-up sheet of paper towel. Carefully discard the paper towel when you’re done, as it will have sulfuric acid residue on it.
When you’re done with the first cell, move to the next one and repeat the process. Never transfer electrolyte from one cell to another (i.e. trying to balance them out). Work on one cell at a time, and always put fluid back into the cell it came from.
Unfortunately, every cell has to have good specific gravity readings for the battery to be considered healthy. If you have a 12-volt house battery and 5 of the 6 cells read around 1.275, but the 6th cell reads far lower, your battery’s days may be numbered (on a 6V battery, there will be only 3 cells, so if one of them is reading low, it will have an even greater impact on the battery’s performance).
If any or all of your battery’s cells are reading fairly low, you’ve probably already noticed reduced battery capacity. That’s often due to something called “sulfation.” This happens when the sulfur (from the sulfuric acid in the electrolyte) comes out of suspension and attaches to the surface or pores of the lead plates as lead sulfate.
Long periods of use, without complete recharging cycles, can lead to the lead sulfate crystals remaining on the plates… reducing both the amount of sulfur in solution AND the surface area on the lead plates (both of which reduce the ability of the battery to hold/store a charge).
The first step to try to rectify battery sulfation is a process called “equalizing” which we’ll get into further down.
Electrolyte Level Check & Adjustment
After completing the hydrometer readings, it’s time to add distilled water to any cells that are below the bottom of the filler neck/slots.
Fluid/water loss due to outgassing is common with this type of battery. That’s especially true if you boondock a lot since each recharging cycle increases the amount of electrolyte that’s lost. It’s also that outgassing that causes a lot of the corrosion found on the battery posts and cables.
So you need to be sure to check the electrolyte/water levels regularly and top off as indicated by your inspection. Never use tap water for this purpose. Make sure to use only clean distilled water.
Add water until the level reaches the bottom of the filler tube/slot, but no further. Don’t overfill the cells! Again, the level should just come up to the bottom of the filler tube. Battery watering isn’t rocket science, but it is important to do it right. Allowing levels to fall until the plates are exposed will damage the battery. Overfilling (or even overflowing!) the fluid can cause serious damage to anything it gets onto (and will reduce the performance of that cell due to loss of electrolyte).
Don’t ask me (Peter) how I know for a fact how much damage overflowing the battery cells can cause. Suffice it to say that 17-year-olds excited to own their very first used car can make a lot of dumb mistakes. 🤦♂️ When we say “We learn things the hard way so that you don’t have to,” it goes back a long way! 😂
Refer to the photo below to see how to correctly determine the proper fluid level in each cell. That’s right…every cell is an individual chamber. 6-volt golf cart batteries typically have 3 cells, with a vented cap for each. 12-volt batteries will have 6 (smaller) cells.
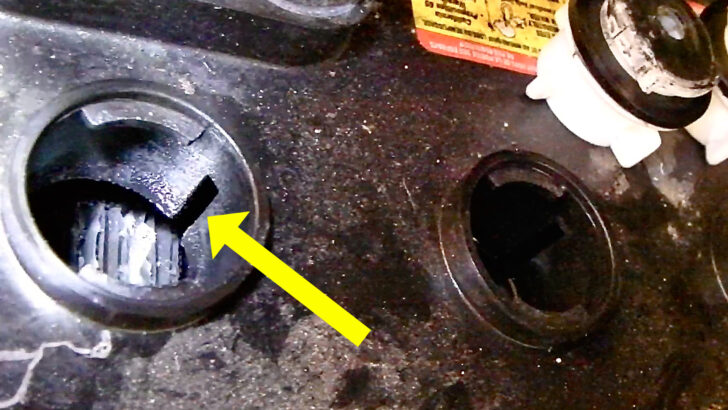

The yellow arrow in this photo points to one of the vertical slots you’ll find in each cell of a flooded lead-acid battery. These slots and filler neck/tube are KEY to maintaining the electrolyte at the proper level in each cell.
Add distilled water to each cell until the level JUST touches the BOTTOM of the slot. You can see in the photo above that a little water is needed in the cell indicated, since it’s slightly below the bottom of the slot/filler neck. You can also see the tops of the lead plates (the white area on top is just light reflecting off the surface of the electrolyte).
The electrolyte level must never ever be allowed to drop low enough that the top of the plates gets exposed. That would damage the battery and is a prime reason why it’s so important to inspect the batteries every month.
Keep Battery Terminals Corrosion-Free
Batteries need to be kept clean and free of corrosion (which increases electrical resistance and decreases battery performance).
Clean the battery terminals and cable connections using either a commercially-available spray or a mixture of baking soda and water to neutralize the acid residue and prevent corrosion. We love this type, which turns pink to let you know there’s acid present.

- Fleet and Vehicle Maintenance
- Manufacturer: Crc
For more details on cleaning corrosion from your RV (or car or truck) battery terminals, check out our article: How to Clean Battery Terminals on Your Car or RV
Once the terminals & connections are cleaned of corrosion and dry, you can spray them with a corrosion inhibitor or terminal protector spray to help protect them from the effects of the acid from battery outgassing.

- Specially designed to protect battery terminals from corrosion, a leading cause of hard starting and battery failure.
- Provides a lead-free soft protective coating
Another popular way to decrease the potential for corrosion on battery terminals is to use dielectric grease. You can read more about the best ways to deal with battery corrosion and prevent it in our post on RV battery corrosion.

- Protects electrical connections and wiring from salt, dirt and corrosion
- Prevents voltage leaks around any electrical connection
Proper Charging
To prevent undercharging or overcharging (both of which can degrade battery performance) you need a quality battery charger or converter. One with a smart charging cycle to automatically adjust the charging voltage and current based on the battery’s state of charge is best. See our post on RV converters vs battery chargers for more information on the difference between the two.
It’s important to keep lead-acid batteries properly charged when they’re in use, ideally with a good-quality 3-stage charger. A 3-stage model offers charging in bulk, acceptance/absorption, and float stages.
Note that there are single and 2-stage chargers out there, but 3-stage charging is what’s needed to provide a complete recharge for deep cycle RV batteries. For much more on this topic, please see our post dedicated to RV battery chargers.
Avoid Deep Discharging
It’s important to pay attention to the depth of discharge of your RV batteries. Be careful not to discharge your flooded lead-acid batteries too deeply. You want to stay at or above 50% state of charge (SoC).
The best, most accurate way to do this is to install an RV battery monitor kit so you know the exact SoC of your batteries without having to rely on less accurate methods, like voltage.
Following is an example of a good battery monitor at a mid-range price. Check out our post on the 5 best RV battery monitors for more options and information.

- Victron Energy BMV-712 Smart Battery Monitor (Grey) is a high precision smart battery monitor for systems with battery voltage ranging from 6.5 - 70...
- Victron Energy BMV-712 features an additional input which can be programmed to measure battery temperature (temperature sensor sold separately),...
Proper Battery Equalization
To maintain flooded lead acid batteries well you sometimes need to equalize them to remove stubborn sulfation from the lead plates. Putting an equalization charge on your batteries will not only contribute to their longevity but will also improve performance overall.
Equalizing is basically putting a higher-than-normal charge level (as high as about 16 volts) into the batteries. That basically “boils” the electrolyte to force the sulfur crystals back into suspension in the fluid. It’s not actually “boiling,” but the (hydrogen gas) bubbles rising up through the fluid make it look that way!
Follow manufacturer guidelines for the frequency, duration, and voltage of equalization cycles. You only want to equalize your battery when needed (as indicated by low hydrometer readings). That’s because the process can accelerate the aging of the battery. So you don’t want to do it unless it’s called for.
The great part about equalizing is that it can take an underperforming battery and make it seem almost like new again. For much more information on proper equalization, see our full post on equalizing RV batteries to improve their performance and lifespan.
Temperature Management
It’s best to protect your flooded lead-acid batteries from extreme temperatures. Excessive heat or cold can accelerate battery aging and reduce capacity. If you’re camping in extreme heat, for example, you can park your RV in shaded areas. You can also use insulated battery boxes to minimize temperature fluctuations and maintain optimal operating conditions (just be sure the boxes have proper ventilation… the hydrogen gas that is emitted by batteries during charging can be an explosion hazard!).
Excessive cold is also a danger. If a flooded lead-acid battery is left in extremely cold conditions, especially if it’s not fully charged, it can be permanently damaged.
Proper Battery Storage
If you’re storing your RV for an extended period, you’ll want to take several steps.
- Fully charge the batteries.
- Clean them thoroughly.
- Top up the water/electrolyte levels (again, only to the bottom of the slot in the filler tube).
- Remove all loads/drains on the batteries (see our post on the RV battery disconnect switch for related information.)
- Store them according to the manufacturer’s instructions to protect them from heat/freezing.
- Periodically check the charge level to ensure they remain in a healthy state.
- If power is available, using a low-amp trickle charger/battery tender is a great idea.

- Meet the GENIUS10 - Similar to our G7200, just better. It's 17% smaller and delivers over 115% more power. It's the all-in-one universal charging...
- Do more with Genius - Designed for 6-volt and 12-volt sealed lead-acid automotive, marine, RV, powersport, and deep-cycle batteries, including...

- STAY CHARGED: The 10 AMP car battery charger automotive provides a full charge to your machine's battery before automatically switching to float mode...
- CONNECT AND FORGET: With a low maintenance design, our universal vehicle charger and maintainer is compact, lightweight, and easy to operate even in...
Too Long To Read? Watch Our Battery Maintenance Video
We get it, time is short. For a visual tutorial covering battery maintenance, check out our video below, which includes the equalizing process, too.
Final Notes on Maintaining Flooded Lead-Acid Batteries
It bears repeating: When dealing with your RV batteries, always take appropriate safety precautions. Wear gloves and eye protection when handling or working around batteries to prevent contact with the corrosive electrolyte.
Follow the proper procedures for all maintenance tasks, and you should be able to help extend the life of your batteries and avoid the cost and hassle of replacing them. If, after doing all of the above, you feel like your batteries still aren’t performing well, read our article: Deep Cycle Battery Tests: Don’t Get Caught Powerless! if you need to replace a flooded lead-acid battery, be sure to dispose of old batteries properly. For more information on how to replace an RV battery that will no longer hold a charge, see our post on replacing an RV battery.
For a detailed discussion of the most common types of RV house batteries and their pros and cons, watch our deep dive (an hour-long presentation) on the topic at the 2019 Xscapers Annual BASH:
If you’re curious about the rest of your RV’s electrical system, check out our article, “RV Wiring For Dummies: Don’t Be Shocked By What You Don’t Know” to learn more.
Free RVing Tips, Tricks, Reviews & Giveaways
As 20-year full-timers, we share everything we’ve learned about RVing over the years. Join our online community to receive a wealth of great RVing knowledge delivered daily to your inbox.
Whether you’re a new RVer or a seasoned full-timer, you’ll love the wide range of RVing topics we cover. Don’t miss a single article or any of our famous Giveaways. Subscribe to our newsletter today!
Gay Traveler
Monday 26th of February 2024
Hey guys. Another awesome story. Another problem I've heard about Lithium batteries is the risk of fire if not stored properly. Isn't that also a concern with flooded lead acid batteries?
TheRVgeeks
Monday 26th of February 2024
Hey Jason. It's true, you need to be careful storing any kind of battery (heck, even an improperly stored 9V battery can trigger a fire!). But keep in mind that the term "Lithium Battery" spans a wide range of battery chemistries, and they're not all created equal. The Lithium formulation used for RV/motorhome batteries is Lithium Iron Phosphate (abbreviated as LiFePO4 using the symbols for the chemical formulation) and they are extremely safe. Other chemistries that are used for small/portable electronic devices (smartphones, tablets, laptops, etc) have a higher likelihood for fire if damaged or improperly stored (which is why airlines require you to bring any portable/removable lithium batteries in the passenger compartment... so any fire that starts can be seen and dealt with as quickly as possible, instead of letting it get more out of control in the cargo hold).
You're also right that flooded lead acid batteries can be a safety concern due to the dangers of the acid (if the case cracks and leaks) and outgassing of hydrogen gas (which is explosive, think Hindenberg! 😱). So, yes, care is needed!
sparky1
Monday 26th of February 2024
thank you this was great information.
TheRVgeeks
Monday 26th of February 2024
Thanks so much, Sparky. Glad you liked this! Battery maintenance is an important topic (or at least WE think it is!).